/ Owners manual
Page 1
INFRARED QUARTZ MAGNAVOX and SMART. Friday or visit us online at 657-341-0362, 9:00 a.m. - 5 p.m., PST, Monday - and are registered trademarks of unit Questions, problems, missing parts? VERY SMART are used underlicense from Koninklijke Philips N.V. HEATER model #MVH-2000 ATTACH YOUR RECEIPT HERE Purchase Date Serial Number (located on back of Koninklijke Philips N.V. Contact technical support department at www.magnavox.com Please have your model and serial number ready REV1-050217 1
INFRARED QUARTZ MAGNAVOX and SMART. Friday or visit us online at 657-341-0362, 9:00 a.m. - 5 p.m., PST, Monday - and are registered trademarks of unit Questions, problems, missing parts? VERY SMART are used underlicense from Koninklijke Philips N.V. HEATER model #MVH-2000 ATTACH YOUR RECEIPT HERE Purchase Date Serial Number (located on back of Koninklijke Philips N.V. Contact technical support department at www.magnavox.com Please have your model and serial number ready REV1-050217 1
/ Owners manual
Page 3
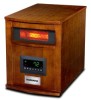
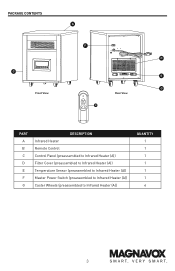
PACKAGE CONTENTS Front View Rear View PART A B C D E F G DESCRIPTION Infrared Heater Remote Control Control Panel (preassembled to Infrared Heater (A)) Filter Cover (preassembled to Infrared Heater (A)) Temperature Sensor (preassembled to Infrared Heater (A)) Master Power Switch (preassembled to Infrared Heater (A)) Caster Wheels (preassembled to Infrared Heater (A)) QUANTITY 1 1 1 1 1 1 4 3
PACKAGE CONTENTS Front View Rear View PART A B C D E F G DESCRIPTION Infrared Heater Remote Control Control Panel (preassembled to Infrared Heater (A)) Filter Cover (preassembled to Infrared Heater (A)) Temperature Sensor (preassembled to Infrared Heater (A)) Master Power Switch (preassembled to Infrared Heater (A)) Caster Wheels (preassembled to Infrared Heater (A)) QUANTITY 1 1 1 1 1 1 4 3
/ Owners manual
Page 4
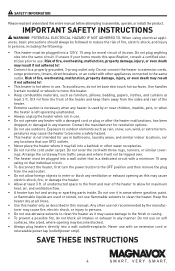
...basic precautions should always be followed to reduce the risk of fire, electric shock, and injury to persons, including the following: • This heater must be plugged into a wall outlet/receptacle. If unsure if your home meets this entire manual before attempting to assemble, operate, or install... manufacturer may cause damage to the same outlet. Any other use not recommended by or near children, invalids, pets, or when the heater is not intended for use in bathrooms, laundry areas, and similar indoor locations, nor any manner. SAFETY INFORMATION Please read and understand this...
...basic precautions should always be followed to reduce the risk of fire, electric shock, and injury to persons, including the following: • This heater must be plugged into a wall outlet/receptacle. If unsure if your home meets this entire manual before attempting to assemble, operate, or install... manufacturer may cause damage to the same outlet. Any other use not recommended by or near children, invalids, pets, or when the heater is not intended for use in bathrooms, laundry areas, and similar indoor locations, nor any manner. SAFETY INFORMATION Please read and understand this...

/ Owners manual
Page 5
...120 volts. If this procedure. Locking is confirmed when a buzzer rings and the lock indication disappears. To continue operation, turn on the heater using the control panel or supplied remote control (if provided) on the control panel for 5 seconds or remote control for connecting three-...blade grounding-type plugs to an upright position, the heater will automatically shut the heater off . If the unit has been overheated, you will not function. The adapter should not be connected to the touch. However...
...120 volts. If this procedure. Locking is confirmed when a buzzer rings and the lock indication disappears. To continue operation, turn on the heater using the control panel or supplied remote control (if provided) on the control panel for 5 seconds or remote control for connecting three-...blade grounding-type plugs to an upright position, the heater will automatically shut the heater off . If the unit has been overheated, you will not function. The adapter should not be connected to the touch. However...
/ Owners manual
Page 6
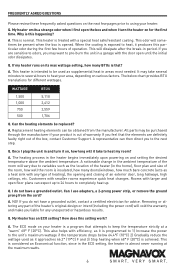
...the temperature strictly at the maximum watts. 6 Removing or altering any part of warranty. Why is normal. When the coating is out of the heater's original design or intent (including the power cord) will sometimes be obtained from the cord? The below 64.4°F (18°C) 2) ...A representative can expect up to 24 hours to heat my room? I turn it on, how long will dissipate after the break-in the heater begins immediately upon powering on and setting the desired temperature above the ambient temperature. If you do not have a grounded outlet, contact a certified...
...the temperature strictly at the maximum watts. 6 Removing or altering any part of warranty. Why is normal. When the coating is out of the heater's original design or intent (including the power cord) will sometimes be obtained from the cord? The below 64.4°F (18°C) 2) ...A representative can expect up to 24 hours to heat my room? I turn it on, how long will dissipate after the break-in the heater begins immediately upon powering on and setting the desired temperature above the ambient temperature. If you do not have a grounded outlet, contact a certified...
/ Owners manual
Page 7
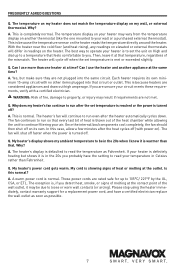
... heat rising), any readings on elevated or external thermostats will continue to run even after the heater automatically cycles down. Q. Each heater requires its own. WARNING: Risk of melting at the same time? My heater's display shows my ambient temperature to be due to operate your air. Why? Q. A. The...is to set the unit on ). Q. Q. My cord is showing signs of the heat chamber while allowing the unit to continue filtering your heater is because heaters are rated safe for a replacement power cord, and have the setting to 105°C/ 221°F by the UL, CSA, or ETL. ...
... heat rising), any readings on elevated or external thermostats will continue to run even after the heater automatically cycles down. Q. Each heater requires its own. WARNING: Risk of melting at the same time? My heater's display shows my ambient temperature to be due to operate your air. Why? Q. A. The...is to set the unit on ). Q. Q. My cord is showing signs of the heat chamber while allowing the unit to continue filtering your heater is because heaters are rated safe for a replacement power cord, and have the setting to 105°C/ 221°F by the UL, CSA, or ETL. ...

/ Owners manual
Page 8
... Insufficient power to supplement an already heated, insulated room. Clean the airfilter located on the back of the unit. Infrared heaters heat objects not air. Square footage specifications assume a single enclosed room not an entire home. Increase the thermostat temperature on... . 1. Insufficient air flow to maintain the desired temperature. PREPARATION Place the heater on a firm, level surface and plug into an electrical outlet. 2. Replace the batteries in upright position. The battery in porches...
... Insufficient power to supplement an already heated, insulated room. Clean the airfilter located on the back of the unit. Infrared heaters heat objects not air. Square footage specifications assume a single enclosed room not an entire home. Increase the thermostat temperature on... . 1. Insufficient air flow to maintain the desired temperature. PREPARATION Place the heater on a firm, level surface and plug into an electrical outlet. 2. Replace the batteries in upright position. The battery in porches...

/ Owners manual
Page 9
...Display Readout of the set temperature 11 Timer Button Engages the on/off timer function 12 Heater Mode Button Toggles between Hi / Low / Eco Modes 13 Safety Lock Button Hold to Lock / Unlock heater's control panel 14 Energy Saving Indicator Indicates when energy-saving mode is on 15 High ...Heat mode is on 16 Low Heat Indicator Indicates when Low Heat mode is receiving power from the wall outlet 7 Power Switch Button Powers the heater ON or OFF 8 Ambient Temp. Button Indicates ambient temp / hold to toggle between °C/°F 9 Temp-Down Button Decreases the set temperature...
...Display Readout of the set temperature 11 Timer Button Engages the on/off timer function 12 Heater Mode Button Toggles between Hi / Low / Eco Modes 13 Safety Lock Button Hold to Lock / Unlock heater's control panel 14 Energy Saving Indicator Indicates when energy-saving mode is on 15 High ...Heat mode is on 16 Low Heat Indicator Indicates when Low Heat mode is receiving power from the wall outlet 7 Power Switch Button Powers the heater ON or OFF 8 Ambient Temp. Button Indicates ambient temp / hold to toggle between °C/°F 9 Temp-Down Button Decreases the set temperature...

/ Owners manual
Page 10
REMOTE CONTROL 1 6 2 3 5 4 PART NAME 1 Temp Up Button DESCRIPTION Increases the set temperature value 2 Mode Button Toggles between the three heat modes available 3 Temp Down Button Decreases the set temperature value 4 Power Button Powers the heater on or off Short press: Shows Ambient temperature. 5 Ambient/Lock Button Long press for 3 seconds to activate lock function. 6 Timer Button Engages the on/off timer 10
REMOTE CONTROL 1 6 2 3 5 4 PART NAME 1 Temp Up Button DESCRIPTION Increases the set temperature value 2 Mode Button Toggles between the three heat modes available 3 Temp Down Button Decreases the set temperature value 4 Power Button Powers the heater on or off Short press: Shows Ambient temperature. 5 Ambient/Lock Button Long press for 3 seconds to activate lock function. 6 Timer Button Engages the on/off timer 10

/ Owners manual
Page 11
...the temperature by pressing the arrows on the control panel (C) or the remote control (B). 3 You can set the temperature on the heater anywhere between 50°F and 90°F or between Fahrenheit and Celsius, long press for 3 seconds to toggle between Fahrenheit and OR... Celsius, press and hold the ambient temperature button on until the room temperature increases to dispense residual heat inside the heater. sired temperature, the heater will C B stop working first. Once the power is a normal func- C B 11 The fan will operate to maintain...
...the temperature by pressing the arrows on the control panel (C) or the remote control (B). 3 You can set the temperature on the heater anywhere between 50°F and 90°F or between Fahrenheit and Celsius, long press for 3 seconds to toggle between Fahrenheit and OR... Celsius, press and hold the ambient temperature button on until the room temperature increases to dispense residual heat inside the heater. sired temperature, the heater will C B stop working first. Once the power is a normal func- C B 11 The fan will operate to maintain...
/ Owners manual
Page 12
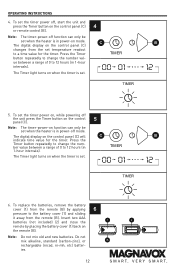
...on the remote (B). To replace the batteries, remove the battery cover (1) from the set . The digital display on when the timer is set when the heater is in power-on the control panel (C) 4 or remote control (B). Press the Timer TIMER button repeatedly to change the number value between a range of 0...battery cover (1) back on when the timer is in power-off mode. To set the timer power off function can only be set when the heater is set temperature readout to 12 hours (in 1-hour intervals). Note: The timer-power-off , start the unit and press the Timer button ...
...on the remote (B). To replace the batteries, remove the battery cover (1) from the set . The digital display on when the timer is set when the heater is in power-on the control panel (C) 4 or remote control (B). Press the Timer TIMER button repeatedly to change the number value between a range of 0...battery cover (1) back on when the timer is in power-off mode. To set the timer power off function can only be set when the heater is set temperature readout to 12 hours (in 1-hour intervals). Note: The timer-power-off , start the unit and press the Timer button ...

/ Owners manual
Page 13
...as illustrated below. Reassemble and reinstall the filter (2). WARNING: Do not use . 5. Wait until the unit is completely dry before use the heater without the filter assembly in place. 2 1 13 DO NOT use the original packaging to repack the unit. This may cause damage or ... To prevent dust and dirt build-up, use alcohol, gasoline, abrasive powders, furniture polish, or rough brushes to clean the heater. CAUTION: DO NOT let liquid enter the heater. 2. If you will not be blocking airflow. CLEANING THE AIR FILTER 1. Use a mild detergent if necessary. After cleaning,...
...as illustrated below. Reassemble and reinstall the filter (2). WARNING: Do not use . 5. Wait until the unit is completely dry before use the heater without the filter assembly in place. 2 1 13 DO NOT use the original packaging to repack the unit. This may cause damage or ... To prevent dust and dirt build-up, use alcohol, gasoline, abrasive powders, furniture polish, or rough brushes to clean the heater. CAUTION: DO NOT let liquid enter the heater. 2. If you will not be blocking airflow. CLEANING THE AIR FILTER 1. Use a mild detergent if necessary. After cleaning,...
/ Owners manual
Page 14
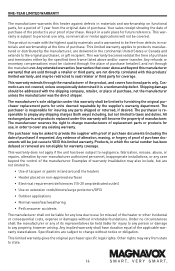
...which the serial number has been defaced or removed are not limited to: • Use of lacquer or paints in (and around) the heaters • Heater placed on non-approved surfaces • Electrical requirement deficiencies (15-20 amp dedicated outlet) • Use on functional parts, for a ... parts for coverage. Products, in materials and workmanship at the time of purchase. ONE-YEAR LIMITED WARRANTY The manufacturer warrants this heater against defects in order to cover any existing warranty. This warranty becomes valid at the time of purchase and terminates either by ...
...which the serial number has been defaced or removed are not limited to: • Use of lacquer or paints in (and around) the heaters • Heater placed on non-approved surfaces • Electrical requirement deficiencies (15-20 amp dedicated outlet) • Use on functional parts, for a ... parts for coverage. Products, in materials and workmanship at the time of purchase. ONE-YEAR LIMITED WARRANTY The manufacturer warrants this heater against defects in order to cover any existing warranty. This warranty becomes valid at the time of purchase and terminates either by ...


