

User manual, English (US)
Page 3
The features described in a residential installation. Features • A-B Repeat Play • Automatic Channel Setup • Automatic Head Cleaner • Automatic Tracking Adjustment • Blue Background • Closed Caption • Daylight-Savings Time • English or Spanish displays • High Quality (HQ) System • One-Touch Recording • Real-Time Counter • Repeat Play • ShowGuardTM - Still • S-VHS Quasi Playback (SQPB) • Timer Recording • Wake Up Timer Safety Precautions Warning: To prevent fire...
The features described in a residential installation. Features • A-B Repeat Play • Automatic Channel Setup • Automatic Head Cleaner • Automatic Tracking Adjustment • Blue Background • Closed Caption • Daylight-Savings Time • English or Spanish displays • High Quality (HQ) System • One-Touch Recording • Real-Time Counter • Repeat Play • ShowGuardTM - Still • S-VHS Quasi Playback (SQPB) • Timer Recording • Wake Up Timer Safety Precautions Warning: To prevent fire...
User manual, English (US)
Page 4
... Using the TV/VCR 5 Hooking Up the TV/VCR 6-7 Turning On the TV/VCR 8 Language Selection 9 Automatic Channel Setup 10-11 Setting the Clock 12-17 Daylight-Savings Time 18 Time Zone 19 Description of Controls Front Panel 20 Rear Panel 21 Remote Control Buttons 22-23 Adjusting the Picture Controls 24-25 On-Screen Status Displays 26 Reminder 27 Basic Operations Playing 28 Recording 29 Recording Options One-Touch Recording 30 Rerecording (Tape Duplication 31 Timer Recording 32-35 Defeat Recording 36 Playing...
... Using the TV/VCR 5 Hooking Up the TV/VCR 6-7 Turning On the TV/VCR 8 Language Selection 9 Automatic Channel Setup 10-11 Setting the Clock 12-17 Daylight-Savings Time 18 Time Zone 19 Description of Controls Front Panel 20 Rear Panel 21 Remote Control Buttons 22-23 Adjusting the Picture Controls 24-25 On-Screen Status Displays 26 Reminder 27 Basic Operations Playing 28 Recording 29 Recording Options One-Touch Recording 30 Rerecording (Tape Duplication 31 Timer Recording 32-35 Defeat Recording 36 Playing...
User manual, English (US)
Page 5
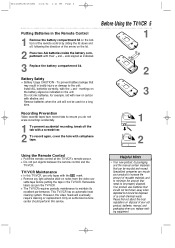
...; Recording Prevention Video cassette tapes have record tabs to ensure you replace existing equipment. q Do not put objects between the remote control and the TV/VCR. Removable labels can recycle your old product, batteries, manual, and packaging when you do not erase recordings accidentally. 1 To prevent accidental recording, break off , following the direction of your product to increase the amount of reusable materials and to the unit: Install...
...; Recording Prevention Video cassette tapes have record tabs to ensure you replace existing equipment. q Do not put objects between the remote control and the TV/VCR. Removable labels can recycle your old product, batteries, manual, and packaging when you do not erase recordings accidentally. 1 To prevent accidental recording, break off , following the direction of your product to increase the amount of reusable materials and to the unit: Install...

User manual, English (US)
Page 6
... the TV/VCR as shown. Rod Antenna (not supplied) ANT. Then, select channels at the Cable Box. Extend the antenna and adjust its length, direction, and angle for the clearest picture. OUT IN RF coaxial cable (not supplied) C Hooking Up Your TV/VCR With an Indoor Antenna To install a rod antenna (not supplied), push the stem of the connections shown. ANT. ANT. Connect the Cable signal...
... the TV/VCR as shown. Rod Antenna (not supplied) ANT. Then, select channels at the Cable Box. Extend the antenna and adjust its length, direction, and angle for the clearest picture. OUT IN RF coaxial cable (not supplied) C Hooking Up Your TV/VCR With an Indoor Antenna To install a rod antenna (not supplied), push the stem of the connections shown. ANT. ANT. Connect the Cable signal...

User manual, English (US)
Page 7
... TV/VCR's power cord. 3 Before you turn on the TV/VCR, go to the ANT(enna) Jack, make sure the pin is not bent. OUT 3CH 4CH AUDIO VIDEO OUT IN IN ANT. Details are on page 31. Crooked Pin Bent pin Straight Pin Cable Plug Select channel 00 (A/V IN) at the TV/VCR when viewing tapes that you are playing on the VCR or camcorder. OUT VIDEO AUDIO VIDEO AUDIO POWER VOLUME CHANNEL STOP/EJECT REW PLAY...
... TV/VCR's power cord. 3 Before you turn on the TV/VCR, go to the ANT(enna) Jack, make sure the pin is not bent. OUT 3CH 4CH AUDIO VIDEO OUT IN IN ANT. Details are on page 31. Crooked Pin Bent pin Straight Pin Cable Plug Select channel 00 (A/V IN) at the TV/VCR when viewing tapes that you are playing on the VCR or camcorder. OUT VIDEO AUDIO VIDEO AUDIO POWER VOLUME CHANNEL STOP/EJECT REW PLAY...

User manual, English (US)
Page 8
... TV/VCR will come on and the screen shown below will memorize all available channels. Use the VOL(ume) o/p buttons to begin automatic channel setup. The instructions on this page work only when you turn on the TV/VCR, make sure batteries are in English. MC132DMG/MC192DMG 3/22/02 1:21 PM Page 8 8 Turning On the TV/VCR Before you turn on the TV/VCR for the first time. 1 Press the POWER button. CONNECT ANTENNA OR CABLE TO...
... TV/VCR will come on and the screen shown below will memorize all available channels. Use the VOL(ume) o/p buttons to begin automatic channel setup. The instructions on this page work only when you turn on the TV/VCR, make sure batteries are in English. MC132DMG/MC192DMG 3/22/02 1:21 PM Page 8 8 Turning On the TV/VCR Before you turn on the TV/VCR for the first time. 1 Press the POWER button. CONNECT ANTENNA OR CABLE TO...

User manual, English (US)
Page 10
... channel number will memorize its available channels. 4 Wait for the TV/VCR to set up channels. AUTO CH PROGRAMMING IN PROCESS PLEASE WAIT START FINISH 2-3 POWER SLEEP/WAKE UP 1 REW PLAY STOP F.FWD MENU STATUS/EXIT CLEAR 123 CH. 456 789 SPEED 0 MEMORY ALT.CH PAUSE/STILL VOL. Helpful Hints • Line Input mode will scan only through channels you are in Line Input mode. PRIMARY SETUP SELECT LANGUAGE > AUTO PROGRAMMING CH MEMORY REVIEW VOLUME BAR [ON] SET CLOCK...
... channel number will memorize its available channels. 4 Wait for the TV/VCR to set up channels. AUTO CH PROGRAMMING IN PROCESS PLEASE WAIT START FINISH 2-3 POWER SLEEP/WAKE UP 1 REW PLAY STOP F.FWD MENU STATUS/EXIT CLEAR 123 CH. 456 789 SPEED 0 MEMORY ALT.CH PAUSE/STILL VOL. Helpful Hints • Line Input mode will scan only through channels you are in Line Input mode. PRIMARY SETUP SELECT LANGUAGE > AUTO PROGRAMMING CH MEMORY REVIEW VOLUME BAR [ON] SET CLOCK...

User manual, English (US)
Page 12
... Channel Selection. To set the clock manually. Then, press the F.FWD/B button. Before you tell the TV/VCR the current time. q You make sure: q You have the TV/VCR maintain the clock according to have connected and turned on pages 16-17. SETUP VCR PROGRAM VCR SETUP CAPTION REMINDER BRIGHTNESS PRESS B 2 Press the PLAY/v button or the STOP/w button to select SET CLOCK. SETUP. Then, press the F.FWD/B button. PRIMARY SETUP > SELECT LANGUAGE AUTO PROGRAMMING CH MEMORY REVIEW VOLUME BAR [ON] SET CLOCK...
... Channel Selection. To set the clock manually. Then, press the F.FWD/B button. Before you tell the TV/VCR the current time. q You make sure: q You have the TV/VCR maintain the clock according to have connected and turned on pages 16-17. SETUP VCR PROGRAM VCR SETUP CAPTION REMINDER BRIGHTNESS PRESS B 2 Press the PLAY/v button or the STOP/w button to select SET CLOCK. SETUP. Then, press the F.FWD/B button. PRIMARY SETUP > SELECT LANGUAGE AUTO PROGRAMMING CH MEMORY REVIEW VOLUME BAR [ON] SET CLOCK...

User manual, English (US)
Page 20
... audio out jack of a camcorder or a VCR. Press the CHANNEL o button and the VOLUME p button on page 31. It will blink rapidly two minutes before a timer recording is on the screen. Wireless Remote Sensor Receives a signal from your remote control so you are on page 41. Press again to stop the tape. Details are on the TV/VCR at the same time to begin if the TV/VCR power is set to display...
... audio out jack of a camcorder or a VCR. Press the CHANNEL o button and the VOLUME p button on page 31. It will blink rapidly two minutes before a timer recording is on the screen. Wireless Remote Sensor Receives a signal from your remote control so you are on page 41. Press again to stop the tape. Details are on the TV/VCR at the same time to begin if the TV/VCR power is set to display...

User manual, English (US)
Page 22
... tape playback is stopped, press to display the main menu. Details are on page 48. Press to change the setting of the TV/VCR to program TV/VCR functions (such as a two-digit number for the quickest results. MENU Button Press to rewind the tape at high speed. Details are on page 30. Number Buttons Use to select channels and to access the main menu. q Cable Users Enter channel numbers as a three-digit number. If you only press the Number 6 button, channel...
... tape playback is stopped, press to display the main menu. Details are on page 48. Press to change the setting of the TV/VCR to program TV/VCR functions (such as a two-digit number for the quickest results. MENU Button Press to rewind the tape at high speed. Details are on page 30. Number Buttons Use to select channels and to access the main menu. q Cable Users Enter channel numbers as a three-digit number. If you only press the Number 6 button, channel...

User manual, English (US)
Page 23
.... TRACKING / Buttons Press during tape playback to access or remove the status display. POWER SLEEP/WAKE UP REW PLAY STOP F.FWD MENU STATUS/EXIT CLEAR 123 4 5 6 CH. 789 SPEED 0 MEMORY ALT.CH PAUSE/STILL VOL. STATUS/EXIT Button Press to adjust the tracking. STOP/w Button Press to remove the menu. Details are on page 26. Details are on page 29. Details are on pages 38-39. Each time you set...
.... TRACKING / Buttons Press during tape playback to access or remove the status display. POWER SLEEP/WAKE UP REW PLAY STOP F.FWD MENU STATUS/EXIT CLEAR 123 4 5 6 CH. 789 SPEED 0 MEMORY ALT.CH PAUSE/STILL VOL. STATUS/EXIT Button Press to adjust the tracking. STOP/w Button Press to remove the menu. Details are on page 26. Details are on page 29. Details are on pages 38-39. Each time you set...

User manual, English (US)
Page 29
... tape. The Record light will eject the tape. Cassette type / Playback Time Tape Speed T160 T120 T60 SP(Standard Play) 2 hrs. 40 mins. 2 hrs. 1 hr. The power will switch to Stop mode automatically to turn on the TV/VCR, if necessary. 2 Press the SPEED button until the desired tape speed appears on the screen briefly. The Record light will flash. Cover the tab with the SPEED button while a recording is in the TV/VCR, NO CASSETTE flashes on . Recording 29 1 POWER SLEEP...
... tape. The Record light will eject the tape. Cassette type / Playback Time Tape Speed T160 T120 T60 SP(Standard Play) 2 hrs. 40 mins. 2 hrs. 1 hr. The power will switch to Stop mode automatically to turn on the TV/VCR, if necessary. 2 Press the SPEED button until the desired tape speed appears on the screen briefly. The Record light will flash. Cover the tab with the SPEED button while a recording is in the TV/VCR, NO CASSETTE flashes on . Recording 29 1 POWER SLEEP...

User manual, English (US)
Page 31
... TV/VCR. Helpful Hints • Unauthorized recording of copyrighted television programs, video tapes, or other materials may infringe on the rights of copyright owners and violate copyright laws. • Different brands of equipment may not record clearly. Make sure the tape's record tab is now in Line Input mode. 5 Point the TV/VCR remote control at the same time. Connect the source unit (VCR or camcorder) to VIDEO In AUDIO and VIDEO In Jacks on TV/VCR 1 Make the connections shown above, using audio and video cables...
... TV/VCR. Helpful Hints • Unauthorized recording of copyrighted television programs, video tapes, or other materials may infringe on the rights of copyright owners and violate copyright laws. • Different brands of equipment may not record clearly. Make sure the tape's record tab is now in Line Input mode. 5 Point the TV/VCR remote control at the same time. Connect the source unit (VCR or camcorder) to VIDEO In AUDIO and VIDEO In Jacks on TV/VCR 1 Make the connections shown above, using audio and video cables...
User manual, English (US)
Page 32
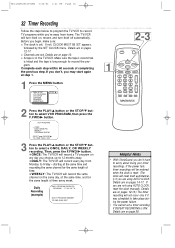
... and the tape is long enough to record TV programs while you choose, up to take place during the power failure. • You cannot set a timer recording if DEFEAT RECORDING is in the TV/VCR. qONCE: The TV/VCR will record the same channel on page 36. If the power fails, timer recordings will reset itself off automatically. Details are not using AUTO CLOCK. Before you begin, make sure: q The clock is reset. (The clock will...
... and the tape is long enough to record TV programs while you choose, up to take place during the power failure. • You cannot set a timer recording if DEFEAT RECORDING is in the TV/VCR. qONCE: The TV/VCR will record the same channel on page 36. If the power fails, timer recordings will reset itself off automatically. Details are not using AUTO CLOCK. Before you begin, make sure: q The clock is reset. (The clock will...

User manual, English (US)
Page 33
... a timer recording, PREVIOUSLY SET PROGRAM will appear on the screen. Then use the Number buttons to select another position. 5 Use the Number buttons to enter the channel of the TV program at the Cable Box and leave the Cable Box on the item you want to store the timer recording. TO CORRECT PRESS CLEAR TO END PRESS EXIT POWER SLEEP/WAKE UP REW PLAY STOP F.FWD MENU STATUS/EXIT CLEAR 123 4 5 6 CH. 789 SPEED 0 MEMORY...
... a timer recording, PREVIOUSLY SET PROGRAM will appear on the screen. Then use the Number buttons to select another position. 5 Use the Number buttons to enter the channel of the TV program at the Cable Box and leave the Cable Box on the item you want to store the timer recording. TO CORRECT PRESS CLEAR TO END PRESS EXIT POWER SLEEP/WAKE UP REW PLAY STOP F.FWD MENU STATUS/EXIT CLEAR 123 4 5 6 CH. 789 SPEED 0 MEMORY...

User manual, English (US)
Page 34
... a tape without a record tab in progress, press the STOP/EJECT button on the screen. q If PROGRAM NOT COMPLETED appears, start again at this happens, insert a different tape. If you finish setting a timer recording. Helpful Hints • PROGRAM NOT COMPLETED / CLASH may appear on the TV/VCR screen two minutes before a timer recording should begin. 11 POWER SLEEP/WAKE UP 8 REW PLAY STOP F.FWD MENU STATUS/EXIT CLEAR 123 CH. 456 789 SPEED...
... a tape without a record tab in progress, press the STOP/EJECT button on the screen. q If PROGRAM NOT COMPLETED appears, start again at this happens, insert a different tape. If you finish setting a timer recording. Helpful Hints • PROGRAM NOT COMPLETED / CLASH may appear on the TV/VCR screen two minutes before a timer recording should begin. 11 POWER SLEEP/WAKE UP 8 REW PLAY STOP F.FWD MENU STATUS/EXIT CLEAR 123 CH. 456 789 SPEED...
User manual, English (US)
Page 53
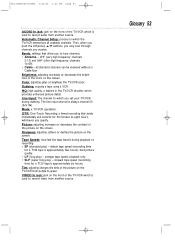
...TV/VCR which is approximately two hours); HQ: high quality; Mode: a TV/VCR operation. best picture quality. • LP (long play ) - slowest tape speed (recording time for a T120 tape is used to green. Line Input: The channel to record audio from another source. playback only. • SLP (super long play ) - Tint: adjusting changes the tints of the TV/VCR which the TV/VCR memorizes all standard channels can be received without a Cable Box. Color: adjusting pales or brightens the TV/VCR color. Dubbing: copying a tape using a VCR. The line input channel...
...TV/VCR which is approximately two hours); HQ: high quality; Mode: a TV/VCR operation. best picture quality. • LP (long play ) - slowest tape speed (recording time for a T120 tape is used to green. Line Input: The channel to record audio from another source. playback only. • SLP (super long play ) - Tint: adjusting changes the tints of the TV/VCR which the TV/VCR memorizes all standard channels can be received without a Cable Box. Color: adjusting pales or brightens the TV/VCR color. Dubbing: copying a tape using a VCR. The line input channel...
User manual, English (US)
Page 54
.... TV/VCR will not record. • Make sure the tape has a record tab. If the power fails, timer recordings will be restored when the clock is OFF. Details are using AUTO CLOCK, reset the clock manually. Details are on top of the TV/VCR. Details are on page 36. • Plug the power cord into the TV/VCR cassette compartment. • Do not place anything on pages six-seven. • Set up the channels again...
.... TV/VCR will not record. • Make sure the tape has a record tab. If the power fails, timer recordings will be restored when the clock is OFF. Details are using AUTO CLOCK, reset the clock manually. Details are on top of the TV/VCR. Details are on page 36. • Plug the power cord into the TV/VCR cassette compartment. • Do not place anything on pages six-seven. • Set up the channels again...
User manual, English (US)
Page 55
... TV/VCR power is off the TV/VCR power for the timer recording. • Unplug the TV/VCR power cord for at the TV/VCR's remote sensor. Be sure to insert a tape and turn on the TV/VCR three to five times. Refer to the TV listings in your local newspaper. MC132DMG/MC192DMG 3/22/02 1:21 PM Page 55 Helpful Hints (cont'd) 55 The remote control is not available, or the remote control will not access the menu. • Use the buttons...
... TV/VCR power is off the TV/VCR power for the timer recording. • Unplug the TV/VCR power cord for at the TV/VCR's remote sensor. Be sure to insert a tape and turn on the TV/VCR three to five times. Refer to the TV listings in your local newspaper. MC132DMG/MC192DMG 3/22/02 1:21 PM Page 55 Helpful Hints (cont'd) 55 The remote control is not available, or the remote control will not access the menu. • Use the buttons...

User manual, English (US)
Page 58
... color, adjusting 24-25 connections 6-7, 31 contents, table of 4 controls remote 22-23 tv/vcr 20 counter only mode 26 daylight-savings time 18 defeat recording 36 duplication 31 earphone jack 20 ejecting a tape 55 fast forward search 41 f.fwd button 20 f.fwd/B button 22, 41 front panel 20 glossary 53 helpful hints 54-55 hookups 6-7, 31 language selection 9 line input mode . . . .7, 10, 31, 53 long play 29, 53...
... color, adjusting 24-25 connections 6-7, 31 contents, table of 4 controls remote 22-23 tv/vcr 20 counter only mode 26 daylight-savings time 18 defeat recording 36 duplication 31 earphone jack 20 ejecting a tape 55 fast forward search 41 f.fwd button 20 f.fwd/B button 22, 41 front panel 20 glossary 53 helpful hints 54-55 hookups 6-7, 31 language selection 9 line input mode . . . .7, 10, 31, 53 long play 29, 53...


