
User manual, English (US)
Page 3
... cable ground shall be determined by one or more of the FCC Rules. Features • A-B Repeat Play • Automatic Channel Setup • Automatic Head Cleaner • Automatic Tracking Adjustment • Blue Background • Closed Caption • Daylight-Savings Time • English or Spanish displays • High Quality (HQ) System • One-Touch Recording • Real-Time Counter • Repeat Play • ShowGuardTM - Still • S-VHS Quasi Playback (SQPB) • Timer Recording...
... cable ground shall be determined by one or more of the FCC Rules. Features • A-B Repeat Play • Automatic Channel Setup • Automatic Head Cleaner • Automatic Tracking Adjustment • Blue Background • Closed Caption • Daylight-Savings Time • English or Spanish displays • High Quality (HQ) System • One-Touch Recording • Real-Time Counter • Repeat Play • ShowGuardTM - Still • S-VHS Quasi Playback (SQPB) • Timer Recording...

User manual, English (US)
Page 4
... Using the TV/VCR 5 Hooking Up the TV/VCR 6-7 Turning On the TV/VCR 8 Language Selection 9 Automatic Channel Setup 10-11 Setting the Clock 12-17 Daylight-Savings Time 18 Time Zone 19 Description of Controls Front Panel 20 Rear Panel 21 Remote Control Buttons 22-23 Adjusting the Picture Controls 24-25 On-Screen Status Displays 26 Reminder 27 Basic Operations Playing 28 Recording 29 Recording Options One-Touch Recording 30 Rerecording (Tape Duplication 31 Timer Recording 32-35 Defeat Recording 36 Playing...
... Using the TV/VCR 5 Hooking Up the TV/VCR 6-7 Turning On the TV/VCR 8 Language Selection 9 Automatic Channel Setup 10-11 Setting the Clock 12-17 Daylight-Savings Time 18 Time Zone 19 Description of Controls Front Panel 20 Rear Panel 21 Remote Control Buttons 22-23 Adjusting the Picture Controls 24-25 On-Screen Status Displays 26 Reminder 27 Basic Operations Playing 28 Recording 29 Recording Options One-Touch Recording 30 Rerecording (Tape Duplication 31 Timer Recording 32-35 Defeat Recording 36 Playing...

User manual, English (US)
Page 5
... that needs to the unit: Install ALL batteries correctly, with the + and - sette tape before putting the tape in the TV/VCR. TV/VCR Maintenance q In this TV/VCR, use only tapes with alkaline; Removable labels can recycle your old product, batteries, manual, and packaging when you do not erase recordings accidentally. 1 To prevent accidental recording, break off , following the direction of as indicated. 3 Replace the battery compartment lid. This TV/VCR has an automatic head cleaning...
... that needs to the unit: Install ALL batteries correctly, with the + and - sette tape before putting the tape in the TV/VCR. TV/VCR Maintenance q In this TV/VCR, use only tapes with alkaline; Removable labels can recycle your old product, batteries, manual, and packaging when you do not erase recordings accidentally. 1 To prevent accidental recording, break off , following the direction of as indicated. 3 Replace the battery compartment lid. This TV/VCR has an automatic head cleaning...

User manual, English (US)
Page 6
... Your TV/VCR With a Cable Box To view any channel, set the TV/VCR to the ANT(enna) Jack on the TV/VCR. Connect an RF coaxial cable (75ohm, not supplied) to the OUT Jack on the back of the TV/VCR. Extend the antenna and adjust its length, direction, and angle for the clearest picture. Connect the Cable signal to the ANT(enna) Jack on the Cable Box and to the Cable Box output channel (channel...
... Your TV/VCR With a Cable Box To view any channel, set the TV/VCR to the ANT(enna) Jack on the TV/VCR. Connect an RF coaxial cable (75ohm, not supplied) to the OUT Jack on the back of the TV/VCR. Extend the antenna and adjust its length, direction, and angle for the clearest picture. Connect the Cable signal to the ANT(enna) Jack on the Cable Box and to the Cable Box output channel (channel...

User manual, English (US)
Page 7
... TV/VCR's power cord. 3 Before you turn on the VCR or camcorder. AUDIO/VIDEO OUT Jacks on VCR Connect an Audio cable to the AUDIO OUT Jack on the VCR and to the ANT(enna) Jack. • Audio and video cables are playing on the TV/VCR, go to page eight. If the pin is not bent. OUT VIDEO AUDIO VIDEO AUDIO POWER VOLUME CHANNEL STOP/EJECT REW PLAY F.FWD REC/OTR EARPHONE AUDIO/VIDEO In Jacks on front of TV/VCR Connect a Video cable to the VIDEO...
... TV/VCR's power cord. 3 Before you turn on the VCR or camcorder. AUDIO/VIDEO OUT Jacks on VCR Connect an Audio cable to the AUDIO OUT Jack on the VCR and to the ANT(enna) Jack. • Audio and video cables are playing on the TV/VCR, go to page eight. If the pin is not bent. OUT VIDEO AUDIO VIDEO AUDIO POWER VOLUME CHANNEL STOP/EJECT REW PLAY F.FWD REC/OTR EARPHONE AUDIO/VIDEO In Jacks on front of TV/VCR Connect a Video cable to the VIDEO...
User manual, English (US)
Page 8
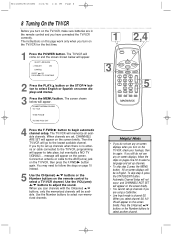
... on-screen displays will be in the remote control and you turn on the TV/VCR for the first time. 1 Press the POWER button. SELECT LANGUAGE > ENGLISH ON ESPAÑOL SELECT KL OR PRESS MENU TO CONTINUE 2 Press the PLAY/K button or the STOP/L button to take place, but eventually a NO TV SIGNALS ... The TV/VCR will appear. When channels are using a Cable Box. • Line Input mode is no antenna or cable connected to the TV/VCR, programming...
... on-screen displays will be in the remote control and you turn on the TV/VCR for the first time. 1 Press the POWER button. SELECT LANGUAGE > ENGLISH ON ESPAÑOL SELECT KL OR PRESS MENU TO CONTINUE 2 Press the PLAY/K button or the STOP/L button to take place, but eventually a NO TV SIGNALS ... The TV/VCR will appear. When channels are using a Cable Box. • Line Input mode is no antenna or cable connected to the TV/VCR, programming...

User manual, English (US)
Page 10
.../B button. PRIMARY SETUP SELECT LANGUAGE > AUTO PROGRAMMING CH MEMORY REVIEW VOLUME BAR [ON] SET CLOCK SELECT KL CHOOSE B TO END PRESS EXIT 3 Press the PLAY/v button or the STOP/w button to select PRIM. When setup is complete, CHANNELS ARE SET will always be channel 00. You can still select non-memorized channels using the Number buttons. The TV/VCR distinguishes between TV channels and cable channels automatically, and the TV/VCR will appear on the screen. Helpful Hints • Line Input mode...
.../B button. PRIMARY SETUP SELECT LANGUAGE > AUTO PROGRAMMING CH MEMORY REVIEW VOLUME BAR [ON] SET CLOCK SELECT KL CHOOSE B TO END PRESS EXIT 3 Press the PLAY/v button or the STOP/w button to select PRIM. When setup is complete, CHANNELS ARE SET will always be channel 00. You can still select non-memorized channels using the Number buttons. The TV/VCR distinguishes between TV channels and cable channels automatically, and the TV/VCR will appear on the screen. Helpful Hints • Line Input mode...

User manual, English (US)
Page 12
... TV/VCR. PRIMARY SETUP > SELECT LANGUAGE AUTO PROGRAMMING CH MEMORY REVIEW VOLUME BAR [ON] SET CLOCK SELECT KL CHOOSE B TO END PRESS EXIT 3 Press the PLAY/v button or the STOP/w button to select PRIM. Then enter the correct number. With manual clock setting, you want to correct is flashing. Cable Box users must set the clock: Manually, with Automatic PBS Channel Selection, or with Manual PBS Channel Selection. Then, press the F.FWD/B button. SET CLOCK > AUTO CLOCK SET MANUAL CLOCK DAYLIGHT SVG.TIME SET TIME ZONE [AUTO...
... TV/VCR. PRIMARY SETUP > SELECT LANGUAGE AUTO PROGRAMMING CH MEMORY REVIEW VOLUME BAR [ON] SET CLOCK SELECT KL CHOOSE B TO END PRESS EXIT 3 Press the PLAY/v button or the STOP/w button to select PRIM. Then enter the correct number. With manual clock setting, you want to correct is flashing. Cable Box users must set the clock: Manually, with Automatic PBS Channel Selection, or with Manual PBS Channel Selection. Then, press the F.FWD/B button. SET CLOCK > AUTO CLOCK SET MANUAL CLOCK DAYLIGHT SVG.TIME SET TIME ZONE [AUTO...
User manual, English (US)
Page 20
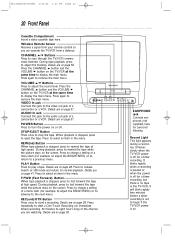
... Still mode and return to play a tape. REC(ord)/OTR Button Press once to start a One-Touch Recording (an immediate timed recording, 30 minutes to eight hours long) of a menu item (for example, to adjust the BRIGHTNESS) or to return to rewind the tape while the picture stays on page 29. It flashes slowly when the TV/VCR power is set to display the main menu. During playback, press...
... Still mode and return to play a tape. REC(ord)/OTR Button Press once to start a One-Touch Recording (an immediate timed recording, 30 minutes to eight hours long) of a menu item (for example, to adjust the BRIGHTNESS) or to return to rewind the tape while the picture stays on page 29. It flashes slowly when the TV/VCR power is set to display the main menu. During playback, press...
User manual, English (US)
Page 22
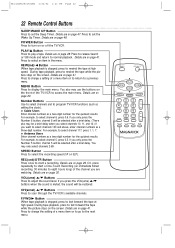
... 22 22 Remote Control Buttons SLEEP/WAKE UP Button Press to set the Wake Up Timer. POWER Button Press to start a recording. PLAY/v Button Press to select the recording speed (SP or SLP). q Cable Users Enter channel numbers as a two-digit number for the quickest results. SPEED Button Press to play a tape. Or, press repeatedly to turn on page 20. REC/OTR TRACKING MUTE Press to change the setting of the TV/VCR to the next menu. You also may use the buttons on...
... 22 22 Remote Control Buttons SLEEP/WAKE UP Button Press to set the Wake Up Timer. POWER Button Press to start a recording. PLAY/v Button Press to select the recording speed (SP or SLP). q Cable Users Enter channel numbers as a two-digit number for the quickest results. SPEED Button Press to play a tape. Or, press repeatedly to turn on page 20. REC/OTR TRACKING MUTE Press to change the setting of the TV/VCR to the next menu. You also may use the buttons on...

User manual, English (US)
Page 23
... are on page 26. During tape playback, press to remove the menu. MUTE Button Press to the previous volume level. Press again to return to eliminate the TV/VCR's sound. REC/OTR TRACKING MUTE Details are on a tape when setting up A-B Repeat Play. You cannot pause a One-Touch Recording. CH (Alternate Channel) Button Press to return to the TV channel you set the real-time counter to memorize the start and...
... are on page 26. During tape playback, press to remove the menu. MUTE Button Press to the previous volume level. Press again to return to eliminate the TV/VCR's sound. REC/OTR TRACKING MUTE Details are on a tape when setting up A-B Repeat Play. You cannot pause a One-Touch Recording. CH (Alternate Channel) Button Press to return to the TV channel you set the real-time counter to memorize the start and...

User manual, English (US)
Page 29
...; If you can change the tape speed using the SPEED button. You cannot record in the TV/VCR, press the POWER button to turn on the TV/VCR, if necessary. 2 Press the SPEED button until the desired tape speed appears on the TV/VCR screen. Recording 29 1 POWER SLEEP/WAKE UP 2 4 REW PLAY STOP F.FWD MENU STATUS/EXIT CLEAR 123 CH. 456 789 SPEED 0 MEMORY ALT.CH PAUSE/STILL VOL. Tape Speeds This chart shows the recording/playback time for example, during...
...; If you can change the tape speed using the SPEED button. You cannot record in the TV/VCR, press the POWER button to turn on the TV/VCR, if necessary. 2 Press the SPEED button until the desired tape speed appears on the TV/VCR screen. Recording 29 1 POWER SLEEP/WAKE UP 2 4 REW PLAY STOP F.FWD MENU STATUS/EXIT CLEAR 123 CH. 456 789 SPEED 0 MEMORY ALT.CH PAUSE/STILL VOL. Tape Speeds This chart shows the recording/playback time for example, during...
User manual, English (US)
Page 31
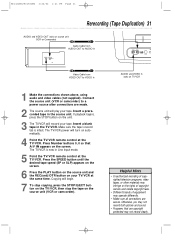
... recording of equipment may not record clearly. Otherwise, you may infringe on your tape. MC132DMG/MC192DMG 3/22/02 1:21 PM Page 31 Rerecording (Tape Duplication) 31 AUDIO and VIDEO OUT Jacks on source unit (VCR or Camcorder) Audio Cable from AUDIO OUT to AUDIO In VIDEO AUDIO OUT IN VIDEO AUDIO POWER Video Cable from VIDEO OUT to a power source after connections are secure. Make sure the tape's record tab is now in Line Input mode. 5 Point the TV/VCR remote control at the TV/VCR...
... recording of equipment may not record clearly. Otherwise, you may infringe on your tape. MC132DMG/MC192DMG 3/22/02 1:21 PM Page 31 Rerecording (Tape Duplication) 31 AUDIO and VIDEO OUT Jacks on source unit (VCR or Camcorder) Audio Cable from AUDIO OUT to AUDIO In VIDEO AUDIO OUT IN VIDEO AUDIO POWER Video Cable from VIDEO OUT to a power source after connections are secure. Make sure the tape's record tab is now in Line Input mode. 5 Point the TV/VCR remote control at the TV/VCR...
User manual, English (US)
Page 32
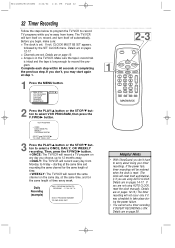
... length of time every week. If the power fails, timer recordings will record every day from home. Details are using AUTO CLOCK, reset the clock manually. Make sure the tape's record tab is intact and the tape is long enough to take place during the power failure. • You cannot set . MC132DMG/MC192DMG 3/22/02 1:21 PM Page 32 32 Timer Recording Follow the steps below to program the TV/VCR to record TV programs while...
... length of time every week. If the power fails, timer recordings will record every day from home. Details are using AUTO CLOCK, reset the clock manually. Make sure the tape's record tab is intact and the tape is long enough to take place during the power failure. • You cannot set . MC132DMG/MC192DMG 3/22/02 1:21 PM Page 32 32 Timer Recording Follow the steps below to program the TV/VCR to record TV programs while...

User manual, English (US)
Page 34
... the Number 1 button to record in SP speed or press the Number 2 button to record in the TV/VCR. Details about tape speed are on the screen when you just tried to program overlaps with another timer recording. REC/OTR TRACKING MUTE 10 9 Turn off the TV/VCR, PLEASE TURN OFF FOR TIMER RECORDING appears on (if applicable). Leave the Cable Box/DBS on the TV/VCR screen two minutes before a timer recording should begin. 11 POWER SLEEP/WAKE UP 8 REW PLAY...
... the Number 1 button to record in SP speed or press the Number 2 button to record in the TV/VCR. Details about tape speed are on the screen when you just tried to program overlaps with another timer recording. REC/OTR TRACKING MUTE 10 9 Turn off the TV/VCR, PLEASE TURN OFF FOR TIMER RECORDING appears on (if applicable). Leave the Cable Box/DBS on the TV/VCR screen two minutes before a timer recording should begin. 11 POWER SLEEP/WAKE UP 8 REW PLAY...

User manual, English (US)
Page 53
...: adjusting changes the tints of the picture on the front of the TV/VCR which is always channel 00 (A/V IN). MC132DMG/MC192DMG 3/22/02 1:21 PM Page 53 AUDIO In Jack: jack on the TV/VCR from purple to green. Bands: settings that starts immediately and records for a T120 tape is approximately six hours). all available channels. Mode: a TV/VCR operation. a timed recording that allow you to eight hours, whichever you specify. playback...
...: adjusting changes the tints of the picture on the front of the TV/VCR which is always channel 00 (A/V IN). MC132DMG/MC192DMG 3/22/02 1:21 PM Page 53 AUDIO In Jack: jack on the TV/VCR from purple to green. Bands: settings that starts immediately and records for a T120 tape is approximately six hours). all available channels. Mode: a TV/VCR operation. a timed recording that allow you to eight hours, whichever you specify. playback...

User manual, English (US)
Page 54
... this list of problems and possible solutions before you don't have to call a customer service representative, please know the model number and serial number of the TV/VCR. If the power fails, timer recordings will allow the TV/VCR to help you with insufficient ventilation. MC132DMG/MC192DMG 3/22/02 1:21 PM Page 54 54 Helpful Hints If you are using AUTO CLOCK, reset the clock manually. This information is poor. • Check connections, then set...
... this list of problems and possible solutions before you don't have to call a customer service representative, please know the model number and serial number of the TV/VCR. If the power fails, timer recordings will allow the TV/VCR to help you with insufficient ventilation. MC132DMG/MC192DMG 3/22/02 1:21 PM Page 54 54 Helpful Hints If you are using AUTO CLOCK, reset the clock manually. This information is poor. • Check connections, then set...
User manual, English (US)
Page 55
... channel numbers as a two-digit number. TV/VCR does not display closed captioning is OFF. Remote control does not operate TV/VCR. • Aim the remote control directly at least two hours, but do not try to play mechanism switches the tape mechanism from the TV/VCR. • Make sure the power plug is completely connected to an AC (alternating current) outlet. • If a timer recording is normal. If the tape does not eject, press the STOP/EJECT button...
... channel numbers as a two-digit number. TV/VCR does not display closed captioning is OFF. Remote control does not operate TV/VCR. • Aim the remote control directly at least two hours, but do not try to play mechanism switches the tape mechanism from the TV/VCR. • Make sure the power plug is completely connected to an AC (alternating current) outlet. • If a timer recording is normal. If the tape does not eject, press the STOP/EJECT button...

User manual, English (US)
Page 57
... Warranty 57 TV/VCR COMBINATION 90 Days Free Labor/One Year Free Parts Exchange (Two Years Free Exchange on Color Picture Tube) This product must be carried in for the original warranty period. uct, adjustment of customer controls on all parts will be easier for all countries where the product is used for any circumstances for commercial or institutional purposes. MAKE SURE YOU KEEP... Also keep both nearby...
... Warranty 57 TV/VCR COMBINATION 90 Days Free Labor/One Year Free Parts Exchange (Two Years Free Exchange on Color Picture Tube) This product must be carried in for the original warranty period. uct, adjustment of customer controls on all parts will be easier for all countries where the product is used for any circumstances for commercial or institutional purposes. MAKE SURE YOU KEEP... Also keep both nearby...
User manual, English (US)
Page 58
.../p button 23 stop/eject button 20 super high speed searching . . .41 super long play 38-39 accessories 60 alt. MC132DMG/MC192DMG 3/22/02 1:21 PM Page 58 58 Index a-b repeat play 29, 53 table of contents 4 tape duplication 31 eject 52 speed 29, 53 time setting 12-17 zone 19 timer recording cancelling 35 reviewing 35 setting 32-34 tint, adjusting 24-25 tracking 23, 52 turning on the tv/vcr 8 video in jack 7, 20, 31 volume...
.../p button 23 stop/eject button 20 super high speed searching . . .41 super long play 38-39 accessories 60 alt. MC132DMG/MC192DMG 3/22/02 1:21 PM Page 58 58 Index a-b repeat play 29, 53 table of contents 4 tape duplication 31 eject 52 speed 29, 53 time setting 12-17 zone 19 timer recording cancelling 35 reviewing 35 setting 32-34 tint, adjusting 24-25 tracking 23, 52 turning on the tv/vcr 8 video in jack 7, 20, 31 volume...


