User manual, English (US)
Page 4
... 4 Introduction 5 Playable Discs and Videotapes 6 Initial Setup and Use Before Using the TV/VCR/DVD 7 Hooking Up the TV/VCR/DVD 8-9 Optional Connections 10 Watching TV 11 Playing a Videotape 12 Playing a Disc 13 Description of Controls Remote Control Buttons 14-15 Front Panel 16 Rear Panel 17 TV Settings Menu Language, ResettingTV Channels 18 Adding/Deleting Channels 19 Setting the Clock...
... 4 Introduction 5 Playable Discs and Videotapes 6 Initial Setup and Use Before Using the TV/VCR/DVD 7 Hooking Up the TV/VCR/DVD 8-9 Optional Connections 10 Watching TV 11 Playing a Videotape 12 Playing a Disc 13 Description of Controls Remote Control Buttons 14-15 Front Panel 16 Rear Panel 17 TV Settings Menu Language, ResettingTV Channels 18 Adding/Deleting Channels 19 Setting the Clock...
User manual, English (US)
Page 5
...; Subtitles* • Virtual Surround • Zoomed Play * If available on the remote control. T1056(06)_2006_1.qx3 10/12/04 11:57 AM Page 5 Introduction 5 Welcome to select the TV/VCR SETUP menu. DVD manufacturers set a DVD feature in the unit's SETUP menu, it by pressing the DISC MENU button on...during play is illustrated in DVD mode. If you can select only the TV/VCR SETUP menu. This manual describes the 20MC4304 and 27MC4304.These two models are two setup menus: one for the TV/VCR features while the unit is in this manual describe DVD Disc menus. There are ...
...; Subtitles* • Virtual Surround • Zoomed Play * If available on the remote control. T1056(06)_2006_1.qx3 10/12/04 11:57 AM Page 5 Introduction 5 Welcome to select the TV/VCR SETUP menu. DVD manufacturers set a DVD feature in the unit's SETUP menu, it by pressing the DISC MENU button on...during play is illustrated in DVD mode. If you can select only the TV/VCR SETUP menu. This manual describes the 20MC4304 and 27MC4304.These two models are two setup menus: one for the TV/VCR features while the unit is in this manual describe DVD Disc menus. There are ...
User manual, English (US)
Page 7
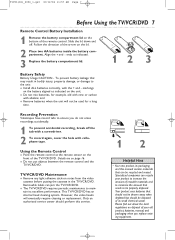
...heads will not be recycled and reused. T1056(06)_2006_1.qx3 10/12/04 11:57 AM Page 7 Before Using the TV/VCR/DVD 7 Remote Control Battery Installation 1 Remove the battery compartment lid on the bottom of the arrow on the lid. 2 Place two AA batteries ... batteries when the unit will eventually require cleaning or replacement. Follow the direction of the remote control. Using the Remote Control ● Point the remote control at the remote sensor on disposal of the TV/VCR/DVD. To prevent battery leakage that needs to maintain its packaging, and this service. 12 Helpful...
...heads will not be recycled and reused. T1056(06)_2006_1.qx3 10/12/04 11:57 AM Page 7 Before Using the TV/VCR/DVD 7 Remote Control Battery Installation 1 Remove the battery compartment lid on the bottom of the arrow on the lid. 2 Place two AA batteries ... batteries when the unit will eventually require cleaning or replacement. Follow the direction of the remote control. Using the Remote Control ● Point the remote control at the remote sensor on disposal of the TV/VCR/DVD. To prevent battery leakage that needs to maintain its packaging, and this service. 12 Helpful...

User manual, English (US)
Page 14
... Button Press to set the Sleep Timer. T1056(06)_2006_1.qx3 10/12/04 11:57 AM Page 14 14 Remote Control Buttons PICTURE Button Press to the previous Setup menu in DVD or TV/VCR mode. Details are on page 36. Details are on videotape. PLAY B Button Press to start a recording on ... Button Press to go to access the picture controls. STANDBY-ON Button Press to search forward during Disc playback. Press 0 before entering double-digit numbers. Details are on page 26. DVD Mode: Press to see the Disc status on or off the TV/VCR/DVD. STANDBY-ON PICTURE SLEEP SELECT 123 CH. ...
... Button Press to set the Sleep Timer. T1056(06)_2006_1.qx3 10/12/04 11:57 AM Page 14 14 Remote Control Buttons PICTURE Button Press to the previous Setup menu in DVD or TV/VCR mode. Details are on page 36. Details are on videotape. PLAY B Button Press to start a recording on ... Button Press to go to access the picture controls. STANDBY-ON Button Press to search forward during Disc playback. Press 0 before entering double-digit numbers. Details are on page 26. DVD Mode: Press to see the Disc status on or off the TV/VCR/DVD. STANDBY-ON PICTURE SLEEP SELECT 123 CH. ...
User manual, English (US)
Page 15
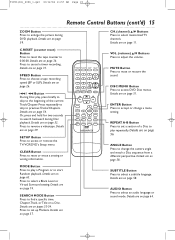
... volume. REPEAT A-B Button Press to set up Markers. Details are on page 58. AUDIO Button Press to play a Program or to access or remove the TV/VCR/DVD's Setup menu. STANDBY-ON PICTURE SLEEP SELECT 123 CH. 456 789 +100 0 +10 SPEED C.RESET ZOOM VOL. MUTE Button Press to select a subtitle ...are on page 59. Press to enlarge the picture during Disc playback. T1056(06)_2006_1.qx3 10/12/04 11:57 AM Page 15 Remote Control Buttons (cont'd) 15 ZOOM Button Press to select a Black Level or Virtual Surround setting. Details are on page 65. Press to reverse a videotape...
... volume. REPEAT A-B Button Press to set up Markers. Details are on page 58. AUDIO Button Press to play a Program or to access or remove the TV/VCR/DVD's Setup menu. STANDBY-ON PICTURE SLEEP SELECT 123 CH. 456 789 +100 0 +10 SPEED C.RESET ZOOM VOL. MUTE Button Press to select a subtitle ...are on page 59. Press to enlarge the picture during Disc playback. T1056(06)_2006_1.qx3 10/12/04 11:57 AM Page 15 Remote Control Buttons (cont'd) 15 ZOOM Button Press to select a Black Level or Virtual Surround setting. Details are on page 65. Press to reverse a videotape...
User manual, English (US)
Page 16
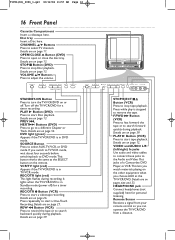
... or close the disc tray. Remote Sensor Receives a signal from your remote control so you switch to TV/VCR mode, wait about four seconds before switching back to stop tape playback. Details are on pages nine and 33. DVD light (green) Appears if the TV/VCR/DVD is in DVD mode. Details are on the remote. Disc tray Insert a Disc here...
... or close the disc tray. Remote Sensor Receives a signal from your remote control so you switch to TV/VCR mode, wait about four seconds before switching back to stop tape playback. Details are on pages nine and 33. DVD light (green) Appears if the TV/VCR/DVD is in DVD mode. Details are on the remote. Disc tray Insert a Disc here...

User manual, English (US)
Page 27
... with the remote control. • To show the remaining recording time, press DISPLAY. Recording will increase the recording time by 30 minutes. Otherwise, recording will appear on the front of REC/OTR I will start immediately. Select the channel you want to record. The red VCR/TV light will ...eight hours long. OTR (2:30) SP 4 Press STOP C to stop a one-touch recording before the recording's end time, the TV/VCR/DVD will stop at the Cable Box/Satellite Receiver. MUTE RECORD PLAY STOP DISC MENU DISPLAY SETUP TITLE ENTER RETURN CLEAR SEARCH MODE REPEAT REPEAT...
... with the remote control. • To show the remaining recording time, press DISPLAY. Recording will increase the recording time by 30 minutes. Otherwise, recording will appear on the front of REC/OTR I will start immediately. Select the channel you want to record. The red VCR/TV light will ...eight hours long. OTR (2:30) SP 4 Press STOP C to stop a one-touch recording before the recording's end time, the TV/VCR/DVD will stop at the Cable Box/Satellite Receiver. MUTE RECORD PLAY STOP DISC MENU DISPLAY SETUP TITLE ENTER RETURN CLEAR SEARCH MODE REPEAT REPEAT...
User manual, English (US)
Page 33
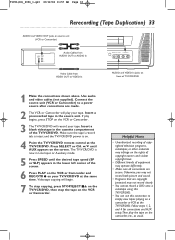
The TV/VCR/DVD is on. 4 Point the TV/VCR/DVD remote control at the same time. Insert a prerecorded tape in the lower left corner of equipment may operate differently. • Make sure all connections are copyright...sound. • Programs that are secure. Follow steps 1, 2, and 4 for connections and AUX setup.Then play your tape. Videotape copying will record your TV/VCR/DVD at the TV/VCR/DVD. Helpful Hints • Unauthorized recording of copyrighted television programs, videotapes, or other materials may infringe on the rights of copyright owners and violate copyright...
The TV/VCR/DVD is on. 4 Point the TV/VCR/DVD remote control at the same time. Insert a prerecorded tape in the lower left corner of equipment may operate differently. • Make sure all connections are copyright...sound. • Programs that are secure. Follow steps 1, 2, and 4 for connections and AUX setup.Then play your tape. Videotape copying will record your TV/VCR/DVD at the TV/VCR/DVD. Helpful Hints • Unauthorized recording of copyrighted television programs, videotapes, or other materials may infringe on the rights of copyright owners and violate copyright...

User manual, English (US)
Page 40
...record a videotape to its end, the TV/VCR/DVD will rewind the tape, stop, turn itself off, and eject the tape. Automatic Tracking Adjustment The TV/VCR/DVD automatically adjusts the videotape tracking to Automatic ...adjust the tracking manually, press the CHANNEL ▲/▼ buttons on the front of the TV/VCR/DVD or the CH. ▲/▼ buttons on page 34. The tape will start again ...Touch Recording ends. Tracking returns to give you may get a better picture using the manual tracking controls (see Auto Return details on page 32. Automatic Rewind, Eject, Off When you insert a...
...record a videotape to its end, the TV/VCR/DVD will rewind the tape, stop, turn itself off, and eject the tape. Automatic Tracking Adjustment The TV/VCR/DVD automatically adjusts the videotape tracking to Automatic ...adjust the tracking manually, press the CHANNEL ▲/▼ buttons on the front of the TV/VCR/DVD or the CH. ▲/▼ buttons on page 34. The tape will start again ...Touch Recording ends. Tracking returns to give you may get a better picture using the manual tracking controls (see Auto Return details on page 32. Automatic Rewind, Eject, Off When you insert a...

User manual, English (US)
Page 77
... the window facing up and the record tab facing you want to channel 3, 4, or AUX. Not all obstacles between the remote control and the TV/VCR/DVD. • Inspect and replace the batteries in the power cord again, then press STANDBY-ON on page 11. • ...the Rental feature. Videotape play . • Insert a playable Disc. Remote control does not operate the TV/VCR/DVD. • Aim the remote control directly at least two hours, but do not have set the TV/VCR/DVD to play a tape. You cannot choose a DVD feature, such as Dolby Digital) or language. Refer to restore the ...
... the window facing up and the record tab facing you want to channel 3, 4, or AUX. Not all obstacles between the remote control and the TV/VCR/DVD. • Inspect and replace the batteries in the power cord again, then press STANDBY-ON on page 11. • ...the Rental feature. Videotape play . • Insert a playable Disc. Remote control does not operate the TV/VCR/DVD. • Aim the remote control directly at least two hours, but do not have set the TV/VCR/DVD to play a tape. You cannot choose a DVD feature, such as Dolby Digital) or language. Refer to restore the ...
User manual, English (US)
Page 78
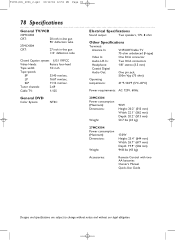
...04 12:51 PM Page 78 78 Specifications General TV/VCR 20MC4304 CRT: 20 inch in-line gun 90˚...LP 16.67 mm/sec. Tuner channels: 2-69 Cable TV: 1-125 General DVD Color System: NTSC Electrical Specifications Sound output: Two speakers, 1W, 8 ohm Other...20MC4304: Power consumption (Maximum): Dimensions: Weight: 90W Height: 20.2" (513 mm) Width: 22.1" (562 mm) Depth: 20.2" (513 mm) 50.7 lbs (23 kg) 27MC4304: Power consumption (Maximum): Dimensions: Weight: 130W Height: 25.4" (644 mm) Width: 26.7" (677 mm) Depth: 19.9" (506 mm) 94.8 lbs (43 kg) Accessories: Remote Control...
...04 12:51 PM Page 78 78 Specifications General TV/VCR 20MC4304 CRT: 20 inch in-line gun 90˚...LP 16.67 mm/sec. Tuner channels: 2-69 Cable TV: 1-125 General DVD Color System: NTSC Electrical Specifications Sound output: Two speakers, 1W, 8 ohm Other...20MC4304: Power consumption (Maximum): Dimensions: Weight: 90W Height: 20.2" (513 mm) Width: 22.1" (562 mm) Depth: 20.2" (513 mm) 50.7 lbs (23 kg) 27MC4304: Power consumption (Maximum): Dimensions: Weight: 130W Height: 25.4" (644 mm) Width: 26.7" (677 mm) Depth: 19.9" (506 mm) 94.8 lbs (43 kg) Accessories: Remote Control...

User manual, English (US)
Page 80
...16, 40 chapters 53 clear button 15 clock setting 20-23 closed captions 41 color 25 connections 8-10, 33 contents, table of 4 contrast 25 controls remote 14-15 tv/vcr/dvd 16 copyright protection 3, 33 counter 25, 36 daylight-savings time 24 disc menu button 15, 51 disc tray 13, 16 display button 14, ...65 random playback 65 ratings mpaa 46 tv 42-45 real-time tape counter 36 rear panel 17 record button 14, 26 recording basic 26 one-touch 27 timer 28-31 rec/otr I button 16, 27 rec/otr light 16 remote control buttons 14-15 using 7 remote sensor 16 repeat button 14, 56 ...
...16, 40 chapters 53 clear button 15 clock setting 20-23 closed captions 41 color 25 connections 8-10, 33 contents, table of 4 contrast 25 controls remote 14-15 tv/vcr/dvd 16 copyright protection 3, 33 counter 25, 36 daylight-savings time 24 disc menu button 15, 51 disc tray 13, 16 display button 14, ...65 random playback 65 ratings mpaa 46 tv 42-45 real-time tape counter 36 rear panel 17 record button 14, 26 recording basic 26 one-touch 27 timer 28-31 rec/otr I button 16, 27 rec/otr light 16 remote control buttons 14-15 using 7 remote sensor 16 repeat button 14, 56 ...
User manual, English
Page 4
... 4 Introduction 5 Playable Discs and Videotapes 6 Initial Setup and Use Before Using the TV/VCR/DVD 7 Hooking Up the TV/VCR/DVD 8-9 Optional Connections 10 Watching TV 11 Playing a Videotape 12 Playing a Disc 13 Description of Controls Remote Control Buttons 14-15 Front Panel 16 Rear Panel 17 TV Settings Menu Language, ResettingTV Channels 18 Adding/Deleting Channels 19 Setting the Clock...
... 4 Introduction 5 Playable Discs and Videotapes 6 Initial Setup and Use Before Using the TV/VCR/DVD 7 Hooking Up the TV/VCR/DVD 8-9 Optional Connections 10 Watching TV 11 Playing a Videotape 12 Playing a Disc 13 Description of Controls Remote Control Buttons 14-15 Front Panel 16 Rear Panel 17 TV Settings Menu Language, ResettingTV Channels 18 Adding/Deleting Channels 19 Setting the Clock...

User manual, English
Page 5
... a menu, access it will appear in the top right corner of the TV/VCR/DVD.There are different in size, but operate identically.The 20MC4304 is illustrated in TV/VCR mode, and one for the unit's DVD Player. For example, some features are available only during play, while others are available only...the Disc features while the unit is not available. If you can select only the TV/VCR SETUP menu. Details are not available on the remote control. In DVD mode, you cannot access a feature, try to the DVD Player's SETUP menu. 20_27MC4304_1.qx3 04.5.12 11:09 AM Page 5 Introduction 5 ...
... a menu, access it will appear in the top right corner of the TV/VCR/DVD.There are different in size, but operate identically.The 20MC4304 is illustrated in TV/VCR mode, and one for the unit's DVD Player. For example, some features are available only during play, while others are available only...the Disc features while the unit is not available. If you can select only the TV/VCR SETUP menu. Details are not available on the remote control. In DVD mode, you cannot access a feature, try to the DVD Player's SETUP menu. 20_27MC4304_1.qx3 04.5.12 11:09 AM Page 5 Introduction 5 ...

User manual, English
Page 7
.... 2 To record again, cover the hole with the + and - Align the + and - TV/VCR/DVD Maintenance ● Remove any light adhesive stick-on page 16. ● Do not put objects between the remote control and the TV/VCR/DVD. Specialized companies can jam the TV/VCR/DVD. ● The TV/VCR/DVD requires periodic maintenance to maintain its packaging, and this service. 12 Helpful...
.... 2 To record again, cover the hole with the + and - Align the + and - TV/VCR/DVD Maintenance ● Remove any light adhesive stick-on page 16. ● Do not put objects between the remote control and the TV/VCR/DVD. Specialized companies can jam the TV/VCR/DVD. ● The TV/VCR/DVD requires periodic maintenance to maintain its packaging, and this service. 12 Helpful...

User manual, English
Page 14
... to select or adjust menu items. RETURN Button Press to go to access the picture controls. 20_27MC4304_1.qx3 04.5.12 11:09 AM Page 14 14 Remote Control Buttons PICTURE Button Press to the previous Setup menu in DVD or TV/VCR mode. Details are on page 39. Press again to the next Track or Chapter...
... to select or adjust menu items. RETURN Button Press to go to access the picture controls. 20_27MC4304_1.qx3 04.5.12 11:09 AM Page 14 14 Remote Control Buttons PICTURE Button Press to the previous Setup menu in DVD or TV/VCR mode. Details are on page 39. Press again to the next Track or Chapter...

User manual, English
Page 15
... 789 +100 0 +10 SPEED C.RESET ZOOM VOL. VOL. (volume) K/L Buttons Press to access or remove the TV/VCR/DVD's Setup menu. ANGLE Button Press to select an audio language or sound mode. AUDIO Button Press to change a menu setting...Button Press to 0:00:00. C.RESET (counter reset) Button Press to reset the tape counter to access DVD Disc menus. MODE Button Press to play a Program or to accept or change the camera angle and watch .... 20_27MC4304_1.qx3 04.5.12 11:09 AM Page 15 Remote Control Buttons (cont'd) 15 ZOOM Button Press to the beginning of the current Track/Chapter.
... 789 +100 0 +10 SPEED C.RESET ZOOM VOL. VOL. (volume) K/L Buttons Press to access or remove the TV/VCR/DVD's Setup menu. ANGLE Button Press to select an audio language or sound mode. AUDIO Button Press to change a menu setting...Button Press to 0:00:00. C.RESET (counter reset) Button Press to reset the tape counter to access DVD Disc menus. MODE Button Press to play a Program or to accept or change the camera angle and watch .... 20_27MC4304_1.qx3 04.5.12 11:09 AM Page 15 Remote Control Buttons (cont'd) 15 ZOOM Button Press to the beginning of the current Track/Chapter.

User manual, English
Page 16
... remote control so you switch to TV/VCR mode, wait about four seconds before switching back to search forward quickly during playback. DVD light (green) Appears if the TV/VCR/DVD is in DVD mode. STOP/EJECT CA Button (VCR) Press to start a One-Touch Recording. If you can operate the TV/VCR/DVD from a distance. Press repeatedly to turn the TV/VCR/DVD on the remote...
... remote control so you switch to TV/VCR mode, wait about four seconds before switching back to search forward quickly during playback. DVD light (green) Appears if the TV/VCR/DVD is in DVD mode. STOP/EJECT CA Button (VCR) Press to start a One-Touch Recording. If you can operate the TV/VCR/DVD from a distance. Press repeatedly to turn the TV/VCR/DVD on the remote...

User manual, English
Page 27
...the top left corner of the TV/VCR/DVD to select a recording length. Details are on the front of the unit. ● Insert a videotape with the remote control. • To show the remaining recording time, press DISPLAY. Each press of the TV/VCR/DVD repeatedly to indicate recording is still ...in progress. • To change the recording length while an OTR is in TV/VCR mode. Helpful Hints • You...
...the top left corner of the TV/VCR/DVD to select a recording length. Details are on the front of the unit. ● Insert a videotape with the remote control. • To show the remaining recording time, press DISPLAY. Each press of the TV/VCR/DVD repeatedly to indicate recording is still ...in progress. • To change the recording length while an OTR is in TV/VCR mode. Helpful Hints • You...

User manual, English
Page 33
... desired tape speed (SP or SLP) appears in Line Input or Auxiliary mode. 5 Press SPEED until AUX appears on . 4 Point the TV/VCR/DVD remote control at the TV/VCR/DVD. 20_27MC4304_1.qx3 04.5.12 11:09 AM Page 33 Rerecording (Tape Duplication) 33 AUDIO and VIDEO OUT Jacks on source unit...camcorder, etc., as usual. Insert a blank videotape in the source unit. Press SELECT or CH. Videotape copying will record your TV/VCR/DVD at the TV/VCR/DVD. The TV/VCR/DVD is on the screen. Follow steps 1, 2, and 4 for connections and AUX setup.Then play begins, press STOP on a camcorder or...
... desired tape speed (SP or SLP) appears in Line Input or Auxiliary mode. 5 Press SPEED until AUX appears on . 4 Point the TV/VCR/DVD remote control at the TV/VCR/DVD. 20_27MC4304_1.qx3 04.5.12 11:09 AM Page 33 Rerecording (Tape Duplication) 33 AUDIO and VIDEO OUT Jacks on source unit...camcorder, etc., as usual. Insert a blank videotape in the source unit. Press SELECT or CH. Videotape copying will record your TV/VCR/DVD at the TV/VCR/DVD. The TV/VCR/DVD is on the screen. Follow steps 1, 2, and 4 for connections and AUX setup.Then play begins, press STOP on a camcorder or...


