
User Manual
Page 3
GAS BURNER 11 OPERATION INSTRUCTIONS - CONTENTS PRODUCT REGISTRATION 2 PRECAUTIONS 4 IMPORTANT SAFETY INSTRUCTIONS 6 SPECIFICATIONS 8 PARTS AND FEATURES 9 BEFORE USE 10 OPERATION INSTRUCTIONS - OVEN 13 CARE AND MAINTENANCE 16 TROUBLESHOOTING 18 LIMITED WARRANTY 20 3
GAS BURNER 11 OPERATION INSTRUCTIONS - CONTENTS PRODUCT REGISTRATION 2 PRECAUTIONS 4 IMPORTANT SAFETY INSTRUCTIONS 6 SPECIFICATIONS 8 PARTS AND FEATURES 9 BEFORE USE 10 OPERATION INSTRUCTIONS - OVEN 13 CARE AND MAINTENANCE 16 TROUBLESHOOTING 18 LIMITED WARRANTY 20 3

User Manual
Page 6
... climb, stand or hang on the oven door, broiler door or cooktop. they could be allowed to the range. DO NOT repair or replace any part of the oven unless specifically recommended in carbon monoxide poisoning and overheating of the oven. 5. DO NOT use , do not let the potholder contact the... hot heating element in the oven, or near the vicinity of the range or any part of the unit. 19. NEVER pick up a flaming pan or pot. Use multi-purpose dry chemicals or foam-type fire extinguisher. 12. A multipurpose dry chemical...
... climb, stand or hang on the oven door, broiler door or cooktop. they could be allowed to the range. DO NOT repair or replace any part of the oven unless specifically recommended in carbon monoxide poisoning and overheating of the oven. 5. DO NOT use , do not let the potholder contact the... hot heating element in the oven, or near the vicinity of the range or any part of the unit. 19. NEVER pick up a flaming pan or pot. Use multi-purpose dry chemicals or foam-type fire extinguisher. 12. A multipurpose dry chemical...
User Manual
Page 9
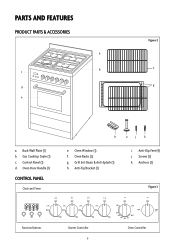
Control Panel (1) d. Oven Racks (2) g. Anti-Tip Bracket (1) i. Anti-Slip Feet (4) j. PARTS and features Product Parts & Accessories Figure 2 a b f c g d e h u jk a. Grill Set: Basin & Anti-Splash (1) h. Anchors (2) control panel Clock and Timer Figure 3 °F °F OFF OFF OFF OFF OFF OFF LITE MAX ...
Control Panel (1) d. Oven Racks (2) g. Anti-Tip Bracket (1) i. Anti-Slip Feet (4) j. PARTS and features Product Parts & Accessories Figure 2 a b f c g d e h u jk a. Grill Set: Basin & Anti-Splash (1) h. Anchors (2) control panel Clock and Timer Figure 3 °F °F OFF OFF OFF OFF OFF OFF LITE MAX ...
User Manual
Page 20
.... • Any delivery/installation costs incurred as the result of a unit that fails to perform as instructions on this unit for any part(s) of MC Appliance Corporation. A copy of this limited warranty. MC Appliance Corporation is not liable for incidental or consequential damages and no ...located in a remote area where service by unauthorized service agents. • Service calls that has failed during the warranty period. Model MCSRG24S Parts One Year Labor One Year Type of Service Carry In For Service or Assistance please call 888-775-0202 or visit us any other...
.... • Any delivery/installation costs incurred as the result of a unit that fails to perform as instructions on this unit for any part(s) of MC Appliance Corporation. A copy of this limited warranty. MC Appliance Corporation is not liable for incidental or consequential damages and no ...located in a remote area where service by unauthorized service agents. • Service calls that has failed during the warranty period. Model MCSRG24S Parts One Year Labor One Year Type of Service Carry In For Service or Assistance please call 888-775-0202 or visit us any other...

User Manual 1
Page 2
CONTENTS PRECAUTIONS 3 INSTALLATION REQUIREMENTS 5 Tools and Parts 5 Location Requirements 6 Electrical Requirements 8 Gas Supply Requirements 9 INSTALLATION INSTRUCTIONS 11 Removing Packaging Materials 11 How to Install Backsplash 11 How to Install Anti-Tip Bracket 11 How to Connect Gas Line 12 How to Connect Electric Power 14 How to Install Range to Final Location 14 How to Level the Range 15 How to Check Operation 15 Gas Conversion 16 2
CONTENTS PRECAUTIONS 3 INSTALLATION REQUIREMENTS 5 Tools and Parts 5 Location Requirements 6 Electrical Requirements 8 Gas Supply Requirements 9 INSTALLATION INSTRUCTIONS 11 Removing Packaging Materials 11 How to Install Backsplash 11 How to Install Anti-Tip Bracket 11 How to Connect Gas Line 12 How to Connect Electric Power 14 How to Install Range to Final Location 14 How to Level the Range 15 How to Check Operation 15 Gas Conversion 16 2

User Manual 1
Page 5
... (Concrete/Ceramic Floors) • Pipe Wrench • Non-Corrosive Leak-Detection Solution • 10" Adjustable Wrenches (2) Parts Supplied Check that all parts are included. The anti-tip bracket must be available at your local hardware store. Gas Supply Line Kit Figure 2 Adapter... Flexible Gas Supply Line 5 Adapter INSTALLATION REQUIREMENTS Tools and parts Tools Required Gather the necessary tools and parts before starting the installation. Carefully follow the instructions with Washer Regulator LP/Natural Gas Conversion Kit ...
... (Concrete/Ceramic Floors) • Pipe Wrench • Non-Corrosive Leak-Detection Solution • 10" Adjustable Wrenches (2) Parts Supplied Check that all parts are included. The anti-tip bracket must be available at your local hardware store. Gas Supply Line Kit Figure 2 Adapter... Flexible Gas Supply Line 5 Adapter INSTALLATION REQUIREMENTS Tools and parts Tools Required Gather the necessary tools and parts before starting the installation. Carefully follow the instructions with Washer Regulator LP/Natural Gas Conversion Kit ...

User Manual 1
Page 11
... protect the flooring. • Using two or more people, firmly grasp the range and gently lay it on its back. 4. Remove all oven racks and parts packaged from splatter, install the backsplash to the rear edge of the cooktop to which extends past the back of another. note: It is on...
... protect the flooring. • Using two or more people, firmly grasp the range and gently lay it on its back. 4. Remove all oven racks and parts packaged from splatter, install the backsplash to the rear edge of the cooktop to which extends past the back of another. note: It is on...