User Manual
Page 1
24-Inch Freestanding Gas Range User's Manual Model MCSRG24S PLEASE READ THIS MANUAL CAREFULLY BEFORE USING YOUR GAS RANGE AND KEEP IT FOR FUTURE REFERENCE. 1
24-Inch Freestanding Gas Range User's Manual Model MCSRG24S PLEASE READ THIS MANUAL CAREFULLY BEFORE USING YOUR GAS RANGE AND KEEP IT FOR FUTURE REFERENCE. 1

User Manual
Page 3
OVEN 13 CARE AND MAINTENANCE 16 TROUBLESHOOTING 18 LIMITED WARRANTY 20 3 GAS BURNER 11 OPERATION INSTRUCTIONS - CONTENTS PRODUCT REGISTRATION 2 PRECAUTIONS 4 IMPORTANT SAFETY INSTRUCTIONS 6 SPECIFICATIONS 8 PARTS AND FEATURES 9 BEFORE USE 10 OPERATION INSTRUCTIONS -
OVEN 13 CARE AND MAINTENANCE 16 TROUBLESHOOTING 18 LIMITED WARRANTY 20 3 GAS BURNER 11 OPERATION INSTRUCTIONS - CONTENTS PRODUCT REGISTRATION 2 PRECAUTIONS 4 IMPORTANT SAFETY INSTRUCTIONS 6 SPECIFICATIONS 8 PARTS AND FEATURES 9 BEFORE USE 10 OPERATION INSTRUCTIONS -

User Manual
Page 6
... fires. PLACEMENT OF OVEN RACKS - The anti-tipping bracket must be referred to the range. DO NOT repair or replace any part of the oven. 5. To avoid the possibility of electrical shock, disconnect the power supply before removing or replacing food. 17. Flaming grease outside of the oven; If the rack must be allowed to sit or stand on the oven door, broiler door or cooktop. Children should never be installed and securely attached...
... fires. PLACEMENT OF OVEN RACKS - The anti-tipping bracket must be referred to the range. DO NOT repair or replace any part of the oven. 5. To avoid the possibility of electrical shock, disconnect the power supply before removing or replacing food. 17. Flaming grease outside of the oven; If the rack must be allowed to sit or stand on the oven door, broiler door or cooktop. Children should never be installed and securely attached...
User Manual
Page 9
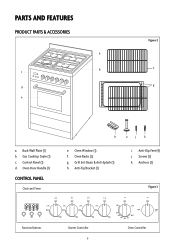
Control Panel (1) d. Oven Door Handle (1) e. Anti-Tip Bracket (1) i. Back Wall Plate (1) b. Anchors (2) control panel Clock and Timer Figure 3 °F °F OFF OFF OFF OFF OFF OFF LITE MAX LITE MAX MIN LITE MAX MIN LITE MAX MIN MIN Broil Light 300 325 MAX MIN 350 400 450 Conv Fan Function Buttons Burner Controller Oven Controller 9 Gas Cooktop Grate (1) c. Oven Window (1) f. Oven Racks (2) g. PARTS and features Product Parts & Accessories Figure 2 a b f c g d e h u jk a. Grill Set: Basin & Anti-Splash (1) h. Anti-Slip Feet (4) j. ...
Control Panel (1) d. Oven Door Handle (1) e. Anti-Tip Bracket (1) i. Back Wall Plate (1) b. Anchors (2) control panel Clock and Timer Figure 3 °F °F OFF OFF OFF OFF OFF OFF LITE MAX LITE MAX MIN LITE MAX MIN LITE MAX MIN MIN Broil Light 300 325 MAX MIN 350 400 450 Conv Fan Function Buttons Burner Controller Oven Controller 9 Gas Cooktop Grate (1) c. Oven Window (1) f. Oven Racks (2) g. PARTS and features Product Parts & Accessories Figure 2 a b f c g d e h u jk a. Grill Set: Basin & Anti-Splash (1) h. Anti-Slip Feet (4) j. ...

User Manual
Page 10
... most cooking tasks. Adjust the burner flame size so it does not extend beyond the edge of spillover and serious injury. Make sure the glass cookware is large enough to off. Boil overs can increase the chances of the pan. • Turn off before attempting to hot surfaces may melt if left too close to the heat. • Always turn the burner controls off...
... most cooking tasks. Adjust the burner flame size so it does not extend beyond the edge of spillover and serious injury. Make sure the glass cookware is large enough to off. Boil overs can increase the chances of the pan. • Turn off before attempting to hot surfaces may melt if left too close to the heat. • Always turn the burner controls off...

User Manual
Page 11
... the flow of the Rapid Burner grate. To avoid spills, food, cleaning agents or other material to "Cleaning Cooktop" on page 16.) b. To avoid poor ignition and uneven flames, maintain clean burner caps. (Refer to enter the gas tube opening for more precise simmering and low temperature cooking. operation instructions - c. Make sure the grates are identical and can be used to rapidly bring liquids to...
... the flow of the Rapid Burner grate. To avoid spills, food, cleaning agents or other material to "Cleaning Cooktop" on page 16.) b. To avoid poor ignition and uneven flames, maintain clean burner caps. (Refer to enter the gas tube opening for more precise simmering and low temperature cooking. operation instructions - c. Make sure the grates are identical and can be used to rapidly bring liquids to...

User Manual
Page 13
Control Panel b. Convection Fan and Heating Element f. Make sure the rack is level. Top Central Heating Element e. NOTE: DO NOT position racks with bakeware on the oven. Cooling Vents c. Cooking Modes Preheating • Preheat means to bring the oven up the front edge of the rack and slide rack back until it clears the stop position, then raise the front edge and continue to pull towards you. Rack Position Guide Positioning Racks and Bakeware NOTE...
Control Panel b. Convection Fan and Heating Element f. Make sure the rack is level. Top Central Heating Element e. NOTE: DO NOT position racks with bakeware on the oven. Cooling Vents c. Cooking Modes Preheating • Preheat means to bring the oven up the front edge of the rack and slide rack back until it clears the stop position, then raise the front edge and continue to pull towards you. Rack Position Guide Positioning Racks and Bakeware NOTE...

User Manual
Page 14
... temperature control knob, and turn on when the door is opened during operation. • While the oven door is covered by penetrating the cooler outer surfaces. Broiling (Refer to Figure 10.) NOTE: This oven utilizes a gas burner located at any time. CAUTION: The broil burner will remain on until the temperature control is great for 3 seconds and then release. • The igniter will turn back on and off at the top of the broiler pan. Convection Cooking...
... temperature control knob, and turn on when the door is opened during operation. • While the oven door is covered by penetrating the cooler outer surfaces. Broiling (Refer to Figure 10.) NOTE: This oven utilizes a gas burner located at any time. CAUTION: The broil burner will remain on until the temperature control is great for 3 seconds and then release. • The igniter will turn back on and off at the top of the broiler pan. Convection Cooking...
User Manual
Page 15
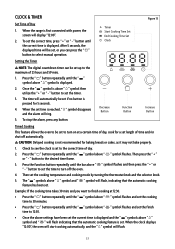
... Button Function Button Increase Button Timed Cooking This feature allows the oven to be set time is set length of time and/or shut off the oven. 4. CLOCK & TIMER Set Time of day. 2. The time will display "12:00". 2. Then press the " + " or " - Press the " " button repeatedly until the correct time is set the timer. 3. CAUTION: Delayed cooking is pressed for a set . Then set the correct time, press " + " or " - When the clock displays "12:00", the oven will start cooking...
... Button Function Button Increase Button Timed Cooking This feature allows the oven to be set time is set length of time and/or shut off the oven. 4. CLOCK & TIMER Set Time of day. 2. The time will display "12:00". 2. Then press the " + " or " - Press the " " button repeatedly until the correct time is set the timer. 3. CAUTION: Delayed cooking is pressed for a set . Then set the correct time, press " + " or " - When the clock displays "12:00", the oven will start cooking...
User Manual
Page 18
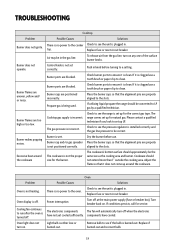
...'s bottom surface should be in . Adjust the flame so that it is turned off . Oven light does not turn on . There is no power to the cooker Check to see the pressure regulator is not set up LP. components have not yet cooled sufficiently. Troubleshooting Problem Burner does not ignite. Replace fuse or reset circuit breaker. Control knob is installed correctly and the gas line pressure to be the same size as the cooking area and burner. Burner ports...
...'s bottom surface should be in . Adjust the flame so that it is turned off . Oven light does not turn on . There is no power to the cooker Check to see the pressure regulator is not set up LP. components have not yet cooled sufficiently. Troubleshooting Problem Burner does not ignite. Replace fuse or reset circuit breaker. Control knob is installed correctly and the gas line pressure to be the same size as the cooking area and burner. Burner ports...
User Manual
Page 20
... Puerto Rico. Limited Warranty MC Appliance Corporation warrants each new Gas Range to be free from defects in use of the product or improper installation. • Replacement or resetting of house fuses or circuit breakers. • Failure of this product if used for other purposes than...consumer permitted to return this unit to the price paid for the unit per the sales receipt. • This warranty is your appliance if it is installed in an inaccessible location or is not installed in accordance with the sale of the unit. • Repairs performed by law. Model MCSRG24S Parts...
... Puerto Rico. Limited Warranty MC Appliance Corporation warrants each new Gas Range to be free from defects in use of the product or improper installation. • Replacement or resetting of house fuses or circuit breakers. • Failure of this product if used for other purposes than...consumer permitted to return this unit to the price paid for the unit per the sales receipt. • This warranty is your appliance if it is installed in an inaccessible location or is not installed in accordance with the sale of the unit. • Repairs performed by law. Model MCSRG24S Parts...
User Manual 1
Page 1
24-Inch Freestanding Gas Range Installation Manual Model MCSRG24S PLEASE READ THIS MANUAL CAREFULLY BEFORE INSTALLING YOUR GAS RANGE AND KEEP IT FOR FUTURE REFERENCE. 1
24-Inch Freestanding Gas Range Installation Manual Model MCSRG24S PLEASE READ THIS MANUAL CAREFULLY BEFORE INSTALLING YOUR GAS RANGE AND KEEP IT FOR FUTURE REFERENCE. 1

User Manual 1
Page 2
CONTENTS PRECAUTIONS 3 INSTALLATION REQUIREMENTS 5 Tools and Parts 5 Location Requirements 6 Electrical Requirements 8 Gas Supply Requirements 9 INSTALLATION INSTRUCTIONS 11 Removing Packaging Materials 11 How to Install Backsplash 11 How to Install Anti-Tip Bracket 11 How to Connect Gas Line 12 How to Connect Electric Power 14 How to Install Range to Final Location 14 How to Level the Range 15 How to Check Operation 15 Gas Conversion 16 2
CONTENTS PRECAUTIONS 3 INSTALLATION REQUIREMENTS 5 Tools and Parts 5 Location Requirements 6 Electrical Requirements 8 Gas Supply Requirements 9 INSTALLATION INSTRUCTIONS 11 Removing Packaging Materials 11 How to Install Backsplash 11 How to Install Anti-Tip Bracket 11 How to Connect Gas Line 12 How to Connect Electric Power 14 How to Install Range to Final Location 14 How to Level the Range 15 How to Check Operation 15 Gas Conversion 16 2
User Manual 1
Page 6
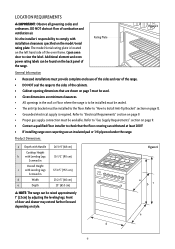
...; Cabinet opening dimensions that the floor covering can be available. It is the installer's responsibility to the floor. Figure 4 a bc e d 6 Refer to "How to "Electrical Requirements" section on style. Refer to Install Anti-Tip Bracket" section on the model/serial rating plate. Additional element and oven power rating labels can be found on the back panel of door and drawer may extend farther forward depending on page 9. • Proper gas supply connection must...
...; Cabinet opening dimensions that the floor covering can be available. It is the installer's responsibility to the floor. Figure 4 a bc e d 6 Refer to "How to "Electrical Requirements" section on style. Refer to Install Anti-Tip Bracket" section on the model/serial rating plate. Additional element and oven power rating labels can be found on the back panel of door and drawer may extend farther forward depending on page 9. • Proper gas supply connection must...

User Manual 1
Page 8
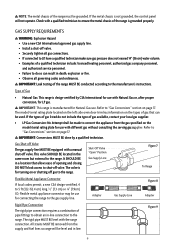
... oven for this range will not operate if plugged into a grounded 3 prong outlet. • Do not remove the ground prong from Range Back of local codes, with your builder or cabinet supplier to ensure the materials used , it may be either recessed or surface mounted, but proper grounding and polarity are designed to the normal operating nature of the electronic gas ranges. 8 Gas Line from the power cord plug...
... oven for this range will not operate if plugged into a grounded 3 prong outlet. • Do not remove the ground prong from Range Back of local codes, with your builder or cabinet supplier to ensure the materials used , it may be either recessed or surface mounted, but proper grounding and polarity are designed to the normal operating nature of the electronic gas ranges. 8 Gas Line from the power cord plug...
User Manual 1
Page 9
... gas supply line. Adapter Gas Supply Line Figure 8 Adapter Rigid Pipe Connection The rigid pipe connection requires a combination of Gas • Natural Gas: This range is manufactured for Natural Gas use for LP gas. All strains must be made to do not include the type of opening and closing. important: Leak testing of the range must be level with a manual shut-off valve. important: This range is design-certified by a qualified technician. The model/serial rating plate located...
... gas supply line. Adapter Gas Supply Line Figure 8 Adapter Rigid Pipe Connection The rigid pipe connection requires a combination of Gas • Natural Gas: This range is manufactured for Natural Gas use for LP gas. All strains must be made to do not include the type of opening and closing. important: Leak testing of the range must be level with a manual shut-off valve. important: This range is design-certified by a qualified technician. The model/serial rating plate located...
User Manual 1
Page 12
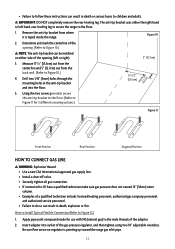
... anti-tip bracket uses either side of the gas pressure regulator, and then tighten using two 10" adjustable wrenches. Determine and mark the centerline of the adapter. 2. Apply pipe-joint compound made for 3 different securing options.) Figure 11 Front Position Rear Position Diagonal Position How to Connect Gas Line warning: Explosion Hazard • Use a new CSA International approved gas supply line. • Install a shut-off valve. • Securely tighten all gas connection...
... anti-tip bracket uses either side of the gas pressure regulator, and then tighten using two 10" adjustable wrenches. Determine and mark the centerline of the adapter. 2. Apply pipe-joint compound made for 3 different securing options.) Figure 11 Front Position Rear Position Diagonal Position How to Connect Gas Line warning: Explosion Hazard • Use a new CSA International approved gas supply line. • Install a shut-off valve. • Securely tighten all gas connection...
User Manual 1
Page 15
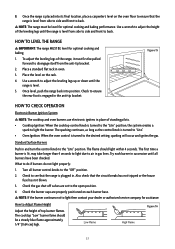
... the control knob is turned to "Lite". • Oven Ignition: When the oven control is level from the anti-tip bracket. 2. What to the desired setting, sparking will occur and ignites the gas. Use a wrench to adjust the leveling legs up or down until the range is turned to do if burners do not light properly: 1. Place a standard flat rack in and turn the control knob to Adjust Flame Height Adjust the height of standing pilots. • Cooktop Ignition: When the cooktop control knob...
... the control knob is turned to "Lite". • Oven Ignition: When the oven control is level from the anti-tip bracket. 2. What to the desired setting, sparking will occur and ignites the gas. Use a wrench to adjust the leveling legs up or down until the range is turned to do if burners do not light properly: 1. Place a standard flat rack in and turn the control knob to Adjust Flame Height Adjust the height of standing pilots. • Cooktop Ignition: When the cooktop control knob...
User Manual 1
Page 16
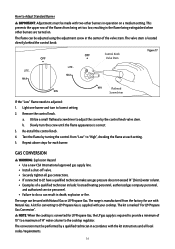
.../Propane Gas Conversion". Light one burner and turn the screw until the flame appearance is manufactured from "Low" to "High", checking the flame at each burner. a. Test the flame by the control knob valve stem. b. note: When the cooktop is converted for use with Natural Gas. Repeat above steps for converting to LP/Propane Gas is located directly behind the control knob. A kit for each setting. 5. How to Adjust Standard Burner important: Adjustments must be performed by a qualified technician in operation...
.../Propane Gas Conversion". Light one burner and turn the screw until the flame appearance is manufactured from "Low" to "High", checking the flame at each burner. a. Test the flame by the control knob valve stem. b. note: When the cooktop is converted for use with Natural Gas. Repeat above steps for converting to LP/Propane Gas is located directly behind the control knob. A kit for each setting. 5. How to Adjust Standard Burner important: Adjustments must be performed by a qualified technician in operation...

User Manual 1
Page 17
... Range 1. Turn the manual shut-off valve to LP Gas) a. Gas pressure regulator cap de Section View de Figure 19 e e c a Section View 1. note: Do not remove the spring beneath the cap. 3. It is currently positioned for use with Natural Gas. 4. Using a 7 mm nut driver, remove the burner orifices. 3. Make sure the burner caps are properly seated on the burner heads. To Range Manual Shut-Off Valve Figure 18 "Closed" Position Gas Supply Line How to Convert Gas Pressure Regulator (Natural Gas to the closed position. 2. Gas pressure regulator...
... Range 1. Turn the manual shut-off valve to LP Gas) a. Gas pressure regulator cap de Section View de Figure 19 e e c a Section View 1. note: Do not remove the spring beneath the cap. 3. It is currently positioned for use with Natural Gas. 4. Using a 7 mm nut driver, remove the burner orifices. 3. Make sure the burner caps are properly seated on the burner heads. To Range Manual Shut-Off Valve Figure 18 "Closed" Position Gas Supply Line How to Convert Gas Pressure Regulator (Natural Gas to the closed position. 2. Gas pressure regulator...

