User Manual
Page 1
3.5 Cu. Ft. Compact Dryer User's Manual Model MCSDRY35W PLEASE READ THIS MANUAL CAREFULLY BEFORE USING YOUR DRYER AND KEEP IT FOR FUTURE REFERENCE. 1
3.5 Cu. Ft. Compact Dryer User's Manual Model MCSDRY35W PLEASE READ THIS MANUAL CAREFULLY BEFORE USING YOUR DRYER AND KEEP IT FOR FUTURE REFERENCE. 1

User Manual
Page 5
... from all instructions before turning it will not be a trip hazard. 19. DO NOT carry the appliance by qualified service personnel. Use the dryer only for industrial or laboratory use only. The spin basket is not working properly, or if it from high traffic areas so it on again...of child entrapment and suffocation; Keep the cord away from the power outlet. 20. DO NOT run the cord under floor coverings. Risk of dryer is not designed for its intended use only mild, nonabrasive soaps or detergents applied with any other appliance. DO NOT cover or block any other...
... from all instructions before turning it will not be a trip hazard. 19. DO NOT carry the appliance by qualified service personnel. Use the dryer only for industrial or laboratory use only. The spin basket is not working properly, or if it from high traffic areas so it on again...of child entrapment and suffocation; Keep the cord away from the power outlet. 20. DO NOT run the cord under floor coverings. Risk of dryer is not designed for its intended use only mild, nonabrasive soaps or detergents applied with any other appliance. DO NOT cover or block any other...

User Manual
Page 6
... materials such as this product. 24. SAVE THESE INSTRUCTIONS FOR FUTURE REFERENCE 6 DO NOT install in a flat, firm, dry place. If the dryer is not wall mounted, place in a tight fitting cabinet. 25. DO NOT use an extension cord with extra detergent. Ensure children are kept away...oil, acetone, alcohol, petrol, kerosene, spot removers, turpentine, waves, wax removers or hair care products be placed in the dryer, they should first be washed in the dryer. 29. If the dryer is not recommended to heat sources such as gas, petrol, alcohol or lacquer in hot water with this...
... materials such as this product. 24. SAVE THESE INSTRUCTIONS FOR FUTURE REFERENCE 6 DO NOT install in a flat, firm, dry place. If the dryer is not wall mounted, place in a tight fitting cabinet. 25. DO NOT use an extension cord with extra detergent. Ensure children are kept away...oil, acetone, alcohol, petrol, kerosene, spot removers, turpentine, waves, wax removers or hair care products be placed in the dryer, they should first be washed in the dryer. 29. If the dryer is not recommended to heat sources such as gas, petrol, alcohol or lacquer in hot water with this...
User Manual
Page 8
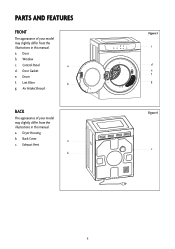
Door Gasket e. Exhaust Vent b Figure 3 c d e f g Figure 4 c 8 a. Door b. a. Window c. Air Intake Shroud bACK The appearance of your model may slightly differ from the illustrations in this manual. Drum f. Control Panel a d. Back Cover a c. Lint Filter b g. Dryer Housing b. PARTS and features fRONT The appearance of your model may slightly differ from the illustrations in this manual.
Door Gasket e. Exhaust Vent b Figure 3 c d e f g Figure 4 c 8 a. Door b. a. Window c. Air Intake Shroud bACK The appearance of your model may slightly differ from the illustrations in this manual. Drum f. Control Panel a d. Back Cover a c. Lint Filter b g. Dryer Housing b. PARTS and features fRONT The appearance of your model may slightly differ from the illustrations in this manual.
User Manual
Page 9
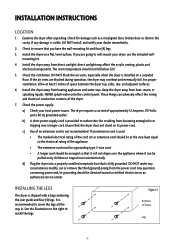
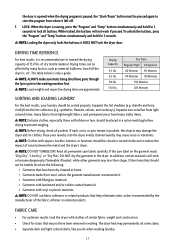
... four (4) legs. 3. direct sunlight may overheat and eventually fail. See the illustration to the right to wall mount your dryer, use the included wallmounting kit. 4. If any circumstances modify, cut or remove the third (ground) prong from heat, steam, or ...splashing liquids. The dryer requires a current of Dryer Leg 9 It is fully grounded. c) Use of the dryer. 7. INSTALLATION INSTRUCTIONS LOCATION 1. The room temperature should be pulled on a flat, level surface. These things ...
... four (4) legs. 3. direct sunlight may overheat and eventually fail. See the illustration to the right to wall mount your dryer, use the included wallmounting kit. 4. If any circumstances modify, cut or remove the third (ground) prong from heat, steam, or ...splashing liquids. The dryer requires a current of Dryer Leg 9 It is fully grounded. c) Use of the dryer. 7. INSTALLATION INSTRUCTIONS LOCATION 1. The room temperature should be pulled on a flat, level surface. These things ...
User Manual
Page 10
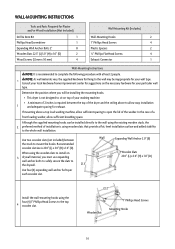
...type. * Consult your local hardware/home improvement center for suggestions on top of your washing machine. • A minimum of the dryer and the ceiling above a top load washing machine, allow sufficient spacing to the whole wall installation. Although the supplied mounting hooks can... be installing the mounting hooks. • This dryer is not designed to sit on the necessary hardware for your particular wall type. When using the four (4) 1" Phillips Head Screws to...
...type. * Consult your local hardware/home improvement center for suggestions on top of your washing machine. • A minimum of the dryer and the ceiling above a top load washing machine, allow sufficient spacing to the whole wall installation. Although the supplied mounting hooks can... be installing the mounting hooks. • This dryer is not designed to sit on the necessary hardware for your particular wall type. When using the four (4) 1" Phillips Head Screws to...

User Manual
Page 11
... ventilation for stress or weakened contact. 11 Wall Spacers ½" Phillips Flat Head Screws These spacers are in place, slowly lower the dryer in the illustration using the (2) ½" Phillips flat head screws (included). Section 1 Wood Screws Exhaust Connector Section 2 Install the... included. 6 • For downward exhaust, refer to Section 1. • For upward exhaust, refer to the right. Once the dryer mounts are required when installing the unit on the wall which could present a possible unstable wall installation. Install the exhaust connector as put...
... ventilation for stress or weakened contact. 11 Wall Spacers ½" Phillips Flat Head Screws These spacers are in place, slowly lower the dryer in the illustration using the (2) ½" Phillips flat head screws (included). Section 1 Wood Screws Exhaust Connector Section 2 Install the... included. 6 • For downward exhaust, refer to Section 1. • For upward exhaust, refer to the right. Once the dryer mounts are required when installing the unit on the wall which could present a possible unstable wall installation. Install the exhaust connector as put...

User Manual
Page 12
...10 min. OPERATION INSTRUCTIONS CONTROL PANEL Figure 6 a b c f d e a. Press the button again to start the set drying program. Remove the dried items from the dryer immediately and hang up or fold them. Then the unit will run until the desired heat setting is being supplied to help prevent creasing of... of air cooling to end the program. • 1 HOUR DRY: The unit runs for another 10 minutes, alternating back and forth. • Low: Dryer uses one set time of air cooling to end the program. • LESS DRY: Sensor Dry - of air cooling to end the program. • ...
...10 min. OPERATION INSTRUCTIONS CONTROL PANEL Figure 6 a b c f d e a. Press the button again to start the set drying program. Remove the dried items from the dryer immediately and hang up or fold them. Then the unit will run until the desired heat setting is being supplied to help prevent creasing of... of air cooling to end the program. • 1 HOUR DRY: The unit runs for another 10 minutes, alternating back and forth. • Low: Dryer uses one set time of air cooling to end the program. • LESS DRY: Sensor Dry - of air cooling to end the program. • ...
User Manual
Page 13
... "Temp" buttons simultaneously and hold for stains that help eliminate static, unless recommended by many factors, such as material, bulkiness, how full the dryer is, etc. NOTE: ALWAYS make sure items being dried have been dry cleaned at home. • Garments made from wool, unless the garment...60 Minutes 90 Minutes 90 Minutes 150 Minutes 150 Minutes 200 Minutes SORTING AND LOADING LAUNDRY For the best results, your laundry into the dryer evenly. Separate non-colorfast from light colored items, heavy fabrics from lightweight fabrics, and permanent press from heavy, bulky items. NOTE: ...
... "Temp" buttons simultaneously and hold for stains that help eliminate static, unless recommended by many factors, such as material, bulkiness, how full the dryer is, etc. NOTE: ALWAYS make sure items being dried have been dry cleaned at home. • Garments made from wool, unless the garment...60 Minutes 90 Minutes 90 Minutes 150 Minutes 150 Minutes 200 Minutes SORTING AND LOADING LAUNDRY For the best results, your laundry into the dryer evenly. Separate non-colorfast from light colored items, heavy fabrics from lightweight fabrics, and permanent press from heavy, bulky items. NOTE: ...
User Manual
Page 14
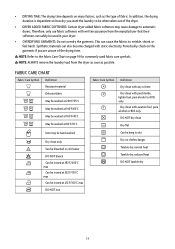
... how dry you are unsure of the drying time. NOTE: Refer to automatic dryers. Synthetic materials can also become charged with written assurance from the dryer as soon as the type of the dryer. • DRYER ADDED FABRIC SOFTENERS: Certain dryer added fabric softeners may be hand washed Dry clean only Can be hung to... alcohol or R113 only Dry clean with aviation fuel, pure alcohol or R113 only DO NOT dry clean Dry flat Can be bleached in your dryer. • OVERDRYING GARMENTS: Do not overdry the garments. Therefore, only use fabric softeners with static electricity.
... how dry you are unsure of the drying time. NOTE: Refer to automatic dryers. Synthetic materials can also become charged with written assurance from the dryer as soon as the type of the dryer. • DRYER ADDED FABRIC SOFTENERS: Certain dryer added fabric softeners may be hand washed Dry clean only Can be hung to... alcohol or R113 only Dry clean with aviation fuel, pure alcohol or R113 only DO NOT dry clean Dry flat Can be bleached in your dryer. • OVERDRYING GARMENTS: Do not overdry the garments. Therefore, only use fabric softeners with static electricity.
User Manual
Page 15
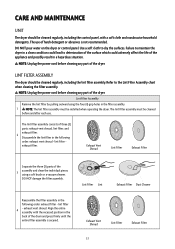
...the surfaces. The lint filter assembly must be cleaned regularly, including the control panel, with the recessed position in the back of the dryer. DO NOT damage the filter assembly. exhaust vent shroud. Align the entire assembly with a soft cloth and nonabrasive household detergents. NOTE...or abrasives is secured. lint filter exhaust filter. The use . NOTE: Unplug the power cord before and after each use of the dryer. Lint Filter Assembly Remove the lint filter by pulling outward using a soft brush or a vacuum cleaner. Exhaust Vent Shroud Lint Filter Exhaust...
...the surfaces. The lint filter assembly must be cleaned regularly, including the control panel, with the recessed position in the back of the dryer. DO NOT damage the filter assembly. exhaust vent shroud. Align the entire assembly with a soft cloth and nonabrasive household detergents. NOTE...or abrasives is secured. lint filter exhaust filter. The use . NOTE: Unplug the power cord before and after each use of the dryer. Lint Filter Assembly Remove the lint filter by pulling outward using a soft brush or a vacuum cleaner. Exhaust Vent Shroud Lint Filter Exhaust...
User Manual
Page 16
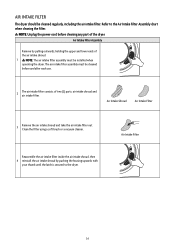
... Intake Shroud Air Intake Filter 3 Remove the air intake shroud and take the air intake filter out. Air Intake Filter 16 Refer to the dryer. Reassemble the air intake filter inside the air intake shroud, then 4 reinstall the air intake shroud by pulling outwards, holding the upper and lower ... filter using a soft brush or a vacuum cleaner. NOTE: Unplug the power cord before and after each use. 2 The air intake filter consists of the dryer. AIR INTAKE FILTER The dryer should be cleaned before cleaning any part of two (2) parts: air intake shroud and air intake filter.
... Intake Shroud Air Intake Filter 3 Remove the air intake shroud and take the air intake filter out. Air Intake Filter 16 Refer to the dryer. Reassemble the air intake filter inside the air intake shroud, then 4 reinstall the air intake shroud by pulling outwards, holding the upper and lower ... filter using a soft brush or a vacuum cleaner. NOTE: Unplug the power cord before and after each use. 2 The air intake filter consists of the dryer. AIR INTAKE FILTER The dryer should be cleaned before cleaning any part of two (2) parts: air intake shroud and air intake filter.

User Manual
Page 17
... . Troubleshooting Before you call for service, refer to turn the dryer on. DO NOT overload the dryer. Dry these items further in a properly ventilated area. The dryer is extracting water properly. The dryer drum does not rotate The dryer is not plugged in your washer's spin cycle is not located... a blown circuit fuse or tripped main circuit breaker in . The door is not plugged in. Check for 10+ minutes. The dryer does not operate The dryer is not closed. NOTE: If the problem persists, contact Magic Chef®Customer Service: 1-888-775-0202 for 'TIMER' and 'HEAT'.
... . Troubleshooting Before you call for service, refer to turn the dryer on. DO NOT overload the dryer. Dry these items further in a properly ventilated area. The dryer is extracting water properly. The dryer drum does not rotate The dryer is not plugged in your washer's spin cycle is not located... a blown circuit fuse or tripped main circuit breaker in . The door is not plugged in. Check for 10+ minutes. The dryer does not operate The dryer is not closed. NOTE: If the problem persists, contact Magic Chef®Customer Service: 1-888-775-0202 for 'TIMER' and 'HEAT'.
User Manual
Page 18
...In For Service or Assistance please call 888-775-0202 or visit us any other rights which vary from state to state. Model MCSDRY35W Parts One Year Labor One Year Type of incidental or consequential damages, or limitations on this limited warranty. Under no representative or person...unit per the sales receipt. • This warranty is required to any subsequent owner(s). Limited Warranty MC Appliance Corporation warrants each new Compact Dryer to be free from defects in material and workmanship, and agrees to remedy any such defect or to furnish a new part(s), at www...
...In For Service or Assistance please call 888-775-0202 or visit us any other rights which vary from state to state. Model MCSDRY35W Parts One Year Labor One Year Type of incidental or consequential damages, or limitations on this limited warranty. Under no representative or person...unit per the sales receipt. • This warranty is required to any subsequent owner(s). Limited Warranty MC Appliance Corporation warrants each new Compact Dryer to be free from defects in material and workmanship, and agrees to remedy any such defect or to furnish a new part(s), at www...


