
Owner's Manual
Page 1
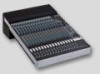
16-Channel Premium Analog Mixer with FireWire OWNER'S MANUAL ALTERNATE FIREWIRE ASSIGNMENTS 1 2 3 4 LINE FW 1 LINE FW 2 LINE FW 3 LINE FW 4 48V 48V 48V 48V 1 5 LINE FW 5 48V SUBGROUPS 2 6 LINE FW 6 48V 3 7 LINE FW 7 48V 4 8 ...
16-Channel Premium Analog Mixer with FireWire OWNER'S MANUAL ALTERNATE FIREWIRE ASSIGNMENTS 1 2 3 4 LINE FW 1 LINE FW 2 LINE FW 3 LINE FW 4 48V 48V 48V 48V 1 5 LINE FW 5 48V SUBGROUPS 2 6 LINE FW 6 48V 3 7 LINE FW 7 48V 4 8 ...

Owner's Manual
Page 3
...channel OL LED turning on . XLR (3-pin) connectors. You can be used to the "U" mark. 2. All Rights Reserved. A mixer manual to write, a mixer manual to get the best mix. Set the levels It's not even necessary to 5 for the channel EQ and pan controls, which the technical..., unlimited gas, and closed roads. Adjust the channel levels to write! The dream suddenly ends and reality kicks in drivers, so no software 5. Owner's Manual 3 Setup 2. Connect the main outputs of the mixer (either XLR or TRS 1/4") to minimum, except for the remaining channels. 7. Use the...
...channel OL LED turning on . XLR (3-pin) connectors. You can be used to the "U" mark. 2. All Rights Reserved. A mixer manual to write, a mixer manual to get the best mix. Set the levels It's not even necessary to 5 for the channel EQ and pan controls, which the technical..., unlimited gas, and closed roads. Adjust the channel levels to write! The dream suddenly ends and reality kicks in drivers, so no software 5. Owner's Manual 3 Setup 2. Connect the main outputs of the mixer (either XLR or TRS 1/4") to minimum, except for the remaining channels. 7. Use the...

Owner's Manual
Page 5
...your new mixer? • Visit www.mackie.com and click Support to find: FAQs, manuals, addendums, and other useful information. • Email us at: techmail@mackie.com. • Telephone 1-800-898-3211 to speak with your mixer. Appendix D: Rotopod instructions. Owner's Manual 5 Go ahead and skip these sections...for fun times with one of our splendid technical support chaps (Monday through Friday, normal business hours, PST). How To Use This Manual The first pages after the table of contents are divided into sections, just as your mixer is organized into distinct zones:...
...your new mixer? • Visit www.mackie.com and click Support to find: FAQs, manuals, addendums, and other useful information. • Email us at: techmail@mackie.com. • Telephone 1-800-898-3211 to speak with your mixer. Appendix D: Rotopod instructions. Owner's Manual 5 Go ahead and skip these sections...for fun times with one of our splendid technical support chaps (Monday through Friday, normal business hours, PST). How To Use This Manual The first pages after the table of contents are divided into sections, just as your mixer is organized into distinct zones:...

Owner's Manual
Page 7
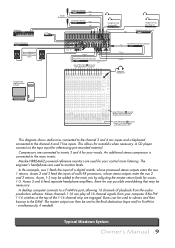
... the control room and phones, or any available channels. Typical Live Sound System Owner's Manual 7 Vocal compressors are then returned for playback on your keyboard player. All inputs...ONYX MIC PRE LINE BAL/UNBAL ONYX MIC PRE LINE BAL/UNBAL ONYX MIC PRE LINE BAL/UNBAL ONYX MIC PRE LINE BAL/UNBAL ONYX MIC PRE LINE BAL/UNBAL ONYX MIC PRE LINE BAL/UNBAL ONYX MIC PRE LINE BAL/UNBAL ONYX MIC PRE LINE BAL/UNBAL ONYX... FW button ( ) to send main mix to computer via FireWire channels 15 and 16 Mackie SRM450v2 Powered Speakers (Stage Monitors) Aux Send 1 Reverb (Aux Send 3) Delay (Aux ...
... the control room and phones, or any available channels. Typical Live Sound System Owner's Manual 7 Vocal compressors are then returned for playback on your keyboard player. All inputs...ONYX MIC PRE LINE BAL/UNBAL ONYX MIC PRE LINE BAL/UNBAL ONYX MIC PRE LINE BAL/UNBAL ONYX MIC PRE LINE BAL/UNBAL ONYX MIC PRE LINE BAL/UNBAL ONYX MIC PRE LINE BAL/UNBAL ONYX MIC PRE LINE BAL/UNBAL ONYX MIC PRE LINE BAL/UNBAL ONYX... FW button ( ) to send main mix to computer via FireWire channels 15 and 16 Mackie SRM450v2 Powered Speakers (Stage Monitors) Aux Send 1 Reverb (Aux Send 3) Delay (Aux ...
Owner's Manual
Page 9
... System Owner's Manual 9 An additional stereo compressor is connected to the DAW. Buses can then be necessary. Compressors are engaged. Auxes 1-3 may be sent to a FireWire port, allowing 16 channels of a digital reverb, whose stereo outputs enter the aux 2 and 3 returns. Keyboard Stereo Compressor Mackie HR824mk2 Powered...BAL/UNBAL ONYX MIC PRE LINE BAL/UNBAL ONYX MIC PRE LINE BAL/UNBAL ONYX MIC PRE LINE BAL/UNBAL ONYX MIC PRE LINE BAL/UNBAL ONYX MIC PRE LINE BAL/UNBAL ONYX MIC PRE LINE BAL/UNBAL ONYX MIC PRE LINE BAL/UNBAL ONYX MIC PRE LINE BAL/UNBAL ONYX MIC PRE...
... System Owner's Manual 9 An additional stereo compressor is connected to the DAW. Buses can then be necessary. Compressors are engaged. Auxes 1-3 may be sent to a FireWire port, allowing 16 channels of a digital reverb, whose stereo outputs enter the aux 2 and 3 returns. Keyboard Stereo Compressor Mackie HR824mk2 Powered...BAL/UNBAL ONYX MIC PRE LINE BAL/UNBAL ONYX MIC PRE LINE BAL/UNBAL ONYX MIC PRE LINE BAL/UNBAL ONYX MIC PRE LINE BAL/UNBAL ONYX MIC PRE LINE BAL/UNBAL ONYX MIC PRE LINE BAL/UNBAL ONYX MIC PRE LINE BAL/UNBAL ONYX MIC PRE LINE BAL/UNBAL ONYX MIC PRE...
Owner's Manual
Page 11
...a standard insert cable that must be selected using that accepts a balanced microphone input from almost any standalone mic preamp on the market today. Owner's Manual 11 INSERT These unbalanced 1/4" jacks are passed through these inputs, use with the mic preamps, and can plug in . "ring" RETURN ...jacks can also accept instrumentlevel signals if the hi-z switches [25] are wired as channel direct outputs; 4. The microphone preamps feature our Onyx design, with phantom power on . The XLR inputs are pressed in almost any kind of circuit is on , unless you can toss at...
...a standard insert cable that must be selected using that accepts a balanced microphone input from almost any standalone mic preamp on the market today. Owner's Manual 11 INSERT These unbalanced 1/4" jacks are passed through these inputs, use with the mic preamps, and can plug in . "ring" RETURN ...jacks can also accept instrumentlevel signals if the hi-z switches [25] are wired as channel direct outputs; 4. The microphone preamps feature our Onyx design, with phantom power on . The XLR inputs are pressed in almost any kind of circuit is on , unless you can toss at...
Owner's Manual
Page 13
The source that can either be pre or post fader, depending on the previous generation Onyx 1640 and other legendary Mackie products). Control-room out is after the input gain control [26] and Low-Cut switch [23], but it might stop in power amplifiers. ... mix, whatever is playing in a complex installation. 18. This way you may EQ a channel, connect a compressor or other , so you to six separate aux mixes. Owner's Manual 13 The headphones and meters play the same program as the control room/phones source • Tape outputs, if tape is selected • Sub outputs...
The source that can either be pre or post fader, depending on the previous generation Onyx 1640 and other legendary Mackie products). Control-room out is after the input gain control [26] and Low-Cut switch [23], but it might stop in power amplifiers. ... mix, whatever is playing in a complex installation. 18. This way you may EQ a channel, connect a compressor or other , so you to six separate aux mixes. Owner's Manual 13 The headphones and meters play the same program as the control room/phones source • Tape outputs, if tape is selected • Sub outputs...
Owner's Manual
Page 15
... you 'll get mix mush. Shelving means that certain frequencies form a "hill" around the center frequency. This is 20 dB of attenuation fully down low. Owner's Manual 15 Through the 1⁄4" line input of all frequencies past the specified frequency. This switch lets you may be adjusted to post. drums...
... you 'll get mix mush. Shelving means that certain frequencies form a "hill" around the center frequency. This is 20 dB of attenuation fully down low. Owner's Manual 15 Through the 1⁄4" line input of all frequencies past the specified frequency. This switch lets you may be adjusted to post. drums...
Owner's Manual
Page 17
..., simply engage the main mix switch on regularly, check that the gain control [26] is set with the channel level, keeping them ," adjust these carefully. Owner's Manual 17 Aux Sends 1-6 [19] are line-level outputs, and are used if you want to connect external processors, powered stage monitors, or external power amps...
..., simply engage the main mix switch on regularly, check that the gain control [26] is set with the channel level, keeping them ," adjust these carefully. Owner's Manual 17 Aux Sends 1-6 [19] are line-level outputs, and are used if you want to connect external processors, powered stage monitors, or external power amps...

Owner's Manual
Page 19
Then turn it up . 44. With the Onyx 1640i, the engineer has several choices of what if the engineer needs to hear something other than the main mix in the control room or headphones? ... down the phones level first, as you will only hear the soloed channel(s) in the control room or headphones, or see its center pin. Owner's Manual 19 LAMP This female BNC connector provides 12 volts DC on its level on which of those tricky parts, so buckle up slowly as soloed...
Then turn it up . 44. With the Onyx 1640i, the engineer has several choices of what if the engineer needs to hear something other than the main mix in the control room or headphones? ... down the phones level first, as you will only hear the soloed channel(s) in the control room or headphones, or see its center pin. Owner's Manual 19 LAMP This female BNC connector provides 12 volts DC on its level on which of those tricky parts, so buckle up slowly as soloed...

Owner's Manual
Page 21
... is typically used to adjust the volume at the right meter [49] (left and right meters when in the tape to maximum gain (max). 54. Owner's Manual 21 It controls the solo signal level for quick spot-checks of , and prior to the main mix bus [73]. If you engage this button...
... is typically used to adjust the volume at the right meter [49] (left and right meters when in the tape to maximum gain (max). 54. Owner's Manual 21 It controls the solo signal level for quick spot-checks of , and prior to the main mix bus [73]. If you engage this button...
Owner's Manual
Page 23
... up , the subs 1-2 / 3-4 button does absolutely nothing. Let us now assume that you can set the overall level of the original drum signals (the "dry"). Owner's Manual 23 Have aux 1 go directly to the aux 5 and 6 sends. These two knobs feed their respectively numbered aux returns level controls, these controls go into...
... up , the subs 1-2 / 3-4 button does absolutely nothing. Let us now assume that you can set the overall level of the original drum signals (the "dry"). Owner's Manual 23 Have aux 1 go directly to the aux 5 and 6 sends. These two knobs feed their respectively numbered aux returns level controls, these controls go into...

Owner's Manual
Page 25
.../or aux 1-6, and make your voice to have set the level, you have both destinations. But if you don't have better results if you . 69. Owner's Manual 25 Slowly turn this to communicate with the musicians through the headphones during a recording session. Start with this to communicate with the talent in mic...
.../or aux 1-6, and make your voice to have set the level, you have both destinations. But if you don't have better results if you . 69. Owner's Manual 25 Slowly turn this to communicate with the musicians through the headphones during a recording session. Start with this to communicate with the talent in mic...
Owner's Manual
Page 27
... mix outputs. Time for a frosty beverage. This is happy. You've just read about all the features of a song if the need ever arises). 74. Owner's Manual 27 Congratulations! If you press the main mix switch [44], you can record the live performance main mix onto your good ear to the levels...
... mix outputs. Time for a frosty beverage. This is happy. You've just read about all the features of a song if the need ever arises). 74. Owner's Manual 27 Congratulations! If you press the main mix switch [44], you can record the live performance main mix onto your good ear to the levels...
Owner's Manual
Page 29
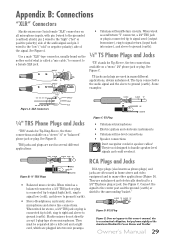
... mono circuits. See Figure C. TRS jacks and plugs are used in this owner's manual, due to a 1⁄4" TS phone plug or jack. See Figure C. TS jacks and plugs are used in many different applications, always unbalanced. Appendix B: Connections "XLR" Connectors Mackie mixers use guitar cords for speaker cables! They're not designed to...
... mono circuits. See Figure C. TRS jacks and plugs are used in this owner's manual, due to a 1⁄4" TS phone plug or jack. See Figure C. TS jacks and plugs are used in many different applications, always unbalanced. Appendix B: Connections "XLR" Connectors Mackie mixers use guitar cords for speaker cables! They're not designed to...

Owner's Manual
Page 31
Appendix C: Technical Information Specifications Noise Characteristics: Equivalent Input Noise (EIN), mic input at insert, 150 Ω source impedance, 20 to 20 kHz: 60 dB (max) gain: 40 dB gain: -129 dBu -128 dBu Output Noise Figure (1/4" Main out, all channels assigned to main, Gain knobs at unity, 20 Hz to 20 kHz): Main Mix knob down, channel Level knobs down: -100 dBu (-104 dB SNR, ref +4dBu) Main Mix knob unity, channel Level knobs down: -93 dBu (-97 dB SNR, ref +4 dBu) Main Mix knob unity, channel Level knobs unity: -91 dBu (-95 dB SNR, ref +4 dBu) FireWire Through (Record...
Appendix C: Technical Information Specifications Noise Characteristics: Equivalent Input Noise (EIN), mic input at insert, 150 Ω source impedance, 20 to 20 kHz: 60 dB (max) gain: 40 dB gain: -129 dBu -128 dBu Output Noise Figure (1/4" Main out, all channels assigned to main, Gain knobs at unity, 20 Hz to 20 kHz): Main Mix knob down, channel Level knobs down: -100 dBu (-104 dB SNR, ref +4dBu) Main Mix knob unity, channel Level knobs down: -93 dBu (-97 dB SNR, ref +4 dBu) Main Mix knob unity, channel Level knobs unity: -91 dBu (-95 dB SNR, ref +4 dBu) FireWire Through (Record...

Owner's Manual
Page 33
Owner's Manual 33 48V Mono Channels Mic Line Mono FW stream from Sub 2 outputs Sub 3-4 SOLO LED Direct outs 3 4 Control Room level solo level C/R L afl L pfl pfl ...
Owner's Manual 33 48V Mono Channels Mic Line Mono FW stream from Sub 2 outputs Sub 3-4 SOLO LED Direct outs 3 4 Control Room level solo level C/R L afl L pfl pfl ...

Owner's Manual
Page 35
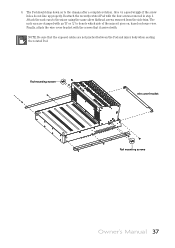
... below, and keep them handy for each side of the mixer attaching the Pod to the mixer. Pod mounting screws Pod mounting screws Owner's Manual 35 There are four screws for the bottom wire cover plate. (Cables not shown for clarity). Turn off the mixer, and disconnect...and all connecting cords. 2. Phillips screwdriver. 2. Pod Relocation Operator's General Journeyman's Certification License (PROGJCL grade III or higher) from a Mackie-accredited Four-Year Pod Relocation Technical Institute. Place the mixer face down on each side. And there are two screws on a soft and dry &#...
... below, and keep them handy for each side of the mixer attaching the Pod to the mixer. Pod mounting screws Pod mounting screws Owner's Manual 35 There are four screws for the bottom wire cover plate. (Cables not shown for clarity). Turn off the mixer, and disconnect...and all connecting cords. 2. Phillips screwdriver. 2. Pod Relocation Operator's General Journeyman's Certification License (PROGJCL grade III or higher) from a Mackie-accredited Four-Year Pod Relocation Technical Institute. Place the mixer face down on each side. And there are two screws on a soft and dry &#...
Owner's Manual
Page 37
... to denote which side of the mixer it arrived with the four screws removed in step 3. Pod mounting screws wire cover bracket Pod mounting screws Owner's Manual 37 The Pod should drop down on house view.
... to denote which side of the mixer it arrived with the four screws removed in step 3. Pod mounting screws wire cover bracket Pod mounting screws Owner's Manual 37 The Pod should drop down on house view.
Owner's Manual
Page 39
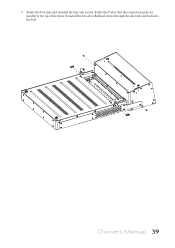
Reinstall the two silver flathead screws through the side trim and back into the Pod. Owner's Manual 39 Rotate the Pod so that the connection jacks are parallel to the top of the mixer. 5. Rotate the Pod arms and reinstall the four arm screws.
Reinstall the two silver flathead screws through the side trim and back into the Pod. Owner's Manual 39 Rotate the Pod so that the connection jacks are parallel to the top of the mixer. 5. Rotate the Pod arms and reinstall the four arm screws.