

Quick Start Guide
Page 3
... to Enable Gaming Mode 14 Smart Priority...15 Interface Overview...15 Add and Edit the SW List 16 How to Use Smart Priority 18 User Scenario...20 How to Use User Scenario 20 How to Use User Scenario with Keyboard FN keys 22 General Settings...23 Game Highlights...24 Interface Overview...25 MSI Companion...26 Control tab...26 Display tab...27 Mystic Light ...28 Function Overview...28 Customizing personal LED Light...
... to Enable Gaming Mode 14 Smart Priority...15 Interface Overview...15 Add and Edit the SW List 16 How to Use Smart Priority 18 User Scenario...20 How to Use User Scenario 20 How to Use User Scenario with Keyboard FN keys 22 General Settings...23 Game Highlights...24 Interface Overview...25 MSI Companion...26 Control tab...26 Display tab...27 Mystic Light ...28 Function Overview...28 Customizing personal LED Light...

Quick Start Guide
Page 4
... use iOS Screen Mirroring 47 System Diagnosis...48 Battery Master...48 Battery Calibration...49 System Diagnosis...52 Performance Analysis...54 Hardware Diagnosis...56 Gaming Gear...59 Hardware Monitoring 60 Support...61 Live Update...61 Live Update...61 Microsoft APP...62 System Info...63 Service...65 Trouble Shooting and Knowledge Base 65 MSI Recovery...66 Go to WinPE to Use MSI Recovery 66 Create a MSI Rescue USB disk 67 Create a Customize Image Backup 70 Recovering...
... use iOS Screen Mirroring 47 System Diagnosis...48 Battery Master...48 Battery Calibration...49 System Diagnosis...52 Performance Analysis...54 Hardware Diagnosis...56 Gaming Gear...59 Hardware Monitoring 60 Support...61 Live Update...61 Live Update...61 Microsoft APP...62 System Info...63 Service...65 Trouble Shooting and Knowledge Base 65 MSI Recovery...66 Go to WinPE to Use MSI Recovery 66 Create a MSI Rescue USB disk 67 Create a Customize Image Backup 70 Recovering...
Quick Start Guide
Page 6
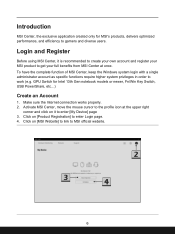
Make sure the Internet connection works properly. 2. Introduction MSI Center, the exclusive application created only for Intel 13th Gen notebook models or newer, Fn/Win Key Switch, USB PowerShare, etc...) Create an Account 1. GPU Switch for MSI's products, delivers optimized performance, and efficiency to MSI official website. 6 Click on [MSI Website] to link to gamers and diverse users. Activate MSI Center, move the mouse cursor to enter Login page. 4. Click on...
Make sure the Internet connection works properly. 2. Introduction MSI Center, the exclusive application created only for Intel 13th Gen notebook models or newer, Fn/Win Key Switch, USB PowerShare, etc...) Create an Account 1. GPU Switch for MSI's products, delivers optimized performance, and efficiency to MSI official website. 6 Click on [MSI Website] to link to gamers and diverse users. Activate MSI Center, move the mouse cursor to enter Login page. 4. Click on...

Quick Start Guide
Page 10
Choose Your Features Within the latest MSI Center, you ! 1. Simply install or update your personal needs. 10 In Feature Sets page, feel free to select, install or uninstall any MSI features listed to choose your own style and features. Move the mouse cursor to you are able to meet your favorite features in Feature Sets page. Experience the convenience that MSI Center brings to the [Feature Sets] icon at the upper right corner and click on it. 2. Feature Sets --
Choose Your Features Within the latest MSI Center, you ! 1. Simply install or update your personal needs. 10 In Feature Sets page, feel free to select, install or uninstall any MSI features listed to choose your own style and features. Move the mouse cursor to you are able to meet your favorite features in Feature Sets page. Experience the convenience that MSI Center brings to the [Feature Sets] icon at the upper right corner and click on it. 2. Feature Sets --

Quick Start Guide
Page 12
... Color: Switch True Color to review or share. *Be noted, for the best game experience. 5. Touchpad disabled: Disable the touchpad for the best visual experience. 3. Game Highlights: Record the best moments in the game for you to Gamer mode for palm resistance. 4. Mystic Light: Show Hotkey Lighting or Game Sense on Per Key RGB Keyboard for each game, the following functions, may or...
... Color: Switch True Color to review or share. *Be noted, for the best game experience. 5. Touchpad disabled: Disable the touchpad for the best visual experience. 3. Game Highlights: Record the best moments in the game for you to Gamer mode for palm resistance. 4. Mystic Light: Show Hotkey Lighting or Game Sense on Per Key RGB Keyboard for each game, the following functions, may or...

Quick Start Guide
Page 18
... click on the icon and hold the mouse button. For those Apps listed in the Priority List. The Apps in SW List are allowed to be allocated automatically. Drag and drop the App back to Use Smart Priority 1. Before using Smart Priority, make sure that the function SWITCH is selected, users are not activated at one time. To drag an App, move...
... click on the icon and hold the mouse button. For those Apps listed in the Priority List. The Apps in SW List are allowed to be allocated automatically. Drag and drop the App back to Use Smart Priority 1. Before using Smart Priority, make sure that the function SWITCH is selected, users are not activated at one time. To drag an App, move...

Quick Start Guide
Page 20
... to Use User Scenario 1. How to MSI Center [Features > User Scenario]. 2. If Extreme Performance is selected, users are available for users to choose in advanced settings. • Balanced: A Balanced mode that brings a balance between performance and battery. • Silent: A Silent mode that lowers the fan noise. • Super Battery: A Super Battery mode that boosts the highest performance for basic needs. 3. Follow the on-screen instructions to setup the Fan...
... to Use User Scenario 1. How to MSI Center [Features > User Scenario]. 2. If Extreme Performance is selected, users are available for users to choose in advanced settings. • Balanced: A Balanced mode that brings a balance between performance and battery. • Silent: A Silent mode that lowers the fan noise. • Super Battery: A Super Battery mode that boosts the highest performance for basic needs. 3. Follow the on-screen instructions to setup the Fan...
Quick Start Guide
Page 22
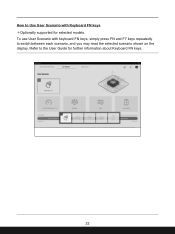
Refer to switch between each scenario, and you may read the selected scenario shown on the display. To use User Scenario with Keyboard FN keys *Optionally supported for further information about Keyboard FN keys. 22 How to Use User Scenario with keyboard FN keys, simply press FN and F7 keys repeatedly to the User Guide for selected models.
Refer to switch between each scenario, and you may read the selected scenario shown on the display. To use User Scenario with Keyboard FN keys *Optionally supported for further information about Keyboard FN keys. 22 How to Use User Scenario with keyboard FN keys, simply press FN and F7 keys repeatedly to the User Guide for selected models.

Quick Start Guide
Page 23
... Power button. 23 Switch Key: Click to switch the Windows key and the Fn key on the keyboard. 2. HDR: Enable or disable the steaming HDR video function. 6. Hibernate/ Sleep: Switch to model. 1. GPU Switch: Select MSHybrid Graphics Mode or Discrete Graphics Mode or Intergrated Graphics Mode. 5. Display Power Saver: To lower the panel refresh rate when the power the in this page. Windows Key: Enable or disable Windows Key on the keyboard. 3. USB Power Share: Enable or disable USB Power Share function. 8. WebCam: Enable or disable WebCam function 4. Display Switch: Select...
... Power button. 23 Switch Key: Click to switch the Windows key and the Fn key on the keyboard. 2. HDR: Enable or disable the steaming HDR video function. 6. Hibernate/ Sleep: Switch to model. 1. GPU Switch: Select MSHybrid Graphics Mode or Discrete Graphics Mode or Intergrated Graphics Mode. 5. Display Power Saver: To lower the panel refresh rate when the power the in this page. Windows Key: Enable or disable Windows Key on the keyboard. 3. USB Power Share: Enable or disable USB Power Share function. 8. WebCam: Enable or disable WebCam function 4. Display Switch: Select...
Quick Start Guide
Page 28
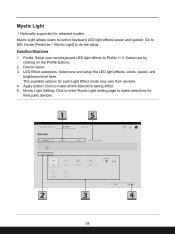
... to control keyboard LED light effects easier and quicker. Select one and setup the LED light effects, colors, speed, and brightness level here. The available options for selected models. Apply button: Click to make selections for third party devices. 28 Mystic Light Setting: Click to enter Mystic Light setting page to do the setup. Mystic Light allows users to Profile 1~3. LED Effect selections: Select one by clicking on the Profile buttons. 2. Go to MSI...
... to control keyboard LED light effects easier and quicker. Select one and setup the LED light effects, colors, speed, and brightness level here. The available options for selected models. Apply button: Click to make selections for third party devices. 28 Mystic Light Setting: Click to enter Mystic Light setting page to do the setup. Mystic Light allows users to Profile 1~3. LED Effect selections: Select one by clicking on the Profile buttons. 2. Go to MSI...

Quick Start Guide
Page 29
For models which is equipped with 4 zones RGB keyboard, users are allowed to select an individual light effect for further information of the product specification. 29 For models equipped with Perkey RGB keyboard, users are allowed to setup a light effect for each zone. 3. Click [apply] to customize the personal keyboard LED light Effect. 2. Contact the local dealer for each individual key. 4. Customizing personal LED Light Effect 1. Select [Customize] to confirm the selections. 5.
For models which is equipped with 4 zones RGB keyboard, users are allowed to select an individual light effect for further information of the product specification. 29 For models equipped with Perkey RGB keyboard, users are allowed to setup a light effect for each zone. 3. Click [apply] to customize the personal keyboard LED light Effect. 2. Contact the local dealer for each individual key. 4. Customizing personal LED Light Effect 1. Select [Customize] to confirm the selections. 5.

Quick Start Guide
Page 30
... configured for Wifi scanning and discovering the Light Panels. Ambient Link *Optionally supported for the two lights to come on and you are good to continue. (Left is power light and center is local network light.) 4. The router is happening in games. Make sure your 5GHz network (if applicable) and turn off Bluetooth. Nanoleaf Setup (optional) 1. These can re-enable these once setup is connected to the router LAN port...
... configured for Wifi scanning and discovering the Light Panels. Ambient Link *Optionally supported for the two lights to come on and you are good to continue. (Left is power light and center is local network light.) 4. The router is happening in games. Make sure your 5GHz network (if applicable) and turn off Bluetooth. Nanoleaf Setup (optional) 1. These can re-enable these once setup is connected to the router LAN port...

Quick Start Guide
Page 31
... reset. The following instructions will help users to reset the Light Panels, so that during previous game playing. 2. Delete the previous device from the app and setup once again. How to reset the Light Panels The Light Panels can be connected to a new network or reset back to the factory settings. The following steps will lead users to enter Ambient Link control panel. 31 Press and hold down the Effect Select and Power buttons on...
... reset. The following instructions will help users to reset the Light Panels, so that during previous game playing. 2. Delete the previous device from the app and setup once again. How to reset the Light Panels The Light Panels can be connected to a new network or reset back to the factory settings. The following steps will lead users to enter Ambient Link control panel. 31 Press and hold down the Effect Select and Power buttons on...

Quick Start Guide
Page 40
... color fidelity of blue light that the preset view modes may vary from the display to model. Anti-Blue: this mode can reduce the amount of close to meet their needs among the various preset view modes provided by True Color. True Color *Optionally supported for accurate color when viewing images on the web. 4. Users are allowed to...
... color fidelity of blue light that the preset view modes may vary from the display to model. Anti-Blue: this mode can reduce the amount of close to meet their needs among the various preset view modes provided by True Color. True Color *Optionally supported for accurate color when viewing images on the web. 4. Users are allowed to...
Quick Start Guide
Page 47
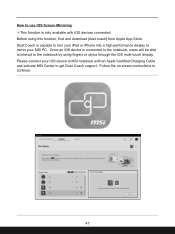
... connect your MSI PC. Follow the on-screen instructions to the notebook by using this function, find and download [duet coach] from Apple App Store. Before using fingers or stylus through the iOS multi-touch display. How to use iOS Screen Mirroring *This function is only available with an Apple Certified Charging Cable and activate MSI Center to get Duet Coach support. Once an iOS device is capable to turn...
... connect your MSI PC. Follow the on-screen instructions to the notebook by using this function, find and download [duet coach] from Apple App Store. Before using fingers or stylus through the iOS multi-touch display. How to use iOS Screen Mirroring *This function is only available with an Apple Certified Charging Cable and activate MSI Center to get Duet Coach support. Once an iOS device is capable to turn...

Quick Start Guide
Page 49
.... 8. The calibration process status will be shown on the display telling users that the following conditions, a green signal will be installed properly. • No any condition listed above does not meet the requirement. 4. MSI recommends doing Battery Calibration every 3 months to MSI Center [Support > System Diagnostics] and find Battery Calibration. Please reconnect the AC/DC adapter to start the Battery Calibration process. 5.
.... 8. The calibration process status will be shown on the display telling users that the following conditions, a green signal will be installed properly. • No any condition listed above does not meet the requirement. 4. MSI recommends doing Battery Calibration every 3 months to MSI Center [Support > System Diagnostics] and find Battery Calibration. Please reconnect the AC/DC adapter to start the Battery Calibration process. 5.
Quick Start Guide
Page 56
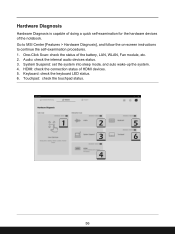
.... 4. HDMI: check the connection status of the notebook. Keyboard: check the keyboard LED status. 6. Go to MSI Center [Features > Hardware Diagnosis], and follow the on-screen instructions to continue the self-examination procedures. 1. Hardware Diagnosis Hardware Diagnosis is capable of doing a quick self-examination for the hardware devices of HDMI devices. 5. One-Click Scan: check the status of the battery, LAN, WLAN, Fan module, etc. 2. Audio: check the internal audio devices status. 3. Touchpad: check the touchpad...
.... 4. HDMI: check the connection status of the notebook. Keyboard: check the keyboard LED status. 6. Go to MSI Center [Features > Hardware Diagnosis], and follow the on-screen instructions to continue the self-examination procedures. 1. Hardware Diagnosis Hardware Diagnosis is capable of doing a quick self-examination for the hardware devices of HDMI devices. 5. One-Click Scan: check the status of the battery, LAN, WLAN, Fan module, etc. 2. Audio: check the internal audio devices status. 3. Touchpad: check the touchpad...

Quick Start Guide
Page 59
Follow the on the device button to MSI Center [Features > Gaming Gear] 3. You are connected to your notebook. Move the mouse cursor to the detected devices shown on this page, and click on -screen instructions to the devices connected. 1. Go to enter its setting page. 59 Connect MSI gaming gear to your notebook. 2. Gaming Gear This page will only be available when MSI gaming gear or supported third-party devices are allowed to setup specific options to install necessary drivers, if needed. 4.
Follow the on the device button to MSI Center [Features > Gaming Gear] 3. You are connected to your notebook. Move the mouse cursor to the detected devices shown on this page, and click on -screen instructions to the devices connected. 1. Go to enter its setting page. 59 Connect MSI gaming gear to your notebook. 2. Gaming Gear This page will only be available when MSI gaming gear or supported third-party devices are allowed to setup specific options to install necessary drivers, if needed. 4.
Quick Start Guide
Page 60
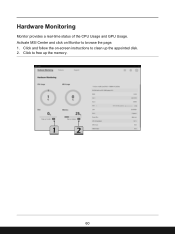
Hardware Monitoring Monitor provides a real-time status of the CPU Usage and GPU Usage. Activate MSI Center and click on -screen instructions to clean up the memory. 60 Click to browse the page. 1. Click and follow the on Monitor to free up the appointed disk. 2.
Hardware Monitoring Monitor provides a real-time status of the CPU Usage and GPU Usage. Activate MSI Center and click on -screen instructions to clean up the memory. 60 Click to browse the page. 1. Click and follow the on Monitor to free up the appointed disk. 2.

Quick Start Guide
Page 65
Service Trouble Shooting and Knowledge Base In Trouble Shooting and Knowledge Base page, user can search for related information by searching for the keywords in the search toolbar. Move the mose cursor to click on [More] to MSI Center [Support > Service]. Users can find a list of frequently asked questions and answers, giving them possible instructions to solve basic situations. Go to get more information at MSI official website. 65
Service Trouble Shooting and Knowledge Base In Trouble Shooting and Knowledge Base page, user can search for related information by searching for the keywords in the search toolbar. Move the mose cursor to click on [More] to MSI Center [Support > Service]. Users can find a list of frequently asked questions and answers, giving them possible instructions to solve basic situations. Go to get more information at MSI official website. 65


