
User Manual
Page 4
... case of the normal use a broken power plug nor keep a power cord near heat source; In case of rare smell or noise out of the equipment, make sure the cut-off component can be sure to immediately cut -off the power supply and ask a professional servicing person to change without permission. All specifications and informations are subject to fix the problem. When this device without...
... case of the normal use a broken power plug nor keep a power cord near heat source; In case of rare smell or noise out of the equipment, make sure the cut-off component can be sure to immediately cut -off the power supply and ask a professional servicing person to change without permission. All specifications and informations are subject to fix the problem. When this device without...
User Manual
Page 5
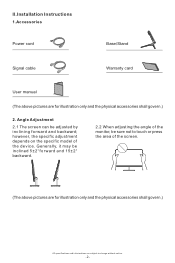
II.Installation Instructions 1.Accessories Power cord Base/Stand Signal cable Warranty card User manual (The above pictures are subject to touch or press the area of the device. Angle Adjustment 2.1 The screen can be sure not to change without notice. -2- Generally, it may be inclined 5±2°forward and 15±2° backward. 2.2 When adjusting the angle of the monitor, be adjusted by inclining forward and backward; however, the specific adjustment depends...
II.Installation Instructions 1.Accessories Power cord Base/Stand Signal cable Warranty card User manual (The above pictures are subject to touch or press the area of the device. Angle Adjustment 2.1 The screen can be sure not to change without notice. -2- Generally, it may be inclined 5±2°forward and 15±2° backward. 2.2 When adjusting the angle of the monitor, be adjusted by inclining forward and backward; however, the specific adjustment depends...

User Manual
Page 6
III. Model with inbuilt power supply * Warning: Always use the power cord of standard configuration. 3 HDMI Port Connect the HDMI cable into the HDMI IN port into the back of the monitor (this needs the support of the monitor). 4 DP Port Connect the DP cable into the DP IN port of the monitor (this needs the support of the monitor). (The above pictures are for illustration only and the physical accessories shall govern.) All specifications and informations are...
III. Model with inbuilt power supply * Warning: Always use the power cord of standard configuration. 3 HDMI Port Connect the HDMI cable into the HDMI IN port into the back of the monitor (this needs the support of the monitor). 4 DP Port Connect the DP cable into the DP IN port of the monitor (this needs the support of the monitor). (The above pictures are for illustration only and the physical accessories shall govern.) All specifications and informations are...

User Manual
Page 7
... the 3. LED 6. indicator Blue: in normal switch-on /off the monitor. M exits from the whole menu). ▲ ▲ When the menu is inactivated, used as the specified shortcut mode hot key (FPS/RTS mode). 4. menu is activated, used as the left function selection key, and decreases progressively the value of main menu, 1. Power switch: Powers on state; flickering in blue: in case of the progress bar; User Setup 1. when...
... the 3. LED 6. indicator Blue: in normal switch-on /off the monitor. M exits from the whole menu). ▲ ▲ When the menu is inactivated, used as the specified shortcut mode hot key (FPS/RTS mode). 4. menu is activated, used as the left function selection key, and decreases progressively the value of main menu, 1. Power switch: Powers on state; flickering in blue: in case of the progress bar; User Setup 1. when...

User Manual
Page 8
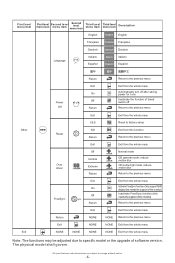
... DVI (digital) signal input HDMI NONE NONE HDMI (digital) signal input DisplayPort NONE NONE Display port (digital) signal input Return NONE NONE Return to the previous menu Exit NONE NONE Exit from the whole menu Gamma1 Adjust color tone brightness grey 1 Gamma Gamma2 Return Adjust color tone brightness grey 2 Return to the previous menu Exit Exit from the whole menu All specifications and informations are subject to change without notice. -5- Operation Menu (OSD) Function Descriptions First level menu item Brightness Contrast...
... DVI (digital) signal input HDMI NONE NONE HDMI (digital) signal input DisplayPort NONE NONE Display port (digital) signal input Return NONE NONE Return to the previous menu Exit NONE NONE Exit from the whole menu Gamma1 Adjust color tone brightness grey 1 Gamma Gamma2 Return Adjust color tone brightness grey 2 Return to the previous menu Exit Exit from the whole menu All specifications and informations are subject to change without notice. -5- Operation Menu (OSD) Function Descriptions First level menu item Brightness Contrast...
User Manual
Page 9
... the whole menu Automatically turn off after saving ON power for 1min Inactivate the function of timed switch-off Return to the previous menu Exit YES Exit from the whole menu Reset to factory setup Other Reset NO Return Exit from this function Return to the previous menu Exit Exit from the whole menu Over driver Off Normal Extreme Return Normal mode OD general mode, reduce...
... the whole menu Automatically turn off after saving ON power for 1min Inactivate the function of timed switch-off Return to the previous menu Exit YES Exit from the whole menu Reset to factory setup Other Reset NO Return Exit from this function Return to the previous menu Exit Exit from the whole menu Over driver Off Normal Extreme Return Normal mode OD general mode, reduce...
User Manual
Page 10
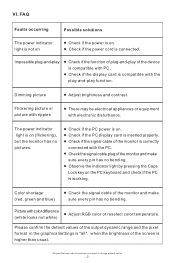
... PC power is on. ◆ Check if the PC display card is inserted properly. ◆ Check if the signal cable of the monitor is correctly connected with the plug-and-play of the output dynamic range and the pixel format in the graphics Settings is "all". All specifications and informations are subject to change without notice. -7- VI. Color shortage (red, green and blue) ◆ Check the signal cable of the monitor and make sure...
... PC power is on. ◆ Check if the PC display card is inserted properly. ◆ Check if the signal cable of the monitor is correctly connected with the plug-and-play of the output dynamic range and the pixel format in the graphics Settings is "all". All specifications and informations are subject to change without notice. -7- VI. Color shortage (red, green and blue) ◆ Check the signal cable of the monitor and make sure...
User Manual
Page 11
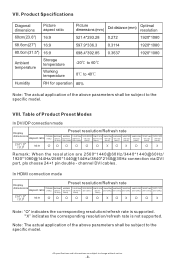
...DVI cables. VIII. "X" indicates the corresponding resolution/refresh rate is supported. All specifications and informations are 2560*1440@60Hz/3440*1440@60Hz/ 1920*1080@144Hz/2560*1440@144Hz/3840*2160@30Hz connection via DVI port, pls choose 24+1 pin double - VII. Product Specifications Diagonal dimensions Picture aspect ratio Picture Dot distance (mm) Optimal dimensions (mm) resolution...Remark: When the resolution are subject to the specific model. In HDMI connection mode Display dimensions Aspect ratio (70Hz) (60/75/ 72.8Hz) Preset resolution/Refresh rate (60/70/...
...DVI cables. VIII. "X" indicates the corresponding resolution/refresh rate is supported. All specifications and informations are 2560*1440@60Hz/3440*1440@60Hz/ 1920*1080@144Hz/2560*1440@144Hz/3840*2160@30Hz connection via DVI port, pls choose 24+1 pin double - VII. Product Specifications Diagonal dimensions Picture aspect ratio Picture Dot distance (mm) Optimal dimensions (mm) resolution...Remark: When the resolution are subject to the specific model. In HDMI connection mode Display dimensions Aspect ratio (70Hz) (60/75/ 72.8Hz) Preset resolution/Refresh rate (60/70/...
