
Quick Start Guide 1
Page 4
Hotline...45 3. MSI Recovery...29 Go to WinPE to Use MSI Recovery 29 Create a MSI Rescue USB disk 30 Create a Customize Image Backup 33 Recovering the System 34 Support 37 Hardware Diagnosis...37 Trouble Shooting...40 After-Sales Service 40 Support Article...41 Knowledge Base...41 Live Update...42 MSI Update...42 Microsoft APP...43 Forum & Channel...44 Forum...44 How-to use Screen Capture 48 How to Channel...44 Contact Us...45 1. Service Location...45 Setting 47 Duet Display...48 How to use iOS Screen Mirroring 51 About...52 4 Web Ticket...45 2.
Hotline...45 3. MSI Recovery...29 Go to WinPE to Use MSI Recovery 29 Create a MSI Rescue USB disk 30 Create a Customize Image Backup 33 Recovering the System 34 Support 37 Hardware Diagnosis...37 Trouble Shooting...40 After-Sales Service 40 Support Article...41 Knowledge Base...41 Live Update...42 MSI Update...42 Microsoft APP...43 Forum & Channel...44 Forum...44 How-to use Screen Capture 48 How to Channel...44 Contact Us...45 1. Service Location...45 Setting 47 Duet Display...48 How to use iOS Screen Mirroring 51 About...52 4 Web Ticket...45 2.

Quick Start Guide 1
Page 19
...remove the Apps shown in the Priority List, move the mouse cursor to be selected into Priority List at one time. Drag and drop the App back to the icon of the App. Left click on the icon and hold the mouse button. To drag an App, move the mouse cursor to the SW List...-edit the Priority List. 19 For those Apps listed in the Priority List. Drag and drop the App into Priority List. 2. Follow the on the icon and hold the mouse button. Right click on -screen instructions to drag a specified App from SW List into the Priority List. 3. If [User Priority] mode is selected, users...
...remove the Apps shown in the Priority List, move the mouse cursor to be selected into Priority List at one time. Drag and drop the App back to the icon of the App. Left click on the icon and hold the mouse button. To drag an App, move the mouse cursor to the SW List...-edit the Priority List. 19 For those Apps listed in the Priority List. Drag and drop the App into Priority List. 2. Follow the on the icon and hold the mouse button. Right click on -screen instructions to drag a specified App from SW List into the Priority List. 3. If [User Priority] mode is selected, users...

Quick Start Guide 1
Page 40
Users can find a list of frequently asked questions and answers, giving them possible instructions to find [Support Article]. Go to visit MSI official FAQ website. 40 Users can also click on the right-most globe icon to MSI Center [Support > Trouble Shooting > Knowledge Base]. Users may read the articles to solve basic situations. Knowledge Base In Knowledge Base page, user can search for related information by searching for the keywords in the search toolbar. Support Article Go to MSI Center Pro [Support > Trouble Shooting] and find solutions with your device.
Users can find a list of frequently asked questions and answers, giving them possible instructions to find [Support Article]. Go to visit MSI official FAQ website. 40 Users can also click on the right-most globe icon to MSI Center [Support > Trouble Shooting > Knowledge Base]. Users may read the articles to solve basic situations. Knowledge Base In Knowledge Base page, user can search for related information by searching for the keywords in the search toolbar. Support Article Go to MSI Center Pro [Support > Trouble Shooting] and find solutions with your device.

Quick Start Guide 1
Page 50
... iOS multi-touch display. Once an iOS device is connected to the notebook, users will be able to interact to the notebook by using this function, find and download [duet coach] from Apple App Store. Follow the on-screen instructions to continue. 50 Please connect your MSI PC. How to use iOS Screen Mirroring *This function is only available with an Apple Certified Charging Cable and activate MSI Center...
... iOS multi-touch display. Once an iOS device is connected to the notebook, users will be able to interact to the notebook by using this function, find and download [duet coach] from Apple App Store. Follow the on-screen instructions to continue. 50 Please connect your MSI PC. How to use iOS Screen Mirroring *This function is only available with an Apple Certified Charging Cable and activate MSI Center...

User Manual
Page 4
... Slot...3-23 How to Connect the Internet in Windows OS 3-24 Wireless LAN...3-24 Wired LAN...3-26 How to Set Up Bluetooth Connection in Windows OS 3-31 Activating Bluetooth Connection 3-31 How to Connect the Internet in Windows 10 3-34 Wireless LAN...3-34 Wired LAN...3-36 How to Set Up Bluetooth Connection in Windows 10 3-41 Activating Bluetooth Connection 3-41 How to Connect External Devices 3-44 Video: How to Use RAID Function (optional 3-45 Video: How to Restore Windows 10 Operating System on MSI Notebooks 3-46 Video: How to Use MSI One Touch Install 3-47...
... Slot...3-23 How to Connect the Internet in Windows OS 3-24 Wireless LAN...3-24 Wired LAN...3-26 How to Set Up Bluetooth Connection in Windows OS 3-31 Activating Bluetooth Connection 3-31 How to Connect the Internet in Windows 10 3-34 Wireless LAN...3-34 Wired LAN...3-36 How to Set Up Bluetooth Connection in Windows 10 3-41 Activating Bluetooth Connection 3-41 How to Connect External Devices 3-44 Video: How to Use RAID Function (optional 3-45 Video: How to Restore Windows 10 Operating System on MSI Notebooks 3-46 Video: How to Use MSI One Touch Install 3-47...

User Manual
Page 10
... the acquisition of replaceable parts (or compatible ones) of spare parts. 1-10 Please contact the manufacturer via http:// www.msi.com/support/ for product service information. Upgrade and Warranty Please note that certain components, such as memory modules, HDD, SSD, ODD, and Bluetooth/WiFi combo card, etc., preinstalled in certain countries or territories may be fulfilled by user's request depending on the models users purchased.
... the acquisition of replaceable parts (or compatible ones) of spare parts. 1-10 Please contact the manufacturer via http:// www.msi.com/support/ for product service information. Upgrade and Warranty Please note that certain components, such as memory modules, HDD, SSD, ODD, and Bluetooth/WiFi combo card, etc., preinstalled in certain countries or territories may be fulfilled by user's request depending on the models users purchased.
User Manual
Page 23
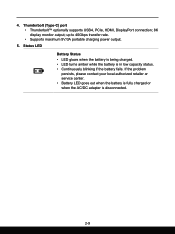
...; LED glows when the battery is being charged. • LED turns amber while the battery is disconnected. 2-9 Thunderbolt (Type-C) port • Thunderbolt™ optionally supports USB4, PCIe, HDMI, DisplayPort connection; 8K display monitor output; If the problem persists, please contact your local authorized retailer or service center. • Battery LED goes out when the battery is fully charged or when the AC/DC adapter is in low capacity status. • Continuously blinking...
...; LED glows when the battery is being charged. • LED turns amber while the battery is disconnected. 2-9 Thunderbolt (Type-C) port • Thunderbolt™ optionally supports USB4, PCIe, HDMI, DisplayPort connection; 8K display monitor output; If the problem persists, please contact your local authorized retailer or service center. • Battery LED goes out when the battery is fully charged or when the AC/DC adapter is in low capacity status. • Continuously blinking...

User Manual
Page 26
Use the FN keys on the keyboard which is a must to work more efficiently. Windows Key You can find the Windows Logo key on the keyboard to Use the Keyboard This notebook provides a full functioned keyboard. With the help of these keys, users will be able to install the necessary applications before using the keyboard function keys. To ensure that the keyboard will be functioning properly, it is used to perform Windows-specific functions, such as opening the Start menu and launching the shortcut menu. 2-12 Introductions How to activate the specific applications or tools.
Use the FN keys on the keyboard which is a must to work more efficiently. Windows Key You can find the Windows Logo key on the keyboard to Use the Keyboard This notebook provides a full functioned keyboard. With the help of these keys, users will be able to install the necessary applications before using the keyboard function keys. To ensure that the keyboard will be functioning properly, it is used to perform Windows-specific functions, such as opening the Start menu and launching the shortcut menu. 2-12 Introductions How to activate the specific applications or tools.

User Manual
Page 27
... utility, MSI Center Pro, providing users an astonished and efficient solution in multitasking. • Use this key to switch the User Scenario in MSI Center Pro. 2-13 Each function key, located on F1 to turn ON/ OFF the Webcam function on. • Webcam is equipped with a set of Quick FN Launch Keys. Webcam • Press to F12, has a built-in speaker's volume. LED off: Quick FN Launch Keys enabled. MSI Center Pro • This notebook may be pre-installing with...
... utility, MSI Center Pro, providing users an astonished and efficient solution in multitasking. • Use this key to switch the User Scenario in MSI Center Pro. 2-13 Each function key, located on F1 to turn ON/ OFF the Webcam function on. • Webcam is equipped with a set of Quick FN Launch Keys. Webcam • Press to F12, has a built-in speaker's volume. LED off: Quick FN Launch Keys enabled. MSI Center Pro • This notebook may be pre-installing with...

User Manual
Page 29
... project on the second screen from the selections of PC screen only, Duplicate, Extend, and Second screen only. Use Multiple Monitors If users connect an additional monitor to change + different view modes. 2-15 True Color Press and hold the FN key, and then press the A key to the notebook, the system will be pre-installed with the True Color application. Users will automatically detect the external monitor connected.
... project on the second screen from the selections of PC screen only, Duplicate, Extend, and Second screen only. Use Multiple Monitors If users connect an additional monitor to change + different view modes. 2-15 True Color Press and hold the FN key, and then press the A key to the notebook, the system will be pre-installed with the True Color application. Users will automatically detect the external monitor connected.

User Manual
Page 31
Storage SSD 2 x M.2 slot, supports PCIe SSD device I/O Port USB 2 x USB 3.2 Gen 2 ThunderboltTM 2 x USB4 Type-C • PCIe, HDMI, DisplayPort connection optionally supported • 8K display monitor output • Up to 40Gbps transfer rate • Supports maximum 5V/3A portable charging power output. Audio 1 x Mic-in/ Headphone-out combo Card Reader 1 x SD 6.0 Communication Port Wireless LAN Supported Bluetooth Supported Display LCD Type 16" QHD+ LED panel Touch Screen (optional) 10-point multi-touch screen monitor supported Video Graphics • NVIDIA® GeForce...
Storage SSD 2 x M.2 slot, supports PCIe SSD device I/O Port USB 2 x USB 3.2 Gen 2 ThunderboltTM 2 x USB4 Type-C • PCIe, HDMI, DisplayPort connection optionally supported • 8K display monitor output • Up to 40Gbps transfer rate • Supports maximum 5V/3A portable charging power output. Audio 1 x Mic-in/ Headphone-out combo Card Reader 1 x SD 6.0 Communication Port Wireless LAN Supported Bluetooth Supported Display LCD Type 16" QHD+ LED panel Touch Screen (optional) 10-point multi-touch screen monitor supported Video Graphics • NVIDIA® GeForce...

User Manual
Page 38
... on the [Change plan settings] to bring out [Power Options]. Go to [Start] and then move the mouse cursor to [Type here to continue. 3. A power plan is selected as an example here. Balanced and Power saver - Click on the different version of hardware and system settings that manages how your needs. 8. How to Get Started How to Set Up a Power Plan in [Edit Plan Settings]. 7. Open up [All Control Panel Items] window.
... on the [Change plan settings] to bring out [Power Options]. Go to [Start] and then move the mouse cursor to [Type here to continue. 3. A power plan is selected as an example here. Balanced and Power saver - Click on the different version of hardware and system settings that manages how your needs. 8. How to Get Started How to Set Up a Power Plan in [Edit Plan Settings]. 7. Open up [All Control Panel Items] window.

User Manual
Page 42
... corner of hardware and system settings that manages how your computer uses and conserves power. The Power Plan of [Balanced] is a collection of the screen. 2. How to Get Started How to Set Up a Power Plan in Windows 10 * For selected models with performance. Change settings for existing plans or create your needs 8. Find [System] and click on [Change advanced power settings] to bring out Power Options. Choose or Customize a Power Plan 1. Click...
... corner of hardware and system settings that manages how your computer uses and conserves power. The Power Plan of [Balanced] is a collection of the screen. 2. How to Get Started How to Set Up a Power Plan in Windows 10 * For selected models with performance. Change settings for existing plans or create your needs 8. Find [System] and click on [Change advanced power settings] to bring out Power Options. Choose or Customize a Power Plan 1. Click...
User Manual
Page 46
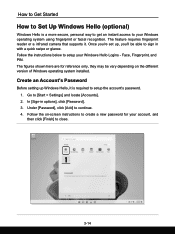
... reader or a infrared camera that supports it is a more secure, personal way to get an instant access to setup the account's password. 1. Create an Account's Password Before setting up , you 're set up Windows Hello, it . Under [Password], click [Add] to [Start > Settings] and locate [Accounts]. 2. Follow the on the different version of Windows operating system installed. Follow the instructions below to setup your account, and then click [Finish] to create a new password...
... reader or a infrared camera that supports it is a more secure, personal way to get an instant access to setup the account's password. 1. Create an Account's Password Before setting up , you 're set up Windows Hello, it . Under [Password], click [Add] to [Start > Settings] and locate [Accounts]. 2. Follow the on the different version of Windows operating system installed. Follow the instructions below to setup your account, and then click [Finish] to create a new password...

User Manual
Page 56
....) 6. Make sure [Airplane mode] is set up [Settings], find and click [Network & internet]. 2. Choose one Wireless LAN network from the network list to connect to continue. 7. Click [Connect] to the Internet. Select [Show available networks] to [Off]. 4. Then click [Next]. 3-24 Select [Wi-Fi] within the [Network & internet] selection menu. 5. Open up a Wireless LAN connection. 1. How to Get Started How to the Internet without using any cables. A security key may vary on the different version of Windows operating system installed...
....) 6. Make sure [Airplane mode] is set up [Settings], find and click [Network & internet]. 2. Choose one Wireless LAN network from the network list to connect to continue. 7. Click [Connect] to the Internet. Select [Show available networks] to [Off]. 4. Then click [Next]. 3-24 Select [Wi-Fi] within the [Network & internet] selection menu. 5. Open up a Wireless LAN connection. 1. How to Get Started How to the Internet without using any cables. A security key may vary on the different version of Windows operating system installed...
User Manual
Page 58
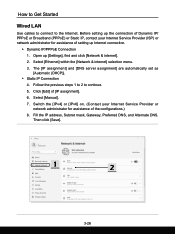
...) or Static IP, contact your Internet Service Provider or network administrator for assistance of setting up [Settings], find and click [Network & internet]. 2. Select [Manual]. 7. Click [Edit] of the configurations.) 8. Switch the [IPv4] or [IPv6] on. (Contact your Internet Service Provider (ISP) or network administrator for assistance of [IP assignment]. 6. Open up Internet connection. ▶▶ Dynamic IP/PPPoE Connection 1. Select [Ethernet] within the [Network & internet] selection menu. 3. Follow the previous steps...
...) or Static IP, contact your Internet Service Provider or network administrator for assistance of setting up [Settings], find and click [Network & internet]. 2. Select [Manual]. 7. Click [Edit] of the configurations.) 8. Switch the [IPv4] or [IPv6] on. (Contact your Internet Service Provider (ISP) or network administrator for assistance of [IP assignment]. 6. Open up Internet connection. ▶▶ Dynamic IP/PPPoE Connection 1. Select [Ethernet] within the [Network & internet] selection menu. 3. Follow the previous steps...

User Manual
Page 66
... network selection table. 5. A security key may be required for connecting the selected network. Then click [Next]. 3-34 Click [Connect] to Connect the Internet in Windows 10 * For selected models with Windows 10 operating system installed. Follow the instructions as below to [Off]. 4. Switch [ON] the Wi-Fi function if it is turn off. 6. Make sure [Airplane mode] is set to set up a Wireless LAN connection. 1. Select [Show available networks] to open up Settings, find and click [Network & Internet...
... network selection table. 5. A security key may be required for connecting the selected network. Then click [Next]. 3-34 Click [Connect] to Connect the Internet in Windows 10 * For selected models with Windows 10 operating system installed. Follow the instructions as below to [Off]. 4. Switch [ON] the Wi-Fi function if it is turn off. 6. Make sure [Airplane mode] is set to set up a Wireless LAN connection. 1. Select [Show available networks] to open up Settings, find and click [Network & Internet...

User Manual
Page 68
... [Change adapter options] to continue. 6. Right click on [Ethernet] to the Internet. Then click [OK]. ▶▶ Static IP Connection 7. How to Get Started Wired LAN Using cables and network adapters to connect to select [Properties] from the drop-down menu. 5. Select [Ethernet] within the Network & Internet selection menu. 3. Click [Use the following IP address] and [Use the following DNS server addresses] in General tab. Open up Ethernet Properties window...
... [Change adapter options] to continue. 6. Right click on [Ethernet] to the Internet. Then click [OK]. ▶▶ Static IP Connection 7. How to Get Started Wired LAN Using cables and network adapters to connect to select [Properties] from the drop-down menu. 5. Select [Ethernet] within the Network & Internet selection menu. 3. Click [Use the following IP address] and [Use the following DNS server addresses] in General tab. Open up Ethernet Properties window...

User Manual
Page 73
... Windows 10 * For selected models with each other through an established connection. Select [Bluetooth]. 6. Switch [ON] the Bluebooth function if it is a must to make sure that Airplane mode is set to [Off]. ▶▶ Pairing the Bluetooth devices 4. Give the passcode as instructed by the device waiting to be connected, and then click on [Connect] to start pairing. 7. Select [Bluetooth & other device] to open up Settings, find and click [Devices...
... Windows 10 * For selected models with each other through an established connection. Select [Bluetooth]. 6. Switch [ON] the Bluebooth function if it is a must to make sure that Airplane mode is set to [Off]. ▶▶ Pairing the Bluetooth devices 4. Give the passcode as instructed by the device waiting to be connected, and then click on [Connect] to start pairing. 7. Select [Bluetooth & other device] to open up Settings, find and click [Devices...
User Manual
Page 79
Video: How to efficiently install all needed drivers on MSI notebooks with Windows 10 operating system installed. Watch the instruction video at: https://www.youtube.com/watch?v=V-5ByMZdnik YouTube 3-47 MSI "One Touch Install", the one-click installer application, allows users to Use MSI One Touch Install * For selected models with single click.
Video: How to efficiently install all needed drivers on MSI notebooks with Windows 10 operating system installed. Watch the instruction video at: https://www.youtube.com/watch?v=V-5ByMZdnik YouTube 3-47 MSI "One Touch Install", the one-click installer application, allows users to Use MSI One Touch Install * For selected models with single click.


