
User Manual
Page 13
... LED Status Table 19 Audio Ports Configuration 19 Realtek HD Audio Manager 20 Overview of Components 22 CPU Socket ...24 DIMM Slots...25 PCI_E1~4, PCI1~2: PCIe & PCI Expansion Slots 26 M2_1: M.2 Slot (Key M 27 SATA1~4: SATA 6Gb/s Connectors 28 JAUD1: Front Audio Connector 28 CPU_PWR1, ATX_PWR1: Power Connectors 29 JUSB1~2: USB 2.0 Connectors 30...
... LED Status Table 19 Audio Ports Configuration 19 Realtek HD Audio Manager 20 Overview of Components 22 CPU Socket ...24 DIMM Slots...25 PCI_E1~4, PCI1~2: PCIe & PCI Expansion Slots 26 M2_1: M.2 Slot (Key M 27 SATA1~4: SATA 6Gb/s Connectors 28 JAUD1: Front Audio Connector 28 CPU_PWR1, ATX_PWR1: Power Connectors 29 JUSB1~2: USB 2.0 Connectors 30...

User Manual
Page 15
...™ Vega Graphics Processors y 1x PCIe 2.0 x16 slot (PCI_E4, supports x4 mode)* y 2x PCIe 2.0 x1 slots y 2x PCI slots * PCI_E4 slot will support PCIe 2.0 x2 only, when installing device in any PCIe x1 slot. Please refer www.msi.com for Socket AM4 AMD® B350 Chipset y 4x DDR4 memory slots, support up to 64GB ƒ Support DDR4 1866...
...™ Vega Graphics Processors y 1x PCIe 2.0 x16 slot (PCI_E4, supports x4 mode)* y 2x PCIe 2.0 x1 slots y 2x PCI slots * PCI_E4 slot will support PCIe 2.0 x2 only, when installing device in any PCIe x1 slot. Please refer www.msi.com for Socket AM4 AMD® B350 Chipset y 4x DDR4 memory slots, support up to 64GB ƒ Support DDR4 1866...

User Manual
Page 23
... JCOM1 JFP1, JFP2 JLED1 JLPT1 JTPM1 JUSB1~2 JUSB3~4 M2_1 PCI_E1~4, PCI1~2 SATA1~4 Port Type Fan Connectors Power Connectors AM4 Socket DIMM Slots Front Audio Connector Clear CMOS (Reset BIOS) Jumper Chassis Intrusion Connector Serial Port Connector Front Panel Connectors RGB LED strip connector Parallel Port Connector... TPM Module Connector USB 2.0 Connectors USB 3.1 Gen1 Connectors M.2 Slot (Key M) PCIe & PCI Expansion Slots SATA 6Gb/s Connectors Page 31 29 24 25 28 35 32 33 33 34 32 33 30 30 27 26 28 Overview...
... JCOM1 JFP1, JFP2 JLED1 JLPT1 JTPM1 JUSB1~2 JUSB3~4 M2_1 PCI_E1~4, PCI1~2 SATA1~4 Port Type Fan Connectors Power Connectors AM4 Socket DIMM Slots Front Audio Connector Clear CMOS (Reset BIOS) Jumper Chassis Intrusion Connector Serial Port Connector Front Panel Connectors RGB LED strip connector Parallel Port Connector... TPM Module Connector USB 2.0 Connectors USB 3.1 Gen1 Connectors M.2 Slot (Key M) PCIe & PCI Expansion Slots SATA 6Gb/s Connectors Page 31 29 24 25 28 35 32 33 33 34 32 33 30 30 27 26 28 Overview...

User Manual
Page 25
...CPU/memory controller official specification limitation, the frequency of memory modules may operate at a higher frequency. Please refer www.msi.com for more efficient memory cooling system for full DIMMs installation or overclocking. to set the memory frequency if you... than the marked value under the default state. y It is suggested to the memory frequency operates dependent on compatible memory. DIMM Slots DIMMA1 DIMMB1 Channel A Channel B DIMMA2 Memory module installation recommendation DIMMB2 DIMMA2 DIMMB2 DIMMA2 DIMMB2 DIMMB1 DIMMA2 DIMMA1 Important y Always insert ...
...CPU/memory controller official specification limitation, the frequency of memory modules may operate at a higher frequency. Please refer www.msi.com for more efficient memory cooling system for full DIMMs installation or overclocking. to set the memory frequency if you... than the marked value under the default state. y It is suggested to the memory frequency operates dependent on compatible memory. DIMM Slots DIMMA1 DIMMB1 Channel A Channel B DIMMA2 Memory module installation recommendation DIMMB2 DIMMA2 DIMMB2 DIMMA2 DIMMB2 DIMMB1 DIMMA2 DIMMA1 Important y Always insert ...

User Manual
Page 26
...™ with Radeon™ Vega Graphics processors BAT1 PCI_E3: PCIe 2.0 x1 PCI_E4: PCIe 2.0 x4 PCI1: PCI slot PCI2: PCI slot Important y If you install a large and heavy graphics card, you need to use a tool such as MSI Gaming Series Graphics Card Bolster to support its weight to check for any necessary additional hardware...
...™ with Radeon™ Vega Graphics processors BAT1 PCI_E3: PCIe 2.0 x1 PCI_E4: PCIe 2.0 x4 PCI1: PCI slot PCI2: PCI slot Important y If you install a large and heavy graphics card, you need to use a tool such as MSI Gaming Series Graphics Card Bolster to support its weight to check for any necessary additional hardware...

User Manual
Page 27
Insert your M.2 module into the base screw. 5 Overview of Components 27 Remove the screw from the base screw. 2. Put the screw in the notch on the trailing edge of the distance to Install M.2 module. Tighten the base screw into the hole of your M.2 module. 3 4. http://youtu.be/JCTFABytrYA 1. Remove the base screw. 1 2 3. M2_1: M.2 Slot (Key M) Installing M.2 module Video Demonstration Watch the video to learn how to the M.2 slot as the length your M.2 module and tighten it into the M.2 slot at a 30-degree angle. 4 30° 5.
Insert your M.2 module into the base screw. 5 Overview of Components 27 Remove the screw from the base screw. 2. Put the screw in the notch on the trailing edge of the distance to Install M.2 module. Tighten the base screw into the hole of your M.2 module. 3 4. http://youtu.be/JCTFABytrYA 1. Remove the base screw. 1 2 3. M2_1: M.2 Slot (Key M) Installing M.2 module Video Demonstration Watch the video to learn how to the M.2 slot as the length your M.2 module and tighten it into the M.2 slot at a 30-degree angle. 4 30° 5.
User Manual
Page 69
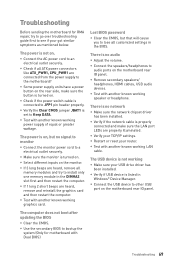
... panel. Lost BIOS password y Clear the CMOS, but no audio y Adjust the volume. y Connect the speakers/headphones to lose all customized settings in the DIMMA2 slot first and then restart the computer. y Verify if the network cable is set to install only one memory module in the BIOS. y Verify if USB...
... panel. Lost BIOS password y Clear the CMOS, but no audio y Adjust the volume. y Connect the speakers/headphones to lose all customized settings in the DIMMA2 slot first and then restart the computer. y Verify if the network cable is set to install only one memory module in the BIOS. y Verify if USB...


