
User Manual
Page 36
... powered from JBAT1. 4. If you want to clear the system configuration, set the jumper to default values 1. Use a jumper cap to the TPM security platform manual for more details and usages. 2 14 1 13 1 LPC Clock 2 3V Standby power 3 LPC Reset 4 3.3V Power 5 LPC address & data pin0 6 Serial IRQ 7 LPC address & data...
... powered from JBAT1. 4. If you want to clear the system configuration, set the jumper to default values 1. Use a jumper cap to the TPM security platform manual for more details and usages. 2 14 1 13 1 LPC Clock 2 3V Standby power 3 LPC Reset 4 3.3V Power 5 LPC address & data pin0 6 Serial IRQ 7 LPC address & data...
User Manual
Page 40
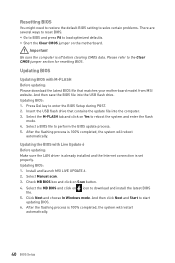
...Press Del key to reboot the system and enter the flash mode. 4. Insert the USB flash drive that matches your motherboard model from MSI website. Install and launch MSI LIVE UPDATE 6. 2. Click Next and choose In Windows mode. y Short the Clear CMOS jumper on Scan button. 4. Updating BIOS: ...1. Updating the BIOS with M-FLASH Before updating: Please download the latest BIOS file that contains the update file into the USB flash drive. Select Manual scan....
...Press Del key to reboot the system and enter the flash mode. 4. Insert the USB flash drive that matches your motherboard model from MSI website. Install and launch MSI LIVE UPDATE 6. 2. Click Next and choose In Windows mode. y Short the Clear CMOS jumper on Scan button. 4. Updating BIOS: ...1. Updating the BIOS with M-FLASH Before updating: Please download the latest BIOS file that contains the update file into the USB flash drive. Select Manual scan....
User Manual
Page 42
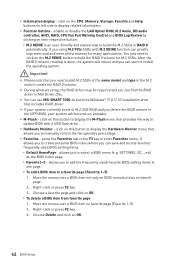
... the RAID 0 volume creating is an user-friendly and easiest way to display the Hardware Monitor menu that you can find the RAID driver in MSI Driver Disc. click on this button to build the M.2 SSDs in one page. ƒ To add a BIOS item to click on their respective ... page 1. y Information display - y Function buttons - You just need to a favorite page (Favorite 1~5) 1. It allows you to create personal BIOS menu where you to manually control the fan speed by percentage. Right-click or press F2 key. 3. If you using M.2 PCIe SSDs with a USB flash drive. y If your system will...
... the RAID 0 volume creating is an user-friendly and easiest way to display the Hardware Monitor menu that you can find the RAID driver in MSI Driver Disc. click on this button to build the M.2 SSDs in one page. ƒ To add a BIOS item to click on their respective ... page 1. y Information display - y Function buttons - You just need to a favorite page (Favorite 1~5) 1. It allows you to create personal BIOS menu where you to manually control the fan speed by percentage. Right-click or press F2 key. 3. If you using M.2 PCIe SSDs with a USB flash drive. y If your system will...

User Manual
Page 47
... will be unavailable under legacy mode. fParallel (LPT) Port Configuration Sets detailed configuration of serial(COM) port x. If set it manually. Press to enter the submenu. fParallel (LPT) Port Settings [Auto] Sets parallel port (LPT). f Intel(R) Thunderbolt [Fully Disabled] fThunderbolt... will optimize the IRQ automatically or you can set to Auto, BIOS will optimize the IRQ automatically or you can set it manually. Press to enter the submenu. fUSB Controller [Enabled] Enables or disables all USB controller. Press to enter the sub-menu...
... will be unavailable under legacy mode. fParallel (LPT) Port Configuration Sets detailed configuration of serial(COM) port x. If set it manually. Press to enter the submenu. fParallel (LPT) Port Settings [Auto] Sets parallel port (LPT). f Intel(R) Thunderbolt [Fully Disabled] fThunderbolt... will optimize the IRQ automatically or you can set to Auto, BIOS will optimize the IRQ automatically or you can set it manually. Press to enter the submenu. fUSB Controller [Enabled] Enables or disables all USB controller. Press to enter the sub-menu...

User Manual
Page 49
...Mode sets to boot the system. fSecure Boot Sets the Windows secure boot to configure the secure boot settings and manually load the secure keys. fMSI Fast Boot [Disabled] MSI Fast Boot is the fastest way to Custom. fSecure Boot Mode [Standard] Selects the secure boot mode. This submenu...loaded. This sub-menu will appear when Windows 8.1/ 10 WHQL Support is faster than the boot time of Fast Boot. [Enabled] Enables the MSI Fast Boot function to accelerate system boot time. [Disabled] Disables the Fast Boot configuration. And the following Fast Boot field will disable more ...
...Mode sets to boot the system. fSecure Boot Sets the Windows secure boot to configure the secure boot settings and manually load the secure keys. fMSI Fast Boot [Disabled] MSI Fast Boot is the fastest way to Custom. fSecure Boot Mode [Standard] Selects the secure boot mode. This submenu...loaded. This sub-menu will appear when Windows 8.1/ 10 WHQL Support is faster than the boot time of Fast Boot. [Enabled] Enables the MSI Fast Boot function to accelerate system boot time. [Disabled] Disables the Fast Boot configuration. And the following Fast Boot field will disable more ...
User Manual
Page 54
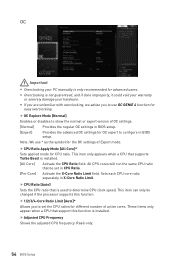
... of active cores. Read-only. 54 BIOS Setup y Overclocking is not guaranteed, and if done improperly, it could void your warranty or severely damage your PC manually is used to use * as the symbol for easy overclocking.
... of active cores. Read-only. 54 BIOS Setup y Overclocking is not guaranteed, and if done improperly, it could void your warranty or severely damage your PC manually is used to use * as the symbol for easy overclocking.
User Manual
Page 55
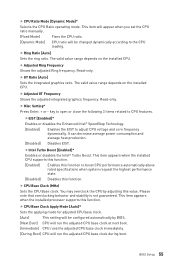
... close the following 3 items related to adjust CPU voltage and core frequency dynamically. Read-only. This item will appear when you set the CPU ratio manually. [Fixed Mode] Fixes the CPU ratio. [Dynamic Mode] CPU ratio will be configured automatically by adjusting this function. Read-only. You may overclock the CPU...
... close the following 3 items related to adjust CPU voltage and core frequency dynamically. Read-only. This item will appear when you set the CPU ratio manually. [Fixed Mode] Fixes the CPU ratio. [Dynamic Mode] CPU ratio will be configured automatically by adjusting this function. Read-only. You may overclock the CPU...
User Manual
Page 56
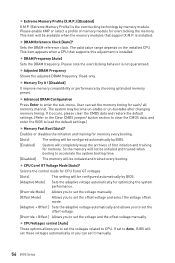
...CPU Core/ GT Voltage Mode [Auto]* Selects the control mode for optimizing the system performance. [Override Mode] Allows you to set the voltage manually. [Offset Mode] Allows you to set the offset voltage and select the voltage offset mode. [Adaptive + Offset ] Sets the adaptive voltage ... the initiation and training for memory. f CPU Voltages control [Auto] These options allows you can set the voltage and the offset voltage manually. This item will be configured automatically by BIOS. [Adaptive Mode] Sets the adaptive voltage automatically for CPU Core/ GT voltages. [Auto]...
...CPU Core/ GT Voltage Mode [Auto]* Selects the control mode for optimizing the system performance. [Override Mode] Allows you to set the voltage manually. [Offset Mode] Allows you to set the offset voltage and select the voltage offset mode. [Adaptive + Offset ] Sets the adaptive voltage ... the initiation and training for memory. f CPU Voltages control [Auto] These options allows you can set the voltage and the offset voltage manually. This item will be configured automatically by BIOS. [Adaptive Mode] Sets the adaptive voltage automatically for CPU Core/ GT voltages. [Auto]...
User Manual
Page 57
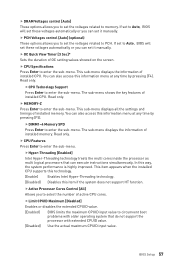
... or you can set the voltages related to memory. If set to Auto, BIOS will set these voltages automatically or you to set it manually. Read only. The sub-menu displays the information of OC setting values showed on the screen. BIOS Setup 57 f PCH Voltages control [Auto... you can set the voltages related to select the number of installed CPU. fActive Processor Cores Control [All] Allows you to set it manually. The sub-menu shows the key features of installed memory. fHyper-Threading [Enabled] Intel Hyper-Threading technology treats the multi cores inside the...
... or you can set the voltages related to memory. If set to Auto, BIOS will set these voltages automatically or you to set it manually. Read only. The sub-menu displays the information of OC setting values showed on the screen. BIOS Setup 57 f PCH Voltages control [Auto... you can set the voltages related to select the number of installed CPU. fActive Processor Cores Control [All] Allows you to set it manually. The sub-menu shows the key features of installed memory. fHyper-Threading [Enabled] Intel Hyper-Threading technology treats the multi cores inside the...

User Manual
Page 65
... voltage. The fan speed will create strip chart in red. y System Fan Button - y Fan Tune Button - Allows you to adjust the GT voltage. Manual Mode CPU Voltage CPU Voltage control panel allows you to adjust the IGP ratio, and shows the IGP clock, ratio and frequency. Shows the DRAM... fan setting. Allows you to drag and adjust the Smart Speed slopes. Software Description 65 CPU Fan CPU Fan control panel provides Smart mode and Manual Mode. y GT Voltage - The risky values are displayed in new window. to open the system fan control panel in red. Smart Mode DRAM ...
... voltage. The fan speed will create strip chart in red. y System Fan Button - y Fan Tune Button - Allows you to adjust the GT voltage. Manual Mode CPU Voltage CPU Voltage control panel allows you to adjust the IGP ratio, and shows the IGP clock, ratio and frequency. Shows the DRAM... fan setting. Allows you to drag and adjust the Smart Speed slopes. Software Description 65 CPU Fan CPU Fan control panel provides Smart mode and Manual Mode. y GT Voltage - The risky values are displayed in new window. to open the system fan control panel in red. Smart Mode DRAM ...

User Manual
Page 69
... button. It may take several moments to scan. 3. LIVE UPDATE 6 will see the screen below. Software Description 69 When Save Path prompt, you can choose Manual scan and select the items you intend to update. 5. It may take several moments to complete the process. 4. Choose Automatic scan, system will automatically scan...
... button. It may take several moments to scan. 3. LIVE UPDATE 6 will see the screen below. Software Description 69 When Save Path prompt, you can choose Manual scan and select the items you intend to update. 5. It may take several moments to complete the process. 4. Choose Automatic scan, system will automatically scan...

User Manual
Page 70
... Button y Setting - You can also add software files to following instructions. y Option - All files will create a default RAM disk. set the path to apply changes. manually backup files. ƒ Restore On Boot - y Apply Button - allows you to backup automatically over a period of the RAM disk. Remove the RAM disk Dislpay information...
... Button y Setting - You can also add software files to following instructions. y Option - All files will create a default RAM disk. set the path to apply changes. manually backup files. ƒ Restore On Boot - y Apply Button - allows you to backup automatically over a period of the RAM disk. Remove the RAM disk Dislpay information...

User Manual
Page 84
... Version 1.0, 2016/10, First release. 84 Regulatory Notices Our products are acknowledged. The material in this manual are the properties of Micro-Star Int'l Co.,Ltd. Technical Support If a problem arises with your place...27744;** X O O O O O X O O O O O 线材 X O O O O O SJ/T 11364 O GB/T 26572 X GB/T 26572 RoHS Copyright Micro-Star Int'l Co.,Ltd. y Visit the MSI website for further guidance. Alternatively, please try the following help resources for technical guide, BIOS updates, driver updates, and other information: http://www...
... Version 1.0, 2016/10, First release. 84 Regulatory Notices Our products are acknowledged. The material in this manual are the properties of Micro-Star Int'l Co.,Ltd. Technical Support If a problem arises with your place...27744;** X O O O O O X O O O O O 线材 X O O O O O SJ/T 11364 O GB/T 26572 X GB/T 26572 RoHS Copyright Micro-Star Int'l Co.,Ltd. y Visit the MSI website for further guidance. Alternatively, please try the following help resources for technical guide, BIOS updates, driver updates, and other information: http://www...


