Declaration of Conformity
Page 1
...Standard EN 60950-1:2006 EN60945:2002 EN 300 440-2, V1.4.1 Description Information technology equipment - Short range devices; Product Lowrance HDS-7, HDS 7m Gen 2 Touch This product has been tested to the following product to which must be used in the appropriate product manuals. e ... Declaration of Conformity Navico declare under our sole responsibility that the equipment specified above directives. NB Number 0191 I www.navico.com LOWRANCE' SIMRAD 13610 :7; Part 2: Harmonized EN covering the essential requirements of article 3.2 of EU directive 1999/5/EC R&TTE (Radio...
...Standard EN 60950-1:2006 EN60945:2002 EN 300 440-2, V1.4.1 Description Information technology equipment - Short range devices; Product Lowrance HDS-7, HDS 7m Gen 2 Touch This product has been tested to the following product to which must be used in the appropriate product manuals. e ... Declaration of Conformity Navico declare under our sole responsibility that the equipment specified above directives. NB Number 0191 I www.navico.com LOWRANCE' SIMRAD 13610 :7; Part 2: Harmonized EN covering the essential requirements of article 3.2 of EU directive 1999/5/EC R&TTE (Radio...
HDS Gen2 Touch FAQ
Page 1
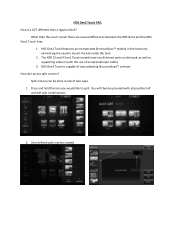
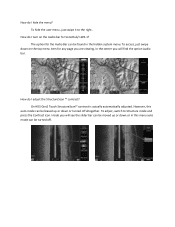
... an incorporated StructureScan™ module in (with all possible half and half split combinations 2. HDS Gen2 Touch FAQ How is capable of two ways 1. HDS Gen2 Touch is a G2T different than the touch screen there are several differences between the HDS Gen2 and the HDS Gen2 Touch lines. 1. You will then be created Split screens can be provided with the use of...
... an incorporated StructureScan™ module in (with all possible half and half split combinations 2. HDS Gen2 Touch FAQ How is capable of two ways 1. HDS Gen2 Touch is a G2T different than the touch screen there are several differences between the HDS Gen2 and the HDS Gen2 Touch lines. 1. You will then be created Split screens can be provided with the use of...
HDS Gen2 Touch FAQ
Page 2
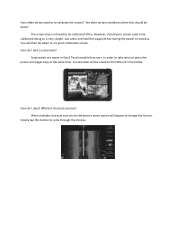
... I take one just press the power and pages keys at the same time. In order to take a screenshot? When multiple structure sources are easier in Gen2 Touch models than ever. Just press and hold the waypoint key during the power on process. Screenshots are detected a menu option will then be saved to... the HDS unit's hard drive. How do I select different structure sources? How often do we need to be calibrated often. The screen does not need to ...
... I take one just press the power and pages keys at the same time. In order to take a screenshot? When multiple structure sources are easier in Gen2 Touch models than ever. Just press and hold the waypoint key during the power on process. Screenshots are detected a menu option will then be saved to... the HDS unit's hard drive. How do I select different structure sources? How often do we need to be calibrated often. The screen does not need to ...
HDS Gen2 Touch FAQ
Page 4
On HDS Gen2 Touch StructureScan™ contrast is actually automatically adjusted. To adjust, switch to the right. In the center you will find the option Audio bar. The option ...
On HDS Gen2 Touch StructureScan™ contrast is actually automatically adjusted. To adjust, switch to the right. In the center you will find the option Audio bar. The option ...

Installation Manual
Page 1
HDS Gen2 Touch Installation Manual ENGLISH lowrance.com
HDS Gen2 Touch Installation Manual ENGLISH lowrance.com

Installation Manual
Page 4
... Warning The user is cautioned that of the receiver • Consult the dealer or an experienced technician for help 2 | Compliance Statements Lowrance HDS-7, HDS-9, and HDS-12 Gen2 Touch: • meet the technical standards in accordance with Part 15.103 of the FCC rules • comply with CE under RTTE directive 1999/5/EC • ...
... Warning The user is cautioned that of the receiver • Consult the dealer or an experienced technician for help 2 | Compliance Statements Lowrance HDS-7, HDS-9, and HDS-12 Gen2 Touch: • meet the technical standards in accordance with Part 15.103 of the FCC rules • comply with CE under RTTE directive 1999/5/EC • ...
Installation Manual
Page 5
... being used under license. • 'HDS', 'StructureScan', 'Navico', 'Lowrance', 'SonicHub', 'SimNet' and 'Skimmer' are trademarks of Navico, registered in the US and other countries and is a reference guide for installing the Lowrance HDS-7, HDS-9, and HDS-12 Gen2 Touch system. Such information is available from our... web site: http://www.lowrance.com/Support/Library/ Important text that requires special attention from the reader...
... being used under license. • 'HDS', 'StructureScan', 'Navico', 'Lowrance', 'SonicHub', 'SimNet' and 'Skimmer' are trademarks of Navico, registered in the US and other countries and is a reference guide for installing the Lowrance HDS-7, HDS-9, and HDS-12 Gen2 Touch system. Such information is available from our... web site: http://www.lowrance.com/Support/Library/ Important text that requires special attention from the reader...

Installation Manual
Page 6
... 22 NMEA 2000 device connection 24 NMEA 0183 device connection 25 Video In 25 Connecting video sources 26 Software setup 26 Sonar installation settings 28 Touch Screen Calibration 28 Software upgrades 29 Dimensional drawings 29 HDS 7 Gen2 Touch 29 HDS 9 Gen2 Touch 29 HDS 12 Gen2 Touch 4 | Contents 6 HDS Gen2 Touch overview 7 Front -
... 22 NMEA 2000 device connection 24 NMEA 0183 device connection 25 Video In 25 Connecting video sources 26 Software setup 26 Sonar installation settings 28 Touch Screen Calibration 28 Software upgrades 29 Dimensional drawings 29 HDS 7 Gen2 Touch 29 HDS 9 Gen2 Touch 29 HDS 12 Gen2 Touch 4 | Contents 6 HDS Gen2 Touch overview 7 Front -
Installation Manual
Page 8
... optional Navionics support via an SD card slot. Power should be mounted on 10.8 V - 17 V. 6 | HDS Gen2 Touch overview | HDS Gen2 Touch Installation Manual All displays are available with or without inbuilt sonar and structure scan. 1 HDS Gen2 Touch overview The HDS-7, HDS-9, and HDS-12 Gen2 Touch multifunction displays are charting ready, with built-in GPS receiver and Insight cartography (region dependent) and...
... optional Navionics support via an SD card slot. Power should be mounted on 10.8 V - 17 V. 6 | HDS Gen2 Touch overview | HDS Gen2 Touch Installation Manual All displays are available with or without inbuilt sonar and structure scan. 1 HDS Gen2 Touch overview The HDS-7, HDS-9, and HDS-12 Gen2 Touch multifunction displays are charting ready, with built-in GPS receiver and Insight cartography (region dependent) and...
Installation Manual
Page 9
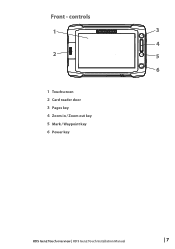
controls 1 3 4 2 5 6 1 Touchscreen 2 Card reader door 3 Pages key 4 Zoom in / Zoom out key 5 Mark / Waypoint key 6 Power key HDS Gen2 Touch overview | HDS Gen2 Touch Installation Manual | 7 Front -
controls 1 3 4 2 5 6 1 Touchscreen 2 Card reader door 3 Pages key 4 Zoom in / Zoom out key 5 Mark / Waypoint key 6 Power key HDS Gen2 Touch overview | HDS Gen2 Touch Installation Manual | 7 Front -
Installation Manual
Page 10
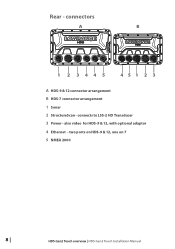
also video for HDS-9 & 12, with optional adaptor 4 Ethernet - connects to LSS-2 HD Transducer 3 Power - connectors A B 1 2 3445 451 2 3 A HDS-9 & 12 connector arrangement B HDS-7 connector arrangement 1 Sonar 2 StructureScan - two ports on HDS-9 & 12, one on 7 5 NMEA 2000 8 | HDS Gen2 Touch overview | HDS Gen2 Touch Installation Manual Rear -
also video for HDS-9 & 12, with optional adaptor 4 Ethernet - connects to LSS-2 HD Transducer 3 Power - connectors A B 1 2 3445 451 2 3 A HDS-9 & 12 connector arrangement B HDS-7 connector arrangement 1 Sonar 2 StructureScan - two ports on HDS-9 & 12, one on 7 5 NMEA 2000 8 | HDS Gen2 Touch overview | HDS Gen2 Touch Installation Manual Rear -
Installation Manual
Page 11
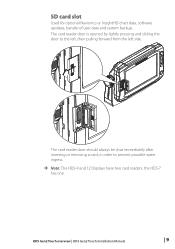
HDS Gen2 Touch overview | HDS Gen2 Touch Installation Manual | 9 The card reader door should always be shut immediately after inserting or removing a card, in order to the left, then pulling forward from the left side. The card reader door is opened by lightly pressing and sliding the door to prevent possible water ingress. ¼¼ Note: The HDS-9 and 12 Displays have two card readers, the HDS-7 has one. SD card slot Used for optional Navionics or InsightHD chart data, software updates, transfer of user data and system backup.
HDS Gen2 Touch overview | HDS Gen2 Touch Installation Manual | 9 The card reader door should always be shut immediately after inserting or removing a card, in order to the left, then pulling forward from the left side. The card reader door is opened by lightly pressing and sliding the door to prevent possible water ingress. ¼¼ Note: The HDS-9 and 12 Displays have two card readers, the HDS-7 has one. SD card slot Used for optional Navionics or InsightHD chart data, software updates, transfer of user data and system backup.
Installation Manual
Page 12
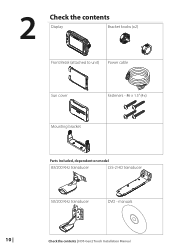
2 Check the contents Display Bracket knobs (x2) Front Bezel (attached to unit) Power cable Sun cover Fasteners - #6 x 1.5" (4x) Mounting bracket Parts Included, dependent on model 83/200 KHz transducer LSS-2 HD transducer 50/200 KHz transducer DVD - manuals 10 | Check the contents | HDS Gen2 Touch Installation Manual
2 Check the contents Display Bracket knobs (x2) Front Bezel (attached to unit) Power cable Sun cover Fasteners - #6 x 1.5" (4x) Mounting bracket Parts Included, dependent on model 83/200 KHz transducer LSS-2 HD transducer 50/200 KHz transducer DVD - manuals 10 | Check the contents | HDS Gen2 Touch Installation Manual
Installation Manual
Page 13
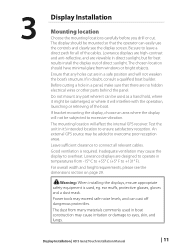
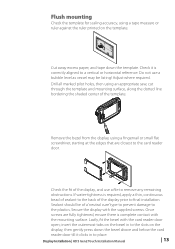
... protectiles. ear muffs, protective glasses, gloves and a dust mask. Power tools may cause the display to ensure satisfactory reception. Lowrance displays are high-contrast and anti-reflective, and are viewable in direct sunlight, but for all relevant cables. Test the unit ...display will affect the internal GPS receiver. Warning: When installing the displays, ensure appropriate safety equipment is required. Display Installation | HDS Gen2 Touch Installation Manual | 11 The display should have minimal glare from windows or bright objects. Before cutting a hole in temperatures from...
... protectiles. ear muffs, protective glasses, gloves and a dust mask. Power tools may cause the display to ensure satisfactory reception. Lowrance displays are high-contrast and anti-reflective, and are viewable in direct sunlight, but for all relevant cables. Test the unit ...display will affect the internal GPS receiver. Warning: When installing the displays, ensure appropriate safety equipment is required. Display Installation | HDS Gen2 Touch Installation Manual | 11 The display should have minimal glare from windows or bright objects. Before cutting a hole in temperatures from...
Installation Manual
Page 14
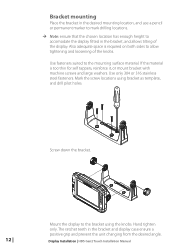
... drill pilot holes. Also adequate space is too thin for self tappers, reinforce it, or mount bracket with machine screws and large washers. Display Installation | HDS Gen2 Touch Installation Manual Use fasteners suited to allow tightening and loosening of the display. Use only 304 or 316 stainless steel fasteners.
... drill pilot holes. Also adequate space is too thin for self tappers, reinforce it, or mount bracket with machine screws and large washers. Display Installation | HDS Gen2 Touch Installation Manual Use fasteners suited to allow tightening and loosening of the display. Use only 304 or 316 stainless steel fasteners.
Installation Manual
Page 15
... or small flat screwdriver, starting at the edges that are fully tightened, ensure there is complete contact with the card reader door open; Display Installation | HDS Gen2 Touch Installation Manual | 13 Adjust where required. Lastly, fit the bezel with the mounting surface. Once screws are closest to place. Do not use a file to...
... or small flat screwdriver, starting at the edges that are fully tightened, ensure there is complete contact with the card reader door open; Display Installation | HDS Gen2 Touch Installation Manual | 13 Adjust where required. Lastly, fit the bezel with the mounting surface. Once screws are closest to place. Do not use a file to...
Installation Manual
Page 16
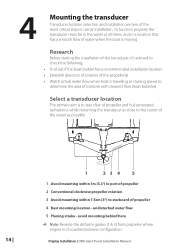
... where engine is of counterclockwise configuration. Research Before starting the installation of the transducer, it's advised to starboard of propeller 4 Best mounting location - Display Installation | HDS Gen2 Touch Installation Manual 4 Mounting the transducer Transducer location selection and installation are two of the most critical steps in a location that has a smooth flow of water...
... where engine is of counterclockwise configuration. Research Before starting the installation of the transducer, it's advised to starboard of propeller 4 Best mounting location - Display Installation | HDS Gen2 Touch Installation Manual 4 Mounting the transducer Transducer location selection and installation are two of the most critical steps in a location that has a smooth flow of water...
Installation Manual
Page 17
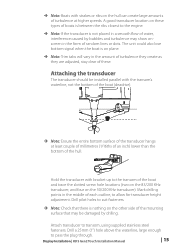
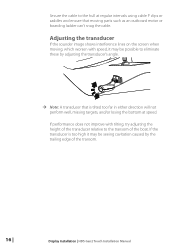
.... ¼¼ Note: Check that may be damaged by bubbles and turbulence may show onscreen in a smooth flow of random lines or dots. Display Installation | HDS Gen2 Touch Installation Manual | 15 Attach transducer to allow for transducer height adjustment. ¼¼ Note: Boats with strakes or ribs on plane. ¼¼ Note: Trim...
.... ¼¼ Note: Check that may be damaged by bubbles and turbulence may show onscreen in a smooth flow of random lines or dots. Display Installation | HDS Gen2 Touch Installation Manual | 15 Attach transducer to allow for transducer height adjustment. ¼¼ Note: Boats with strakes or ribs on plane. ¼¼ Note: Trim...
Installation Manual
Page 18
... boarding ladder can't snag the cable. If the transducer is too high it may be possible to the transom of the transom. 16 | Display Installation | HDS Gen2 Touch Installation Manual
... boarding ladder can't snag the cable. If the transducer is too high it may be possible to the transom of the transom. 16 | Display Installation | HDS Gen2 Touch Installation Manual
Installation Manual
Page 19
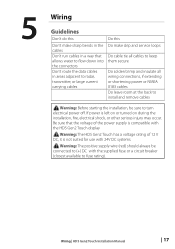
... in a way that the voltage of 12 V DC, it is not suited for use with 24V DC systems. ! Warning: The HDS Gen2 Touch has a voltage rating of the power supply is compatible with the supplied fuse or a circuit breaker (closest available to turn electrical power ...turned on during the installation, fire, electrical shock, or other serious injury may occur. Wiring | HDS Gen2 Touch Installation Manual | 17 Warning: Before starting the installation, be connected to (+) DC with the HDS Gen2 Touch display ! Warning: The positive supply wire (red) should always be sure to fuse rating). ...
... in a way that the voltage of 12 V DC, it is not suited for use with 24V DC systems. ! Warning: The HDS Gen2 Touch has a voltage rating of the power supply is compatible with the supplied fuse or a circuit breaker (closest available to turn electrical power ...turned on during the installation, fire, electrical shock, or other serious injury may occur. Wiring | HDS Gen2 Touch Installation Manual | 17 Warning: Before starting the installation, be connected to (+) DC with the HDS Gen2 Touch display ! Warning: The positive supply wire (red) should always be sure to fuse rating). ...


