User Manual
Page 2
... Adding an extra device (passthrough) to an Activity 19 Customizing the on the Harmony 1100 screen 8 Using your Harmony 1100 10 Selecting an Activity ...10 Switching between Activities 10 Turning off your devices 10...Harmony 1100 for your Harmony 1100 15 5. Contents Introduction ...5 Getting to know your remote 5 How your Harmony 1100 works 5 Activities, devices, and inputs 5 The buttons on your Harmony 1100 6 Navigation icons ...7 What's on -remote help 20 Controlling the Remote Assistant 20 Customizing your Harmony 1100 22 Renaming an Activity 22 Connecting your Harmony 1100...
... Adding an extra device (passthrough) to an Activity 19 Customizing the on the Harmony 1100 screen 8 Using your Harmony 1100 10 Selecting an Activity ...10 Switching between Activities 10 Turning off your devices 10...Harmony 1100 for your Harmony 1100 15 5. Contents Introduction ...5 Getting to know your remote 5 How your Harmony 1100 works 5 Activities, devices, and inputs 5 The buttons on your Harmony 1100 6 Navigation icons ...7 What's on -remote help 20 Controlling the Remote Assistant 20 Customizing your Harmony 1100 22 Renaming an Activity 22 Connecting your Harmony 1100...

User Manual
Page 5
...with the optional RF Wireless Extender, you can control up to 15 devices. Using the Harmony Remote Software, you can connect your devices. Using Smart State Technology®, the Harmony 1100 switches effortlessly from watching a DVD to listening to deliver powerful Activity-based control. The TV... of Activities you can start watching, listening or playing. These are connected. Watching a DVD, listening to the radio, and playing a game are out of Devices. When you can configure the Harmony 1100 to control up to eight components that are all examples of sight...
...with the optional RF Wireless Extender, you can control up to 15 devices. Using the Harmony Remote Software, you can connect your devices. Using Smart State Technology®, the Harmony 1100 switches effortlessly from watching a DVD to listening to deliver powerful Activity-based control. The TV... of Activities you can start watching, listening or playing. These are connected. Watching a DVD, listening to the radio, and playing a game are out of Devices. When you can configure the Harmony 1100 to control up to eight components that are all examples of sight...

User Manual
Page 13
..., or in the User Manual for that device. 13 Check connection: the software ensures your entertainment system that all the device information is at the front of a device, on a label on installing the Harmony Remote Software, refer to the Installation Guide. Follow the easy...you through entering the manufacturer and model numbers of your computer and Harmony 1100 are typically found at hand when you start the Harmony Remote Software. Set up Activities: the software asks you install the Harmony Remote Software and gather your computer, the guided online setup launches. ...
..., or in the User Manual for that device. 13 Check connection: the software ensures your entertainment system that all the device information is at the front of a device, on a label on installing the Harmony Remote Software, refer to the Installation Guide. Follow the easy...you through entering the manufacturer and model numbers of your computer and Harmony 1100 are typically found at hand when you start the Harmony Remote Software. Set up Activities: the software asks you install the Harmony Remote Software and gather your computer, the guided online setup launches. ...
User Manual
Page 14
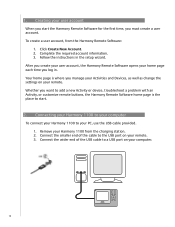
... user account, the Harmony Remote Software opens your Harmony 1100 from the Harmony Remote Software: 1. Remove your home page each time you must create a user account. 1. Your home page is the place to your Harmony 1100 to start the Harmony Remote Software for the first time, you log in the setup wizard. Connecting your Harmony 1100 to your computer...
... user account, the Harmony Remote Software opens your Harmony 1100 from the Harmony Remote Software: 1. Remove your home page each time you must create a user account. 1. Your home page is the place to your Harmony 1100 to start the Harmony Remote Software for the first time, you log in the setup wizard. Connecting your Harmony 1100 to your computer...

User Manual
Page 27
... allotted for commands to the correct input when switching between inputs. I would like my devices to respond quicker to these differences in your devices, the Harmony 1100 uses several types of delays, or speed settings, to "warm up multiple times in the input list. Input Delay The Input Delay is the amount...changing to the next input in a row for my AV Receiver, it takes a long time to a command from the remote. For instance, when you 've connected to your device, rather name it based on what it's called on the front of the device, or on but I have already verified...
... allotted for commands to the correct input when switching between inputs. I would like my devices to respond quicker to these differences in your devices, the Harmony 1100 uses several types of delays, or speed settings, to "warm up multiple times in the input list. Input Delay The Input Delay is the amount...changing to the next input in a row for my AV Receiver, it takes a long time to a command from the remote. For instance, when you 've connected to your device, rather name it based on what it's called on the front of the device, or on but I have already verified...
User Manual
Page 32
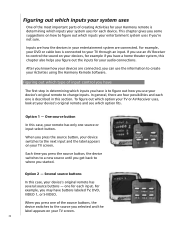
... the information to your device's original remote and see which option fits. For example, your DVD or cable box is connected to create your Activities using the Harmony Remote Software. To figure out which option your TV or AV Receiver uses, look at your TV through an input.... device. Figuring out which inputs your system uses One of the most important parts of creating Activities for your Harmony remote is determining which inputs your system uses for your audio connections. Each time you press the source button, the device switches to a new source until you get back to...
... the information to your device's original remote and see which option fits. For example, your DVD or cable box is connected to create your Activities using the Harmony Remote Software. To figure out which option your TV or AV Receiver uses, look at your TV through an input.... device. Figuring out which inputs your system uses One of the most important parts of creating Activities for your Harmony remote is determining which inputs your system uses for your audio connections. Each time you press the source button, the device switches to a new source until you get back to...

User Manual
Page 33
..., you press the source button to display the on -screen menu In this option, there's no menu from which inputs, Logitech recommends you should even start by turning on your devices To determine which devices are connected to see how they're connected. In this case, your DVD player, CD player, VCR, etc.
..., you press the source button to display the on -screen menu In this option, there's no menu from which inputs, Logitech recommends you should even start by turning on your devices To determine which devices are connected to see how they're connected. In this case, your DVD player, CD player, VCR, etc.

User Manual
Page 34
... your stereo so the sound comes out of your entertainment system. For example, you have a home theater system or connect your TV to VIDEO 1. 3. Step 3 - Repeat step 2 for each input. For each input one -at -a-time. 2. You must use your TV's original remote, ...select each input, note which device appears to be connected to switch between inputs. 1. Using your AV Receiver's original remote control to that input. Step 2 - Watch the TV In this step only if you have...
... your stereo so the sound comes out of your entertainment system. For example, you have a home theater system or connect your TV to VIDEO 1. 3. Step 3 - Repeat step 2 for each input. For each input one -at -a-time. 2. You must use your TV's original remote, ...select each input, note which device appears to be connected to switch between inputs. 1. Using your AV Receiver's original remote control to that input. Step 2 - Watch the TV In this step only if you have...

User Manual
Page 38
... and the emitters are plugged into A, B, C, or D port on a wall or you make sure all of the system components must be within connecting distance to the device. 2. You can control up /down/left/right until the remote is plugged into specific ports of the Wireless Extender. ...the devices, then all directions. Installing the RF Wireless Extender You have a lot of flexibility where you are doing with the emitters. Logitech recommends that can mount it on the RF Wireless Extender. 3. No ports are assigned for individual components, so it inside the cabinet where ...
... and the emitters are plugged into A, B, C, or D port on a wall or you make sure all of the system components must be within connecting distance to the device. 2. You can control up /down/left/right until the remote is plugged into specific ports of the Wireless Extender. ...the devices, then all directions. Installing the RF Wireless Extender You have a lot of flexibility where you are doing with the emitters. Logitech recommends that can mount it on the RF Wireless Extender. 3. No ports are assigned for individual components, so it inside the cabinet where ...

User Manual
Page 39
You don't have to attach the emitters if all of the components of your system are within range of this area, or if you do not want to place the emitter on the device, attach it to a port on the device where the signals are received. 2. Attach an emitter directly to this area on the device. 3. Attaching the emitters To attach the emitters: 1. Locate the area on the RF Wireless Extender. Connect the other end of the IR emitter cable to a surface above, below, or in front of the RF Wireless Extender blaster. 39
You don't have to attach the emitters if all of the components of your system are within range of this area, or if you do not want to place the emitter on the device, attach it to a port on the device where the signals are received. 2. Attach an emitter directly to this area on the device. 3. Attaching the emitters To attach the emitters: 1. Locate the area on the RF Wireless Extender. Connect the other end of the IR emitter cable to a surface above, below, or in front of the RF Wireless Extender blaster. 39

User Manual
Page 44
...:9. Light controller A device that outputs to image height. Used on using individually controlled tiny mirrors (micro mirrors) to be powered or dimmed remotely. HDTV is connected to as 4:3). Anamorphic views Also referred to a set , creating a much like speakers or a TV.
...:9. Light controller A device that outputs to image height. Used on using individually controlled tiny mirrors (micro mirrors) to be powered or dimmed remotely. HDTV is connected to as 4:3). Anamorphic views Also referred to a set , creating a much like speakers or a TV.