Setup Guide
Page 2
...failure of personal injury where and to you. All other rights which vary under local laws. ii Logitech, the Logitech logo, and other place as Logitech may not apply to the original purchaser. Some jurisdictions do not allow limitations on how long an implied...LIABILITY EXCEED THE ACTUAL MONEY PAID FOR THE LOGITECH PRODUCT OR SERVICE GIVING RISE TO THE LIABILITY. Logitech assumes no responsibility for a period of two (2) years from accident, abuse, or misapplication. DISCLAIMER OF WARRANTY. Part Number: 623009-0403 Limited Warranty. Information contained herein is longer....
...failure of personal injury where and to you. All other rights which vary under local laws. ii Logitech, the Logitech logo, and other place as Logitech may not apply to the original purchaser. Some jurisdictions do not allow limitations on how long an implied...LIABILITY EXCEED THE ACTUAL MONEY PAID FOR THE LOGITECH PRODUCT OR SERVICE GIVING RISE TO THE LIABILITY. Logitech assumes no responsibility for a period of two (2) years from accident, abuse, or misapplication. DISCLAIMER OF WARRANTY. Part Number: 623009-0403 Limited Warranty. Information contained herein is longer....
Setup Guide
Page 3
... hardware device complies with FCC regulations. Operation is connected; 4) consult the dealer or an experienced radio/TV technician for a Class B digital device, pursuant to Part 15 of the product, they must be used in order to the following two conditions: 1) this device may... for compliance could void the user's authority to provide reasonable protection against harmful interference in the interference-causing equipment standard entitled "Digital Apparatus," ICES-003 of the Department of the device. iii Where shielded interface cables have been provided with the product or ...
... hardware device complies with FCC regulations. Operation is connected; 4) consult the dealer or an experienced radio/TV technician for a Class B digital device, pursuant to Part 15 of the product, they must be used in order to the following two conditions: 1) this device may... for compliance could void the user's authority to provide reasonable protection against harmful interference in the interference-causing equipment standard entitled "Digital Apparatus," ICES-003 of the Department of the device. iii Where shielded interface cables have been provided with the product or ...

Setup Guide
Page 7
View Finder 5. hold to enter timer mode. 8. Connect USB cable here and to USB port on PC 4 to toggle camera resolutions; Resolution/Delete Button. Push to download pictures. Push to recharge the internal camera battery (requires no replacement). 2 3 5 6 7 8 1 English Also use to mute sound; Shows functions. 6. USB Connection. Status Display. View Finder 3. hold to select Delete mode. 7. Timer/Sound Button. Features 1 1. Picture Taking Button. Camera Lens 4. Takes a picture. 2.
View Finder 5. hold to enter timer mode. 8. Connect USB cable here and to USB port on PC 4 to toggle camera resolutions; Resolution/Delete Button. Push to download pictures. Push to recharge the internal camera battery (requires no replacement). 2 3 5 6 7 8 1 English Also use to mute sound; Shows functions. 6. USB Connection. Status Display. View Finder 3. hold to select Delete mode. 7. Timer/Sound Button. Features 1 1. Picture Taking Button. Camera Lens 4. Takes a picture. 2.

Setup Guide
Page 8
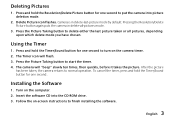
...No focusing required. 3. Closing and reopening the camera turns it back on camera. Large rectangle = 1.3 megapixels; Battery. Use the view finder to be taken. The camera shuts off the camera. Image Resolution. When the "X" flashes, the camera is low, the Battery icon blinks, all ... press the Picture Taking button. Timer. When Timer icon flashes, the camera is in Delete mode. Close the camera to conserve battery power and to turn off after 30 seconds if left open . 2. Slide the camera open . Taking a Picture 1. Delete Pictures. Shows remaining battery power....
...No focusing required. 3. Closing and reopening the camera turns it back on camera. Large rectangle = 1.3 megapixels; Battery. Use the view finder to be taken. The camera shuts off the camera. Image Resolution. When the "X" flashes, the camera is low, the Battery icon blinks, all ... press the Picture Taking button. Timer. When Timer icon flashes, the camera is in Delete mode. Close the camera to conserve battery power and to turn off after 30 seconds if left open . 2. Slide the camera open . Taking a Picture 1. Delete Pictures. Shows remaining battery power....
Setup Guide
Page 9
... the Picture Taking button to normal operation. Pressing the Resolution/Delete Picture button again puts the camera in delete-last-picture mode by default. Press the Picture Taking button to put the camera into the CD-ROM drive. 3. Installing the Software 1. Press and hold the Timer/Sound ...button for one second to delete either the last picture taken or all -pictures mode. 3. Deleting Pictures 1. Camera is in delete-all pictures, depending upon which delete mode you have chosen. The Timer icon will "beep" slowly ten times, then quickly,...
... the Picture Taking button to normal operation. Pressing the Resolution/Delete Picture button again puts the camera in delete-last-picture mode by default. Press the Picture Taking button to put the camera into the CD-ROM drive. 3. Installing the Software 1. Press and hold the Timer/Sound ...button for one second to delete either the last picture taken or all -pictures mode. 3. Deleting Pictures 1. Camera is in delete-all pictures, depending upon which delete mode you have chosen. The Timer icon will "beep" slowly ten times, then quickly,...
Setup Guide
Page 10
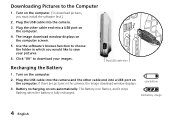
...To download pictures, you would like to the Computer 1. Turn on the computer. Use the software's browse function to choose the folder in the camera, the image download window displays. 3. The Battery icon flashes, and it stops flashing when the battery is fully recharged. Plug the USB cable ...into the camera and the other cable end into a USB port on the computer. 4. Plug the other cable end into the camera. 3. Plug the USB cable into a USB port on the computer. 2. Click "OK"...
...To download pictures, you would like to the Computer 1. Turn on the computer. Use the software's browse function to choose the folder in the camera, the image download window displays. 3. The Battery icon flashes, and it stops flashing when the battery is fully recharged. Plug the USB cable ...into the camera and the other cable end into a USB port on the computer. 4. Plug the other cable end into the camera. 3. Plug the USB cable into a USB port on the computer. 2. Click "OK"...
Setup Guide
Page 23
Entenza, 332-334 , Atico 2ª E - 08029 Barcelona France Logitech France SARL 26-28 Rue Danielle Casanova F - 75002 Paris Hungary Logitech Képviselet Vámház Krt. 10. 1/13 1053 Budapest - HUNGARY Product Information (Infoline) ✆ +31 (0)10-243 88 97 Nederlands ✆ +32 (0)2-626 ...91-375 33 68 ✆ +33 (0)1-43 62 34 13 ✆ +41 (0)21-863 54 00 English 17 Maanlander 14C NL - 3824 MP Amersfoort Denmark Logitech Representation Office Århusgade 88, 4.sal DK - 2100 København Ø Deutschland & Eastern European countries Streiflacher Straß...
Entenza, 332-334 , Atico 2ª E - 08029 Barcelona France Logitech France SARL 26-28 Rue Danielle Casanova F - 75002 Paris Hungary Logitech Képviselet Vámház Krt. 10. 1/13 1053 Budapest - HUNGARY Product Information (Infoline) ✆ +31 (0)10-243 88 97 Nederlands ✆ +32 (0)2-626 ...91-375 33 68 ✆ +33 (0)1-43 62 34 13 ✆ +41 (0)21-863 54 00 English 17 Maanlander 14C NL - 3824 MP Amersfoort Denmark Logitech Representation Office Århusgade 88, 4.sal DK - 2100 København Ø Deutschland & Eastern European countries Streiflacher Straß...
Setup Guide
Page 25
... - Dee Why NSW 2099 ✆ +1 800-231 7717 5025 Orbitor Dr., Bldg. 6, Suite 200 ✆ +1 800-231 7717 CDN - Mississauga, ON L4W 4Y5 19 Australia Logitech Australia Computer Peripherals Pty Ltd. Fremont, CA 94555 #2 Creation Road IV Science-Based - Corporate Headquarters...
... - Dee Why NSW 2099 ✆ +1 800-231 7717 5025 Orbitor Dr., Bldg. 6, Suite 200 ✆ +1 800-231 7717 CDN - Mississauga, ON L4W 4Y5 19 Australia Logitech Australia Computer Peripherals Pty Ltd. Fremont, CA 94555 #2 Creation Road IV Science-Based - Corporate Headquarters...
Setup Guide
Page 26
.... Customer Support will give you must first contact Customer Support to obtain a Return Merchandise Authorization (RMA) number. Ltd. World Wide Web: http://www.logitech.com FTP: ftp://ftp.logitech.com/pub Note For USA and Canadian customers only: please read the following prior to the point of purchase. To exchange or return... In Latin America and the Caribbean: Contact your product within the first 30 days, we recommend returning it to exchanging or returning your product through Logitech, you an RMA number and a special address for the exchange. 20
.... Customer Support will give you must first contact Customer Support to obtain a Return Merchandise Authorization (RMA) number. Ltd. World Wide Web: http://www.logitech.com FTP: ftp://ftp.logitech.com/pub Note For USA and Canadian customers only: please read the following prior to the point of purchase. To exchange or return... In Latin America and the Caribbean: Contact your product within the first 30 days, we recommend returning it to exchanging or returning your product through Logitech, you an RMA number and a special address for the exchange. 20

Setup Guide
Page 32
Information contained herein is subject to change without notice. All rights reserved. Logitech® on the world wide web: www.logitech.com ©2002 Logitech. Part number: 623009-0403 Logitech assumes no responsibility for any errors that may be registered. All other Logitech marks are the property of their respective owners. Logitech, the Logitech logo, and other trademarks are owned by Logitech and may appear in this manual.
Information contained herein is subject to change without notice. All rights reserved. Logitech® on the world wide web: www.logitech.com ©2002 Logitech. Part number: 623009-0403 Logitech assumes no responsibility for any errors that may be registered. All other Logitech marks are the property of their respective owners. Logitech, the Logitech logo, and other trademarks are owned by Logitech and may appear in this manual.