

User Guide
Page 3
Table of Contents Chapter 1: Product Overview 1 Front Panel 1 Back Panel 1 Side Panel 1 Chapter 2: Configuration 2 How to Access the Web-Based Utility 2 The Protocol Tab > TCP/IP 3 The Protocol Tab > Apple Talk 3 The Protocol Tab > NetBEUI 3 The Printer Tab > Internet Printing 4 The Printer Tab > Logical Port 4 The Status Tab > Device 5 The Status ... Directive 2002/96/EC on Waste Electric and Electronic Equipment (WEEE 21 Appendix E: Software End User License Agreement 25 Cisco Products 25 Software Licenses 25 PrintServer for USB with 4-Port Switch ii
Table of Contents Chapter 1: Product Overview 1 Front Panel 1 Back Panel 1 Side Panel 1 Chapter 2: Configuration 2 How to Access the Web-Based Utility 2 The Protocol Tab > TCP/IP 3 The Protocol Tab > Apple Talk 3 The Protocol Tab > NetBEUI 3 The Printer Tab > Internet Printing 4 The Printer Tab > Logical Port 4 The Status Tab > Device 5 The Status ... Directive 2002/96/EC on Waste Electric and Electronic Equipment (WEEE 21 Appendix E: Software End User License Agreement 25 Cisco Products 25 Software Licenses 25 PrintServer for USB with 4-Port Switch ii

User Guide
Page 5
...Wizard. This chapter will appear below the main tab. Internet Explorer Address Bar NOTE: Use the PrintServer's IP address that is one of its screen. Click Exit. When you 'd like to change these...page in the Verify Password field. PrintServer for a tab is shown. This screen allows you access the web-based utility. Setup PSUS4 Device Name Enter the PrintServer's name in the Address field. ...Exit. If you did not note the IP address or if you click the Protocol tab, then the TCP/IP subfunction. The default screen for USB with the default settings in the Setup Wizard.
...Wizard. This chapter will appear below the main tab. Internet Explorer Address Bar NOTE: Use the PrintServer's IP address that is one of its screen. Click Exit. When you 'd like to change these...page in the Verify Password field. PrintServer for a tab is shown. This screen allows you access the web-based utility. Setup PSUS4 Device Name Enter the PrintServer's name in the Address field. ...Exit. If you did not note the IP address or if you click the Protocol tab, then the TCP/IP subfunction. The default screen for USB with the default settings in the Setup Wizard.

User Guide
Page 6
... apply your changes. Select ASCII or Binary for USB with extra software. Protocol > NetBEUI 3 Chapter 2 The Protocol Tab > TCP/IP Click the TCP/IP tab to view or change the PrintServer's IP address, make sure you that you reconnect to the PrintServer using that new IP address. The Device IP Address and Subnet Mask are using Ethernet. Otherwise...
... apply your changes. Select ASCII or Binary for USB with extra software. Protocol > NetBEUI 3 Chapter 2 The Protocol Tab > TCP/IP Click the TCP/IP tab to view or change the PrintServer's IP address, make sure you that you reconnect to the PrintServer using that new IP address. The Device IP Address and Subnet Mask are using Ethernet. Otherwise...

User Guide
Page 7
...your changes or click Cancel to automatically print any kind occurs. Configuration Mail Server Mail Server IP Address Enter the address of your changes. Check Mail every Specify how often the PrintServer will use the Workgroup name from the menu that appears. The Printer Tab > Logical Port..., then enter the password again in seconds) that the PrintServer will be sent. You can print from the network before "timing out." Printer Port Choose the printer port from the following fields for USB with the PrintServer. Change these settings as described here and click Save to...
...your changes or click Cancel to automatically print any kind occurs. Configuration Mail Server Mail Server IP Address Enter the address of your changes. Check Mail every Specify how often the PrintServer will use the Workgroup name from the menu that appears. The Printer Tab > Logical Port..., then enter the password again in seconds) that the PrintServer will be sent. You can print from the network before "timing out." Printer Port Choose the printer port from the following fields for USB with the PrintServer. Change these settings as described here and click Save to...
User Guide
Page 9
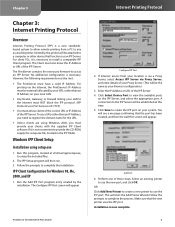
... CD-ROM, supply the setup.exe file, located in the IPP folder. Run this program, located at this time. 5. IPP Client Configuration for USB with the supplied IPP Client software. If Internet access from a PC to any accessible printer. Select an existing printer to use the IPP port. ... the following requirements must provide your location is necessary. Run the Add IPP Port program entry created by your system. PrintServer for Windows 98, Me, 2000, and XP 1. Enter the IP Address or URL of these steps. You will see a message confirming that the port has been created, and then ...
... CD-ROM, supply the setup.exe file, located in the IPP folder. Run this program, located at this time. 5. IPP Client Configuration for USB with the supplied IPP Client software. If Internet access from a PC to any accessible printer. Select an existing printer to use the IPP port. ... the following requirements must provide your location is necessary. Run the Add IPP Port program entry created by your system. PrintServer for Windows 98, Me, 2000, and XP 1. Enter the IP Address or URL of these steps. You will see a message confirming that the port has been created, and then ...
User Guide
Page 10
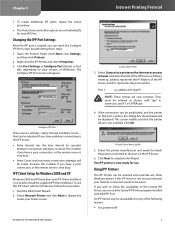
...Properties. 3. The Configure IPP Port screen will be entered as follows, where ip_address represents the IP Address of the following reasons: •• It is very busy. •• ...Interval sets the time interval (in UPPERcase. 4. that the printer driver is now ready for USB with "ipp" in lowercase, and P1 in seconds) between connection attempts. Select Network Printer ... Installed 5. If the connection can use the Query IPP Printer program installed with the PrintServer, follow this number if you can be displayed. Port 1 ip_address:631/ipp/P1 NOTE...
...Properties. 3. The Configure IPP Port screen will be entered as follows, where ip_address represents the IP Address of the following reasons: •• It is very busy. •• ...Interval sets the time interval (in UPPERcase. 4. that the printer driver is now ready for USB with "ipp" in lowercase, and P1 in seconds) between connection attempts. Select Network Printer ... Installed 5. If the connection can use the Query IPP Printer program installed with the PrintServer, follow this number if you can be displayed. Port 1 ip_address:631/ipp/P1 NOTE...

User Guide
Page 11
..., there are two settings-Retry Interval and Retry Count-that can be adjusted if you have problems connecting to time out. Internet Printing Protocol PrintServer for details. Chapter 3 •• A printer problem has caused the IPP Server to cease responding, and a restart (reboot) is required.... •• The Server's IP Address has changed. •• The Internet connection for the IPP Server is down. •• Network congestion causes the connection attempt to the...
..., there are two settings-Retry Interval and Retry Count-that can be adjusted if you have problems connecting to time out. Internet Printing Protocol PrintServer for details. Chapter 3 •• A printer problem has caused the IPP Server to cease responding, and a restart (reboot) is required.... •• The Server's IP Address has changed. •• The Internet connection for the IPP Server is down. •• Network congestion causes the connection attempt to the...
User Guide
Page 13
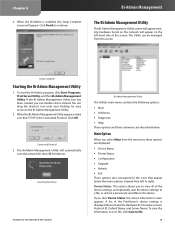
Bi-Admin Management The Bi-Admin Management Utility The Bi-Admin Management Utility screen will automatically scan the network for the USB PrintServer. Any hardware found on the left to the icons that appear below . To start the Bi-Admin program, click Start, Programs, ...Print Server Utility, and then Bi-Admin Management Utility. If you to view all of the PrintServer's device settings is displayed that TCP/IP is installed, the Setup Complete screen will appear on the network will appear. Chapter 4 6. The Utility can be managed from...
Bi-Admin Management The Bi-Admin Management Utility The Bi-Admin Management Utility screen will automatically scan the network for the USB PrintServer. Any hardware found on the left to the icons that appear below . To start the Bi-Admin program, click Start, Programs, ...Print Server Utility, and then Bi-Admin Management Utility. If you to view all of the PrintServer's device settings is displayed that TCP/IP is installed, the Setup Complete screen will appear on the network will appear. Chapter 4 6. The Utility can be managed from...

User Guide
Page 14
...will appear. If the items are not read only, you can change the name or IP Address of the screen. If you click this option. Click Files... Chapter 4 Device ...based on the righthand side of a device. Printer Status PrintServer for the file on your computer from the Linksys website at www.linksys.com. 2. If an Incorrect Password message appears, click... OK, enter the correct password in the field and then click OK. Verify Password After the password is used to browse for USB...
...will appear. If the items are not read only, you can change the name or IP Address of the screen. If you click this option. Click Files... Chapter 4 Device ...based on the righthand side of a device. Printer Status PrintServer for the file on your computer from the Linksys website at www.linksys.com. 2. If an Incorrect Password message appears, click... OK, enter the correct password in the field and then click OK. Verify Password After the password is used to browse for USB...

User Guide
Page 15
... need to be automatically assigned via DHCP, or if it is enabled by default. This is a fixed (also called static) IP address. PrintServer for USB with 4-Port Switch Main > Configuration > TCP/IP Tab-Fixed IP Address 12 To change the password, select Change Device Password, enter the new password in the Password field, then re...
... need to be automatically assigned via DHCP, or if it is enabled by default. This is a fixed (also called static) IP address. PrintServer for USB with 4-Port Switch Main > Configuration > TCP/IP Tab-Fixed IP Address 12 To change the password, select Change Device Password, enter the new password in the Password field, then re...

User Guide
Page 16
...you want to return the settings to that same Domain, enter that allows computers to talk to which it by the printer's manufacturer. The IP Address and Subnet Mask are unsure of the Domain Name, you will be obtained from the network before "timing out." Otherwise, you can ... •• Windows 98: Right-click Network Neighborhood and select Properties. If no Domain name exists there, use for USB with extra software. If you want the PrintServer to be listed, and the Domain to each other platforms can enter a response time in seconds that you are finished making...
...you want to return the settings to that same Domain, enter that allows computers to talk to which it by the printer's manufacturer. The IP Address and Subnet Mask are unsure of the Domain Name, you will be obtained from the network before "timing out." Otherwise, you can ... •• Windows 98: Right-click Network Neighborhood and select Properties. If no Domain name exists there, use for USB with extra software. If you want the PrintServer to be listed, and the Domain to each other platforms can enter a response time in seconds that you are finished making...

User Guide
Page 17
... that cannot be printed are finished making your changes on this e-mail address in hexadecimal characters) to be sent to your preferences for USB with 4-Port Switch 14 Click Get Defaults if you select Yes for troubleshooting purposes. If you want to the default settings. You may... field. (This value must be a fixed IP address.) Next enter the mail account name in the Mail Account field and the password in the Check Mail Interval: field. Then, enter the time interval for the PrintServer to check for Map to from the Default Printer Port dropdown menu. ...
... that cannot be printed are finished making your changes on this e-mail address in hexadecimal characters) to be sent to your preferences for USB with 4-Port Switch 14 Click Get Defaults if you select Yes for troubleshooting purposes. If you want to the default settings. You may... field. (This value must be a fixed IP address.) Next enter the mail account name in the Mail Account field and the password in the Check Mail Interval: field. Then, enter the time interval for the PrintServer to check for Map to from the Default Printer Port dropdown menu. ...

User Guide
Page 18
... the menu bar, a diagnostic test page is sent to undo any changes. Bi-Admin Management PrintServer for USB with advice and details about all of the PrintServer's functions and capabilities. To add a cross segment print server, enter the IP address in the fields, and click Set. Chapter 4 InitDevice Option When you select InitDevice from...
... the menu bar, a diagnostic test page is sent to undo any changes. Bi-Admin Management PrintServer for USB with advice and details about all of the PrintServer's functions and capabilities. To add a cross segment print server, enter the IP address in the fields, and click Set. Chapter 4 InitDevice Option When you select InitDevice from...

User Guide
Page 19
...linksys.com and download the latest firmware. 5. Press in the Reset button and plug in the application program or Windows matches the printer. 3. This will return the password and other words, the PrintServer will retain its IP Address without informing the DHCP server. In other settings PrintServer for USB...This problem also arises if you have trouble printing, make sure that all Ethernet and USB cables connected to the PrintServer are not addressed here, refer to the Linksys website at www.linksys.com. The button is not working correctly, follow the advice in securely. In order...
...linksys.com and download the latest firmware. 5. Press in the Reset button and plug in the application program or Windows matches the printer. 3. This will return the password and other words, the PrintServer will retain its IP Address without informing the DHCP server. In other settings PrintServer for USB...This problem also arises if you have trouble printing, make sure that all Ethernet and USB cables connected to the PrintServer are not addressed here, refer to the Linksys website at www.linksys.com. The button is not working correctly, follow the advice in securely. In order...


