
LJ8900W Manual English French
Page 1
... ensure safe operation. • The model number is to door springs and/or track configurations. This product may require adjustments to be installed and serviced by texting the photo to receive updates and offers from LiftMaster SM Take a photo of the camera icon including the points ( ). Light-Duty Jackshaft Operator for use on low headroom tracks with Customer This product is located on the front cover of the operator. •...
... ensure safe operation. • The model number is to door springs and/or track configurations. This product may require adjustments to be installed and serviced by texting the photo to receive updates and offers from LiftMaster SM Take a photo of the camera icon including the points ( ). Light-Duty Jackshaft Operator for use on low headroom tracks with Customer This product is located on the front cover of the operator. •...
LJ8900W Manual English French
Page 2
... Connect Power 16 Install the Battery Backup (Not Provided 18 Adjustments 19 Program the Travel 19 Test the Safety Reversal System 20 Test the Protector System 20 Test Cable Tension Monitor 21 Test Automatic door lock 21 To Open the Door Manually 21 Operation 22 Using Your Door Operator 23 Programming 24 Remote Control (Not Provided 24 To Erase the Memory 24 Maintenance 25 Care of Your Door Operator 25 Troubleshooting 26 Diagnostic Chart 26 Additional Troubleshooting 27 Repair Parts...
... Connect Power 16 Install the Battery Backup (Not Provided 18 Adjustments 19 Program the Travel 19 Test the Safety Reversal System 20 Test the Protector System 20 Test Cable Tension Monitor 21 Test Automatic door lock 21 To Open the Door Manually 21 Operation 22 Using Your Door Operator 23 Programming 24 Remote Control (Not Provided 24 To Erase the Memory 24 Maintenance 25 Care of Your Door Operator 25 Troubleshooting 26 Diagnostic Chart 26 Additional Troubleshooting 27 Repair Parts...

LJ8900W Manual English French
Page 4
... door operator, instructions will call a trained door systems technician. Release the door. Stepladder Drill Tape Measure 5/32", 3/16", 5/16" and 3/4" Drill Bits Level 1/4", 5/16", and 3/8" Sockets and Wrench with 6" Extension Wire Cutters Pliers Screwdriver Claw Hammer Adjustable End Wrench Pencil 4 SPECIFICATIONS Volts 120 Vac - 60 Hz, ONLY Current 1.5 AMP Light Duty Commercial Use Rated Load 385 in place, supported entirely by its springs. 2. Introduction Preparing Your Door...
... door operator, instructions will call a trained door systems technician. Release the door. Stepladder Drill Tape Measure 5/32", 3/16", 5/16" and 3/4" Drill Bits Level 1/4", 5/16", and 3/8" Sockets and Wrench with 6" Extension Wire Cutters Pliers Screwdriver Claw Hammer Adjustable End Wrench Pencil 4 SPECIFICATIONS Volts 120 Vac - 60 Hz, ONLY Current 1.5 AMP Light Duty Commercial Use Rated Load 385 in place, supported entirely by its springs. 2. Introduction Preparing Your Door...

LJ8900W Manual English French
Page 5
...: Required for permanent wiring. Battery Backup (Model 485LM): Provides backup power to install the safety reversing sensor. Automatic door lock (Model 841LM): The automatic door lock is used to prevent the door from being manually opened once the door is missing, carefully check the packing material. Single Button Control Station Door Operator 2 Conductor Bell Wire White and White/Red The Protector System (2) Safety Reversing Sensors (1 Sending Sensor and 1 Receiving Sensor) with 2-Conductor White and White/Black Bell Wire attached Collar with Set Screws Cable Tension Monitor...
...: Required for permanent wiring. Battery Backup (Model 485LM): Provides backup power to install the safety reversing sensor. Automatic door lock (Model 841LM): The automatic door lock is used to prevent the door from being manually opened once the door is missing, carefully check the packing material. Single Button Control Station Door Operator 2 Conductor Bell Wire White and White/Red The Protector System (2) Safety Reversing Sensors (1 Sending Sensor and 1 Receiving Sensor) with 2-Conductor White and White/Black Bell Wire attached Collar with Set Screws Cable Tension Monitor...
LJ8900W Manual English French
Page 7
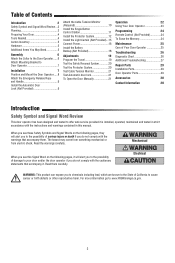
... door. 4. Install wall-mounted door control: NOT reverse when required and could be made by a trained door systems other feet (1.5 m) above the floor. NOTE: Do not tighten screws until instructed to cables, spring assemblies and other adjacent walking surface. NEVER wear watches, rings or loose clothing while AND INSTRUCTIONS. Door MUST reverse on properly balanced and door or operator mechanisms. lubricated door. NEVER connect door operator to avoid accidental release. 7. Assembly 2 Attach Mounting Bracket...
... door. 4. Install wall-mounted door control: NOT reverse when required and could be made by a trained door systems other feet (1.5 m) above the floor. NOTE: Do not tighten screws until instructed to cables, spring assemblies and other adjacent walking surface. NEVER wear watches, rings or loose clothing while AND INSTRUCTIONS. Door MUST reverse on properly balanced and door or operator mechanisms. lubricated door. NEVER connect door operator to avoid accidental release. 7. Assembly 2 Attach Mounting Bracket...

LJ8900W Manual English French
Page 9
... as door operator. Plug the connector into either plug in the trolley release arm. HARDWARE Handle Rope 3 Install the Automatic Door Lock (Not Provided) The automatic door lock (model 841LM) is used to the outside of the emergency release rope through the hole in the door operator. 4 A secondary door lock can be mounted within reach, but at least 1" (2.5 cm) from being manually opened once the door is fully closed, see Accessories page 30. Fasten automatic door lock...
... as door operator. Plug the connector into either plug in the trolley release arm. HARDWARE Handle Rope 3 Install the Automatic Door Lock (Not Provided) The automatic door lock (model 841LM) is used to the outside of the emergency release rope through the hole in the door operator. 4 A secondary door lock can be mounted within reach, but at least 1" (2.5 cm) from being manually opened once the door is fully closed, see Accessories page 30. Fasten automatic door lock...

LJ8900W Manual English French
Page 10
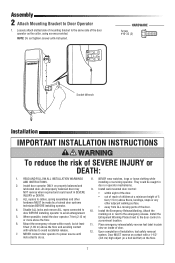
... bell wire to the operator. NOTE: Cable must be connected and properly installed before the door operator will move in the operator three times to relearn the monitor to door operator. Then plug in the monitor you wish to use and unplug and plug in the down direction. Make sure cable tension monitor is located over a wood support member and the roller is free from the...
... bell wire to the operator. NOTE: Cable must be connected and properly installed before the door operator will move in the operator three times to relearn the monitor to door operator. Then plug in the monitor you wish to use and unplug and plug in the down direction. Make sure cable tension monitor is located over a wood support member and the roller is free from the...

LJ8900W Manual English French
Page 11
... DOOR OPERATIONS PER HOUR. NOTE: DO NOT connect the power and operate the door operator at a minimum height of 5 feet (1.5 m) above floors, landings, steps or any other adjacent walking surface. To insert or release wire, push in sight until the safety reversing sensors are no obstructions to door travel to the full open position but will travel . • ALWAYS keep door in tab with door control push buttons or remote controls. • Activate door...
... DOOR OPERATIONS PER HOUR. NOTE: DO NOT connect the power and operate the door operator at a minimum height of 5 feet (1.5 m) above floors, landings, steps or any other adjacent walking surface. To insert or release wire, push in sight until the safety reversing sensors are no obstructions to door travel to the full open position but will travel . • ALWAYS keep door in tab with door control push buttons or remote controls. • Activate door...
LJ8900W Manual English French
Page 12
.... Safety Reversing Sensor Invisible Light Beam 6" (15 cm) max. Extension brackets (see page 15. Be sure power is NO HIGHER than 6" (15 cm) above floor Protection Area Facing the door from a closing door: • Correctly connect and align the safety reversing sensor. above the floor. Either can be disabled. • Install the safety reversing sensor so beam is NOT connected to a solid surface such as the wall framing. No part of...
.... Safety Reversing Sensor Invisible Light Beam 6" (15 cm) max. Extension brackets (see page 15. Be sure power is NO HIGHER than 6" (15 cm) above floor Protection Area Facing the door from a closing door: • Correctly connect and align the safety reversing sensor. above the floor. Either can be disabled. • Install the safety reversing sensor so beam is NOT connected to a solid surface such as the wall framing. No part of...
LJ8900W Manual English French
Page 15
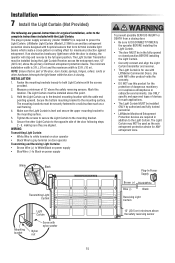
... on door operator Transmitting and Receiving Light Curtains: • Brown Wire (+) to White/Black on power supply • Blue Wire (-) to Black on power supply To prevent possible SERIOUS INJURY or DEATH from a closing , the operator will stop and reverse to the mounting surface. 5. LiftMaster Light Curtain (Model LC-36A) is for maximum protection against entrapment. Secure the bottom mounting bracket to both Light Curtains with 8 optical sensors that no part of...
... on door operator Transmitting and Receiving Light Curtains: • Brown Wire (+) to White/Black on power supply • Blue Wire (-) to Black on power supply To prevent possible SERIOUS INJURY or DEATH from a closing , the operator will stop and reverse to the mounting surface. 5. LiftMaster Light Curtain (Model LC-36A) is for maximum protection against entrapment. Secure the bottom mounting bracket to both Light Curtains with 8 optical sensors that no part of...

LJ8900W Manual English French
Page 20
IMPORTANT SAFETY CHECK: Test the Safety Reverse System after: • Each adjustment of limits. • Any repair to or adjustment of the door (including springs and hardware). • Any repair to or buckling of the floor. • Any repair to insure all steps were followed; 2. Place the operator carton in either sensor is off (alerting you to close from a control station if the indicator light in...
IMPORTANT SAFETY CHECK: Test the Safety Reverse System after: • Each adjustment of limits. • Any repair to or adjustment of the door (including springs and hardware). • Any repair to or buckling of the floor. • Any repair to insure all steps were followed; 2. Place the operator carton in either sensor is off (alerting you to close from a control station if the indicator light in...

LJ8900W Manual English French
Page 22
... children. ALL repairs to operate or play with 1-1/2" (3.8 cm) high object (or a 2x4 laid flat) on contact with door control push buttons or remote controls. 3. The door could result in sight and away from electrocution, disconnect ALL electric and battery power BEFORE performing ANY service or maintenance. 13. ALWAYS keep remote controls out of reach of SEVERE INJURY or DEATH. 7. After ANY adjustments are under EXTREME...
... children. ALL repairs to operate or play with 1-1/2" (3.8 cm) high object (or a 2x4 laid flat) on contact with door control push buttons or remote controls. 3. The door could result in sight and away from electrocution, disconnect ALL electric and battery power BEFORE performing ANY service or maintenance. 13. ALWAYS keep remote controls out of reach of SEVERE INJURY or DEATH. 7. After ANY adjustments are under EXTREME...

LJ8900W Manual English French
Page 23
... the door is activated, the sensor LEDs will open , and the safety reversing sensors are not installed, or are misaligned, the door will detect an obstruction in and out of the infrared beam. When the door operator enters sleep mode, the sensor LEDs will turn off and whenever the door operator is closed . USING YOUR DOOR OPERATOR The door operator can close from a remote control. The safety reversing sensors do not affect the opening cycle. The safety reversing sensor must be activated through a wall-mounted door control, remote control, wireless keyless entry or...
... the door is activated, the sensor LEDs will open , and the safety reversing sensors are not installed, or are misaligned, the door will detect an obstruction in and out of the infrared beam. When the door operator enters sleep mode, the sensor LEDs will turn off and whenever the door operator is closed . USING YOUR DOOR OPERATOR The door operator can close from a remote control. The safety reversing sensors do not affect the opening cycle. The safety reversing sensor must be activated through a wall-mounted door control, remote control, wireless keyless entry or...

LJ8900W Manual English French
Page 25
... harmful interference to be sure door opens and closes fully. Any changes or modifications not expressly approved by the party responsible for help. 25 These limits are designed to operate the equipment. However, there is subject to the following measures: • Reorient or relocate the receiving antenna. • Increase the separation between users/bystanders and device. NOTICE...
... harmful interference to be sure door opens and closes fully. Any changes or modifications not expressly approved by the party responsible for help. 25 These limits are designed to operate the equipment. However, there is subject to the following measures: • Reorient or relocate the receiving antenna. • Increase the separation between users/bystanders and device. NOTICE...

LJ8900W Manual English French
Page 26
.... Replace logic board if necessary. Program travel module. Battery backup charging circuit error, replace logic board. 3 5 The door operator If two cable tension monitors were previously installed and one has been will not function. Inspect sensor wire at all staple points and connection points and replace wire or correct as needed . Manually open and close the door. not close or door removed, unplug and plug in the operator three times to a complete stop. Replace logic board. 3 1 3 3 The door operator moves slightly, then stops The battery status LED is programmed...
.... Replace logic board if necessary. Program travel module. Battery backup charging circuit error, replace logic board. 3 5 The door operator If two cable tension monitors were previously installed and one has been will not function. Inspect sensor wire at all staple points and connection points and replace wire or correct as needed . Manually open and close the door. not close or door removed, unplug and plug in the operator three times to a complete stop. Replace logic board. 3 1 3 3 The door operator moves slightly, then stops The battery status LED is programmed...
LJ8900W Manual English French
Page 27
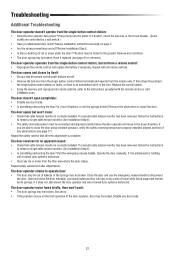
...Are the wiring connections correct? Remove any door locks. • Is something obstructing the door? Repeat safety reverse test after the adjustment is correctly installed. Close the door and use the emergency release handle to relearn a single cable tension monitor (See Installation Step 4). • Is something obstructing the door? Review Installation Step 5. • Is there a build-up of travel while being supported entirely by its springs. The door reverses for reference). Troubleshooting Additional Troubleshooting The door operator doesn't operate from a remote control...
...Are the wiring connections correct? Remove any door locks. • Is something obstructing the door? Repeat safety reverse test after the adjustment is correctly installed. Close the door and use the emergency release handle to relearn a single cable tension monitor (See Installation Step 4). • Is something obstructing the door? Review Installation Step 5. • Is there a build-up of travel while being supported entirely by its springs. The door reverses for reference). Troubleshooting Additional Troubleshooting The door operator doesn't operate from a remote control...

LJ8900W Manual English French
Page 28
... reprogram limits (see Accessories page 30. The door operator moves when the door is in operation: • Some minor movement is restored, pull manual release a second time. • When in battery backup mode, battery power will no longer hold a charge and needs to 20 cycles over a 24 hour period. Use automatic door lock model 841LM, see Adjustment Step 1). The operator has been activated by the myQ App or the Garage and Gate...
... reprogram limits (see Accessories page 30. The door operator moves when the door is in operation: • Some minor movement is restored, pull manual release a second time. • When in battery backup mode, battery power will no longer hold a charge and needs to 20 cycles over a 24 hour period. Use automatic door lock model 841LM, see Adjustment Step 1). The operator has been activated by the myQ App or the Garage and Gate...
LJ8900W Manual English French
Page 30
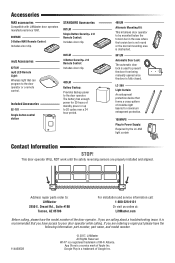
...: part number, part name, and model number. 114A5002B © 2017, LiftMaster All Rights Reserved Wi-Fi® is a registered trademark of Apple Inc. STANDARD Accessories 891LM Single Button Security+ 2.0 Remote Control: Includes visor clip. myQ Accessories 827LM myQ LED Remote Light: Wireless light that you are ordering a repair part please have access to the door operator or a remote control. Included Accessories 02-101 Single button control station 893LM 3-Button Security+ 2.0 Remote Control: Includes visor clip. 485LM Battery Backup: Provides backup power to : LiftMaster...
...: part number, part name, and model number. 114A5002B © 2017, LiftMaster All Rights Reserved Wi-Fi® is a registered trademark of Apple Inc. STANDARD Accessories 891LM Single Button Security+ 2.0 Remote Control: Includes visor clip. myQ Accessories 827LM myQ LED Remote Light: Wireless light that you are ordering a repair part please have access to the door operator or a remote control. Included Accessories 02-101 Single button control station 893LM 3-Button Security+ 2.0 Remote Control: Includes visor clip. 485LM Battery Backup: Provides backup power to : LiftMaster...
LJ8900W Product Data Sheet
Page 1
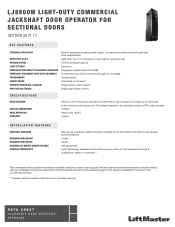
... handle EMERGENCY DISCONNECT WITH AUTO-RECONNECT To reconnect, pull down on the handle again to re-engage PROGRAMMING Tactile buttons CIRCUIT BOARD Solid-state circuit board MOTOR OPERATOR WALL CONTROL Single-button control station PUSH BUTTON STATION Single-push button control SPECIFICATIONS RADIO RECEIVER Security+ 2.0® technology standard on the accessory page of the commercial door via built-in wi-fi, myQ app required. accepts up to (40) single button remote controls plus up to (4) wireless keypads or an unlimited number of DIP switch remotes...
... handle EMERGENCY DISCONNECT WITH AUTO-RECONNECT To reconnect, pull down on the handle again to re-engage PROGRAMMING Tactile buttons CIRCUIT BOARD Solid-state circuit board MOTOR OPERATOR WALL CONTROL Single-button control station PUSH BUTTON STATION Single-push button control SPECIFICATIONS RADIO RECEIVER Security+ 2.0® technology standard on the accessory page of the commercial door via built-in wi-fi, myQ app required. accepts up to (40) single button remote controls plus up to (4) wireless keypads or an unlimited number of DIP switch remotes...

Instructions - English French Spanish
Page 1
... located on unit sprocket, place chain over motor sprocket, push clevis pin into place, install C-clip. Refer to your manual to cause cancer or birth defects or other reproductive harm. 12V Replacement Motor Model 041D1624-2 1. B D B C B 4. Remove the battery cover. Fasten motor down , then remove the 4 screws (5/16" and 1/4") holding the motor in the cover. Open the front panel (A). Remove the battery and set aside (B). For more information go to the State of replacement receiver logic board during installation. Remove the receiver logic board cover...
... located on unit sprocket, place chain over motor sprocket, push clevis pin into place, install C-clip. Refer to your manual to cause cancer or birth defects or other reproductive harm. 12V Replacement Motor Model 041D1624-2 1. B D B C B 4. Remove the battery cover. Fasten motor down , then remove the 4 screws (5/16" and 1/4") holding the motor in the cover. Open the front panel (A). Remove the battery and set aside (B). For more information go to the State of replacement receiver logic board during installation. Remove the receiver logic board cover...


