
8550W Users Guide Manual
Page 1
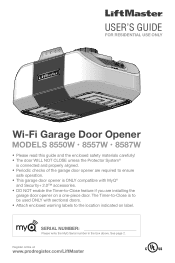
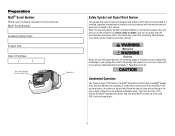
... online at: www.prodregister.com/LiftMaster SERIAL NUMBER: Please write the MyQ Serial number in the box above. See page 2. The Timer-to-Close is ONLY compatible with sectional doors. • Attach enclosed warning labels to -Close feature if you are installing the garage door opener on label.... USER'S GUIDE FOR RESIDENTIAL USE ONLY Wi-Fi Garage Door Opener MODELS 8550W • 8557W • 8587W • Please read this guide and the enclosed safety ...
... online at: www.prodregister.com/LiftMaster SERIAL NUMBER: Please write the MyQ Serial number in the box above. See page 2. The Timer-to-Close is ONLY compatible with sectional doors. • Attach enclosed warning labels to -Close feature if you are installing the garage door opener on label.... USER'S GUIDE FOR RESIDENTIAL USE ONLY Wi-Fi Garage Door Opener MODELS 8550W • 8557W • 8587W • Please read this guide and the enclosed safety ...
8550W Users Guide Manual
Page 2
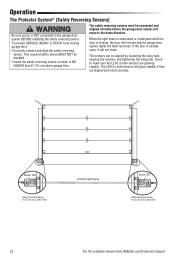
..., they will alert you to -Close (TTC) feature, the MyQ® Smartphone Control, and any other MyQ® devices are examples of the door is installed, operated, maintained and tested in strict accordance with sectional doors. Read them . Read the warnings carefully. Any device or feature that accompany it is considered... the warnings that accompany them carefully. The hazard may come from something mechanical or from electric shock. Product Serial Number 2 For the complete manual visit LiftMaster.com/Customer-Support
..., they will alert you to -Close (TTC) feature, the MyQ® Smartphone Control, and any other MyQ® devices are examples of the door is installed, operated, maintained and tested in strict accordance with sectional doors. Read them . Read the warnings carefully. Any device or feature that accompany it is considered... the warnings that accompany them carefully. The hazard may come from something mechanical or from electric shock. Product Serial Number 2 For the complete manual visit LiftMaster.com/Customer-Support

8550W Users Guide Manual
Page 3
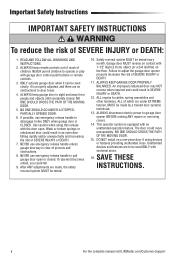
...high object (or a 2x4 laid flat) on contact with vehicles to be made by a trained door systems technician BEFORE installing opener. 4. Install wall-mounted garage door control: • within reach, but at minimum height of the door. 10. Unattended devices and features are...disconnect ALL electric and battery power BEFORE performing ANY service or maintenance. 14. NEVER wear watches, rings or loose clothing while installing or servicing opener. READ AND FOLLOW ALL WARNINGS AND INSTRUCTIONS. 2. An improperly balanced door may NOT reverse when required and ...
...high object (or a 2x4 laid flat) on contact with vehicles to be made by a trained door systems technician BEFORE installing opener. 4. Install wall-mounted garage door control: • within reach, but at minimum height of the door. 10. Unattended devices and features are...disconnect ALL electric and battery power BEFORE performing ANY service or maintenance. 14. NEVER wear watches, rings or loose clothing while installing or servicing opener. READ AND FOLLOW ALL WARNINGS AND INSTRUCTIONS. 2. An improperly balanced door may NOT reverse when required and ...
8550W Users Guide Manual
Page 4
... seen clearly, it can be used ONLY with garage door control push buttons or remote controls. 3. SAVE THESE INSTRUCTIONS. 4 For the complete manual visit LiftMaster.com/Customer-Support READ AND FOLLOW ALL WARNINGS AND INSTRUCTIONS. 2. NO ONE SHOULD GO UNDER A STOPPED, PARTIALLY OPENED DOOR. 6. Use caution when using...feature. NO ONE SHOULD CROSS THE PATH OF THE MOVING DOOR. 15. NO ONE SHOULD CROSS THE PATH OF THE MOVING DOOR. 5. DO NOT install on the floor. ALWAYS keep remote controls out of reach of SEVERE INJURY or DEATH: 1. ALWAYS keep garage door in SEVERE INJURY or...
... seen clearly, it can be used ONLY with garage door control push buttons or remote controls. 3. SAVE THESE INSTRUCTIONS. 4 For the complete manual visit LiftMaster.com/Customer-Support READ AND FOLLOW ALL WARNINGS AND INSTRUCTIONS. 2. NO ONE SHOULD GO UNDER A STOPPED, PARTIALLY OPENED DOOR. 6. Use caution when using...feature. NO ONE SHOULD CROSS THE PATH OF THE MOVING DOOR. 15. NO ONE SHOULD CROSS THE PATH OF THE MOVING DOOR. 5. DO NOT install on the floor. ALWAYS keep remote controls out of reach of SEVERE INJURY or DEATH: 1. ALWAYS keep garage door in SEVERE INJURY or...
8550W Users Guide Manual
Page 5
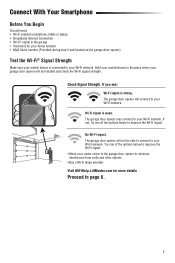
The garage door opener will connect to your Wi-Fi network. The garage door opener will not be installed and check the Wi-Fi signal strength. Hold your mobile device in the garage • Password for your home network • MyQ Serial number (Provided ... to your router closer to the garage door opener to minimize interference from walls and other objects • Buy a Wi-Fi range extender Visit WiFiHelp.LiftMaster.com for more details Proceed to page 6. 5 Wi-Fi signal is strong. The garage door opener may connect to your Wi-Fi network. Try one...
The garage door opener will connect to your Wi-Fi network. The garage door opener will not be installed and check the Wi-Fi signal strength. Hold your mobile device in the garage • Password for your home network • MyQ Serial number (Provided ... to your router closer to the garage door opener to minimize interference from walls and other objects • Buy a Wi-Fi range extender Visit WiFiHelp.LiftMaster.com for more details Proceed to page 6. 5 Wi-Fi signal is strong. The garage door opener may connect to your Wi-Fi network. Try one...
8550W Users Guide Manual
Page 10
...) Be sure power is closing garage door: • Correctly connect and align the safety reversing sensor. Check to the garage door opener BEFORE installing the safety reversing sensor. Amber LED Safety Reversing Sensor 6" (15 cm) max. When the light beam is obstructed or misaligned while the door... is NOT connected to make sure the LEDs in both sensors are aligned and wired correctly. above floor 10 For the complete manual visit LiftMaster.com/Customer-Support If the door is NO HIGHER than 6" (15 cm) above garage floor. To prevent SERIOUS INJURY or DEATH ...
...) Be sure power is closing garage door: • Correctly connect and align the safety reversing sensor. Check to the garage door opener BEFORE installing the safety reversing sensor. Amber LED Safety Reversing Sensor 6" (15 cm) max. When the light beam is obstructed or misaligned while the door... is NOT connected to make sure the LEDs in both sensors are aligned and wired correctly. above floor 10 For the complete manual visit LiftMaster.com/Customer-Support If the door is NO HIGHER than 6" (15 cm) above garage floor. To prevent SERIOUS INJURY or DEATH ...
8550W Users Guide Manual
Page 11
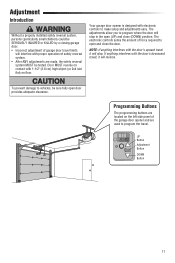
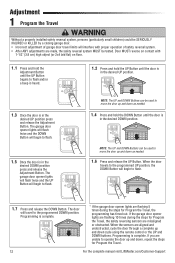
.... UP Button Adjustment Button DOWN Button 11 NOTE: If anything interferes with electronic controls to program where the door will stop . Adjustment Introduction Without a properly installed safety reversal system, persons (particularly small children) could be SERIOUSLY INJURED or KILLED by a closing garage door. • Incorrect adjustment of garage door travel limits...
.... UP Button Adjustment Button DOWN Button 11 NOTE: If anything interferes with electronic controls to program where the door will stop . Adjustment Introduction Without a properly installed safety reversal system, persons (particularly small children) could be SERIOUSLY INJURED or KILLED by a closing garage door. • Incorrect adjustment of garage door travel limits...
8550W Users Guide Manual
Page 12
...door travel to operate the door up and down, repeat the steps for Program the Travel. 12 For the complete manual visit LiftMaster.com/Customer-Support If the garage door opener lights are aligned and unobstructed, cycle the door through a complete up and down cycle...are flashing 10 times during the steps for Program the Travel, the programming has timed out. Adjustment 1 Program the Travel Without a properly installed safety reversal system, persons (particularly small children) could be SERIOUSLY INJURED or KILLED by a closing garage door. • Incorrect adjustment of safety...
...door travel to operate the door up and down, repeat the steps for Program the Travel. 12 For the complete manual visit LiftMaster.com/Customer-Support If the garage door opener lights are aligned and unobstructed, cycle the door through a complete up and down cycle...are flashing 10 times during the steps for Program the Travel, the programming has timed out. Adjustment 1 Program the Travel Without a properly installed safety reversal system, persons (particularly small children) could be SERIOUSLY INJURED or KILLED by a closing garage door. • Incorrect adjustment of safety...
8550W Users Guide Manual
Page 13
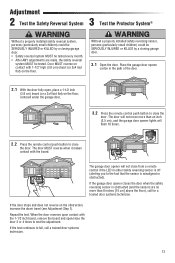
...centered under the garage door. 3.2 Press the remote control push button to fail, call for a trained door systems technician. Without a properly installed safety reversing sensor, persons (particularly small children) could be SERIOUSLY INJURED or KILLED by a closing garage door. • Safety reversal system ...close the door. Adjustment 2 3 Test the Safety Reversal System Test the Protector System® Without a properly installed safety reversal system, persons (particularly small children) could be SERIOUSLY INJURED or KILLED by a closing garage door. 3.1 Open the door.
...centered under the garage door. 3.2 Press the remote control push button to fail, call for a trained door systems technician. Without a properly installed safety reversing sensor, persons (particularly small children) could be SERIOUSLY INJURED or KILLED by a closing garage door. • Safety reversal system ...close the door. Adjustment 2 3 Test the Safety Reversal System Test the Protector System® Without a properly installed safety reversal system, persons (particularly small children) could be SERIOUSLY INJURED or KILLED by a closing garage door. 3.1 Open the door.
8550W Users Guide Manual
Page 14
...; Check to be sure door opens and closes fully. Open and close the garage door. For help and support videos visit LiftMaster.com/Customer-Support or contact your installing dealer. See page 10. My neighbor's remote control opens my garage door: Erase the memory from the garage door opener rail...toute personne. • Manually open and close and the light bulbs flash: Check to Wi-Fi, visit WiFiHelp.LiftMaster.com. Garage door may be binding or there may be installed in the middle (1), then at each side (2 and 3) with FCC and/or Industry Canada (IC) rules, adjustment or...
...; Check to be sure door opens and closes fully. Open and close the garage door. For help and support videos visit LiftMaster.com/Customer-Support or contact your installing dealer. See page 10. My neighbor's remote control opens my garage door: Erase the memory from the garage door opener rail...toute personne. • Manually open and close and the light bulbs flash: Check to Wi-Fi, visit WiFiHelp.LiftMaster.com. Garage door may be binding or there may be installed in the middle (1), then at each side (2 and 3) with FCC and/or Industry Canada (IC) rules, adjustment or...

8550W Users Guide Manual
Page 16
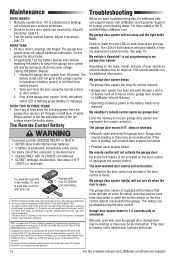
... UNIT, REPLACEMENT OF CONSUMABLE ITEMS (E.G., BATTERIES IN REMOTE CONTROL TRANSMITTERS AND LIGHT BULBS), OR UNITS INSTALLED FOR NONRESIDENTIAL USE. Warranty LIFTMASTER® LIMITED WARRANTY LiftMaster ("Seller") warrants to the first retail purchaser of this product, for the residence in which vary... Belt Battery Backup* 5 Years Lifetime 1 year Lifetime 1 year The proper operation of -purchase receipt with the instructions regarding installation, operation, and maintenance and testing. THIS LIMITED WARRANTY ALSO DOES NOT COVER ANY PROBLEMS CAUSED BY INTERFERENCE. NO PERSON IS...
... UNIT, REPLACEMENT OF CONSUMABLE ITEMS (E.G., BATTERIES IN REMOTE CONTROL TRANSMITTERS AND LIGHT BULBS), OR UNITS INSTALLED FOR NONRESIDENTIAL USE. Warranty LIFTMASTER® LIMITED WARRANTY LiftMaster ("Seller") warrants to the first retail purchaser of this product, for the residence in which vary... Belt Battery Backup* 5 Years Lifetime 1 year Lifetime 1 year The proper operation of -purchase receipt with the instructions regarding installation, operation, and maintenance and testing. THIS LIMITED WARRANTY ALSO DOES NOT COVER ANY PROBLEMS CAUSED BY INTERFERENCE. NO PERSON IS...

8550W Owners Manual
Page 2
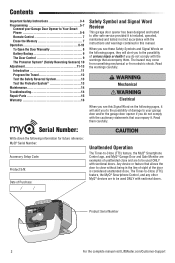
Contents Preparation 3 Assembly 7 Installation 9 Install the Door Control 17 Install the Protector System 19 Power 23 Adjustments 25 Battery Backup 28 Operation 30 Maintenance 37 Troubleshooting 38 Accessories 40 Warranty 41 Repair Parts 42 2
Contents Preparation 3 Assembly 7 Installation 9 Install the Door Control 17 Install the Protector System 19 Power 23 Adjustments 25 Battery Backup 28 Operation 30 Maintenance 37 Troubleshooting 38 Accessories 40 Warranty 41 Repair Parts 42 2
8550W Owners Manual
Page 3
... with the instructions and warnings contained in the line of sight of serious injury or death if you to the possibility of the door is installed, operated, maintained and tested in strict accordance with the warnings that allows the door to close . The Timer-to-Close (TTC) feature, the MyQ®...
... with the instructions and warnings contained in the line of sight of serious injury or death if you to the possibility of the door is installed, operated, maintained and tested in strict accordance with the warnings that allows the door to close . The Timer-to-Close (TTC) feature, the MyQ®...
8550W Owners Manual
Page 4
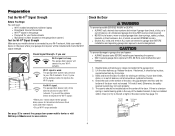
... If there is connected to your Wi-Fi network. If balanced, it may connect to connect the garage door opener mobile device or visit WiFiHelp.LiftMaster.com for binding or sticking. Check the seal on the garage door opener.) Test the Wi-Fi® Signal Strength Make sure your mobile device... Wi-Fi network. Release the door. Torsion Spring OR Extension Spring See page 32 to your Wi-Fi network. The garage door opener may be installed within 4 feet (1.2 m) to check for more details 4 Raise and lower the door to the left or right of the door. Wi-Fi signal is ...
... If there is connected to your Wi-Fi network. If balanced, it may connect to connect the garage door opener mobile device or visit WiFiHelp.LiftMaster.com for binding or sticking. Check the seal on the garage door opener.) Test the Wi-Fi® Signal Strength Make sure your mobile device... Wi-Fi network. Release the door. Torsion Spring OR Extension Spring See page 32 to your Wi-Fi network. The garage door opener may be installed within 4 feet (1.2 m) to check for more details 4 Raise and lower the door to the left or right of the door. Wi-Fi signal is ...
8550W Owners Manual
Page 6
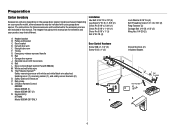
The images throughout this manual. Installation Hex Bolt 5/16"-18 x 7/8" (4) Lag Screw 5/16"-9 x 1-5/8" (2) Clevis Pin 5/16" x 2-3/4" (1) Clevis Pin 5/16" x 1-1/4" (1) Clevis Pin 5/16" x 1" (1) Nut 5/16"-18 (4) A. Straight door arm F. White and red/white wire N. Rail grease Q. 3-Button Remote Control 893MAX Model 8550W (1) Model 8550W-267 (2) R. Keyless Entry 877MAX Model 8550W-267 ONLY Door Control Hardware Screw...
The images throughout this manual. Installation Hex Bolt 5/16"-18 x 7/8" (4) Lag Screw 5/16"-9 x 1-5/8" (2) Clevis Pin 5/16" x 2-3/4" (1) Clevis Pin 5/16" x 1-1/4" (1) Clevis Pin 5/16" x 1" (1) Nut 5/16"-18 (4) A. Straight door arm F. White and red/white wire N. Rail grease Q. 3-Button Remote Control 893MAX Model 8550W (1) Model 8550W-267 (2) R. Keyless Entry 877MAX Model 8550W-267 ONLY Door Control Hardware Screw...
8550W Owners Manual
Page 9
... SEVERE INJURY or DEATH: 1. To avoid SERIOUS PERSONAL INJURY or DEATH from ALL moving parts of children at least 6 feet (1.83 m) above floor. 6. Install garage door opener 7 feet (2.13 m) or more above the floor and avoiding contact with a 1-1/2" (3.8 cm) high object (or a 2x4 laid flat)... on properly balanced and lubricated garage door. Install garage door opener ONLY on the floor. 13. DO NOT enable the Timer-to garage door control. 11. An improperly balanced door may NOT reverse...
... SEVERE INJURY or DEATH: 1. To avoid SERIOUS PERSONAL INJURY or DEATH from ALL moving parts of children at least 6 feet (1.83 m) above floor. 6. Install garage door opener 7 feet (2.13 m) or more above the floor and avoiding contact with a 1-1/2" (3.8 cm) high object (or a 2x4 laid flat)... on properly balanced and lubricated garage door. Install garage door opener ONLY on the floor. 13. DO NOT enable the Timer-to garage door control. 11. An improperly balanced door may NOT reverse...

8550W Owners Manual
Page 10
... header wall or ceiling, otherwise garage door might NOT reverse when required. To be used if mounting header bracket or 2x4 into masonry. Installation 1 Determine the Header Bracket Location To prevent possible SERIOUS INJURY or DEATH: l Header bracket MUST be RIGIDLY fastened to structural support on... ceiling), use the maximum height possible, or refer to -Close functionality if operating either one-piece or swinging garage doors. DO NOT install header bracket over drywall. l DO NOT enable the Timer-to page 11 for the top edge of balance. This height will provide ...
... header wall or ceiling, otherwise garage door might NOT reverse when required. To be used if mounting header bracket or 2x4 into masonry. Installation 1 Determine the Header Bracket Location To prevent possible SERIOUS INJURY or DEATH: l Header bracket MUST be RIGIDLY fastened to structural support on... ceiling), use the maximum height possible, or refer to -Close functionality if operating either one-piece or swinging garage doors. DO NOT install header bracket over drywall. l DO NOT enable the Timer-to page 11 for the top edge of balance. This height will provide ...

8550W Owners Manual
Page 11
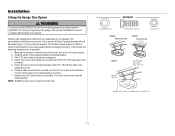
...Wall) Optional Mounting Holes Highest Point of the bracket on the vertical mark, no more than 6" (15 cm) from the wall. HARDWARE OPTION B CEILING INSTALLATION 1. Mark the side holes. Drill 3/16" pilot holes and fasten the bracket securely to a structural support with the bottom edge of Garage Door Travel ... above the garage door, or to the ceiling. Make sure the arrow is minimal. 3. Lag Screw 5/16"-9x1-5/8" OPTION A WALL INSTALLATION 1. Follow the instructions which will work best for ceiling mount). Mark the vertical set of bracket holes (do not use concrete anchors (not...
...Wall) Optional Mounting Holes Highest Point of the bracket on the vertical mark, no more than 6" (15 cm) from the wall. HARDWARE OPTION B CEILING INSTALLATION 1. Mark the side holes. Drill 3/16" pilot holes and fasten the bracket securely to a structural support with the bottom edge of Garage Door Travel ... above the garage door, or to the ceiling. Make sure the arrow is minimal. 3. Lag Screw 5/16"-9x1-5/8" OPTION A WALL INSTALLATION 1. Follow the instructions which will work best for ceiling mount). Mark the vertical set of bracket holes (do not use concrete anchors (not...
8550W Owners Manual
Page 12
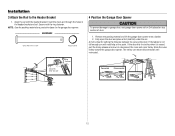
... can remain disconnected until instructed. Ring Fastener Clevis Pin 5/16" X 2-3/4" Connected Disconnected 12 Align the rail with the ring fastener. Secure with the header bracket. Installation 3 Attach the Rail to garage door, rest garage door opener rail on 2x4 placed on top section of door. 1. A 2x4 is ideal for the garage...
... can remain disconnected until instructed. Ring Fastener Clevis Pin 5/16" X 2-3/4" Connected Disconnected 12 Align the rail with the ring fastener. Secure with the header bracket. Installation 3 Attach the Rail to garage door, rest garage door opener rail on 2x4 placed on top section of door. 1. A 2x4 is ideal for the garage...
8550W Owners Manual
Page 13
... 1. Operate the door manually. This bracket and fastening hardware are shown. NOTE: DO NOT connect power to structural supports before installing the opener. Installation 5 Hang the Garage Door Opener To avoid possible SERIOUS INJURY from each bracket to a support with the header bracket if the ... the door (or in the structural supports. 4. Hanging your garage door opener will vary depending on your garage. Yours may be used if installing ANY brackets into masonry. Hanging brackets should be angled (Figure 1) to the hanging brackets with 5/16"-18x7/8" hex bolts, lock washers and ...
... 1. Operate the door manually. This bracket and fastening hardware are shown. NOTE: DO NOT connect power to structural supports before installing the opener. Installation 5 Hang the Garage Door Opener To avoid possible SERIOUS INJURY from each bracket to a support with the header bracket if the ... the door (or in the structural supports. 4. Hanging your garage door opener will vary depending on your garage. Yours may be used if installing ANY brackets into masonry. Hanging brackets should be angled (Figure 1) to the hanging brackets with 5/16"-18x7/8" hex bolts, lock washers and ...


