

8550 Manual
Page 3
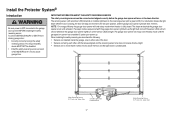
... Panel® 895MAX Remote Control 829LM Garage Door Monitor Hardware Assembly H1 Hex Screw #8x3/8" (3) [packed with white and white/black wire attached: Sending Sensor (1) Receiving Sensor (1) and Safety Sensor Brackets (2) O. Sprocket cover and screws K. Door control M. Door bracket D. Garage door opener K J. Safety reversing sensors with the sprocket cover] Installation H2...
... Panel® 895MAX Remote Control 829LM Garage Door Monitor Hardware Assembly H1 Hex Screw #8x3/8" (3) [packed with white and white/black wire attached: Sending Sensor (1) Receiving Sensor (1) and Safety Sensor Brackets (2) O. Sprocket cover and screws K. Door control M. Door bracket D. Garage door opener K J. Safety reversing sensors with the sprocket cover] Installation H2...
8550 Manual
Page 17
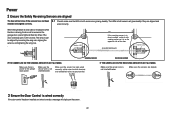
... to the full open position, and the garage door opener lights will enter sleep mode when the door is NOT connected to the receiving sensor (with the lenses aligned and the receiving sensor lens does not receive direct sunlight. • Sensors are installed inside the garage, one on the sensor LEDs will light.
... to the full open position, and the garage door opener lights will enter sleep mode when the door is NOT connected to the receiving sensor (with the lenses aligned and the receiving sensor lens does not receive direct sunlight. • Sensors are installed inside the garage, one on the sensor LEDs will light.
8550 Manual
Page 22
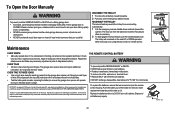
...close . The sensors can be aligned by loosening the wing nuts, aligning the sensors, and tightening the wing nuts. . IF THE GREEN LED ON THE RECEIVING SENSOR IS NOT GLOWING: Make sure the sensor wire is not shorted/broken. RED WHITE WHITE GREY 3 Ensure the Door Control is power to make... will reverse and the garage door opener lights will display on the opposite side of the door. (invisible light beam) Green LED SENDING SENSOR RECEIVING SENSOR IF THE AMBER LED ON THE SENDING SENSOR IS NOT GLOWING: Make sure there is wired correctly If the door control has been installed...
...close . The sensors can be aligned by loosening the wing nuts, aligning the sensors, and tightening the wing nuts. . IF THE GREEN LED ON THE RECEIVING SENSOR IS NOT GLOWING: Make sure the sensor wire is not shorted/broken. RED WHITE WHITE GREY 3 Ensure the Door Control is power to make... will reverse and the garage door opener lights will display on the opposite side of the door. (invisible light beam) Green LED SENDING SENSOR RECEIVING SENSOR IF THE AMBER LED ON THE SENDING SENSOR IS NOT GLOWING: Make sure there is wired correctly If the door control has been installed...
8550 Manual
Page 34
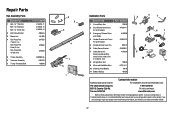
... a trained door systems technician. Push the battery out of this device maynot cause harmful interface, and (2) thisdevice must accept anyinterference received, including interference that may cause undesired operation. EVERY YEAR • Oil door rollers, bearings and hinges. Do not grease the ...obstructions. • NEVER use emergency release handle to Adjustment section). Operation is subject to the following tow conditions: (1) this receiver and/or transmitter are prohibited, except for removal. To replace the batteries, remove the two screws and open door falling rapidly ...
... a trained door systems technician. Push the battery out of this device maynot cause harmful interface, and (2) thisdevice must accept anyinterference received, including interference that may cause undesired operation. EVERY YEAR • Oil door rollers, bearings and hinges. Do not grease the ...obstructions. • NEVER use emergency release handle to Adjustment section). Operation is subject to the following tow conditions: (1) this receiver and/or transmitter are prohibited, except for removal. To replace the batteries, remove the two screws and open door falling rapidly ...

8550 Manual
Page 35
... sensor LED indicates a misalignment. Check staple 1-2 1 FLASH 2 FLASHES points. Make sure nothing is lit, check the wire connections leading to the receiving sensor (green LED). If sending wires may be cut wire(s). See page 18 for installation. If pre-wired home, check the splices. Reattach wire... the travel module are connected, if wires are shorted or needed. The garage door opener will not close Misaligned or Realign the receiving sensor (green LED) by ensuring the LED is faulty garage door opener, replace the door control. DIAGNOSTIC UP CODE ARROW DOWN ...
... sensor LED indicates a misalignment. Check staple 1-2 1 FLASH 2 FLASHES points. Make sure nothing is lit, check the wire connections leading to the receiving sensor (green LED). If sending wires may be cut wire(s). See page 18 for installation. If pre-wired home, check the splices. Reattach wire... the travel module are connected, if wires are shorted or needed. The garage door opener will not close Misaligned or Realign the receiving sensor (green LED) by ensuring the LED is faulty garage door opener, replace the door control. DIAGNOSTIC UP CODE ARROW DOWN ...
8550 Manual
Page 37
... Header Bracket with Clevis 41A5047-2 5 Pin and Fastener 5 Remote Control Visor Clip 29B137 9 6 Safety Sensor Bracket 41A5266-1 7 Safety Sensor Kit 41A5034 8 Receiving and sending sensors with 3 feet (.9 m) 2-conductor wire 10 11 8 Straight Door Arm 178B34 9 White and Red/White Wire 41C5141-1 10 3V2016 Lithium .... Country Club Rd. Tucson, AZ 85706 For installation and service information call: 1-800-528-9131 Or visit us online at: www.liftmaster.com Before calling, please have access to : The Chamberlain Group, Inc. 6050 S. If you have the model number of the garage...
... Header Bracket with Clevis 41A5047-2 5 Pin and Fastener 5 Remote Control Visor Clip 29B137 9 6 Safety Sensor Bracket 41A5266-1 7 Safety Sensor Kit 41A5034 8 Receiving and sending sensors with 3 feet (.9 m) 2-conductor wire 10 11 8 Straight Door Arm 178B34 9 White and Red/White Wire 41C5141-1 10 3V2016 Lithium .... Country Club Rd. Tucson, AZ 85706 For installation and service information call: 1-800-528-9131 Or visit us online at: www.liftmaster.com Before calling, please have access to : The Chamberlain Group, Inc. 6050 S. If you have the model number of the garage...
8550 Manual
Page 38
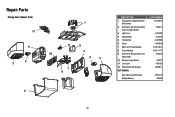
Repair Parts Garage Door Opener Parts 11 9 4 3 1 12 5 2 10 4 3 7 8 6 38 DESCRIPTION 1 Sprocket and Sprocket Cover with Screws 2 End Panel with labels, battery cover and light socket 3 Light Lens 4 Light Socket 5 Transformer 6 Cover 7 Motor and Travel Module 8 Travel Module 9 End Panel with all labels and light socket 10 Receiver Logic Board 11 Line Cord 12 Filter Board with Screws NOT SHOWN Wire Harness with Screws Battery Backup PART NUMBER 41C589-2 41D217 41A7562 41C279 41A7635 41A7619 41D1739-1 41A7114-7 41D216 45DCT 41B135 41B7611 41B7418 485LM
Repair Parts Garage Door Opener Parts 11 9 4 3 1 12 5 2 10 4 3 7 8 6 38 DESCRIPTION 1 Sprocket and Sprocket Cover with Screws 2 End Panel with labels, battery cover and light socket 3 Light Lens 4 Light Socket 5 Transformer 6 Cover 7 Motor and Travel Module 8 Travel Module 9 End Panel with all labels and light socket 10 Receiver Logic Board 11 Line Cord 12 Filter Board with Screws NOT SHOWN Wire Harness with Screws Battery Backup PART NUMBER 41C589-2 41D217 41A7562 41C279 41A7635 41A7619 41D1739-1 41A7114-7 41D216 45DCT 41B135 41B7611 41B7418 485LM


