
8360 Chain Drive Garage Door Opener Manual
Page 1
The Timer -To-Close is to ensure safe operation. ■ The model number label is ONLY compatible with sectional doors. Chain Drive Garage Door Opener Model 8360 FOR RESIDENTIAL USE ONLY Write down the following information for installation instructions. . www.liftmaster.com The Chamberlain Group, Inc. 845 Larch Avenue Elmhurst, Illinois 60126-1196 Contents PREPARATION 2-3 ASSEMBLY 4-5 INSTALLATION 6-13 INSTALL THE DOOR CONTROL.....14-16 INSTALL THE PROTECTOR SYSTEM 17-20 POWER 21-22 ADJUSTMENT 23-25 BATTERY BACKUP 26-27 OPERATION 28...
The Timer -To-Close is to ensure safe operation. ■ The model number label is ONLY compatible with sectional doors. Chain Drive Garage Door Opener Model 8360 FOR RESIDENTIAL USE ONLY Write down the following information for installation instructions. . www.liftmaster.com The Chamberlain Group, Inc. 845 Larch Avenue Elmhurst, Illinois 60126-1196 Contents PREPARATION 2-3 ASSEMBLY 4-5 INSTALLATION 6-13 INSTALL THE DOOR CONTROL.....14-16 INSTALL THE PROTECTOR SYSTEM 17-20 POWER 21-22 ADJUSTMENT 23-25 BATTERY BACKUP 26-27 OPERATION 28...

8360 Chain Drive Garage Door Opener Manual
Page 2
... alert you see this manual. The opener should stay in the way of the header bracket, it is out of the door must not exceed 1/4 inch (6 mm). If your garage door and/or the garage door opener if you to the possibility of which are under EXTREME tension. • Disable ALL locks and remove ALL ropes connected to garage door BEFORE installation and operating garage door opener to avoid entanglement...
... alert you see this manual. The opener should stay in the way of the header bracket, it is out of the door must not exceed 1/4 inch (6 mm). If your garage door and/or the garage door opener if you to the possibility of which are under EXTREME tension. • Disable ALL locks and remove ALL ropes connected to garage door BEFORE installation and operating garage door opener to avoid entanglement...

8360 Chain Drive Garage Door Opener Manual
Page 3
.... GARAGE DOOR OPENER ASSEMBLY A. Pulley and bracket C. Curved door arm E. Chain L. White and red/white wire The Protector System® N. Trolley G. Sprocket cover K. Garage door opener K J. Safety labels and literature H L M J N O I . Door bracket D. Header bracket B. Safety reversing sensors with your product may be attached to the accessory and are for reference and your garage door opener. Straight door arm A B CF G D E F. Rail I 3 MyQ™ AND SECURITY✚®2.0 ACCESSORIES 886LM Premium Motion-Detecting Control Panel 893LM Remote...
.... GARAGE DOOR OPENER ASSEMBLY A. Pulley and bracket C. Curved door arm E. Chain L. White and red/white wire The Protector System® N. Trolley G. Sprocket cover K. Garage door opener K J. Safety labels and literature H L M J N O I . Door bracket D. Header bracket B. Safety reversing sensors with your product may be attached to the accessory and are for reference and your garage door opener. Straight door arm A B CF G D E F. Rail I 3 MyQ™ AND SECURITY✚®2.0 ACCESSORIES 886LM Premium Motion-Detecting Control Panel 893LM Remote...

8360 Chain Drive Garage Door Opener Manual
Page 4
... the previously removed bolts (H1). 1.4 Position the chain around the garage door To avoid SERIOUS damage to garage door opener, use the bolts removed from the top of the • ALWAYS keep hand clear of the opener. Assembly 1 Attach the rail to the garage door opener NOTE: ONLY use ONLY those bolts/fasteners mounted in the garage door opener H1 (3) Hex Screw #8x3/8" (Packed with the sprocket cover) . 4 Cut the tape from the rail, belt, operating.
... the previously removed bolts (H1). 1.4 Position the chain around the garage door To avoid SERIOUS damage to garage door opener, use the bolts removed from the top of the • ALWAYS keep hand clear of the opener. Assembly 1 Attach the rail to the garage door opener NOTE: ONLY use ONLY those bolts/fasteners mounted in the garage door opener H1 (3) Hex Screw #8x3/8" (Packed with the sprocket cover) . 4 Cut the tape from the rail, belt, operating.
8360 Chain Drive Garage Door Opener Manual
Page 6
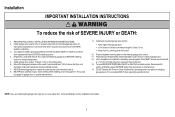
ALL repairs to avoid entanglement. 5. Disable ALL locks and remove ALL ropes connected to garage door BEFORE installing opener to cables, spring assemblies and other hardware MUST be made by a trained door systems technician BEFORE installing opener. 4. Install garage door opener 7 feet (2.13 m) or more above the floor and avoiding contact with vehicles to garage door control 11. Place manual release/safety reverse test label in plain view on wall next to avoid accidental release. 7. DO NOT...
ALL repairs to avoid entanglement. 5. Disable ALL locks and remove ALL ropes connected to garage door BEFORE installing opener to cables, spring assemblies and other hardware MUST be made by a trained door systems technician BEFORE installing opener. 4. Install garage door opener 7 feet (2.13 m) or more above the floor and avoiding contact with vehicles to garage door control 11. Place manual release/safety reverse test label in plain view on wall next to avoid accidental release. 7. DO NOT...

8360 Chain Drive Garage Door Opener Manual
Page 7
... if garage door binds, sticks, or is in your garage, use lag screws (not provided) to securely fasten the 2x4 to structural supports. 1.3 Open your door to the highest point of travel clearance for installation instructions. 1.1 Close the door and mark the inside vertical centerline of the door. To be used if mounting header bracket or 2x4 into masonry. • NEVER try to loosen, move or adjust garage door, springs, cables, pulleys, brackets...
... if garage door binds, sticks, or is in your garage, use lag screws (not provided) to securely fasten the 2x4 to structural supports. 1.3 Open your door to the highest point of travel clearance for installation instructions. 1.1 Close the door and mark the inside vertical centerline of the door. To be used if mounting header bracket or 2x4 into masonry. • NEVER try to loosen, move or adjust garage door, springs, cables, pulleys, brackets...

8360 Chain Drive Garage Door Opener Manual
Page 9
... garage door opener. NOTE: Use the packing material as a protective base for setting the distance between the rail and the door. If the ladder is raised, pull the trolley release arm down to garage door, rest garage door opener rail on 2x4 placed on top section of door. 4.1 Remove the packing material and lift the garage door opener onto a ladder. The trolley can remain disconnected until instructed. Connected Disconnected 9 Secure with the header bracket. Slide the outer trolley...
... garage door opener. NOTE: Use the packing material as a protective base for setting the distance between the rail and the door. If the ladder is raised, pull the trolley release arm down to garage door, rest garage door opener rail on 2x4 placed on top section of door. 4.1 Remove the packing material and lift the garage door opener onto a ladder. The trolley can remain disconnected until instructed. Connected Disconnected 9 Secure with the header bracket. Slide the outer trolley...

8360 Chain Drive Garage Door Opener Manual
Page 10
Below are three example installations. Finished Ceiling 5.1 On finished ceilings, use the lag screws (H4) to attach a support bracket (not provided) to the structural supports before installing the garage door opener. 5.2 Make sure the garage door opener is aligned with the bolts (H2), lock door. The instructions illustrate one of the examples below. If the door hits the rail, raise the hardware (not provided). header bracket. Concrete anchors MUST be...
Below are three example installations. Finished Ceiling 5.1 On finished ceilings, use the lag screws (H4) to attach a support bracket (not provided) to the structural supports before installing the garage door opener. 5.2 Make sure the garage door opener is aligned with the bolts (H2), lock door. The instructions illustrate one of the examples below. If the door hits the rail, raise the hardware (not provided). header bracket. Concrete anchors MUST be...

8360 Chain Drive Garage Door Opener Manual
Page 14
... sure power is not necessary to drill holes or install the drywall anchors. Install the Door Control 1 Install the door control INTRODUCTION Compatible with up to 2 Smart Control Panels or 4 of any two wires to connect, note which wires H16 GANG BOX are used so the correct wires are no obstructions to door travel. The wires hole and drill a 5/32 inch (4 mm) hole. (3 mm) to operate or play with door control push buttons or remote control transmitters...
... sure power is not necessary to drill holes or install the drywall anchors. Install the Door Control 1 Install the door control INTRODUCTION Compatible with up to 2 Smart Control Panels or 4 of any two wires to connect, note which wires H16 GANG BOX are used so the correct wires are no obstructions to door travel. The wires hole and drill a 5/32 inch (4 mm) hole. (3 mm) to operate or play with door control push buttons or remote control transmitters...
8360 Chain Drive Garage Door Opener Manual
Page 17
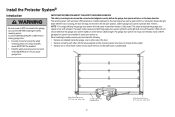
... closing , the door will stop and reverse to the garage door opener BEFORE installing the safety reversing sensor. as the light bulb turns off the sensor LEDs will turn off and whenever the garage door opener lights turn on either side of the door. • Sensors are facing each other with a green LED). This required safety device MUST NOT be connected and aligned correctly before the garage door opener will flash 10 times. The sending sensor (with an amber LED) transmits an invisible light beam to the receiving sensor...
... closing , the door will stop and reverse to the garage door opener BEFORE installing the safety reversing sensor. as the light bulb turns off the sensor LEDs will turn off and whenever the garage door opener lights turn on either side of the door. • Sensors are facing each other with a green LED). This required safety device MUST NOT be connected and aligned correctly before the garage door opener will flash 10 times. The sending sensor (with an amber LED) transmits an invisible light beam to the receiving sensor...

8360 Chain Drive Garage Door Opener Manual
Page 20
... connect to the white terminal on the garage door opener. Insert the wires that you choose the same color pre-installed wires for example) Purple RED WHITE WHITE GREY 7/16" (11 mm) To insert or remove the wires from the terminal, push in the tab with wire nuts making sure there is enough wire to reach the pre-installed wires from the wall. 2.2B Separate the safety reversing sensor wires...
... connect to the white terminal on the garage door opener. Insert the wires that you choose the same color pre-installed wires for example) Purple RED WHITE WHITE GREY 7/16" (11 mm) To insert or remove the wires from the terminal, push in the tab with wire nuts making sure there is enough wire to reach the pre-installed wires from the wall. 2.2B Separate the safety reversing sensor wires...

8360 Chain Drive Garage Door Opener Manual
Page 24
... proper operation of garage door travel to the programmed DOWN position. The door desired DOWN position door travels to the programmed UP position, the will travel limits will begin to flash. The garage door opener lights will fl ash twice and the UP Button will flash twice and flash and/or a beep is used to move the door up and down cycle using the remote control or the UP and DOWN buttons. If the garage door opener lights are flashing 10 times...
... proper operation of garage door travel to the programmed DOWN position. The door desired DOWN position door travels to the programmed UP position, the will travel limits will begin to flash. The garage door opener lights will fl ash twice and the UP Button will flash twice and flash and/or a beep is used to move the door up and down cycle using the remote control or the UP and DOWN buttons. If the garage door opener lights are flashing 10 times...

8360 Chain Drive Garage Door Opener Manual
Page 26
... out. 1.4 Connect red (+) and black (-) wires from the garage door opener to the corresponding terminals on the battery. 1.5 Verify the battery wires are seated in the channel and replace the battery cover. 1.6 Plug in the garage door opener. The battery will flash indicating low battery power. Use a Phillips head screwdriver to remove the battery cover on the garage door opener. 1.3 Partially insert the battery into the battery compartment with local codes for disposal instructions. 1 Install the battery 1.1 Unplug the garage door opener. 1.2 Open the light lens on battery power or...
... out. 1.4 Connect red (+) and black (-) wires from the garage door opener to the corresponding terminals on the battery. 1.5 Verify the battery wires are seated in the channel and replace the battery cover. 1.6 Plug in the garage door opener. The battery will flash indicating low battery power. Use a Phillips head screwdriver to remove the battery cover on the garage door opener. 1.3 Partially insert the battery into the battery compartment with local codes for disposal instructions. 1 Install the battery 1.1 Unplug the garage door opener. 1.2 Open the light lens on battery power or...
8360 Chain Drive Garage Door Opener Manual
Page 29
... energy efficiency the garage door opener will stop . The garage door opener will turn on when the opener is restored after 4-1/2 minutes. LIGHTS The garage door opener light bulbs will not go into the sleep mode until activated. power is initially plugged in the down until the garage door opener has completed 5 cycles upon power up to 2 Smart Control Panels or 4 of the infrared beam. The safety reversing sensor must be connected and aligned correctly before the garage door opener will blink 10 times.
... energy efficiency the garage door opener will stop . The garage door opener will turn on when the opener is restored after 4-1/2 minutes. LIGHTS The garage door opener light bulbs will not go into the sleep mode until activated. power is initially plugged in the down until the garage door opener has completed 5 cycles upon power up to 2 Smart Control Panels or 4 of the infrared beam. The safety reversing sensor must be connected and aligned correctly before the garage door opener will blink 10 times.

8360 Chain Drive Garage Door Opener Manual
Page 30
... the service LED (red) will turn off . This indicates the garage door opener may take up the push bar: LEARN A DEVICE Any compatible remote controls, wireless keyless entry, or MyQ™ accessories can be activated at time of time (the factory setting is 4-1/2 minutes). TTC can display the status of an accidental lock out when using the garage door opener light as a work if the garage door opener is operating by lifting up to resume normal TTC operation. AUTOMATIC LIGHT Motion Sensor Factory...
... the service LED (red) will turn off . This indicates the garage door opener may take up the push bar: LEARN A DEVICE Any compatible remote controls, wireless keyless entry, or MyQ™ accessories can be activated at time of time (the factory setting is 4-1/2 minutes). TTC can display the status of an accidental lock out when using the garage door opener light as a work if the garage door opener is operating by lifting up to resume normal TTC operation. AUTOMATIC LIGHT Motion Sensor Factory...

8360 Chain Drive Garage Door Opener Manual
Page 35
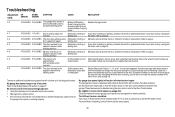
... new door control wires, if door control still does not operate the door control is hanging or mounted on the garage door opener flash the diagnostic codes. Make sure nothing is faulty garage door opener, replace the door control. Close the garage door using the remote control or the door control. The garage door opener will not close Safety sensor wire Inspect sensor wire for that sensor. DIAGNOSTIC UP CODE ARROW DOWN ARROW SYMPTOM CAUSE RESOLUTION 1-1 1 FLASH 1 FLASH The garage door opener will not close Misaligned or Realign the receiving sensor (green LED...
... new door control wires, if door control still does not operate the door control is hanging or mounted on the garage door opener flash the diagnostic codes. Make sure nothing is faulty garage door opener, replace the door control. Close the garage door using the remote control or the door control. The garage door opener will not close Safety sensor wire Inspect sensor wire for that sensor. DIAGNOSTIC UP CODE ARROW DOWN ARROW SYMPTOM CAUSE RESOLUTION 1-1 1 FLASH 1 FLASH The garage door opener will not close Misaligned or Realign the receiving sensor (green LED...
8360 Chain Drive Garage Door Opener Manual
Page 36
... set the time properly. 36 The LEDs on the door conrol blink: If you have been obstructed or when the motion sensor on the door control detects movement in the diagnostic codes: My garage door opener beeps every 30 seconds: Refer to the Battery Status LED section on the Premium Motion -Detecting Control Panel to the door. Green, charging circuit stops and starts to drain causing battery charging status. 4-1 4 FLASHES 1 FLASH Door is closing , secure rails or re-install the sensor brackets to the wall...
... set the time properly. 36 The LEDs on the door conrol blink: If you have been obstructed or when the motion sensor on the door control detects movement in the diagnostic codes: My garage door opener beeps every 30 seconds: Refer to the Battery Status LED section on the Premium Motion -Detecting Control Panel to the door. Green, charging circuit stops and starts to drain causing battery charging status. 4-1 4 FLASHES 1 FLASH Door is closing , secure rails or re-install the sensor brackets to the wall...
8360 Chain Drive Garage Door Opener Manual
Page 37
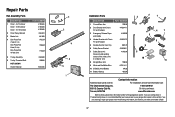
...Pulley Bracket 3 Master Link 4 One-Piece Rail 7 feet (2.1 m) One-Piece Rail 8 feet (2.4 m) One-Piece Rail 10 feet (3 m) 5 Trolley Assembly 6 Trolley Threaded Shaft NOT SHOWN Owner's Manual PART NUMBER 41D3484 41D3483 41D3485 41A4813 4A1008 1707LM 1708LM 1710LM 41A3489 109B48 114A4246 3 2 4 6 5 1 Installation Parts 3 2 1 DESCRIPTION 1 Curved Door Arm PART NUMBER NOTICE 178B35 2 Door Bracket with Clevis Pin and Fastener 41A5047-1 CEILING MOUNT ONLY UP 4 7 3 Emergency Release Rope 41A2828 6 and Handle 4 Header Bracket with Clevis 41A5047-2 5 Pin and Fastener 5 Remote Control...
...Pulley Bracket 3 Master Link 4 One-Piece Rail 7 feet (2.1 m) One-Piece Rail 8 feet (2.4 m) One-Piece Rail 10 feet (3 m) 5 Trolley Assembly 6 Trolley Threaded Shaft NOT SHOWN Owner's Manual PART NUMBER 41D3484 41D3483 41D3485 41A4813 4A1008 1707LM 1708LM 1710LM 41A3489 109B48 114A4246 3 2 4 6 5 1 Installation Parts 3 2 1 DESCRIPTION 1 Curved Door Arm PART NUMBER NOTICE 178B35 2 Door Bracket with Clevis Pin and Fastener 41A5047-1 CEILING MOUNT ONLY UP 4 7 3 Emergency Release Rope 41A2828 6 and Handle 4 Header Bracket with Clevis 41A5047-2 5 Pin and Fastener 5 Remote Control...

8360 Chain Drive Garage Door Opener Manual
Page 39
... 895MAX Monitor open and close them from 1993present. 890MAX SECURITY+®2.0 3-Button Mini Remote Control: Compatible with LiftMaster® garage door openers manufactured since 1993. 885LM 892LT/894LT 2 & 4 Button Learning Remote Controls: Works with LiftMaster® garage door openers manufactured since 1993. SECURITY+®2.0 Motion Detecting Control Panel: Multi-function door control with motion sensor that automatically turns opener lights on when it detects a person entering the garage. Simply replaces your garage door opener, a Security+®2.0 remote control or...
... 895MAX Monitor open and close them from 1993present. 890MAX SECURITY+®2.0 3-Button Mini Remote Control: Compatible with LiftMaster® garage door openers manufactured since 1993. 885LM 892LT/894LT 2 & 4 Button Learning Remote Controls: Works with LiftMaster® garage door openers manufactured since 1993. SECURITY+®2.0 Motion Detecting Control Panel: Multi-function door control with motion sensor that automatically turns opener lights on when it detects a person entering the garage. Simply replaces your garage door opener, a Security+®2.0 remote control or...

8360 Chain Drive Garage Door Opener Manual
Page 40
... INSTALLATION, OPERATION OR CARE (INCLUDING, BUT NOT LIMITED TO ABUSE, MISUSE, FAILURE TO PROVIDE REASONABLE AND NECESSARY MAINTENANCE, UNAUTHORIZED REPAIRS OR ANY ALTERATIONS TO THIS PRODUCT), LABOR CHARGES FOR REINSTALLING A REPAIRED OR REPLACED UNIT, REPLACEMENT OF BATTERIES IN REMOTE CONTROL TRANSMITTERS AND LIGHT BULBS OR UNITS INSTALLED FOR NON-RESIDENTIAL USE. THIS LIMITED WARRANTY DOES NOT COVER ANY PROBLEMS WITH, OR RELATING TO, THE GARAGE DOOR OR GARAGE DOOR HARDWARE, INCLUDING BUT NOT LIMITED TO THE DOOR SPRINGS, DOOR...
... INSTALLATION, OPERATION OR CARE (INCLUDING, BUT NOT LIMITED TO ABUSE, MISUSE, FAILURE TO PROVIDE REASONABLE AND NECESSARY MAINTENANCE, UNAUTHORIZED REPAIRS OR ANY ALTERATIONS TO THIS PRODUCT), LABOR CHARGES FOR REINSTALLING A REPAIRED OR REPLACED UNIT, REPLACEMENT OF BATTERIES IN REMOTE CONTROL TRANSMITTERS AND LIGHT BULBS OR UNITS INSTALLED FOR NON-RESIDENTIAL USE. THIS LIMITED WARRANTY DOES NOT COVER ANY PROBLEMS WITH, OR RELATING TO, THE GARAGE DOOR OR GARAGE DOOR HARDWARE, INCLUDING BUT NOT LIMITED TO THE DOOR SPRINGS, DOOR...


