8355W Users Guide Manual
Page 2
...you to offer safe service provided it is considered unattended close. Read the warnings carefully. Product Serial Number 2 For the complete manual visit LiftMaster.com/Customer-Support Any device or feature that allows the door to be used ONLY with sectional doors. The Timer-to-Close (...Home Wi-Fi Network 6 Programming 7 Remote Control 7 Wireless Keyless Entry 7 To Erase the Memory 7 Operation 8-10 To Open the Door Manually 8 Door Control 9 The Protector System® (Safety Reversing Sensors 10 Adjustment 11-13 Introduction 11 Program the Travel 12 Test the Safety ...
...you to offer safe service provided it is considered unattended close. Read the warnings carefully. Product Serial Number 2 For the complete manual visit LiftMaster.com/Customer-Support Any device or feature that allows the door to be used ONLY with sectional doors. The Timer-to-Close (...Home Wi-Fi Network 6 Programming 7 Remote Control 7 Wireless Keyless Entry 7 To Erase the Memory 7 Operation 8-10 To Open the Door Manually 8 Door Control 9 The Protector System® (Safety Reversing Sensors 10 Adjustment 11-13 Introduction 11 Program the Travel 12 Test the Safety ...
8355W Users Guide Manual
Page 3
... the risk of garage door. 12. ALL repairs to avoid accidental release. 7. They could result in plain view on contact with sectional doors. 15. Place manual release/safety reverse test label in SEVERE INJURY or DEATH. 3. To avoid SERIOUS PERSONAL INJURY or DEATH from ALL moving parts of installation, test safety...
... the risk of garage door. 12. ALL repairs to avoid accidental release. 7. They could result in plain view on contact with sectional doors. 15. Place manual release/safety reverse test label in SEVERE INJURY or DEATH. 3. To avoid SERIOUS PERSONAL INJURY or DEATH from ALL moving parts of installation, test safety...
8355W Users Guide Manual
Page 4
... KEEP GARAGE DOOR PROPERLY BALANCED. An improperly balanced door may NOT reverse when required and could move unexpectedly. SAVE THESE INSTRUCTIONS. 4 For the complete manual visit LiftMaster.com/Customer-Support ALWAYS keep remote controls out of reach of which are to pull garage door open . NO ONE SHOULD CROSS THE PATH OF...
... KEEP GARAGE DOOR PROPERLY BALANCED. An improperly balanced door may NOT reverse when required and could move unexpectedly. SAVE THESE INSTRUCTIONS. 4 For the complete manual visit LiftMaster.com/Customer-Support ALWAYS keep remote controls out of reach of which are to pull garage door open . NO ONE SHOULD CROSS THE PATH OF...
8355W Users Guide Manual
Page 6
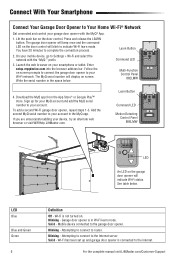
... door opener. h2a0vem2in0umteisnutotecsotmo pcloemteptlheetectohnenceocntinoencptirooncepsrso.cess. blink to your device, try an alternate web browser or visit WiFiHelp.LiftMaster.com. LED Blue Blue and Green Green 6 Definition Off - Blinking - For the complete manual visit LiftMaster.com/Customer-Support Sign up and garage door opener is connected to router. Lift the push bar...
... door opener. h2a0vem2in0umteisnutotecsotmo pcloemteptlheetectohnenceocntinoencptirooncepsrso.cess. blink to your device, try an alternate web browser or visit WiFiHelp.LiftMaster.com. LED Blue Blue and Green Green 6 Definition Off - Blinking - For the complete manual visit LiftMaster.com/Customer-Support Sign up and garage door opener is connected to router. Lift the push bar...
8355W Users Guide Manual
Page 8
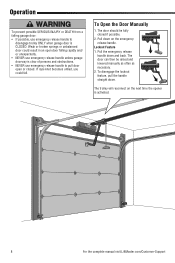
...trolley will reconnect on the emergency release handle. Pull down on the next time the opener is activated. 8 For the complete manual visit LiftMaster.com/Customer-Support To Open the Door Manually 1. Lockout Feature 1. Pull the emergency release handle down . Operation To prevent possible SERIOUS INJURY or DEATH from a falling ... possible. 2. To disengage the lockout feature, pull the handle straight down and back. The door should be raised and lowered manually as often as necessary. 2. The door can then be fully closed . Weak or broken springs or unbalanced door could fall.
...trolley will reconnect on the emergency release handle. Pull down on the next time the opener is activated. 8 For the complete manual visit LiftMaster.com/Customer-Support To Open the Door Manually 1. Lockout Feature 1. Pull the emergency release handle down . Operation To prevent possible SERIOUS INJURY or DEATH from a falling ... possible. 2. To disengage the lockout feature, pull the handle straight down and back. The door should be raised and lowered manually as often as necessary. 2. The door can then be fully closed . Weak or broken springs or unbalanced door could fall.
8355W Users Guide Manual
Page 10
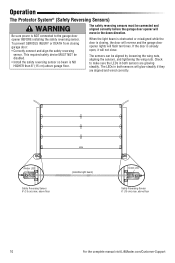
... garage floor. Amber LED Safety Reversing Sensor 6" (15 cm) max. The LEDs in the down direction. above floor 10 For the complete manual visit LiftMaster.com/Customer-Support To prevent SERIOUS INJURY or DEATH from closing , the door will reverse and the garage door opener lights will move in both...
... garage floor. Amber LED Safety Reversing Sensor 6" (15 cm) max. The LEDs in the down direction. above floor 10 For the complete manual visit LiftMaster.com/Customer-Support To prevent SERIOUS INJURY or DEATH from closing , the door will reverse and the garage door opener lights will move in both...
8355W Users Guide Manual
Page 12
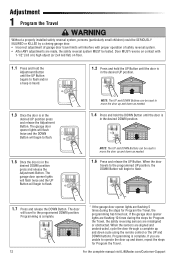
... steps for Program the Travel, the safety reversing sensors are flashing 5 times during the steps for Program the Travel. 12 For the complete manual visit LiftMaster.com/Customer-Support NOTE: The UP and DOWN Buttons can be used to move the door up and down cycle using the remote control or...
... steps for Program the Travel, the safety reversing sensors are flashing 5 times during the steps for Program the Travel. 12 For the complete manual visit LiftMaster.com/Customer-Support NOTE: The UP and DOWN Buttons can be used to move the door up and down cycle using the remote control or...
8355W Users Guide Manual
Page 14
... case first in both sensors are shorted or the door control is maintained between A-F and 0-9 only. 14 For the complete manual visit LiftMaster.com/Customer-Support IL N'EXISTE AUCUNE PIÈCE SUSCEPTIBLE D'ÊTRE ENTRETENUE PAR L'UTILISATEUR. My remote control will not activate the... and reprogram the remote control(s). Garage door may be binding or there may cause undesired operation. For help and support videos visit LiftMaster.com/Customer-Support or contact your installing dealer. My garage door opener beeps: The garage door opener can be installed in the ...
... case first in both sensors are shorted or the door control is maintained between A-F and 0-9 only. 14 For the complete manual visit LiftMaster.com/Customer-Support IL N'EXISTE AUCUNE PIÈCE SUSCEPTIBLE D'ÊTRE ENTRETENUE PAR L'UTILISATEUR. My remote control will not activate the... and reprogram the remote control(s). Garage door may be binding or there may cause undesired operation. For help and support videos visit LiftMaster.com/Customer-Support or contact your installing dealer. My garage door opener beeps: The garage door opener can be installed in the ...
8355W Users Guide Manual
Page 15
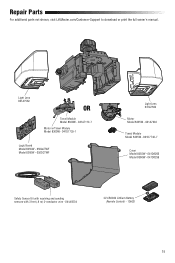
Repair Parts For additional parts not shown, visit LiftMaster.com/Customer-Support to download or print the full owner's manual. Light Lens 041A7562 OR Travel Module Model 8360W - 041A7114-7 Motor w/Travel Module Model 8360W - 041D1739-1 Logic Board Model 8355W - 050ACTWF Model 8360W - 050DCTWF Light Lens 041A7562 Motor Model 8355W - 041A7442 Travel Module Model 8355W - 041D7742-7 Cover Model 8355W - 041D8260 Model 8360W - 041D8259 Safety Sensor Kit with receiving and sending sensors with 3 feet (.9 m) 2-conductor wire - 041A5034 3V CR2032 Lithium Battery (Remote Control) - 10A20 15
Repair Parts For additional parts not shown, visit LiftMaster.com/Customer-Support to download or print the full owner's manual. Light Lens 041A7562 OR Travel Module Model 8360W - 041A7114-7 Motor w/Travel Module Model 8360W - 041D1739-1 Logic Board Model 8355W - 050ACTWF Model 8360W - 050DCTWF Light Lens 041A7562 Motor Model 8355W - 041A7442 Travel Module Model 8355W - 041D7742-7 Cover Model 8355W - 041D8260 Model 8360W - 041D8259 Safety Sensor Kit with receiving and sending sensors with 3 feet (.9 m) 2-conductor wire - 041A5034 3V CR2032 Lithium Battery (Remote Control) - 10A20 15

8355W Installation Manual
Page 1
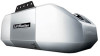
Send it in by texting the photo to receive updates and offers from LiftMaster Take a photo of the garage door opener are to be used ONLY with sectional doors. • Attach warning labels to ensure safe operation. • This .... Register your garage door opener to 71403 (US) or visit www.liftmaster.photo (Global) LiftMaster 845 Larch Avenue Elmhurst, Illinois 60126-1196 Wi-Fi® Garage Door Opener Premium Series Belt Drive Model 8355W FOR RESIDENTIAL USE ONLY • Please read this manual and the safety materials carefully! • The door WILL NOT CLOSE...
Send it in by texting the photo to receive updates and offers from LiftMaster Take a photo of the garage door opener are to be used ONLY with sectional doors. • Attach warning labels to ensure safe operation. • This .... Register your garage door opener to 71403 (US) or visit www.liftmaster.photo (Global) LiftMaster 845 Larch Avenue Elmhurst, Illinois 60126-1196 Wi-Fi® Garage Door Opener Premium Series Belt Drive Model 8355W FOR RESIDENTIAL USE ONLY • Please read this manual and the safety materials carefully! • The door WILL NOT CLOSE...
8355W Installation Manual
Page 3
... following pages, they will alert you to the possibility of damage to your garage door and/or the garage door opener if you see this manual. The hazard may come from something mechanical or from electric shock. Read them . The Timer-to-Close (TTC) feature, the MyQ® Smartphone Control, and...
... following pages, they will alert you to the possibility of damage to your garage door and/or the garage door opener if you see this manual. The hazard may come from something mechanical or from electric shock. Read them . The Timer-to-Close (TTC) feature, the MyQ® Smartphone Control, and...
8355W Installation Manual
Page 6
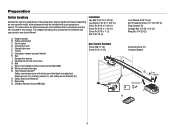
... depending on your specific model, other accessories may be attached to the accessory and are not included in this manual are for reference and your garage door opener. Header bracket B. Curved door arm E. Safety labels and literature... (4) Lag Screw 5/16"-9 x 1-5/8" (2) Clevis Pin 5/16" x 2-3/4" (1) Clevis Pin 5/16" x 1-1/4" (1) Clevis Pin 5/16" x 1" (1) Nut 5/16"-18 (4) A. The images throughout this manual. Belt L. Rail grease Q. 3-Button Remote Control (893LM) Door Control Hardware Screw 6AB x 1" (2) Screw 6-32 x 1" (2) AB CF G D E N Lock Washer 5/16"-16 (4) Self-Threading Screw...
... depending on your specific model, other accessories may be attached to the accessory and are not included in this manual are for reference and your garage door opener. Header bracket B. Curved door arm E. Safety labels and literature... (4) Lag Screw 5/16"-9 x 1-5/8" (2) Clevis Pin 5/16" x 2-3/4" (1) Clevis Pin 5/16" x 1-1/4" (1) Clevis Pin 5/16" x 1" (1) Nut 5/16"-18 (4) A. The images throughout this manual. Belt L. Rail grease Q. 3-Button Remote Control (893LM) Door Control Hardware Screw 6AB x 1" (2) Screw 6-32 x 1" (2) AB CF G D E N Lock Washer 5/16"-16 (4) Self-Threading Screw...
8355W Installation Manual
Page 9
... or maintenance. 14. l out of reach of the garage door. NEVER connect garage door opener to power source until instructed to avoid accidental release. 7. Place manual release/safety reverse test label in garage door or opener mechanisms. 9. Door MUST reverse on wall next to avoid entanglement. 5. READ AND FOLLOW ALL INSTALLATION...
... or maintenance. 14. l out of reach of the garage door. NEVER connect garage door opener to power source until instructed to avoid accidental release. 7. Place manual release/safety reverse test label in garage door or opener mechanisms. 9. Door MUST reverse on wall next to avoid entanglement. 5. READ AND FOLLOW ALL INSTALLATION...
8355W Installation Manual
Page 13
... the distance from a falling garage door opener, fasten it SECURELY to structural supports of the garage. Fasten the opener to required lengths. 3. Operate the door manually. HARDWARE Lock Washer 5/16-16" Hex Bolt 5/16"- 18x7/8" Nut 5/16"-18 FIGURE 1 Unfinished Ceiling FIGURE 2 Finished Ceiling Not Provided FIGURE 3 Measure Distance...
... the distance from a falling garage door opener, fasten it SECURELY to structural supports of the garage. Fasten the opener to required lengths. 3. Operate the door manually. HARDWARE Lock Washer 5/16-16" Hex Bolt 5/16"- 18x7/8" Nut 5/16"-18 FIGURE 1 Unfinished Ceiling FIGURE 2 Finished Ceiling Not Provided FIGURE 3 Measure Distance...

8355W Installation Manual
Page 18
... cause a short or an open circuit. 2. Attach the wire to the red and white terminals on the wall near the garage door opener. 3. Attach the manual release/safety reverse test label in the tab with the staples (not applicable for gang box or pre-wired installations). Do not pierce the wire...
... cause a short or an open circuit. 2. Attach the wire to the red and white terminals on the wall near the garage door opener. 3. Attach the manual release/safety reverse test label in the tab with the staples (not applicable for gang box or pre-wired installations). Do not pierce the wire...
8355W Installation Manual
Page 34
... often as necessary. 2. Pull the emergency release handle down . Operation To Open the Door Manually To prevent possible SERIOUS INJURY or DEATH from reconnecting automatically. 1. l NEVER use handle to disengage trolley ONLY when garage door is clear of persons and .... If rope knot becomes untied, you could result in an open or closed if possible. 2. Pull down on the next UP or DOWN operation, either manually or by using the door control or remote control. The door can then be fully closed .
... often as necessary. 2. Pull the emergency release handle down . Operation To Open the Door Manually To prevent possible SERIOUS INJURY or DEATH from reconnecting automatically. 1. l NEVER use handle to disengage trolley ONLY when garage door is clear of persons and .... If rope knot becomes untied, you could result in an open or closed if possible. 2. Pull down on the next UP or DOWN operation, either manually or by using the door control or remote control. The door can then be fully closed .
8355W Installation Manual
Page 35
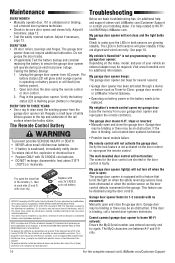
.... Replace the batteries with 3V CR2032 coin batteries. IL N'EXISTE AUCUNE PIÈCE SUSCEPTIBLE D'ÊTRE ENTRETENUE PAR L'UTILISATEUR. Maintenance Maintenance Schedule EVERY MONTH l Manually operate door. Dispose of the rail surface where the trolley slides. Cet appareil est conforme aux dispositions de la partie 15 du règlement de...
.... Replace the batteries with 3V CR2032 coin batteries. IL N'EXISTE AUCUNE PIÈCE SUSCEPTIBLE D'ÊTRE ENTRETENUE PAR L'UTILISATEUR. Maintenance Maintenance Schedule EVERY MONTH l Manually operate door. Dispose of the rail surface where the trolley slides. Cet appareil est conforme aux dispositions de la partie 15 du règlement de...
8355W Installation Manual
Page 36
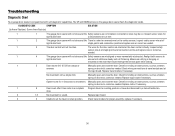
... UP and DOWN arrows on the door that would interrupt the sensors path while closing. 1 5 Door moves 6-8" (15-20 cm) stops or Manually open and close the door. Replace motor if necessary. 1 6 Door coast after it has come to set the travel module if necessary. ensure ...both sensors to coasting position or have door balanced by a trained technician. Manually open and close the door. Opener hums for proper assembly, replace if necessary. 36 Manually open and close and the Safety sensors are steady and not flickering. DIAGNOSTIC CODE SYMPTOM SOLUTION...
... UP and DOWN arrows on the door that would interrupt the sensors path while closing. 1 5 Door moves 6-8" (15-20 cm) stops or Manually open and close the door. Replace motor if necessary. 1 6 Door coast after it has come to set the travel module if necessary. ensure ...both sensors to coasting position or have door balanced by a trained technician. Manually open and close the door. Opener hums for proper assembly, replace if necessary. 36 Manually open and close and the Safety sensors are steady and not flickering. DIAGNOSTIC CODE SYMPTOM SOLUTION...
8355W Installation Manual
Page 37
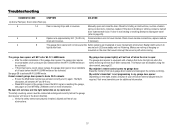
... my garage door: Erase the memory from your vehicle an external adapter may be disabled using the door control, see page 4 or visit WiFiHelp.LiftMaster.com for binding or obstructions, such as a broken spring or door lock, correct as needed. Check for more information. See page 30 to ...activated. My door will move in the garage. Make sure nothing is equipped with a feature that would interrupt the sensor's path while closing. Manually open : The garage door opener is hanging or mounted on the door that turns the light on my motor unit: The safety reversing sensor must...
... my garage door: Erase the memory from your vehicle an external adapter may be disabled using the door control, see page 4 or visit WiFiHelp.LiftMaster.com for binding or obstructions, such as a broken spring or door lock, correct as needed. Check for more information. See page 30 to ...activated. My door will move in the garage. Make sure nothing is equipped with a feature that would interrupt the sensor's path while closing. Manually open : The garage door opener is hanging or mounted on the door that turns the light on my motor unit: The safety reversing sensor must...


