8355W Users Guide Manual
Page 14
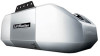
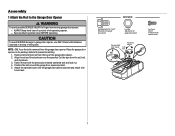
... notify doctor. The wall-mounted door control will glow solid orange (opener is maintained between A-F and 0-9 only. 14 For the complete manual visit LiftMaster.com/Customer-Support EVERY YEAR • Oil door rollers, bearings and hinges. Do not grease the door tracks. • (If applicable) Test .... Adjust if necessary, page 12. • Test the safety reversal system. Unplug the garage door opener from the garage door opener rail. Visit www.homelink.com for additional help related to the top and underside of your garage door opener and reprogram the remote control(s). ...
... notify doctor. The wall-mounted door control will glow solid orange (opener is maintained between A-F and 0-9 only. 14 For the complete manual visit LiftMaster.com/Customer-Support EVERY YEAR • Oil door rollers, bearings and hinges. Do not grease the door tracks. • (If applicable) Test .... Adjust if necessary, page 12. • Test the safety reversal system. Unplug the garage door opener from the garage door opener rail. Visit www.homelink.com for additional help related to the top and underside of your garage door opener and reprogram the remote control(s). ...
8355W Product Guide Manual
Page 2
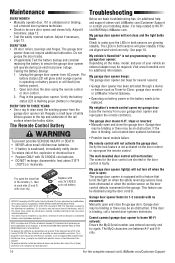
... door opener and MyQ Accessories. -- EFFICIENCY -- Approximately 1.5-Watt Power in lbs.) 24 17 CARTONS (2) HEAD RAIL CARTON 1: 20" x 12" x 10" --M ul ti -Fun ction Con tr ol Pa ne l... ( 882L MW) --3 -Button Remote Contr ol ( 893L M) --G a ra ge Door O pen er Hea d ( 8355W) - -T h e P r o t e c t o r S y s t e m ® S a f e t y R e v e r s i n g S e n s o r s CARTON 2: 10'4" x 5" x 5" --Asse m bled Solid -Steel B e lt T-R a il C O N V E N I E N C E A N D ...LiftMaster All Rights Reserved 845 Larch Ave., Elmhurst, IL 60126...
... door opener and MyQ Accessories. -- EFFICIENCY -- Approximately 1.5-Watt Power in lbs.) 24 17 CARTONS (2) HEAD RAIL CARTON 1: 20" x 12" x 10" --M ul ti -Fun ction Con tr ol Pa ne l... ( 882L MW) --3 -Button Remote Contr ol ( 893L M) --G a ra ge Door O pen er Hea d ( 8355W) - -T h e P r o t e c t o r S y s t e m ® S a f e t y R e v e r s i n g S e n s o r s CARTON 2: 10'4" x 5" x 5" --Asse m bled Solid -Steel B e lt T-R a il C O N V E N I E N C E A N D ...LiftMaster All Rights Reserved 845 Larch Ave., Elmhurst, IL 60126...
8355W Installation Manual
Page 6
... images throughout this manual are for these accessories will vary depending on your specific model, other accessories may look different. Rail I 6 Sprocket cover with white and white/black wire attached: Sending senor (1), receiving sensor (1), and safety sensor brackets... (2) O. The Protector System® Safety reversing sensors with hex screws K. Emergency release rope and handle H. Safety labels and literature P. Rail grease Q. 3-Button Remote Control (893LM) Door Control Hardware Screw 6AB x 1" (2) Screw 6-32 x 1" (2) AB CF G D E N Lock Washer ...
... images throughout this manual are for these accessories will vary depending on your specific model, other accessories may look different. Rail I 6 Sprocket cover with white and white/black wire attached: Sending senor (1), receiving sensor (1), and safety sensor brackets... (2) O. The Protector System® Safety reversing sensors with hex screws K. Emergency release rope and handle H. Safety labels and literature P. Rail grease Q. 3-Button Remote Control (893LM) Door Control Hardware Screw 6AB x 1" (2) Screw 6-32 x 1" (2) AB CF G D E N Lock Washer ...
8355W Installation Manual
Page 7
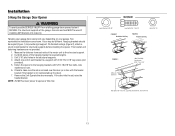
...l Securely attach sprocket cover BEFORE operating. Cut the tape from the garage door opener. To avoid SERIOUS damage to prevent scratching. 1. Fasten the rail with the sprocket cover) 7 HARDWARE Washered Bolt 5/16"-18x1/2" (Mounted in the garage door opener) Lock Nut (Mounted in the top of... sprocket while operating opener. Place the garage door opener on the packing material to garage door opener, use the bolts removed from the rail, belt, and styrofoam. 3. NOTE: ONLY use ONLY those bolts/fasteners mounted in the garage door opener) Washered Bolt 5/16"-18x1/2" Hex...
...l Securely attach sprocket cover BEFORE operating. Cut the tape from the garage door opener. To avoid SERIOUS damage to prevent scratching. 1. Fasten the rail with the sprocket cover) 7 HARDWARE Washered Bolt 5/16"-18x1/2" (Mounted in the garage door opener) Lock Nut (Mounted in the top of... sprocket while operating opener. Place the garage door opener on the packing material to garage door opener, use the bolts removed from the rail, belt, and styrofoam. 3. NOTE: ONLY use ONLY those bolts/fasteners mounted in the garage door opener) Washered Bolt 5/16"-18x1/2" Hex...
8355W Installation Manual
Page 12
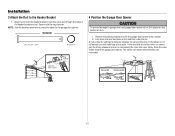
... you will need help at this point. Clevis Pin 5/16" X 2-3/4" Connected Disconnected 12 Insert the clevis pin through the holes in the header bracket and rail. Secure with the header bracket. NOTE: Use the packing material as a protective base for setting the distance between the... rail and the door. A 2x4 is ideal for the garage door opener. Slide the outer trolley toward the garage door opener. The trolley can remain disconnected ...
... you will need help at this point. Clevis Pin 5/16" X 2-3/4" Connected Disconnected 12 Insert the clevis pin through the holes in the header bracket and rail. Secure with the header bracket. NOTE: Use the packing material as a protective base for setting the distance between the... rail and the door. A 2x4 is ideal for the garage door opener. Slide the outer trolley toward the garage door opener. The trolley can remain disconnected ...
8355W Installation Manual
Page 13
...falling garage door opener, fasten it SECURELY to structural supports of each side of the hanging bracket to required lengths. 3. If the door hits the rail, raise the header bracket. HARDWARE Lock Washer 5/16-16" Hex Bolt 5/16"- 18x7/8" Nut 5/16"-18 FIGURE 1 Unfinished Ceiling FIGURE... 18x7/8", Lock Washer 5/16-16", Nut 5/16"-18 13 Concrete anchors MUST be different. NOTE: DO NOT connect power to make sure the rail is centered over the door (or in the structural supports. 4. Two representative installations are not provided. 1. Check to opener at this time....
...falling garage door opener, fasten it SECURELY to structural supports of each side of the hanging bracket to required lengths. 3. If the door hits the rail, raise the header bracket. HARDWARE Lock Washer 5/16-16" Hex Bolt 5/16"- 18x7/8" Nut 5/16"-18 FIGURE 1 Unfinished Ceiling FIGURE... 18x7/8", Lock Washer 5/16-16", Nut 5/16"-18 13 Concrete anchors MUST be different. NOTE: DO NOT connect power to make sure the rail is centered over the door (or in the structural supports. 4. Two representative installations are not provided. 1. Check to opener at this time....
8355W Installation Manual
Page 35
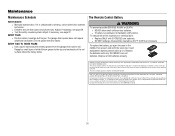
... operation. The Remote Control Battery To prevent possible SERIOUS INJURY or DEATH: l NEVER allow small children near batteries. To reduce risk of the rail surface where the trolley slides. Cet appareil est conforme aux dispositions de la partie 15 du règlement de la FCC et de l'norme...003 du Canada. 35 EVERY YEAR l Oil door rollers, bearings and hinges. l Check to wipe away the existing grease from the garage door opener rail. IL N'EXISTE AUCUNE PIÈCE SUSCEPTIBLE D'ÊTRE ENTRETENUE PAR L'UTILISATEUR. Dispose of the FCC rules and IC RSS-210. l If battery ...
... operation. The Remote Control Battery To prevent possible SERIOUS INJURY or DEATH: l NEVER allow small children near batteries. To reduce risk of the rail surface where the trolley slides. Cet appareil est conforme aux dispositions de la partie 15 du règlement de la FCC et de l'norme...003 du Canada. 35 EVERY YEAR l Oil door rollers, bearings and hinges. l Check to wipe away the existing grease from the garage door opener rail. IL N'EXISTE AUCUNE PIÈCE SUSCEPTIBLE D'ÊTRE ENTRETENUE PAR L'UTILISATEUR. Dispose of the FCC rules and IC RSS-210. l If battery ...
8355W Installation Manual
Page 40
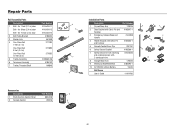
for 10 foot (3 m) door 2 Belt Pulley Bracket 3 Master Link 4 One-Piece Rail 7 feet (2.1 m) One-Piece Rail 8 feet (2.4 m) One-Piece Rail 10 feet (3 m) 5 Trolley Assembly 6 Tensioner Assembly 7 Trolley Threaded Shaft Part Number 41A5434-11 41A5434-13 41A5434-14 41B5424 4A1008 2777BD 2778BD 2770BD 41B3869-3A 41B4103 ... 114A4760 2 3 1 7 4 6 5 8 9 10 Accessories Description Part Number 1 1 Multi-function Control Panel 882LMW 2 Remote Control 893LM 2 40 for 8 foot (2.4 m) door Belt - for 7 foot (2.1 m) door Belt - Repair Parts Rail Assembly Parts Description 1 Belt -
for 10 foot (3 m) door 2 Belt Pulley Bracket 3 Master Link 4 One-Piece Rail 7 feet (2.1 m) One-Piece Rail 8 feet (2.4 m) One-Piece Rail 10 feet (3 m) 5 Trolley Assembly 6 Tensioner Assembly 7 Trolley Threaded Shaft Part Number 41A5434-11 41A5434-13 41A5434-14 41B5424 4A1008 2777BD 2778BD 2770BD 41B3869-3A 41B4103 ... 114A4760 2 3 1 7 4 6 5 8 9 10 Accessories Description Part Number 1 1 Multi-function Control Panel 882LMW 2 Remote Control 893LM 2 40 for 8 foot (2.4 m) door Belt - for 7 foot (2.1 m) door Belt - Repair Parts Rail Assembly Parts Description 1 Belt -

Garage Door Opener Comparison Chart Manual
Page 1
...893LM 3-Button Remote Control 24 Remote Controls; 2 Wireless Keyless Entries PREMIUM SERIES 8355W 3240 1/2 HP AC Belt Drive Wi-Fi 1/2 HP AC Screw Drive Yes Yes Yes - Yes Yes - Yes Yes - LiftMaster® Garage Door Openers Model Number 8500 ELITE SERIES® 8550W 8587W ... Wi-Fi - Yes Yes Yes Yes Yes 880LMW Smart Control Panel 893MAX 3-Button Remote Control 40 Remote Controls; 4 Wireless Keyless Entries I-Beam Rail System, 2-Speed Sprocket, Sensor Extension Brackets, Chassis Support Bracket 2 x 100 Watts, Side to -Close Yes Yes Backwards Compatible Remote (MAX)...
...893LM 3-Button Remote Control 24 Remote Controls; 2 Wireless Keyless Entries PREMIUM SERIES 8355W 3240 1/2 HP AC Belt Drive Wi-Fi 1/2 HP AC Screw Drive Yes Yes Yes - Yes Yes - Yes Yes - LiftMaster® Garage Door Openers Model Number 8500 ELITE SERIES® 8550W 8587W ... Wi-Fi - Yes Yes Yes Yes Yes 880LMW Smart Control Panel 893MAX 3-Button Remote Control 40 Remote Controls; 4 Wireless Keyless Entries I-Beam Rail System, 2-Speed Sprocket, Sensor Extension Brackets, Chassis Support Bracket 2 x 100 Watts, Side to -Close Yes Yes Backwards Compatible Remote (MAX)...


