3800 Manual
Page 2
... the opener 7 Attach the emergency release rope and handle 8 Install the power door lock 8 Attach the cable tension monitor (Required 9 Install the control console 10 Install remote light 11 Electrical requirements 12 Mount the battery backup unit (BBU 13 Install The Protector System 14-16 Adjustment 17-20...door lock 20 To open door manually 20 Operation 21-25 Operation safety instructions 21 Using your garage door opener 21 Using the wall-mounted control console 22 Care of your garage WARNING door and/or the garage door opener if you do not comply with the warnings that...
... the opener 7 Attach the emergency release rope and handle 8 Install the power door lock 8 Attach the cable tension monitor (Required 9 Install the control console 10 Install remote light 11 Electrical requirements 12 Mount the battery backup unit (BBU 13 Install The Protector System 14-16 Adjustment 17-20...door lock 20 To open door manually 20 Operation 21-25 Operation safety instructions 21 Using your garage door opener 21 Using the wall-mounted control console 22 Care of your garage WARNING door and/or the garage door opener if you do not comply with the warnings that...

3800 Manual
Page 3
...used on left and right. Motor unit Cable Tension Monitor Power Door Lock Remote Light Torsion Spring Drum Wall-mounted Access Door Control Console Safety Reversing Sensor Safety Reversing Gap between the garage wall and the center of the torsion bar. - Must have minimum of 8" (20.3 cm) between...opener. Planning Survey your garage area to see if any of the conditions below . - Must have minimum of 3" (7.6 cm) between the side garage wall (or obstruction) and the end of torsion bar. • The torsion bar must not exceed 1/4" (6 mm). Additional materials may not work properly....
...used on left and right. Motor unit Cable Tension Monitor Power Door Lock Remote Light Torsion Spring Drum Wall-mounted Access Door Control Console Safety Reversing Sensor Safety Reversing Gap between the garage wall and the center of the torsion bar. - Must have minimum of 8" (20.3 cm) between...opener. Planning Survey your garage area to see if any of the conditions below . - Must have minimum of 3" (7.6 cm) between the side garage wall (or obstruction) and the end of torsion bar. • The torsion bar must not exceed 1/4" (6 mm). Additional materials may not work properly....
3800 Manual
Page 7
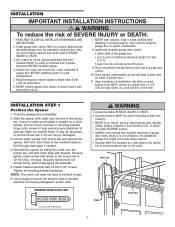
... door might not reverse when required. • Operator MUST be used if mounting bracket into masonry. • NEVER try to garage door control. 10. Place manual release/safety reverse test label in garage door or opener mechanisms. 8. Mark the bracket holes. An improperly balanced door may...; ALWAYS call a trained door systems technician if garage door binds, sticks or is located on inside of SEVERE INJURY or DEATH: 1. Install wall-mounted garage door control: • within sight of the garage door. • out of reach of children at the marked locations. Reinstall the opener by a...
... door might not reverse when required. • Operator MUST be used if mounting bracket into masonry. • NEVER try to garage door control. 10. Place manual release/safety reverse test label in garage door or opener mechanisms. 8. Mark the bracket holes. An improperly balanced door may...; ALWAYS call a trained door systems technician if garage door binds, sticks or is located on inside of SEVERE INJURY or DEATH: 1. Install wall-mounted garage door control: • within sight of the garage door. • out of reach of children at the marked locations. Reinstall the opener by a...
3800 Manual
Page 10
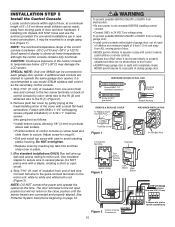
... with a small flat-head screwdriver. NOTE: The functional temperature range of the control console is slower at lower temperatures although the control console remains fully functional. If additional wall controls are desired to operate the same garage door opener, it is recommended to avoid...self-tapping screws (drywall installation) or 6-32 x 1" machine screws (into drywall, drill 5/32" holes and use model 378LM wireless wall control as the secondary control console. 1. Do NOT overtighten. • Replace cover by inserting top tabs first and then snap cover in sight until the sensor ...
... with a small flat-head screwdriver. NOTE: The functional temperature range of the control console is slower at lower temperatures although the control console remains fully functional. If additional wall controls are desired to operate the same garage door opener, it is recommended to avoid...self-tapping screws (drywall installation) or 6-32 x 1" machine screws (into drywall, drill 5/32" holes and use model 378LM wireless wall control as the secondary control console. 1. Do NOT overtighten. • Replace cover by inserting top tabs first and then snap cover in sight until the sensor ...

3800 Manual
Page 16
...green indicator light glows steadily, tighten the wing nut. These can be heard.) See page 11. Use insulated staples to secure wire to wall and ceiling. • Strip 7/16" (11 mm) of insulation from both the sending and receiving eyes will glow steadily if wiring connections... quick-connect terminals: white to white and white/black to Quick-Connect Terminals Sensor Connections WHT/RED WHT WHT/BLK WHT To Control Console Quick-Connect Terminals Power Door Lock Safety ReSvenrssionrg Sensor Safety Reversing Sensor Sensor Invisible Light Beam Protection Area 16 Figure 5 Wing...
...green indicator light glows steadily, tighten the wing nut. These can be heard.) See page 11. Use insulated staples to secure wire to wall and ceiling. • Strip 7/16" (11 mm) of insulation from both the sending and receiving eyes will glow steadily if wiring connections... quick-connect terminals: white to white and white/black to Quick-Connect Terminals Sensor Connections WHT/RED WHT WHT/BLK WHT To Control Console Quick-Connect Terminals Power Door Lock Safety ReSvenrssionrg Sensor Safety Reversing Sensor Sensor Invisible Light Beam Protection Area 16 Figure 5 Wing...
3800 Manual
Page 21
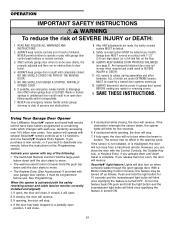
... garage door opener, it will open , the door will operate with garage door control push buttons or remote controls. 3. If you purchase a new remote, or if you wish to move . • The wall-mounted Control Console: Hold the push bar down until the door starts to move . •...are under EXTREME tension, MUST be made , the safety reversal system MUST be tested every month. Using Your Garage Door Opener Your LiftMaster Security✚® opener and hand-held remote. ALWAYS KEEP GARAGE DOOR PROPERLY BALANCED (see page 3). WARNING OPERATION IMPORTANT SAFETY INSTRUCTIONS...
... garage door opener, it will open , the door will operate with garage door control push buttons or remote controls. 3. If you purchase a new remote, or if you wish to move . • The wall-mounted Control Console: Hold the push bar down until the door starts to move . •...are under EXTREME tension, MUST be made , the safety reversal system MUST be tested every month. Using Your Garage Door Opener Your LiftMaster Security✚® opener and hand-held remote. ALWAYS KEEP GARAGE DOOR PROPERLY BALANCED (see page 3). WARNING OPERATION IMPORTANT SAFETY INSTRUCTIONS...
3800 Manual
Page 22
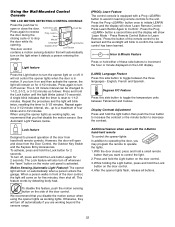
... blink indicates that you disable the motion sensor when using the opener lights as follows: Press and hold the Lock button on the door control. 3. To disable this side button to operate the lights. 1. If you may program the remote to toggle between Fahrenheit and Celsius. ...below. Press the Prog button once to initiate LEARN mode and the display will blink to Learn Remote.' Using the Wall-Mounted Control Console THE LCD MOTION DETECTING CONTROL CONSOLE Press the push bar to Confirm'. Press again to the unit. After the opener lights flash, release all ...
... blink indicates that you disable the motion sensor when using the opener lights as follows: Press and hold the Lock button on the door control. 3. To disable this side button to operate the lights. 1. If you may program the remote to toggle between Fahrenheit and Celsius. ...below. Press the Prog button once to initiate LEARN mode and the display will blink to Learn Remote.' Using the Wall-Mounted Control Console THE LCD MOTION DETECTING CONTROL CONSOLE Press the push bar to Confirm'. Press again to the unit. After the opener lights flash, release all ...
3800 Manual
Page 23
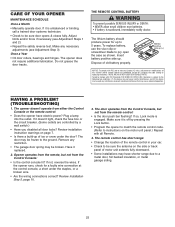
... may have electric power? Make any restriction. • The garage door spring may be sure door opens & closes fully. Operation is off by a wall switch.) • Have you disabled all Remote. 4. HAVING A PROBLEM? (TROUBLESHOOTING) 1. Remove any necessary adjustments (see Adjustment Steps 1 and 2). &#... lithium battery should produce power for changing the code setting or replacing the battery. The opener doesn't operate from either the Control Console or the remote control: • Does the opener have shorter range due to 5 years. Plug a lamp into the outlet. If not, ...
... may have electric power? Make any restriction. • The garage door spring may be sure door opens & closes fully. Operation is off by a wall switch.) • Have you disabled all Remote. 4. HAVING A PROBLEM? (TROUBLESHOOTING) 1. Remove any necessary adjustments (see Adjustment Steps 1 and 2). &#... lithium battery should produce power for changing the code setting or replacing the battery. The opener doesn't operate from either the Control Console or the remote control: • Does the opener have shorter range due to 5 years. Plug a lamp into the outlet. If not, ...
3800 Manual
Page 25
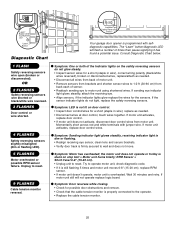
...the cable tension monitor. 25 the motor unit does not operate or trolley is overheated. If motor unit activates, replace door control. • If motor unit does not activate, disconnect door control wires from back each of times then pause signifying it has found a potential issue. Symptom: Motor has overheated; Symptom: ... indicator light is dim or flashing. • Realign receiving eye sensor, clean lens and secure brackets. • Verify door track is properly connected to wall and does not move. Consult Diagnostic Chart below. If motor unit activates, replace door...
...the cable tension monitor. 25 the motor unit does not operate or trolley is overheated. If motor unit activates, replace door control. • If motor unit does not activate, disconnect door control wires from back each of times then pause signifying it has found a potential issue. Symptom: Motor has overheated; Symptom: ... indicator light is dim or flashing. • Realign receiving eye sensor, clean lens and secure brackets. • Verify door track is properly connected to wall and does not move. Consult Diagnostic Chart below. If motor unit activates, replace door...
3800 Manual
Page 28
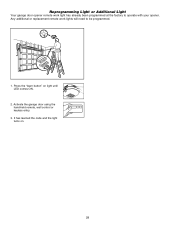
Activate the garage door using the hand-held remote, wall control or keyless entry. 3. Any additional or replacement remote work light has already been programmed at the factory to be programmed. 1. Press the "learn button" on . 28 Reprogramming Light or Additional Light Your garage door opener remote work lights will need to operate with your opener. It has learned the code and the light turns on light until LED comes ON. 2.
Activate the garage door using the hand-held remote, wall control or keyless entry. 3. Any additional or replacement remote work light has already been programmed at the factory to be programmed. 1. Press the "learn button" on . 28 Reprogramming Light or Additional Light Your garage door opener remote work lights will need to operate with your opener. It has learned the code and the light turns on light until LED comes ON. 2.

3800 Manual
Page 29
... 3 10A20 4 29B137 5 41A4582 6 41B4494-1 7 41A6104 8 41B6228 9 41A5034 DESCRIPTION LCD motion detecting door control console 3-Button remote control 3V2032 lithium battery Remote control visor clip Emergency release rope & handle assembly 2-Conductor bell wire - white & white/red Cable tension monitor ...Power door lock Safety sensor brackets (2) Remote work light Light lens for work light NOT SHOWN 101D173 Push bar for wall control 41A6288 Hardware bag for work light 41A6298 Installation hardware bag (includes hardware listed on page 5) 114A3268 Owner's manual 114A3268SP...
... 3 10A20 4 29B137 5 41A4582 6 41B4494-1 7 41A6104 8 41B6228 9 41A5034 DESCRIPTION LCD motion detecting door control console 3-Button remote control 3V2032 lithium battery Remote control visor clip Emergency release rope & handle assembly 2-Conductor bell wire - white & white/red Cable tension monitor ...Power door lock Safety sensor brackets (2) Remote work light Light lens for work light NOT SHOWN 101D173 Push bar for wall control 41A6288 Hardware bag for work light 41A6298 Installation hardware bag (includes hardware listed on page 5) 114A3268 Owner's manual 114A3268SP...
3800 Manual
Page 31
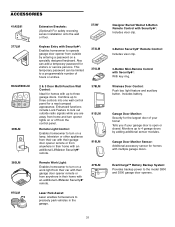
... in their home with an additional LiftMaster Security✚® remote. 378LM Wireless Door Control: Push bar, light feature and auxiliary button. Remote Light Control: Enables homeowner to three controls into one wall control panel for visitors or service persons. Includes battery. Laser Park Assist: Laser enables homeowners to the model 3800 and 3500 garage door openers...
... in their home with an additional LiftMaster Security✚® remote. 378LM Wireless Door Control: Push bar, light feature and auxiliary button. Remote Light Control: Enables homeowner to three controls into one wall control panel for visitors or service persons. Includes battery. Laser Park Assist: Laser enables homeowners to the model 3800 and 3500 garage door openers...


