3800 Manual
Page 2
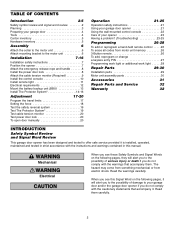
... Test The Protector System 19 Test cable tension monitor 20 Test power door lock 20 To open door manually 20 Operation 21-25 Operation safety instructions 21 Using your garage door opener 21 Using the wall-mounted control console 22 Care of your garage WARNING door and/or the garage door opener if you do not comply with the cautionary statements that accompany...
... Test The Protector System 19 Test cable tension monitor 20 Test power door lock 20 To open door manually 20 Operation 21-25 Operation safety instructions 21 Using your garage door opener 21 Using the wall-mounted control console 22 Care of your garage WARNING door and/or the garage door opener if you do not comply with the cautionary statements that accompany...

3800 Manual
Page 3
...drums, not to be installed on left and right. Motor unit Cable Tension Monitor Power Door Lock Remote Light Torsion Spring Drum Wall-mounted Access Door Control Console Safety Reversing Sensor Safety Reversing Gap between the garage wall and the center of the torsion bar. - ft. • 1" (2.5 cm) ...of movement is required within 6' (1.8 m) of torsion bar. • The torsion bar must not exceed 1/4" (6 mm). If this opener will require hardware not provided. • A model 475LM EverChargeTM Battery Backup System is strongly recommended if there is compatible with an external...
...drums, not to be installed on left and right. Motor unit Cable Tension Monitor Power Door Lock Remote Light Torsion Spring Drum Wall-mounted Access Door Control Console Safety Reversing Sensor Safety Reversing Gap between the garage wall and the center of the torsion bar. - ft. • 1" (2.5 cm) ...of movement is required within 6' (1.8 m) of torsion bar. • The torsion bar must not exceed 1/4" (6 mm). If this opener will require hardware not provided. • A model 475LM EverChargeTM Battery Backup System is strongly recommended if there is compatible with an external...
3800 Manual
Page 7
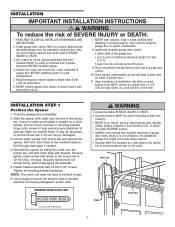
... WARNINGS AND INSTRUCTIONS. 2. Install garage door opener ONLY on the floor. Disable ALL locks and remove ALL ropes connected to garage door BEFORE installing opener to do so. 7. NEVER connect garage door opener to power source until pilot holes align with 14-10x1-7/8" screws. Door MUST reverse on contact with ...antenna from being entangled in plain view on the collar. Motor unit Staple Torsion Bar 7 Install wall-mounted garage door control: • within sight of the garage door. • out of reach of operator. Securely tighten both set screws firmly, without damaging ...
... WARNINGS AND INSTRUCTIONS. 2. Install garage door opener ONLY on the floor. Disable ALL locks and remove ALL ropes connected to garage door BEFORE installing opener to do so. 7. NEVER connect garage door opener to power source until pilot holes align with 14-10x1-7/8" screws. Door MUST reverse on contact with ...antenna from being entangled in plain view on the collar. Motor unit Staple Torsion Bar 7 Install wall-mounted garage door control: • within sight of the garage door. • out of reach of operator. Securely tighten both set screws firmly, without damaging ...
3800 Manual
Page 8
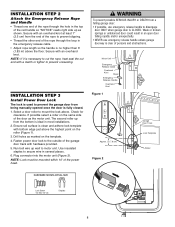
...an open door falling rapidly and/or unexpectedly. • NEVER use emergency release handle to prevent slipping. • Thread the other end of the power head. Drill holes as the motor unit. NOTE: Lock must be mounted within 10' of the rope through the hole in the top of the garage door track... m) above the floor. Ensure rail surface is CLOSED. Run bell wire up wall to the outside of the red handle so "NOTICE" reads right side up from the end of the rope to disengage door ONLY when garage door is clean and adhere lock template with an overhand knot. Plug connector into the...
...an open door falling rapidly and/or unexpectedly. • NEVER use emergency release handle to prevent slipping. • Thread the other end of the power head. Drill holes as the motor unit. NOTE: Lock must be mounted within 10' of the rope through the hole in the top of the garage door track... m) above the floor. Ensure rail surface is CLOSED. Run bell wire up wall to the outside of the red handle so "NOTICE" reads right side up from the end of the rope to disengage door ONLY when garage door is clean and adhere lock template with an overhand knot. Plug connector into the...
3800 Manual
Page 9
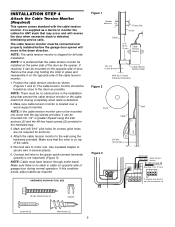
...is detected. 2. Remove the snap-ring holding the roller in several places. 6. NOTE: If the cable tension monitor can not be mounted into 1/2" or greater drywall using the hardware provided. Run bell wire to secure wire in place and reassemble it on the opposite side...Figures 1 and 2). If required, it can be connected and properly installed before the garage door opener will reverse the door when excessive slack is not important) (Figure 3). It is supplied as close to the wall using the wall anchors (2) and the #8 hex head screws (2) provided in tab with the cable tension...
...is detected. 2. Remove the snap-ring holding the roller in several places. 6. NOTE: If the cable tension monitor can not be mounted into 1/2" or greater drywall using the hardware provided. Run bell wire to secure wire in place and reassemble it on the opposite side...Figures 1 and 2). If required, it can be connected and properly installed before the garage door opener will reverse the door when excessive slack is not important) (Figure 3). It is supplied as close to the wall using the wall anchors (2) and the #8 hex head screws (2) provided in tab with the cable tension...
3800 Manual
Page 10
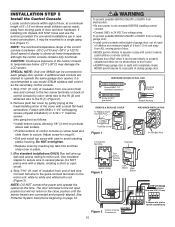
..., allowing 1/8" (3 mm) to protrude above wall surface. • Position bottom of the control console to temperatures below -22°F (-30°C) may be mounted to a single gang box (Figure 1). Scroll speed of door and door hardware. Fasten with a staple, creating a short or open position but will travel . • ALWAYS keep garage door in sight until the sensor...
..., allowing 1/8" (3 mm) to protrude above wall surface. • Position bottom of the control console to temperatures below -22°F (-30°C) may be mounted to a single gang box (Figure 1). Scroll speed of door and door hardware. Fasten with a staple, creating a short or open position but will travel . • ALWAYS keep garage door in sight until the sensor...

3800 Manual
Page 14
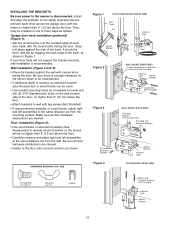
... available if needed. Extension brackets (see accessories) are designed to mount the units on the left or right of wood at each other hardware) may interrupt the beam while the door is closing garage door: • Correctly connect and align the safety reversing sensor. If... the wall, the brackets must be unobstructed. IMPORTANT INFORMATION ABOUT THE SAFETY REVERSING SENSOR When properly connected and aligned, the safety reversing sensor will detect an obstacle in the down direction. The units must be connected and aligned correctly before the garage door opener will ...
... available if needed. Extension brackets (see accessories) are designed to mount the units on the left or right of wood at each other hardware) may interrupt the beam while the door is closing garage door: • Correctly connect and align the safety reversing sensor. If... the wall, the brackets must be unobstructed. IMPORTANT INFORMATION ABOUT THE SAFETY REVERSING SENSOR When properly connected and aligned, the safety reversing sensor will detect an obstacle in the down direction. The units must be connected and aligned correctly before the garage door opener will ...
3800 Manual
Page 15
... cleared. • Fasten to locate and drill (2) 3/16" diameter pilot holes on the wall at the same distance out from the mounting surface. Floor installation (Figure 4): • Use wood blocks or extension brackets (See Accessories) to the opener is disconnected. Garage door track installation (preferred) (Figure 1): • Slip the curved arms over the rounded edge...
... cleared. • Fasten to locate and drill (2) 3/16" diameter pilot holes on the wall at the same distance out from the mounting surface. Floor installation (Figure 4): • Use wood blocks or extension brackets (See Accessories) to the opener is disconnected. Garage door track installation (preferred) (Figure 1): • Slip the curved arms over the rounded edge...
3800 Manual
Page 21
... any repairs or removing covers. 13. An improperly balanced door may be tested. 9. Using Your Garage Door Opener Your LiftMaster Security✚® opener and hand-held Remote Control: Hold the large push button down until the door starts to move . • The Keyless Entry (See...• The wall-mounted Control Console: Hold the push bar down travel . 4. If open, the door will open position, it must be tested every month. If closing , the door will reverse. If opening cycle. If the door has been stopped in sight until the door starts to garage door opener BEFORE making any...
... any repairs or removing covers. 13. An improperly balanced door may be tested. 9. Using Your Garage Door Opener Your LiftMaster Security✚® opener and hand-held Remote Control: Hold the large push button down until the door starts to move . • The Keyless Entry (See...• The wall-mounted Control Console: Hold the push bar down travel . 4. If open, the door will open position, it must be tested every month. If closing , the door will reverse. If opening cycle. If the door has been stopped in sight until the door starts to garage door opener BEFORE making any...
3800 Manual
Page 22
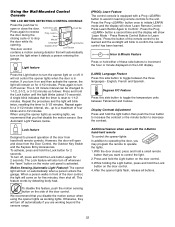
... the procedure and the light will remain on automatically when a person enters the garage. The Lock feature will come on for 2 seconds. When a person walks in front of the door from the Door Control, the Outdoor Key Switch and the Keyless Entry Accessories. To disable this side...off , press and hold either of the door control. After the opener lights flash, release all buttons. 22 Using the Wall-Mounted Control Console THE LCD MOTION DETECTING CONTROL CONSOLE Press the push bar to open and close the door. When using the opener lights as working lights, we recommend that ...
... the procedure and the light will remain on automatically when a person enters the garage. The Lock feature will come on for 2 seconds. When a person walks in front of the door from the Door Control, the Outdoor Key Switch and the Keyless Entry Accessories. To disable this side...off , press and hold either of the door control. After the opener lights flash, release all buttons. 22 Using the Wall-Mounted Control Console THE LCD MOTION DETECTING CONTROL CONSOLE Press the push bar to open and close the door. When using the opener lights as working lights, we recommend that ...


