

3280 Manual
Page 2
...remotes 31 To add, reprogram or change a Keyless Entry PIN 32 Repair Parts 33-34 Rail assembly parts 33 Installation parts 33 Motor unit assembly parts 34 Accessories 35 Repair Parts and Service 36 Warranty 36 INTRODUCTION Safety Symbol and Signal ... 2-5 Safety symbol and signal word review 2 Preparing your garage door 3 Tools needed 3 Planning 4 Carton inventory 5 Hardware inventory 5 Assembly 6-7 Attach the rail to the motor unit 6 Set the belt tension 6 Attach the belt cap retainer 7 Installation 7-22 Installation safety instructions 7 Determine the...
...remotes 31 To add, reprogram or change a Keyless Entry PIN 32 Repair Parts 33-34 Rail assembly parts 33 Installation parts 33 Motor unit assembly parts 34 Accessories 35 Repair Parts and Service 36 Warranty 36 INTRODUCTION Safety Symbol and Signal ... 2-5 Safety symbol and signal word review 2 Preparing your garage door 3 Tools needed 3 Planning 4 Carton inventory 5 Hardware inventory 5 Assembly 6-7 Attach the rail to the motor unit 6 Set the belt tension 6 Attach the belt cap retainer 7 Installation 7-22 Installation safety instructions 7 Determine the...

3280 Manual
Page 6
...b16o/9lt2s-!5/U21s/9e2 -o6f/2a/9n2y other bolts will cause6/1s1e/9r2ious damage to door opener. • Position belt over sprocket. ASSEMBLY STEP 1 Attach the Rail to the Motor Unit To avoid installation difficulties, do not run the garage door opener until instructed to do so. • Remove ... slots and brace it is finger tight against the trolley (Figure 3). USE ONLY THIS TYPE AND SIZE BOLT Washered Bolt 5/16"-18x1/2" Rail Hole Sprocket Rail Hole ASSEMBLY STEP 2 Set the Belt Tension • By hand, thread the spring trolley nut on the threaded shaft until the spring releases and ...
...b16o/9lt2s-!5/U21s/9e2 -o6f/2a/9n2y other bolts will cause6/1s1e/9r2ious damage to door opener. • Position belt over sprocket. ASSEMBLY STEP 1 Attach the Rail to the Motor Unit To avoid installation difficulties, do not run the garage door opener until instructed to do so. • Remove ... slots and brace it is finger tight against the trolley (Figure 3). USE ONLY THIS TYPE AND SIZE BOLT Washered Bolt 5/16"-18x1/2" Rail Hole Sprocket Rail Hole ASSEMBLY STEP 2 Set the Belt Tension • By hand, thread the spring trolley nut on the threaded shaft until the spring releases and ...
3280 Manual
Page 33
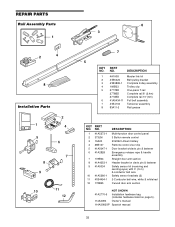
NO. REPAIR PARTS Rail Assembly Parts 1 2 4 8 Installation Parts LOCK LIGHT 13 2 4 5 6 NOTICE 8 CEILING MOUNT ONLY UP 7 9 10 11 12 6 3 7 5 KEY PART NO. NO. 1 41A5273-1 2 373LM 3 10A20 4 ... Owner's manual 114A3083SP Spanish manual 33 DESCRIPTION 1 4A1008 Master link kit 2 41B5424 Belt pulley bracket 3 41B3869-1 Complete trolley assembly 4 109B33 Trolley clip 5 2777BD One-piece T-rail 2778BD Complete rail 8' (2.4m) 2770BD Complete rail 10' (3m) 6 41A5434-11 Full belt assembly 7 41B4103 Tensioner assembly 8 83A11-2 Rail grease KEY PART NO.
NO. REPAIR PARTS Rail Assembly Parts 1 2 4 8 Installation Parts LOCK LIGHT 13 2 4 5 6 NOTICE 8 CEILING MOUNT ONLY UP 7 9 10 11 12 6 3 7 5 KEY PART NO. NO. 1 41A5273-1 2 373LM 3 10A20 4 ... Owner's manual 114A3083SP Spanish manual 33 DESCRIPTION 1 4A1008 Master link kit 2 41B5424 Belt pulley bracket 3 41B3869-1 Complete trolley assembly 4 109B33 Trolley clip 5 2777BD One-piece T-rail 2778BD Complete rail 8' (2.4m) 2770BD Complete rail 10' (3m) 6 41A5434-11 Full belt assembly 7 41B4103 Tensioner assembly 8 83A11-2 Rail grease KEY PART NO.


