
3280 Manual
Page 1
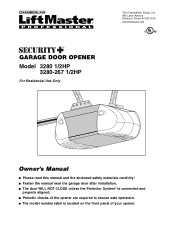
® GARAGE DOOR OPENER Model 3280 1/2HP 3280-267 1/2HP For Residential Use Only The Chamberlain Group, Inc. 845 Larch Avenue Elmhurst, Illinois 60126-1196 www.liftmaster.com Owner's Manual ■ Please read this manual and the enclosed safety materials carefully! ■ Fasten the manual near the garage door after installation. ■ The door WILL NOT CLOSE unless the Protector System® is connected and properly aligned. ■ Periodic checks of the opener are required to ensure safe operation. ■ The model number label is located on the front panel of your opener.
® GARAGE DOOR OPENER Model 3280 1/2HP 3280-267 1/2HP For Residential Use Only The Chamberlain Group, Inc. 845 Larch Avenue Elmhurst, Illinois 60126-1196 www.liftmaster.com Owner's Manual ■ Please read this manual and the enclosed safety materials carefully! ■ Fasten the manual near the garage door after installation. ■ The door WILL NOT CLOSE unless the Protector System® is connected and properly aligned. ■ Periodic checks of the opener are required to ensure safe operation. ■ The model number label is located on the front panel of your opener.

3280 Manual
Page 2
Mechanical Electrical When you see this manual. TABLE OF CONTENTS Introduction 2-5 Safety symbol and signal word review 2 Preparing your garage door 3 Tools needed 3 Planning 4 Carton inventory 5 Hardware inventory 5 Assembly 6-7 Attach the rail ... 25 Operation 26-30 Operation safety instructions 26 Using your garage door opener 26 Using the wall-mounted door control 27 To open the door manually 27 Care of serious injury or death if you do not comply with the cautionary statements that accompany it is installed, operated, maintained and tested...
Mechanical Electrical When you see this manual. TABLE OF CONTENTS Introduction 2-5 Safety symbol and signal word review 2 Preparing your garage door 3 Tools needed 3 Planning 4 Carton inventory 5 Hardware inventory 5 Assembly 6-7 Attach the rail ... 25 Operation 26-30 Operation safety instructions 26 Using your garage door opener 26 Using the wall-mounted door control 27 To open the door manually 27 Care of serious injury or death if you do not comply with the cautionary statements that accompany it is installed, operated, maintained and tested...
3280 Manual
Page 7
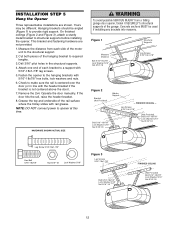
... remove ALL ropes connected to garage door BEFORE installing opener to the installation section. Install garage door opener 7 feet (2.13 m) or more above floor. 7. Place manual release/safety reverse test label in mounting plate.
... remove ALL ropes connected to garage door BEFORE installing opener to the installation section. Install garage door opener 7 feet (2.13 m) or more above floor. 7. Place manual release/safety reverse test label in mounting plate.
3280 Manual
Page 12
... the hanging bracket to a support with the header bracket if the bracket is centered over the door (or in the structural supports. 4. Operate the door manually. If the door hits the rail, raise the header bracket. 8. HARDWARE SHOWN ACTUAL SIZE To avoid possible SERIOUS INJURY from each bracket to required lengths...
... the hanging bracket to a support with the header bracket if the bracket is centered over the door (or in the structural supports. 4. Operate the door manually. If the door hits the rail, raise the header bracket. 8. HARDWARE SHOWN ACTUAL SIZE To avoid possible SERIOUS INJURY from each bracket to required lengths...
3280 Manual
Page 13
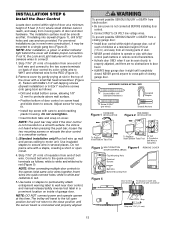
... surface. • Position bottom of door control on cover. Use tacks or staples to permanently attach entrapment warning label to wall near door control, and manual release/safety reverse test label in new home construction), it can be seen clearly, is properly adjusted, and there are no obstructions to door travel...
... surface. • Position bottom of door control on cover. Use tacks or staples to permanently attach entrapment warning label to wall near door control, and manual release/safety reverse test label in new home construction), it can be seen clearly, is properly adjusted, and there are no obstructions to door travel...

3280 Manual
Page 22
...: • Close the door and join the curved arm to the fully closed trolley/door arm positions in the trolley with the remaining clevis pin. Manually raise the door to the open position (parallel to the floor), and lift the door arm to the fully open trolley/door arm positions in... procedures, Figure 5: • On one-piece doors, before connecting the door arm to the trolley. Follow adjustment procedures below . Press the Door Control push button. Manually close the door and lift the door arm to the trolley, the travel to the trolley. It may be adjusted.
...: • Close the door and join the curved arm to the fully closed trolley/door arm positions in the trolley with the remaining clevis pin. Manually raise the door to the open position (parallel to the floor), and lift the door arm to the fully open trolley/door arm positions in... procedures, Figure 5: • On one-piece doors, before connecting the door arm to the trolley. Follow adjustment procedures below . Press the Door Control push button. Manually close the door and lift the door arm to the trolley, the travel to the trolley. It may be adjusted.
3280 Manual
Page 23
... 2. NOTE: To prevent the trolley from hitting the cover protection bolt, keep a minimum distance of travel cycle after each adjustment. To prevent damage to travel . Manually open at which the door will interfere with the door's downward travel , it will stop when moving up travel cycle: If the opener lights are...
... 2. NOTE: To prevent the trolley from hitting the cover protection bolt, keep a minimum distance of travel cycle after each adjustment. To prevent damage to travel . Manually open at which the door will interfere with the door's downward travel , it will stop when moving up travel cycle: If the opener lights are...
3280 Manual
Page 27
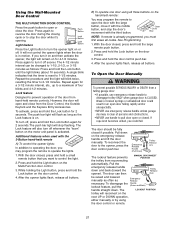
... blink indicates that you could result in motion. Repeat the procedure and the light will reconnect on the emergency release handle and lift the door manually. To turn the opener light on the hand-held remote: You may program the remote to operate the lights. 1. B) To operate one door...and close the door. After the opener lights flash, release all buttons. Press and hold the Lock button for 2 seconds. To Open the Door Manually To prevent possible SERIOUS INJURY or DEATH from a falling garage door: • If possible, use handle to pull door open or closed if possible....
... blink indicates that you could result in motion. Repeat the procedure and the light will reconnect on the emergency release handle and lift the door manually. To turn the opener light on the hand-held remote: You may program the remote to operate the lights. 1. B) To operate one door...and close the door. After the opener lights flash, release all buttons. Press and hold the Lock button for 2 seconds. To Open the Door Manually To prevent possible SERIOUS INJURY or DEATH from a falling garage door: • If possible, use handle to pull door open or closed if possible....
3280 Manual
Page 28
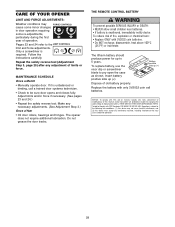
... reduce risk of old battery properly. The opener does not require additional lubrication. THERE ARE NO OTHER USER SERVICEABLE PARTS. MAINTENANCE SCHEDULE Once a Month • Manually operate door. To replace battery, use the visor clip or screwdriver blade to the LIMIT CONTROLS limit and force adjustments. The lithium battery should produce...
... reduce risk of old battery properly. The opener does not require additional lubrication. THERE ARE NO OTHER USER SERVICEABLE PARTS. MAINTENANCE SCHEDULE Once a Month • Manually operate door. To replace battery, use the visor clip or screwdriver blade to the LIMIT CONTROLS limit and force adjustments. The lithium battery should produce...
3280 Manual
Page 29
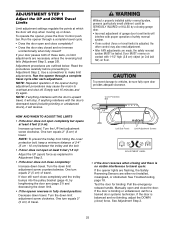
... can affect door travel by turning the UP Travel adjustment screw 2 full turns away from the opener by pulling the Emergency Release Rope. • Manually bring the door to a closed position. • Loosen the belt by adjusting the outer nut 4 to Adjustment Step 1, Adjust the UP and ...door will not close and the light bulbs blink on when the safety sensor beam has been obstructed. Refer to force or travel . • Manually check door for no apparent reason: Repeat safety reverse test after adjustments to disengage. • Decrease the UP travel towards the door and stop ...
... can affect door travel by turning the UP Travel adjustment screw 2 full turns away from the opener by pulling the Emergency Release Rope. • Manually bring the door to a closed position. • Loosen the belt by adjusting the outer nut 4 to Adjustment Step 1, Adjust the UP and ...door will not close and the light bulbs blink on when the safety sensor beam has been obstructed. Refer to force or travel . • Manually check door for no apparent reason: Repeat safety reverse test after adjustments to disengage. • Decrease the UP travel towards the door and stop ...
3280 Manual
Page 33
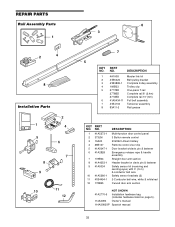
... sensor brackets (2) 2-Conductor bell wire, white & white/red Curved door arm section NOT SHOWN 41A2770-6 Installation hardware bag (includes hardware listed on page 5). 114A3083 Owner's manual 114A3083SP Spanish manual 33
... sensor brackets (2) 2-Conductor bell wire, white & white/red Curved door arm section NOT SHOWN 41A2770-6 Installation hardware bag (includes hardware listed on page 5). 114A3083 Owner's manual 114A3083SP Spanish manual 33
3280 Manual
Page 35
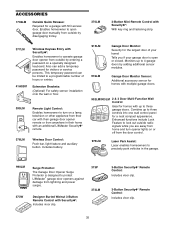
... to precisely park vehicles in the garage. 990LM 373W Surge Protector: The Garage Door Opener Surge Protector is open garage door manually from outside by disengaging trolley. 370LM 3-Button Mini-Remote Control with Security✚®: With key ring and fastening strip. 377LM... doors. Monitors up to a programmable number of your garage door is designed to protect LiftMaster® garage door openers against damage from anywhere in their home with an additional LiftMaster Security✚® remote. 378LM Wireless Door Control: Push bar, light feature and auxiliary...
... to precisely park vehicles in the garage. 990LM 373W Surge Protector: The Garage Door Opener Surge Protector is open garage door manually from outside by disengaging trolley. 370LM 3-Button Mini-Remote Control with Security✚®: With key ring and fastening strip. 377LM... doors. Monitors up to a programmable number of your garage door is designed to protect LiftMaster® garage door openers against damage from anywhere in their home with an additional LiftMaster Security✚® remote. 378LM Wireless Door Control: Push bar, light feature and auxiliary...


