

3280 Manual
Page 2
... word review 2 Preparing your garage door 3 Tools needed 3 Planning 4 Carton inventory 5 Hardware inventory 5 Assembly 6-7 Attach the rail to the motor unit 6 Set the belt tension 6 Attach the belt cap retainer 7 Installation 7-22 Installation safety instructions 7 Determine the header bracket location 8 Install the header bracket 9 Attach the rail to the header bracket 10...
... word review 2 Preparing your garage door 3 Tools needed 3 Planning 4 Carton inventory 5 Hardware inventory 5 Assembly 6-7 Attach the rail to the motor unit 6 Set the belt tension 6 Attach the belt cap retainer 7 Installation 7-22 Installation safety instructions 7 Determine the header bracket location 8 Install the header bracket 9 Attach the rail to the header bracket 10...
3280 Manual
Page 5
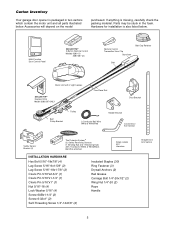
... Door Control Panel SECURITY✚® 3-Button Remote Control Models 3280 (1) 3280-267 (2) Remote Control Transmitter Visor Clip Styrofoam Belt Cap Retainer Belt Motor Unit with 2 Light Lenses SECURITY✚® Keyless Entry Model 3280-267 ONLY One-Piece Rail CEILING MOUNT ONLY UP Door Bracket Belt Pulley Bracket Trolley 2-Conductor Bell Wire White & White/Red...
... Door Control Panel SECURITY✚® 3-Button Remote Control Models 3280 (1) 3280-267 (2) Remote Control Transmitter Visor Clip Styrofoam Belt Cap Retainer Belt Motor Unit with 2 Light Lenses SECURITY✚® Keyless Entry Model 3280-267 ONLY One-Piece Rail CEILING MOUNT ONLY UP Door Bracket Belt Pulley Bracket Trolley 2-Conductor Bell Wire White & White/Red...

3280 Manual
Page 6
USE ONLY THIS TYPE AND SIZE BOLT Washered Bolt 5/16"-18x1/2" Rail Hole Sprocket Rail Hole ASSEMBLY STEP 2 Set the Belt Tension • By hand, thread the spring trolley nut on the threaded shaft until it firmly against the trolley (Figure 2). • Place a 7/...16" open end wrench on the square end. This extends the spring for optimum belt tension. Cut tape from rail, belt and styrofoam. • REMOVE STYROFOAM. • Insert wasThheeCrehadmbbeorllatsin Gthroruopu, gInhc. Spring Trolley Nut Assembly Use only 3t/h5/e92s-e5/b16o/...
USE ONLY THIS TYPE AND SIZE BOLT Washered Bolt 5/16"-18x1/2" Rail Hole Sprocket Rail Hole ASSEMBLY STEP 2 Set the Belt Tension • By hand, thread the spring trolley nut on the threaded shaft until it firmly against the trolley (Figure 2). • Place a 7/...16" open end wrench on the square end. This extends the spring for optimum belt tension. Cut tape from rail, belt and styrofoam. • REMOVE STYROFOAM. • Insert wasThheeCrehadmbbeorllatsin Gthroruopu, gInhc. Spring Trolley Nut Assembly Use only 3t/h5/e92s-e5/b16o/...
3280 Manual
Page 7
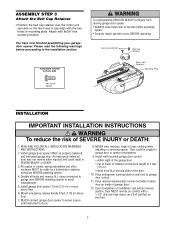
... manual release/safety reverse test label in plain view on wall next to do so. 8. ASSEMBLY STEP 3 Attach the Belt Cap Retainer • Position the belt cap retainer over the motor unit sprocket so the two holes in cap align with 8x3/8" hex screws provided. You have...while operating opener. • Securely attach sprocket cover BEFORE operating. Attach with the two holes in mounting plate. Hex Screws 8x3/8" Belt Cap Retainer HARDWARE SHOWN ACTUAL SIZE Hex Screw #8x3/8" WARNING Motor Unit Sprocket Mounting Plate INSTALLATION WARNING IMPORTANT INSTALLATION INSTRUCTIONS WARNING To ...
... manual release/safety reverse test label in plain view on wall next to do so. 8. ASSEMBLY STEP 3 Attach the Belt Cap Retainer • Position the belt cap retainer over the motor unit sprocket so the two holes in cap align with 8x3/8" hex screws provided. You have...while operating opener. • Securely attach sprocket cover BEFORE operating. Attach with the two holes in mounting plate. Hex Screws 8x3/8" Belt Cap Retainer HARDWARE SHOWN ACTUAL SIZE Hex Screw #8x3/8" WARNING Motor Unit Sprocket Mounting Plate INSTALLATION WARNING IMPORTANT INSTALLATION INSTRUCTIONS WARNING To ...
3280 Manual
Page 10
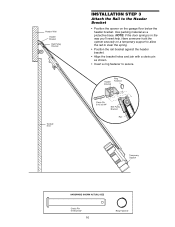
Header Wall Header Bracket Belt Pulley Bracket Garage Door INSTALLATION STEP 3 Attach the Rail to the Header Bracket • Position the opener on a temporary support to allow the rail to ... below the header bracket. NOTE: If the door spring is in the way you'll need help. Header Bracket Ring Fastener Clevis Pin 5/16"x2-3/4" Belt Pulley Bracket Rail Temporary Support HARDWARE SHOWN ACTUAL SIZE Clevis Pin 5/16"x2-3/4" 10 Ring Fastener
Header Wall Header Bracket Belt Pulley Bracket Garage Door INSTALLATION STEP 3 Attach the Rail to the Header Bracket • Position the opener on a temporary support to allow the rail to ... below the header bracket. NOTE: If the door spring is in the way you'll need help. Header Bracket Ring Fastener Clevis Pin 5/16"x2-3/4" Belt Pulley Bracket Rail Temporary Support HARDWARE SHOWN ACTUAL SIZE Clevis Pin 5/16"x2-3/4" 10 Ring Fastener
3280 Manual
Page 29
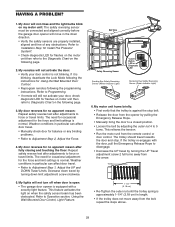
... are properly installed, aligned and free of any binding problems. • Refer to 5 turns. Decrease down travel limits. Refer to a closed position. • Loosen the belt by turning the UP Travel adjustment screw 2 full turns away from the remote control or door control. HAVING A PROBLEM? 1. My door will not close and...
... are properly installed, aligned and free of any binding problems. • Refer to 5 turns. Decrease down travel limits. Refer to a closed position. • Loosen the belt by turning the UP Travel adjustment screw 2 full turns away from the remote control or door control. HAVING A PROBLEM? 1. My door will not close and...
3280 Manual
Page 33
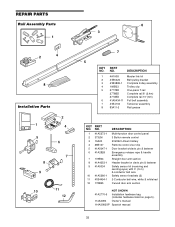
...bag (includes hardware listed on page 5). 114A3083 Owner's manual 114A3083SP Spanish manual 33 DESCRIPTION 1 4A1008 Master link kit 2 41B5424 Belt pulley bracket 3 41B3869-1 Complete trolley assembly 4 109B33 Trolley clip 5 2777BD One-piece T-rail 2778BD Complete rail 8' (2.4m)... 2770BD Complete rail 10' (3m) 6 41A5434-11 Full belt assembly 7 41B4103 Tensioner assembly 8 83A11-2 Rail grease KEY PART NO. NO. REPAIR PARTS Rail Assembly Parts 1 2 4 8 Installation Parts LOCK...
...bag (includes hardware listed on page 5). 114A3083 Owner's manual 114A3083SP Spanish manual 33 DESCRIPTION 1 4A1008 Master link kit 2 41B5424 Belt pulley bracket 3 41B3869-1 Complete trolley assembly 4 109B33 Trolley clip 5 2777BD One-piece T-rail 2778BD Complete rail 8' (2.4m)... 2770BD Complete rail 10' (3m) 6 41A5434-11 Full belt assembly 7 41B4103 Tensioner assembly 8 83A11-2 Rail grease KEY PART NO. NO. REPAIR PARTS Rail Assembly Parts 1 2 4 8 Installation Parts LOCK...

3280 Manual
Page 34
NO. Retaining ring; NO. DESCRIPTION 1 41A4371 Belt cap retainer 2 41A4885-5 Gear and sprocket assy., Complete with Logic board 18 41C5497 41C5548 High voltage wire harness Low voltage wire harness 19 41D180-1 End ...
NO. Retaining ring; NO. DESCRIPTION 1 41A4371 Belt cap retainer 2 41A4885-5 Gear and sprocket assy., Complete with Logic board 18 41C5497 41C5548 High voltage wire harness Low voltage wire harness 19 41D180-1 End ...
3280 Manual
Page 36
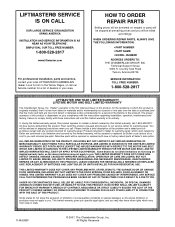
...will be billed accordingly. Country Club Road Tucson, Arizona 85706 SERVICE INFORMATION TOLL FREE NUMBER: 1-800-528-2817 LIFTMASTER ONE YEAR LIMITED WARRANTY LIFETIME MOTOR AND BELT LIMITED WARRANTY The Chamberlain Group, Inc. ("Seller") warrants to the first retail purchaser of this product, for... THIS LIMITED WARRANTY ALSO DOES NOT COVER ANY PROBLEMS CAUSED BY INTERFERENCE. SIMPLY DIAL OUR TOLL FREE NUMBER: 1-800-528-2817 www.liftmaster.com For professional installation, parts and service, contact your area. Technical Support Group 6050 S. Failure to contain a defect covered by ...
...will be billed accordingly. Country Club Road Tucson, Arizona 85706 SERVICE INFORMATION TOLL FREE NUMBER: 1-800-528-2817 LIFTMASTER ONE YEAR LIMITED WARRANTY LIFETIME MOTOR AND BELT LIMITED WARRANTY The Chamberlain Group, Inc. ("Seller") warrants to the first retail purchaser of this product, for... THIS LIMITED WARRANTY ALSO DOES NOT COVER ANY PROBLEMS CAUSED BY INTERFERENCE. SIMPLY DIAL OUR TOLL FREE NUMBER: 1-800-528-2817 www.liftmaster.com For professional installation, parts and service, contact your area. Technical Support Group 6050 S. Failure to contain a defect covered by ...


