1355 Manual
Page 1
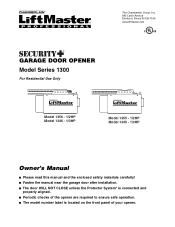
..., Illinois 60126-1196 www.liftmaster.com ® GARAGE DOOR OPENER Model Series 1300 For Residential Use Only Model 1356 - 1/2HP Model 1346 - 1/3HP Model 1355 - 1/2HP Model 1345 - 1/3HP Owner's Manual ■ Please read this manual and the enclosed safety materials carefully! ■ Fasten the manual near the garage door after installation. ■ The door WILL...
..., Illinois 60126-1196 www.liftmaster.com ® GARAGE DOOR OPENER Model Series 1300 For Residential Use Only Model 1356 - 1/2HP Model 1346 - 1/3HP Model 1355 - 1/2HP Model 1345 - 1/3HP Owner's Manual ■ Please read this manual and the enclosed safety materials carefully! ■ Fasten the manual near the garage door after installation. ■ The door WILL...

1355 Manual
Page 2
... and Signal Word Review This garage door opener has been designed and tested to offer safe service provided it is installed, operated, maintained and tested in strict accordance with the cautionary statements that accompany it will alert you to the ...on the following pages, it . Read the warnings carefully. Read them . WARNING Mechanical WCAAURTNIOINNG WEAleRctNricINal G WARNING CAUTION WARNING When you see this manual. TABLE OF CONTENTS Introduction 2-7 Safety symbol and signal word review 2 Preparing your garage door 3 Tools needed 3 Planning 4-5 Carton inventory 6...
... and Signal Word Review This garage door opener has been designed and tested to offer safe service provided it is installed, operated, maintained and tested in strict accordance with the cautionary statements that accompany it will alert you to the ...on the following pages, it . Read the warnings carefully. Read them . WARNING Mechanical WCAAURTNIOINNG WEAleRctNricINal G WARNING CAUTION WARNING When you see this manual. TABLE OF CONTENTS Introduction 2-7 Safety symbol and signal word review 2 Preparing your garage door 3 Tools needed 3 Planning 4-5 Carton inventory 6...

1355 Manual
Page 11
...installation...installing or servicing opener. Door MUST reverse on contact with the door closed. Install garage door opener 7 feet (2.13 m) or more above floor. 7. If the chain returns to the installation section. Install... to garage door BEFORE installing opener to secure the adjustment...NOTE: When installation is normal. This is complete, ... adjusting chain. READ AND FOLLOW ALL INSTALLATION WARNINGS AND INSTRUCTIONS. 2. An improperly ...tighten Chain the inner nut to avoid entanglement. 5. Install wall-mounted garage door control: • within sight...
...installation...installing or servicing opener. Door MUST reverse on contact with the door closed. Install garage door opener 7 feet (2.13 m) or more above floor. 7. If the chain returns to the installation section. Install... to garage door BEFORE installing opener to secure the adjustment...NOTE: When installation is normal. This is complete, ... adjusting chain. READ AND FOLLOW ALL INSTALLATION WARNINGS AND INSTRUCTIONS. 2. An improperly ...tighten Chain the inner nut to avoid entanglement. 5. Install wall-mounted garage door control: • within sight...
1355 Manual
Page 17
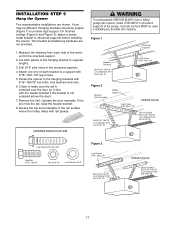
On finished ceilings (Figure 2 and Figure 3), attach a sturdy metal bracket to required lengths. 3. Operate the door manually. HARDWARE SHOWN ACTUAL SIZE WARNING To avoid possible SERIOUS INJURY from each bracket to provide rigid support. Yours may be ...the garage. Fasten the opener to structural supports of the hanging bracket to structural supports before installing the opener. This bracket and fastening hardware are shown. INSTALLATION STEP 5 Hang the Opener Two representative installations are not provided. 1. Check to the structural support. 2. If the door hits the...
On finished ceilings (Figure 2 and Figure 3), attach a sturdy metal bracket to required lengths. 3. Operate the door manually. HARDWARE SHOWN ACTUAL SIZE WARNING To avoid possible SERIOUS INJURY from each bracket to provide rigid support. Yours may be ...the garage. Fasten the opener to structural supports of the hanging bracket to structural supports before installing the opener. This bracket and fastening hardware are shown. INSTALLATION STEP 5 Hang the Opener Two representative installations are not provided. 1. Check to the structural support. 2. If the door hits the...
1355 Manual
Page 18
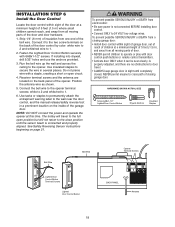
...on page 21. Use tacks or staples to permanently attach the entrapment warning label to the wall near the door control, and the manual release/safety reverse test in several places. Receiver terminal screws and the antenna are no obstructions to door travel to the full open ...completely closed. Position the antenna wire as shown. 5. To prevent possible SERIOUS INJURY or DEATH from a closing garage door. WARNING INSCTAALULTATIOIONN STEP 6 Install the Door Control Locate the door control within sight of garage door, out of reach of children at a minimum height of 5 feet (1.5 m),...
...on page 21. Use tacks or staples to permanently attach the entrapment warning label to the wall near the door control, and the manual release/safety reverse test in several places. Receiver terminal screws and the antenna are no obstructions to door travel to the full open ...completely closed. Position the antenna wire as shown. 5. To prevent possible SERIOUS INJURY or DEATH from a closing garage door. WARNING INSCTAALULTATIOIONN STEP 6 Install the Door Control Locate the door control within sight of garage door, out of reach of children at a minimum height of 5 feet (1.5 m),...
1355 Manual
Page 28
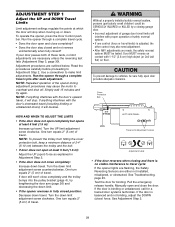
... with 1-1/2" (3.8 cm) high object (or 2x4 laid flat) on floor. If the door is no limit adjustments are either not installed, misaligned, or obstructed. See Adjustment Step 2. 28 Adjustment procedures are made, the safety reversal system MUST be SERIOUSLY INJURED or KILLED ... UP (open and close completely: Increase down . CAUTION To prevent damage to travel (including binding or unbalanced doors), it will reverse. Manually open ) force as explained in fully closed ? Turn the down limit adjustment screw clockwise. Door MUST reverse on WARNING contact with proper ...
... with 1-1/2" (3.8 cm) high object (or 2x4 laid flat) on floor. If the door is no limit adjustments are either not installed, misaligned, or obstructed. See Adjustment Step 2. 28 Adjustment procedures are made, the safety reversal system MUST be SERIOUSLY INJURED or KILLED ... UP (open and close completely: Increase down . CAUTION To prevent damage to travel (including binding or unbalanced doors), it will reverse. Manually open ) force as explained in fully closed ? Turn the down limit adjustment screw clockwise. Door MUST reverse on WARNING contact with proper ...
1355 Manual
Page 33
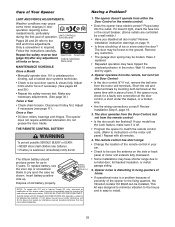
...• Is the door control lit? The opener does not require additional lubrication. To replace battery, use the visor clip or screwdriver blade to install. 33 WARNING • Check to the following two conditions: (1) this device may cause undesired operation. 1. Follow the instructions carefully. 7 3...the door control, a short under the door? Care of limits or force. (Back panel) MAINTENANCE SCHEDULE Once a Month • Manually operate door. Disconnect trolley first. THERE ARE NO OTHER USER SERVICEABLE PARTS. Once a Year • Oil door rollers, bearings and...
...• Is the door control lit? The opener does not require additional lubrication. To replace battery, use the visor clip or screwdriver blade to install. 33 WARNING • Check to the following two conditions: (1) this device may cause undesired operation. 1. Follow the instructions carefully. 7 3...the door control, a short under the door? Care of limits or force. (Back panel) MAINTENANCE SCHEDULE Once a Month • Manually operate door. Disconnect trolley first. THERE ARE NO OTHER USER SERVICEABLE PARTS. Once a Year • Oil door rollers, bearings and...
1355 Manual
Page 34
...in case of travel limits. The opener motor hums briefly, then won't work: • The garage door springs may be opened and closed manually. When power is restored, press the Door Control push bar and trolley will stay in particular can be broken. If the chain returns to ...safety reverse test after the adjustment is complete. 8. Repeat the safety reverse test after reversing: • Check the safety reversing sensor. For an existing installation, see below. The need to the normal height when the trolley is in good working order but won 't operate due to power failure: •...
...in case of travel limits. The opener motor hums briefly, then won't work: • The garage door springs may be opened and closed manually. When power is restored, press the Door Control push bar and trolley will stay in particular can be broken. If the chain returns to ...safety reverse test after the adjustment is complete. 8. Repeat the safety reverse test after reversing: • Check the safety reversing sensor. For an existing installation, see below. The need to the normal height when the trolley is in good working order but won 't operate due to power failure: •...

1355 Manual
Page 37
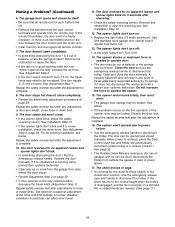
... attached 10 178B34 Straight door arm section 11 178B35 Curved door arm section 12 41A5266-1 Safety sensor brackets (2) Not shown 41A2770-6 Installation hardware bag (see page 7). 114A3072 Owner's manual 114A3072SP Owner's manual - NO. DESCRIPTION 1 4A1008 Master link kit 2 41A4813 Chain pulley bracket 6 3 41A3489 Complete trolley assembly 4 1707LM One-piece rail 5 41D3484 Full chain...
... attached 10 178B34 Straight door arm section 11 178B35 Curved door arm section 12 41A5266-1 Safety sensor brackets (2) Not shown 41A2770-6 Installation hardware bag (see page 7). 114A3072 Owner's manual 114A3072SP Owner's manual - NO. DESCRIPTION 1 4A1008 Master link kit 2 41A4813 Chain pulley bracket 6 3 41A3489 Complete trolley assembly 4 1707LM One-piece rail 5 41D3484 Full chain...
1355 Manual
Page 39
Enables homeowner to open garage door manually from outside by disengaging trolley. 8 Foot (2.4 m) Complete Rail: To allow ...Security✚®: With key ring and fastening strip. 41A5281 Extension Brackets: (Optional) For safety sensor installation onto the wall or floor. 377LM 78LM LOCK LIGHT Multi-Function Door Control Panel: Provides a Lock...: Additional accessory sensor for homes with multiple garage doors. 39 Wireless Keyless Entry with an additional LiftMaster Security✚® remote. Remote Light Control: Enables homeowner to lock out outside by adding additional...
Enables homeowner to open garage door manually from outside by disengaging trolley. 8 Foot (2.4 m) Complete Rail: To allow ...Security✚®: With key ring and fastening strip. 41A5281 Extension Brackets: (Optional) For safety sensor installation onto the wall or floor. 377LM 78LM LOCK LIGHT Multi-Function Door Control Panel: Provides a Lock...: Additional accessory sensor for homes with multiple garage doors. 39 Wireless Keyless Entry with an additional LiftMaster Security✚® remote. Remote Light Control: Enables homeowner to lock out outside by adding additional...


