User's Guide (7.1 MB)
Page 25
... top surface of the printer has matching holes or feet that accommodate the tab, round hole, and four square holes. Getting Started 5 Locate the following parts on the printer or ask someone to help you lift it down. CAUTION: Make sure your fingers are not under the printer when you set...
... top surface of the printer has matching holes or feet that accommodate the tab, round hole, and four square holes. Getting Started 5 Locate the following parts on the printer or ask someone to help you lift it down. CAUTION: Make sure your fingers are not under the printer when you set...

User's Guide (7.1 MB)
Page 26
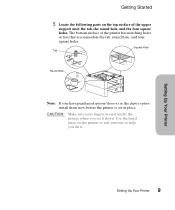
Be sure the edges of the support unit. Hand Grip Support Unit 10 Setting Up Your Printer Setting Up Your Printer Getting Started 6 Lift and place the printer on top of the printer and the support unit are aligned so all the parts fit. The right side of the printer is aligned with the option.
Be sure the edges of the support unit. Hand Grip Support Unit 10 Setting Up Your Printer Setting Up Your Printer Getting Started 6 Lift and place the printer on top of the printer and the support unit are aligned so all the parts fit. The right side of the printer is aligned with the option.
User's Guide (7.1 MB)
Page 42
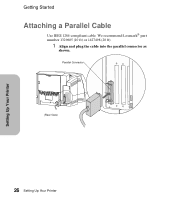
Setting Up Your Printer Getting Started Attaching a Parallel Cable Use IEEE 1284-compliant cable. Parallel Connector (Rear View) 26 Setting Up Your Printer We recommend Lexmark® part number 1329605 (10 ft) or 1427498 (20 ft). 1 Align and plug the cable into the parallel connector as shown.
Setting Up Your Printer Getting Started Attaching a Parallel Cable Use IEEE 1284-compliant cable. Parallel Connector (Rear View) 26 Setting Up Your Printer We recommend Lexmark® part number 1329605 (10 ft) or 1427498 (20 ft). 1 Align and plug the cable into the parallel connector as shown.
User's Guide (7.1 MB)
Page 51
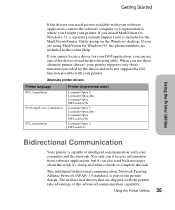
... design. Alternate printer drivers Printer language PCL 5 emulation PostScript Level 2 emulation PCL 6 emulation Printer (in preferred order) Lexmark Optra S Lexmark Optra plus Lexmark Optra HP LaserJet 5Si Lexmark Optra S Lexmark Optra plus Lexmark Optra HP LaserJet 5Si Lexmark Optra S HP LaserJet 5 Bidirectional Communication Your printer is part of intelligent communication with the printer take advantage of the drivers listed in the MarkVision Printer Utility group...
... design. Alternate printer drivers Printer language PCL 5 emulation PostScript Level 2 emulation PCL 6 emulation Printer (in preferred order) Lexmark Optra S Lexmark Optra plus Lexmark Optra HP LaserJet 5Si Lexmark Optra S Lexmark Optra plus Lexmark Optra HP LaserJet 5Si Lexmark Optra S HP LaserJet 5 Bidirectional Communication Your printer is part of intelligent communication with the printer take advantage of the drivers listed in the MarkVision Printer Utility group...
User's Guide (7.1 MB)
Page 62
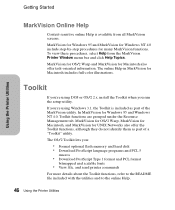
...for OS/2 Warp, MarkVision for Macintosh, and MarkVision for UNIX Networks also offer the Toolkit functions, although they do not identify them as part of a "Toolkit" utility. Toolkit If you're using Windows 3.1, the Toolkit is available from the MarkVision Printer Window menu bar and ... for Macintosh also offer task-oriented information. Using the Printer Utilities Getting Started MarkVision Online Help Context-sensitive online Help is included as part of the MarkVision utility. If you're using DOS or OS/2 2.x, install the Toolkit when you : • Format optional flash...
...for OS/2 Warp, MarkVision for Macintosh, and MarkVision for UNIX Networks also offer the Toolkit functions, although they do not identify them as part of a "Toolkit" utility. Toolkit If you're using Windows 3.1, the Toolkit is available from the MarkVision Printer Window menu bar and ... for Macintosh also offer task-oriented information. Using the Printer Utilities Getting Started MarkVision Online Help Context-sensitive online Help is included as part of the MarkVision utility. If you're using DOS or OS/2 2.x, install the Toolkit when you : • Format optional flash...
User's Guide (7.1 MB)
Page 145
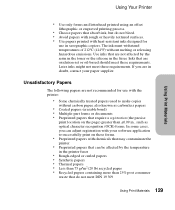
... Materials 129 The ink must withstand temperatures of 212oC (414oF) without carbon paper, also known as carbonless papers • Coated papers (erasable bond) • Multiple-part forms or documents • Preprinted papers that require a registration (the precise print location on the page) greater than 25% post consumer waste that do not...
... Materials 129 The ink must withstand temperatures of 212oC (414oF) without carbon paper, also known as carbonless papers • Coated papers (erasable bond) • Multiple-part forms or documents • Preprinted papers that require a registration (the precise print location on the page) greater than 25% post consumer waste that do not...
User's Guide (7.1 MB)
Page 153
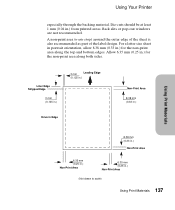
... in .) for the non-print area along both sides. A non-print area (waste strip) around the outer edge of the sheet is also recommended as part of the label design. Using Your Printer especially through the backing material. Die-cuts should be at least 1 mm (0.04 in .) Non-Print Area (Not...
... in .) for the non-print area along both sides. A non-print area (waste strip) around the outer edge of the sheet is also recommended as part of the label design. Using Your Printer especially through the backing material. Die-cuts should be at least 1 mm (0.04 in .) Non-Print Area (Not...
User's Guide (7.1 MB)
Page 155
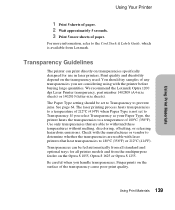
... Type is available from the multipurpose feeder on the Optra S 1855, Optra S 1625 or Optra S 1255. For more sheets of the transparency cause poor print quality. You should be fed automatically from all printer models and from Lexmark. We recommend the Lexmark Optra 1200 dpi Laser Printer transparency, part number 1402809 (A4-size sheets) or 1402810 (letter-size...
... Type is available from the multipurpose feeder on the Optra S 1855, Optra S 1625 or Optra S 1255. For more sheets of the transparency cause poor print quality. You should be fed automatically from all printer models and from Lexmark. We recommend the Lexmark Optra 1200 dpi Laser Printer transparency, part number 1402809 (A4-size sheets) or 1402810 (letter-size...
User's Guide (7.1 MB)
Page 219
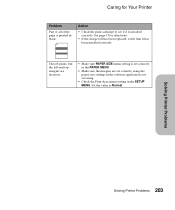
See page 15 for Your Printer Problem Part or all of the page is printed in the SETUP MENU. Solving Printer Problems Solving Printer Problems 203 The job prints, but the left and ...
See page 15 for Your Printer Problem Part or all of the page is printed in the SETUP MENU. Solving Printer Problems Solving Printer Problems 203 The job prints, but the left and ...
User's Guide (7.1 MB)
Page 231
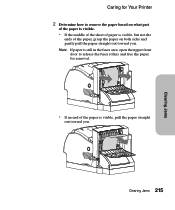
Note: If paper is still in the fuser area, open the upper front door to remove the paper based on what part of the paper is visible. • If the middle of the sheet of the paper, grasp the paper on both sides and gently pull the paper straight out toward you . Clearing Jams 215 Clearing Jams Caring for Your Printer 2 Determine how to release the fuser rollers and free the paper for removal. • If an end of the paper is visible, but not the ends of paper is visible, pull the paper straight out toward you .
Note: If paper is still in the fuser area, open the upper front door to remove the paper based on what part of the paper is visible. • If the middle of the sheet of the paper, grasp the paper on both sides and gently pull the paper straight out toward you . Clearing Jams 215 Clearing Jams Caring for Your Printer 2 Determine how to release the fuser rollers and free the paper for removal. • If an end of the paper is visible, but not the ends of paper is visible, pull the paper straight out toward you .
User's Guide (7.1 MB)
Page 263
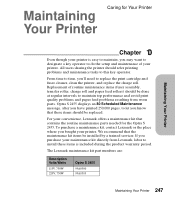
...is easy to maintain, you bought your printer. The Lexmark maintenance kit part numbers are: Description Volts/Watts 115V, 750W 220V, 750W Optra S 2455 99A0500 99A0503 Maintaining Your Printer 247 For your convenience, Lexmark offers a maintenance kit that these items is included during... the product warranty period. Optra S 2455 displays an 80 Scheduled Maintenance message, after you purchase your maintenance kit directly from worn parts. Replacement of your printer. If...
...is easy to maintain, you bought your printer. The Lexmark maintenance kit part numbers are: Description Volts/Watts 115V, 750W 220V, 750W Optra S 2455 99A0500 99A0503 Maintaining Your Printer 247 For your convenience, Lexmark offers a maintenance kit that these items is included during... the product warranty period. Optra S 2455 displays an 80 Scheduled Maintenance message, after you purchase your maintenance kit directly from worn parts. Replacement of your printer. If...
User's Guide (7.1 MB)
Page 264
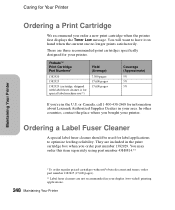
...the printer first displays the Toner Low message. In other countries, contact the place where you order part number 1382929. You may order this item separately using part number 43H0814.** Maintaining Your Printer * To order regular priced cartridges without Prebate discount and terms, ...600 pages). ** Label fuser cleaners are included in the U.S. PrebateTM Print Cartridge Part Numbers* 1382920 1382925 1382929 (cartridge, shipped with label fuser cleaner, is for information about Lexmark Authorized Supplies Dealers in your printer. They are not recommended in your area. ...
...the printer first displays the Toner Low message. In other countries, contact the place where you order part number 1382929. You may order this item separately using part number 43H0814.** Maintaining Your Printer * To order regular priced cartridges without Prebate discount and terms, ...600 pages). ** Label fuser cleaners are included in the U.S. PrebateTM Print Cartridge Part Numbers* 1382920 1382925 1382929 (cartridge, shipped with label fuser cleaner, is for information about Lexmark Authorized Supplies Dealers in your printer. They are not recommended in your area. ...

User's Guide (7.1 MB)
Page 266
In other countries, contact the place where you bought your area. Order Lexmark part number 1382990. or Canada, call 1-800-438-2468 for Your Printer Ordering a Charge Roll Kit We recommend you 're in the kit. Installation instructions are included in the U.S. Maintaining Your Printer Caring for information about Lexmark Authorized Supplies Dealers in your printer. 250 Maintaining Your Printer If you order a new charge roll kit when toner fog or background shading appears on printed pages.
In other countries, contact the place where you bought your area. Order Lexmark part number 1382990. or Canada, call 1-800-438-2468 for Your Printer Ordering a Charge Roll Kit We recommend you 're in the kit. Installation instructions are included in the U.S. Maintaining Your Printer Caring for information about Lexmark Authorized Supplies Dealers in your printer. 250 Maintaining Your Printer If you order a new charge roll kit when toner fog or background shading appears on printed pages.
User's Guide (7.1 MB)
Page 270
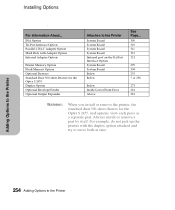
...304 255 7 or 256 273 261 281 WARNING: When you install or remove the printer, the standard dual 500-sheet drawer for the Optra S 2455 Duplex Option Optional Envelope Feeder Optional Output Expander Attaches to move both at once. For example, do not pick up the ... Option Printer Memory Option Flash Memory Option Optional Drawers Standard Dual 500-sheet Drawer for the Optra S 2455, and options, view each piece as a separate part. For Information About... Always install or remove a part by itself. Installing Options . Adding Options to the Printer 254 Adding Options to the Printer...
...304 255 7 or 256 273 261 281 WARNING: When you install or remove the printer, the standard dual 500-sheet drawer for the Optra S 2455 Duplex Option Optional Envelope Feeder Optional Output Expander Attaches to move both at once. For example, do not pick up the ... Option Printer Memory Option Flash Memory Option Optional Drawers Standard Dual 500-sheet Drawer for the Optra S 2455, and options, view each piece as a separate part. For Information About... Always install or remove a part by itself. Installing Options . Adding Options to the Printer 254 Adding Options to the Printer...
User's Guide (7.1 MB)
Page 273
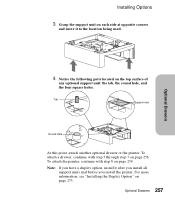
... being used. To attach a drawer, continue with step 8 on page 258. Note: If you install the printer. Optional Drawers 257 Optional Drawers 4 Notice the following parts located on page 273. Tab Square Hole Round Hole At this point, attach another optional drawer or the printer. For more information, see "Installing the...
... being used. To attach a drawer, continue with step 8 on page 258. Note: If you install the printer. Optional Drawers 257 Optional Drawers 4 Notice the following parts located on page 273. Tab Square Hole Round Hole At this point, attach another optional drawer or the printer. For more information, see "Installing the...
User's Guide (7.1 MB)
Page 274
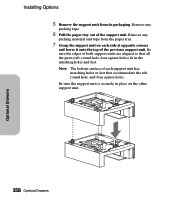
... the support unit on the other support unit. 258 Optional Drawers Be sure the edges of both support units are aligned so that all the parts (tab, round hole, four square holes) fit in place on each support unit has matching holes or feet that accommodate the tab, round hole, and...
... the support unit on the other support unit. 258 Optional Drawers Be sure the edges of both support units are aligned so that all the parts (tab, round hole, four square holes) fit in place on each support unit has matching holes or feet that accommodate the tab, round hole, and...
User's Guide (7.1 MB)
Page 275
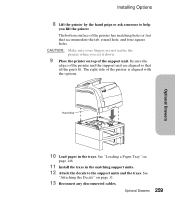
... grips or ask someone to the support units and the trays. The right side of the printer has matching holes or feet that all the parts fit.
... grips or ask someone to the support units and the trays. The right side of the printer has matching holes or feet that all the parts fit.
User's Guide (7.1 MB)
Page 290
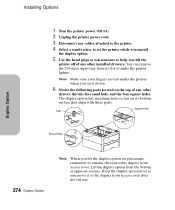
... any other drawer: the tab, the round hole, and the four square holes. Lift the duplex option from its bottom surface that align with these parts. Installing Options 1 Turn the printer power Off (O). 2 Unplug the printer power cord. 3 Disconnect any cables attached to the printer. 4 Select a sturdy place to set it...
... any other drawer: the tab, the round hole, and the four square holes. Lift the duplex option from its bottom surface that align with these parts. Installing Options 1 Turn the printer power Off (O). 2 Unplug the printer power cord. 3 Disconnect any cables attached to the printer. 4 Select a sturdy place to set it...
User's Guide (7.1 MB)
Page 291
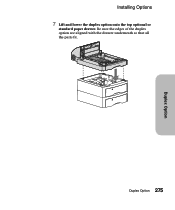
Duplex Option Installing Options 7 Lift and lower the duplex option onto the top optional or standard paper drawer. Be sure the edges of the duplex option are aligned with the drawer underneath so that all the parts fit. Duplex Option 275
Duplex Option Installing Options 7 Lift and lower the duplex option onto the top optional or standard paper drawer. Be sure the edges of the duplex option are aligned with the drawer underneath so that all the parts fit. Duplex Option 275
User's Guide (7.1 MB)
Page 292
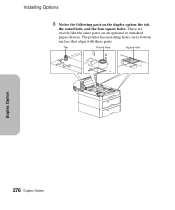
Installing Options 8 Notice the following parts on an optional or standard paper drawer. Tab Round Hole Square Hole Duplex Option 276 Duplex Option These are exactly like the same parts on the duplex option: the tab, the round hole, and the four square holes. The printer has matching holes on its bottom surface that align with these parts.
Installing Options 8 Notice the following parts on an optional or standard paper drawer. Tab Round Hole Square Hole Duplex Option 276 Duplex Option These are exactly like the same parts on the duplex option: the tab, the round hole, and the four square holes. The printer has matching holes on its bottom surface that align with these parts.


