
User's Guide (7.1 MB)
Page 3
... Contents Table of Contents Introduction xi Trademarks xiii Getting Started Setting Up Your Printer 1 Identifying Your Printer, Features, and Options 1 Optra S 1255 and Optra S 1625 2 Optra S 1855 3 Optra S 2455 4 Unpacking the Printer 5 Determining What to Install Next 7 Installing the Dual 500-Sheet Drawer 7 Attaching the Decals ...to the Paper Tray Knob 17 Loading the 250-Sheet Input Tray 20 Installing the Operator Panel Overlay 25 Attaching a Parallel Cable 26 Plugging the Printer In 28 Turning the Printer Power On 28 Printing a Test Page 29 Installing Printer Drivers and ...
... Contents Table of Contents Introduction xi Trademarks xiii Getting Started Setting Up Your Printer 1 Identifying Your Printer, Features, and Options 1 Optra S 1255 and Optra S 1625 2 Optra S 1855 3 Optra S 2455 4 Unpacking the Printer 5 Determining What to Install Next 7 Installing the Dual 500-Sheet Drawer 7 Attaching the Decals ...to the Paper Tray Knob 17 Loading the 250-Sheet Input Tray 20 Installing the Operator Panel Overlay 25 Attaching a Parallel Cable 26 Plugging the Printer In 28 Turning the Printer Power On 28 Printing a Test Page 29 Installing Printer Drivers and ...

User's Guide (7.1 MB)
Page 8
... Option Card 311 Hard Disk with Adapter Option Card 312 Installing an Option Card 315 Removing an Option Card 319 Infrared Adapter 321 Connecting the Cable and Using the Infrared Adapter . . 321 Verifying the Installation of Options 325 Appendixes Understanding Fonts 329 Typefaces and Fonts 329 Weight and Style 330 Pitch...
... Option Card 311 Hard Disk with Adapter Option Card 312 Installing an Option Card 315 Removing an Option Card 319 Infrared Adapter 321 Connecting the Cable and Using the Infrared Adapter . . 321 Verifying the Installation of Options 325 Appendixes Understanding Fonts 329 Typefaces and Fonts 329 Weight and Style 330 Pitch...
User's Guide (7.1 MB)
Page 42
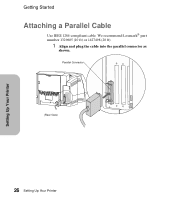
Setting Up Your Printer Getting Started Attaching a Parallel Cable Use IEEE 1284-compliant cable. Parallel Connector (Rear View) 26 Setting Up Your Printer We recommend Lexmark® part number 1329605 (10 ft) or 1427498 (20 ft). 1 Align and plug the cable into the parallel connector as shown.
Setting Up Your Printer Getting Started Attaching a Parallel Cable Use IEEE 1284-compliant cable. Parallel Connector (Rear View) 26 Setting Up Your Printer We recommend Lexmark® part number 1329605 (10 ft) or 1427498 (20 ft). 1 Align and plug the cable into the parallel connector as shown.

User's Guide (7.1 MB)
Page 43
Setting Up Your Printer Getting Started 2 Push the clips at each end of the cable to the computer. 27 Setting Up Your Printer Clips 3 Attach the other end of the connector into the notches. The clips snap when pushed into the notches on the parallel cable.
Setting Up Your Printer Getting Started 2 Push the clips at each end of the cable to the computer. 27 Setting Up Your Printer Clips 3 Attach the other end of the connector into the notches. The clips snap when pushed into the notches on the parallel cable.

User's Guide (7.1 MB)
Page 126
...prevent any stray characters from printing. * Factory Default Network Menu Three option cards can be installed in the Optra S 2455, two option cards can be installed in the Optra S 1855, and one of the handshaking signals for the three networks operate independently of each other. Set Honor DSR... On to determine if data arriving on the display. Functions for most serial interface cables. Using Your Printer Using the Operator ...
...prevent any stray characters from printing. * Factory Default Network Menu Three option cards can be installed in the Optra S 2455, two option cards can be installed in the Optra S 1855, and one of the handshaking signals for the three networks operate independently of each other. Set Honor DSR... On to determine if data arriving on the display. Functions for most serial interface cables. Using Your Printer Using the Operator ...

User's Guide (7.1 MB)
Page 188
... Cord 4 Turn the modem power On. The printer is very important that connects to a computer, you power on page 119. The end of the modem cable that you power on the modem before you connect it to the serial port of connecting the class 1 fax modem to the serial port must...
... Cord 4 Turn the modem power On. The printer is very important that connects to a computer, you power on page 119. The end of the modem cable that you power on the modem before you connect it to the serial port of connecting the class 1 fax modem to the serial port must...

User's Guide (7.1 MB)
Page 189
... use, complete the following steps, in order, for the printer to reset. 2 Turn the modem power Off. 3 Turn the printer power Off (O). 4 Disconnect the modem cable from the printer serial port. 5 Turn the printer power On (|). Wait for your printer to receive faxes: 1 Turn the printer power Off (O). 2 Turn the modem...
... use, complete the following steps, in order, for the printer to reset. 2 Turn the modem power Off. 3 Turn the printer power Off (O). 4 Disconnect the modem cable from the printer serial port. 5 Turn the printer power On (|). Wait for your printer to receive faxes: 1 Turn the printer power Off (O). 2 Turn the modem...

User's Guide (7.1 MB)
Page 204
... print job may not print correctly. • To reset the printer, press Menu> or or or or Check the interface: • Verify that the correct cable is detected (framing or parity) on the parallel host interface. Understanding Printer Messages Caring for Your Printer Attendance Message 54 Standard Serial Error 54 Serial...
... print job may not print correctly. • To reset the printer, press Menu> or or or or Check the interface: • Verify that the correct cable is detected (framing or parity) on the parallel host interface. Understanding Printer Messages Caring for Your Printer Attendance Message 54 Standard Serial Error 54 Serial...

User's Guide (7.1 MB)
Page 221
... Turn the printer power On (|) and verify the installation. Check the menu setting or the software application to the network is made through the network cable. See "Hard Disk with your network option. See "Internal Network Adapter (INA) Option Card" on page 300. Check that you have the correct... cable, that it is securely connected, and that it is made by plugging the card into the connector on the printer system board. Solving Printer ...
... Turn the printer power On (|) and verify the installation. Check the menu setting or the software application to the network is made through the network cable. See "Hard Disk with your network option. See "Internal Network Adapter (INA) Option Card" on page 300. Check that you have the correct... cable, that it is securely connected, and that it is made by plugging the card into the connector on the printer system board. Solving Printer ...

User's Guide (7.1 MB)
Page 222
... it is installed, call for Your Printer Problem Option does not operate correctly after it is set to LocalTalk. • If you have the correct cable and that the option is securely connected. Turn the printer power On (|) and verify the installation. If the printer does not recognize that it is...
... it is installed, call for Your Printer Problem Option does not operate correctly after it is set to LocalTalk. • If you have the correct cable and that the option is securely connected. Turn the printer power On (|) and verify the installation. If the printer does not recognize that it is...
User's Guide (7.1 MB)
Page 223
...under the port settings. For Windows users: • Turn Direct to allow Macintosh connection. • Verify that it is set up properly and the network cable is connected. Solving Printer Problems Solving Printer Problems 207 Action If you are using the network adapters. For Macintosh users: • The printer may need... 24, 1994 or later. • Make sure the NT (no tabs) flag is included in CHOOSER. Caring for setup instructions and information on using a Lexmark INA or external network adapter (ENA), verify that the printer is set up correctly in the capture statement.
...under the port settings. For Windows users: • Turn Direct to allow Macintosh connection. • Verify that it is set up properly and the network cable is connected. Solving Printer Problems Solving Printer Problems 207 Action If you are using the network adapters. For Macintosh users: • The printer may need... 24, 1994 or later. • Make sure the NT (no tabs) flag is included in CHOOSER. Caring for setup instructions and information on using a Lexmark INA or external network adapter (ENA), verify that the printer is set up correctly in the capture statement.

User's Guide (7.1 MB)
Page 224
...? Next, edit the form using Shift+F7, Page, Paper Size, Edit, and set the location to allow serial attachment. WordPerfect for more information. Optra S 2455, Optra S 1625, and Optra S 1255 require an optional adapter to the bin number you want. The TriPort Interface option card supports serial RS-232C/RS422A. How do I attach...
...? Next, edit the form using Shift+F7, Page, Paper Size, Edit, and set the location to allow serial attachment. WordPerfect for more information. Optra S 2455, Optra S 1625, and Optra S 1255 require an optional adapter to the bin number you want. The TriPort Interface option card supports serial RS-232C/RS422A. How do I attach...

User's Guide (7.1 MB)
Page 272
.... Optional Drawers 256 Optional Drawers See the table on a location to accommodate the printer and all installed options. The location must be placed on an Optra S 1855. Note: Decide on page 1 for the location of the support unit. If the option is Off (O). The printer will be sturdy and large enough to... label. An optional drawer consists of it on top of a support unit and a paper tray. 1 Remove the support unit from the paper tray. Remove any cables attached to the printer.
.... Optional Drawers 256 Optional Drawers See the table on a location to accommodate the printer and all installed options. The location must be placed on an Optra S 1855. Note: Decide on page 1 for the location of the support unit. If the option is Off (O). The printer will be sturdy and large enough to... label. An optional drawer consists of it on top of a support unit and a paper tray. 1 Remove the support unit from the paper tray. Remove any cables attached to the printer.
User's Guide (7.1 MB)
Page 275
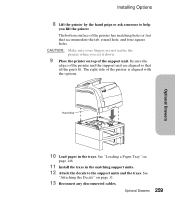
... lift the printer. The bottom surface of the printer is aligned with the options. See "Loading a Paper Tray" on page 11. 13 Reconnect any disconnected cables. Installing Options 8 Lift the printer by the hand grips or ask someone to the support units and the trays. CAUTION: Make sure your fingers are...
... lift the printer. The bottom surface of the printer is aligned with the options. See "Loading a Paper Tray" on page 11. 13 Reconnect any disconnected cables. Installing Options 8 Lift the printer by the hand grips or ask someone to the support units and the trays. CAUTION: Make sure your fingers are...
User's Guide (7.1 MB)
Page 290
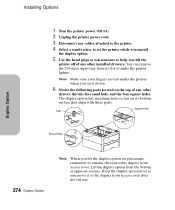
... as you move it contains the removable duplex front access cover. Installing Options 1 Turn the printer power Off (O). 2 Unplug the printer power cord. 3 Disconnect any cables attached to the printer. 4 Select a sturdy place to set it down. 6 Notice the following parts located on its slot to help you lift the duplex...
... as you move it contains the removable duplex front access cover. Installing Options 1 Turn the printer power Off (O). 2 Unplug the printer power cord. 3 Disconnect any cables attached to the printer. 4 Select a sturdy place to set it down. 6 Notice the following parts located on its slot to help you lift the duplex...

User's Guide (7.1 MB)
Page 293
Note: Verify that all the parts fit. Hand Grip 10 Reconnect any disconnected cables. 11 Plug in the printer power cord. 12 Turn the printer power On (|). Be sure the edges of Options" on page 325. See "Verifying the Installation of the printer and the duplex option are aligned so that the duplex option is installed properly. Duplex Option Installing Options 9 Lift the printer by the hand grips or ask someone to help you lift it and lower it onto the duplex option. Duplex Option 277
Note: Verify that all the parts fit. Hand Grip 10 Reconnect any disconnected cables. 11 Plug in the printer power cord. 12 Turn the printer power On (|). Be sure the edges of Options" on page 325. See "Verifying the Installation of the printer and the duplex option are aligned so that the duplex option is installed properly. Duplex Option Installing Options 9 Lift the printer by the hand grips or ask someone to help you lift it and lower it onto the duplex option. Duplex Option 277

User's Guide (7.1 MB)
Page 309
... and option cards for installing and using the options follow these steps. 1 Turn the printer power Off (O) and unplug the printer power cord. 2 Disconnect all cables from the back of the printer.
... and option cards for installing and using the options follow these steps. 1 Turn the printer power Off (O) and unplug the printer power cord. 2 Disconnect all cables from the back of the printer.

User's Guide (7.1 MB)
Page 314
Latch Latch 4 Reconnect the printer cables. 5 Plug in the printer power cord. 6 Turn the printer power on page 325. 298 Memory and Option Cards Note: To verify that the option is installed properly, see "Verifying the Installation of the printer, slide the door to snap it into the notches on the shield. Memory and Option Cards Installing Options 2 Holding the side door slightly to the left of Options" on . The door hinges fit into the notches. 3 Close the side door, pressing on the side door latches to the right into place.
Latch Latch 4 Reconnect the printer cables. 5 Plug in the printer power cord. 6 Turn the printer power on page 325. 298 Memory and Option Cards Note: To verify that the option is installed properly, see "Verifying the Installation of the printer, slide the door to snap it into the notches on the shield. Memory and Option Cards Installing Options 2 Holding the side door slightly to the left of Options" on . The door hinges fit into the notches. 3 Close the side door, pressing on the side door latches to the right into place.

User's Guide (7.1 MB)
Page 327
...-C Adapter Option Card To install, follow the instructions under "Installing an Option Card" starting on models with multiple connectors. We recommend a Lexmark 3 meter (9.84 ft) cable, part number 43H5171. Use a 1284 A-C cable to connect to a Parallel interface. Multiple Parallel 1284-C Adapter cards can be installed and used on page 315. Memory and Option...
...-C Adapter Option Card To install, follow the instructions under "Installing an Option Card" starting on models with multiple connectors. We recommend a Lexmark 3 meter (9.84 ft) cable, part number 43H5171. Use a 1284 A-C cable to connect to a Parallel interface. Multiple Parallel 1284-C Adapter cards can be installed and used on page 315. Memory and Option...

User's Guide (7.1 MB)
Page 337
... you need to install the TriPort interface option card, see "Tri-Port Interface Option Card" on page 315. Infrared Adapter Infrared Adapter 321 Connecting the Cable and Using the Infrared Adapter To connect the infrared adapter to your printer: 1 Locate the infrared port on the optional Tri-Port interface card installed...
... you need to install the TriPort interface option card, see "Tri-Port Interface Option Card" on page 315. Infrared Adapter Infrared Adapter 321 Connecting the Cable and Using the Infrared Adapter To connect the infrared adapter to your printer: 1 Locate the infrared port on the optional Tri-Port interface card installed...


