Getting Started
Page 1
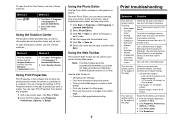
...quality 7 Aligning the print cartridge using the computer 7 Cleaning the print cartridge nozzles 7 Wiping the print cartridge nozzles and contacts 7 US Statement of Limited Warranty 8 Canadian Statement of Limited Warranty 9 Print, copy, scan, and fax troubleshooting - Jams and misfeeds troubleshooting - Recycling Lexmark products • Troubleshooting - Changing a print cartridge - Ordering supplies - Error messages troubleshooting • Notices Contents Setup troubleshooting 3 Removing and reinstalling the software 3 Checking the printer status 3 Using the control panel...
...quality 7 Aligning the print cartridge using the computer 7 Cleaning the print cartridge nozzles 7 Wiping the print cartridge nozzles and contacts 7 US Statement of Limited Warranty 8 Canadian Statement of Limited Warranty 9 Print, copy, scan, and fax troubleshooting - Jams and misfeeds troubleshooting - Recycling Lexmark products • Troubleshooting - Changing a print cartridge - Ordering supplies - Error messages troubleshooting • Notices Contents Setup troubleshooting 3 Removing and reinstalling the software 3 Checking the printer status 3 Using the control panel...
Getting Started
Page 3
Note: After installing the software, be sure to Set As Default. 3 English If necessary, double-click setup.exe. or Click Start Æ Control Panel Æ Printers and Other Hardware Æ Printers and Faxes. 2 Double-click the Lexmark 2400 Series icon. 3 Click Printer, and make sure no check mark appears next to Pause Printing. 4 Make sure a check mark does appear next to re-enable your anti-virus software. If the software does...
Note: After installing the software, be sure to Set As Default. 3 English If necessary, double-click setup.exe. or Click Start Æ Control Panel Æ Printers and Other Hardware Æ Printers and Faxes. 2 Double-click the Lexmark 2400 Series icon. 3 Click Printer, and make sure no check mark appears next to Pause Printing. 4 Make sure a check mark does appear next to re-enable your anti-virus software. If the software does...
Getting Started
Page 4
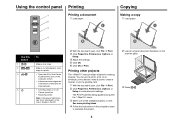
Using the control panel Printing Printing a document 1 Load paper. 1 Copying Making a copy 1 Load paper. 1 2 2 Use this button 1 2 3 4 To Make a color copy. You can print a photo, print on an envelope, print a banner, make a poster, create a booklet, or print a greeting card. 1 With the document open , click File Æ Print. 3 Click Properties, Preferences, Options, or Setup. 4 Adjust the settings. 5 Click OK. 6 Click OK or Print. Note: If the power light blinks, see "Error messages" in the User's Guide on the scanner glass. 3 Press . Make a 4 x 6 borderless...
Using the control panel Printing Printing a document 1 Load paper. 1 Copying Making a copy 1 Load paper. 1 2 2 Use this button 1 2 3 4 To Make a color copy. You can print a photo, print on an envelope, print a banner, make a poster, create a booklet, or print a greeting card. 1 With the document open , click File Æ Print. 3 Click Properties, Preferences, Options, or Setup. 4 Adjust the settings. 5 Click OK. 6 Click OK or Print. Note: If the power light blinks, see "Error messages" in the User's Guide on the scanner glass. 3 Press . Make a 4 x 6 borderless...
Getting Started
Page 6
..., and install a new print cartridge if necessary. Use Lexmark Premium Photo Paper if you can change the settings in this booklet. From the Photo Editor, you are using Microsoft Windows Internet Explorer version 5.5 or later. Method 2 1 Click Start Æ Programs or All programs Æ Lexmark 2400 Series. 2 Select Solution Center. Use the Web Toolbar to dry. Transparencies may take up to 15 minutes to : • Change printer settings...
..., and install a new print cartridge if necessary. Use Lexmark Premium Photo Paper if you can change the settings in this booklet. From the Photo Editor, you are using Microsoft Windows Internet Explorer version 5.5 or later. Method 2 1 Click Start Æ Programs or All programs Æ Lexmark 2400 Series. 2 Select Solution Center. Use the Web Toolbar to dry. Transparencies may take up to 15 minutes to : • Change printer settings...
Getting Started
Page 8
... to the amount you for bodily injury or damage to that user for repair or replacement (at http:// support.lexmark.com. Warranty service does not include repair of failures caused by: • Modification or attachments • Accidents or misuse • Unsuitable physical or operating environment • Maintenance by anyone other rights that user. Remote technical support is true even if you specific legal rights.
... to the amount you for bodily injury or damage to that user for repair or replacement (at http:// support.lexmark.com. Warranty service does not include repair of failures caused by: • Modification or attachments • Accidents or misuse • Unsuitable physical or operating environment • Maintenance by anyone other rights that user. Remote technical support is true even if you specific legal rights.
Getting Started
Page 9
... tangible personal property. For customers outside of Lexmark specifications • Use of original purchase. You may not be available or only be required to a Lexmark designated location. The replacement item assumes the remaining warranty period of a product. For further explanation of such damages or losses. For any claim against any print cartridge(s), programs, data, and removable storage media (unless otherwise...
... tangible personal property. For customers outside of Lexmark specifications • Use of original purchase. You may not be available or only be required to a Lexmark designated location. The replacement item assumes the remaining warranty period of a product. For further explanation of such damages or losses. For any claim against any print cartridge(s), programs, data, and removable storage media (unless otherwise...
User's Guide
Page 7
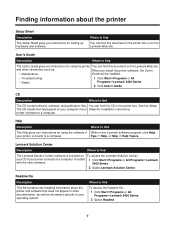
... Sheet for using the printer You can find this document in the printer box or on the Lexmark Web site. Finding information about the printer and software that does not appear in other documentation, as well as : When you install the printer software, the User's • Maintenance Guide will be installed. • Troubleshooting • Safety 1 Click StartŒPrograms or All ProgramsŒLexmark 2400 Series. 2 Click User's Guide. It installs...
... Sheet for using the printer You can find this document in the printer box or on the Lexmark Web site. Finding information about the printer and software that does not appear in other documentation, as well as : When you install the printer software, the User's • Maintenance Guide will be installed. • Troubleshooting • Safety 1 Click StartŒPrograms or All ProgramsŒLexmark 2400 Series. 2 Click User's Guide. It installs...

User's Guide
Page 9
Setting up the printer Checking the box contents Name 1 Color print cartridge 2 Power supply cord 3 Installation software CD 4 Getting Started or Setup Solutions 5 Setup Sheet Description Cartridge to be installed in the printer Attaches to the power supply port located at the back of the printer • Installation software for the printer • Help • User's Guide in electronic format Additional information depending on your country or region Instructions on setting up printer hardware and software, and information on setup troubleshooting 9
Setting up the printer Checking the box contents Name 1 Color print cartridge 2 Power supply cord 3 Installation software CD 4 Getting Started or Setup Solutions 5 Setup Sheet Description Cartridge to be installed in the printer Attaches to the power supply port located at the back of the printer • Installation software for the printer • Help • User's Guide in electronic format Additional information depending on your country or region Instructions on setting up printer hardware and software, and information on setup troubleshooting 9

User's Guide
Page 10
Align paper when feeding. Install or replace a print cartridge. 10 Access the scanner glass. Connect a PictBridge-enabled digital camera to the printer. Learning about the printer Understanding the parts of the printer 6 1 5 7 4 Use the 1 Paper support 2 Control panel 3 PictBridge port 4 Paper exit tray 5 Top cover 6 Paper guide 7 Scanner glass 32 To Load paper. Operate the printer. Stack paper as it exits. Scan, copy, or remove an item. 3 Use the 1 Scanner support 2 Print cartridge carrier 1 2 4 5 To Hold up the scanner unit.
Align paper when feeding. Install or replace a print cartridge. 10 Access the scanner glass. Connect a PictBridge-enabled digital camera to the printer. Learning about the printer Understanding the parts of the printer 6 1 5 7 4 Use the 1 Paper support 2 Control panel 3 PictBridge port 4 Paper exit tray 5 Top cover 6 Paper guide 7 Scanner glass 32 To Load paper. Operate the printer. Stack paper as it exits. Scan, copy, or remove an item. 3 Use the 1 Scanner support 2 Print cartridge carrier 1 2 4 5 To Hold up the scanner unit.

User's Guide
Page 16
... status of the Printing Status window. • Turn printing voice notification on transfers, and transparencies. • Find the electronic guide for a new cartridge. • Print a test page. • Clean to fix horizontal streaks. • Align to fix blurry edges. • Troubleshoot other ink problems. Learn how to : • Print, scan, copy, and fax. • Find and change settings. • Use basic features. • Print projects such as banners, photos, envelopes, cards...
... status of the Printing Status window. • Turn printing voice notification on transfers, and transparencies. • Find the electronic guide for a new cartridge. • Print a test page. • Clean to fix horizontal streaks. • Align to fix blurry edges. • Troubleshoot other ink problems. Learn how to : • Print, scan, copy, and fax. • Find and change settings. • Use basic features. • Print projects such as banners, photos, envelopes, cards...
User's Guide
Page 18
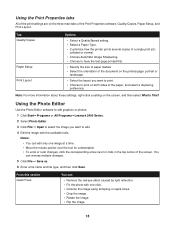
... redo changes, click the corresponding arrow next to print on the screen, and then select What's This? Tab Quality/Copies Paper Setup Print Layout Options • Select a Quality/Speed setting. • Select a Paper Type. • Customize how the printer prints several copies of a single print job: collated or normal. • Choose Automatic Image Sharpening. • Choose to have the last page printed first. • Specify the size of paper loaded. • Select...
... redo changes, click the corresponding arrow next to print on the screen, and then select What's This? Tab Quality/Copies Paper Setup Print Layout Options • Select a Quality/Speed setting. • Select a Paper Type. • Customize how the printer prints several copies of a single print job: collated or normal. • Choose Automatic Image Sharpening. • Choose to have the last page printed first. • Specify the size of paper loaded. • Select...
User's Guide
Page 26
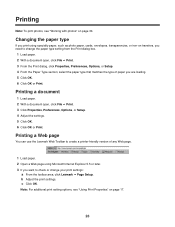
... Web page. 1 Load paper. 2 Open a Web page using specialty paper, such as photo paper, cards, envelopes, transparencies, or iron-on page 17. 26 Note: For additional print setting options, see "Working with photos" on page 30. Printing a Web page You can use the Lexmark Web Toolbar to check or change the paper type setting from the Print dialog box. 1 Load paper. 2 With a document open , click File ΠPrint. 3 Click Properties, Preferences, Options, or Setup. 4 Adjust the settings...
... Web page. 1 Load paper. 2 Open a Web page using specialty paper, such as photo paper, cards, envelopes, transparencies, or iron-on page 17. 26 Note: For additional print setting options, see "Working with photos" on page 30. Printing a Web page You can use the Lexmark Web Toolbar to check or change the paper type setting from the Print dialog box. 1 Load paper. 2 With a document open , click File ΠPrint. 3 Click Properties, Preferences, Options, or Setup. 4 Adjust the settings...

User's Guide
Page 41
... a network computer using a USB cable. network option. e When prompted, select Test Page to make sure g When prompted, select Test Page to make sure that you want to the shared printer. Shared printing Installing software and sharing the printer on the network (on the client computers) Using the peer-to-peer method Using the point-and-print method a Go to a network computer that you want to enable to print to the shared printer. Networking the printer Installing a network printer lets users...
... a network computer using a USB cable. network option. e When prompted, select Test Page to make sure g When prompted, select Test Page to make sure that you want to the shared printer. Shared printing Installing software and sharing the printer on the network (on the client computers) Using the peer-to-peer method Using the point-and-print method a Go to a network computer that you want to enable to print to the shared printer. Networking the printer Installing a network printer lets users...
User's Guide
Page 42
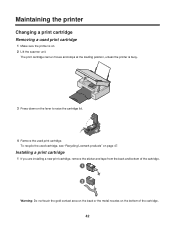
... printer Changing a print cartridge Removing a used print cartridge 1 Make sure the printer is busy. 3 Press down on the lever to raise the cartridge lid. 4 Remove the used cartridge, see "Recycling Lexmark products" on page 47. Installing a print cartridge 1 If you are installing a new print cartridge, remove the sticker and tape from the back and bottom of the cartridge. 42 The print cartridge carrier moves and stops at the loading position, unless the printer is on the bottom of the cartridge...
... printer Changing a print cartridge Removing a used print cartridge 1 Make sure the printer is busy. 3 Press down on the lever to raise the cartridge lid. 4 Remove the used cartridge, see "Recycling Lexmark products" on page 47. Installing a print cartridge 1 If you are installing a new print cartridge, remove the sticker and tape from the back and bottom of the cartridge. 42 The print cartridge carrier moves and stops at the loading position, unless the printer is on the bottom of the cartridge...
User's Guide
Page 48
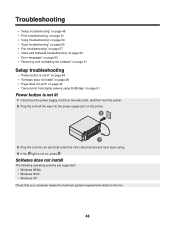
Software does not install The following operating systems are supported: • Windows 98/Me • Windows 2000 • Windows XP Check that other electrical devices have been using. 4 If the light is not lit 1 Disconnect the power supply cord from the wall outlet, and then from the printer. 2 Plug the cord all the way into the power supply port on the printer. 2 1 3 Plug the cord into...
Software does not install The following operating systems are supported: • Windows 98/Me • Windows 2000 • Windows XP Check that other electrical devices have been using. 4 If the light is not lit 1 Disconnect the power supply cord from the wall outlet, and then from the printer. 2 Plug the cord all the way into the power supply port on the printer. 2 1 3 Plug the cord into...

User's Guide
Page 51
... the paper.) • Use a paper that came with the camera. e Select your operating system. Cannot print from digital camera using the computer" on the camera by selecting the correct USB mode. Use only the USB cable that is PictBridge-enabled. For more information, see "Aligning the print cartridge using PictBridge Enable PictBridge printing on page 44. For more information, see "Removing a used print cartridge" on page 42 and "Installing a print cartridge" on page 46. 51 If print quality has...
... the paper.) • Use a paper that came with the camera. e Select your operating system. Cannot print from digital camera using the computer" on the camera by selecting the correct USB mode. Use only the USB cable that is PictBridge-enabled. For more information, see "Aligning the print cartridge using PictBridge Enable PictBridge printing on page 44. For more information, see "Removing a used print cartridge" on page 42 and "Installing a print cartridge" on page 46. 51 If print quality has...

User's Guide
Page 53
... the paper size being used matches the printer setting. 1 From the software application, click File Œ Print. 2 Click Properties, Preferences, Options, or Setup. 3 Click Paper Setup. 4 Check the paper size. Try minimizing the number and size of the page Unless you are using the borderless feature, use these minimum print margin settings: • Left and right margins: - 6.35 mm (0.25 in.) for letter size paper - 3.37 mm (0.133 in.) for drivers and downloads. 53 Remove as many unused fonts...
... the paper size being used matches the printer setting. 1 From the software application, click File Œ Print. 2 Click Properties, Preferences, Options, or Setup. 3 Click Paper Setup. 4 Check the paper size. Try minimizing the number and size of the page Unless you are using the borderless feature, use these minimum print margin settings: • Left and right margins: - 6.35 mm (0.25 in.) for letter size paper - 3.37 mm (0.133 in.) for drivers and downloads. 53 Remove as many unused fonts...
User's Guide
Page 66
... physical or operating environment -Maintenance by anyone other than Lexmark or a Lexmark authorized servicer -Operation of a product beyond repair, or if the product is not free of your area, contact Lexmark at www.lexmark.com/support. NO WARRANTIES, EXPRESS OR IMPLIED, WILL APPLY AFTER THIS PERIOD. This limitation of this document. Lexmark's and its duty cycle -Use of printing media outside of Lexmark. The replacement may...
... physical or operating environment -Maintenance by anyone other than Lexmark or a Lexmark authorized servicer -Operation of a product beyond repair, or if the product is not free of your area, contact Lexmark at www.lexmark.com/support. NO WARRANTIES, EXPRESS OR IMPLIED, WILL APPLY AFTER THIS PERIOD. This limitation of this document. Lexmark's and its duty cycle -Use of printing media outside of Lexmark. The replacement may...

User's Guide
Page 69
... quality 52 portrait orientation, selecting 18 postcards loading 22 printing 28 power button is blinking 60 power button is not lit 48 power supply port 11 previewing photos from the computer 14 print cartridge aligning 44 cleaning 44 installing 42 preserving 46 removing 42 wiping 45 print cartridge carrier 10 print cartridge nozzles, cleaning 44 Print Layout tab changing document type 18 duplexing 18 Print Properties I Want To menu 17 opening 17 Options menu 17 Paper Setup...
... quality 52 portrait orientation, selecting 18 postcards loading 22 printing 28 power button is blinking 60 power button is not lit 48 power supply port 11 previewing photos from the computer 14 print cartridge aligning 44 cleaning 44 installing 42 preserving 46 removing 42 wiping 45 print cartridge carrier 10 print cartridge nozzles, cleaning 44 Print Layout tab changing document type 18 duplexing 18 Print Properties I Want To menu 17 opening 17 Options menu 17 Paper Setup...
User's Guide
Page 70
... quality 57 scan was not successful 56 scanner does not respond 55 scanning takes too long or freezes the computer 56 troubleshooting, setup cannot print from digital camera using PictBridge 51 page does not print 49 power button is not lit 48 software does not install 48 U USB port 11 W Web page printing 26 printing only the photos 27 Web site button 13 finding 8 Web Toolbar printing a Web page 26 printing...
... quality 57 scan was not successful 56 scanner does not respond 55 scanning takes too long or freezes the computer 56 troubleshooting, setup cannot print from digital camera using PictBridge 51 page does not print 49 power button is not lit 48 software does not install 48 U USB port 11 W Web page printing 26 printing only the photos 27 Web site button 13 finding 8 Web Toolbar printing a Web page 26 printing...


