(English) Rescue and Recovery 4.3 Deployment Guide
Page 10
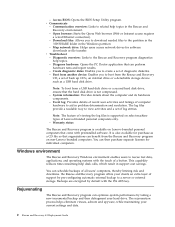
...Boot from another device: Enables you to boot from the Rescue and Recovery program on non-Lenovo branded computers. Note: The feature of diagnostic diskettes. - Backups are encrypted by pre-...available on select machine types of support by default with the 256 AES key. Rejuvenating The Rescue and Recovery program can optimize system performance by taking a ...and Recovery Windows environment enables users to related help topics in the Windows partition. - Access BIOS: Opens the BIOS Setup Utility program. You can perform hardware tests and report results. - - Note: ...
...Boot from another device: Enables you to boot from the Rescue and Recovery program on non-Lenovo branded computers. Note: The feature of diagnostic diskettes. - Backups are encrypted by pre-...available on select machine types of support by default with the 256 AES key. Rejuvenating The Rescue and Recovery program can optimize system performance by taking a ...and Recovery Windows environment enables users to related help topics in the Windows partition. - Access BIOS: Opens the BIOS Setup Utility program. You can perform hardware tests and report results. - - Note: ...
(English) Rescue and Recovery 4.3 Deployment Guide
Page 65
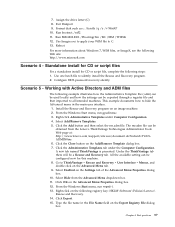
7. Run bootsect /nt52 11. Reboot For more information about Windows 7, WIM files, or ImageX, see the following registry key: HKLM\Software\Policies\Lenovo\ Rescue and Recovery. 14. Click the Administrative Templates tab under Computer Configuration. 4. From the Windows Start menu, run gpedit.msc....machine. 8. Use one batch file to hide the Advanced menu in the File Name field on the Advanced Menu tab. 9. Configure BIOS password recovery silently. Working with Active Directory and ADM files The following example illustrates how the Administrative Template file (.adm) can be used...
7. Run bootsect /nt52 11. Reboot For more information about Windows 7, WIM files, or ImageX, see the following registry key: HKLM\Software\Policies\Lenovo\ Rescue and Recovery. 14. Click the Administrative Templates tab under Computer Configuration. 4. From the Windows Start menu, run gpedit.msc....machine. 8. Use one batch file to hide the Advanced menu in the File Name field on the Advanced Menu tab. 9. Configure BIOS password recovery silently. Working with Active Directory and ADM files The following example illustrates how the Administrative Template file (.adm) can be used...
(English) Rescue and Recovery 4.3 Deployment Guide
Page 76
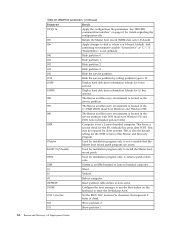
... environment is located in the C:\PARTITION (dual boot Windows and Windows PE). /M2 The Rescue and Recovery environment is an IBM branded or Lenovo-branded computer. /Q Silent. /V Verbose. /R Reboot computer. /REFRESH Reset partition table entries in data sector. /THINK Configure the boot manager... the Master boot record patch. /PRTC Used for the F11 (default) key press after POST. This forces a second check for installation program only, to enter the Predesktop Area. /TOC tocvalue Set the BIOS TOC location (16 characters that represent 8 bytes of the Rescue and Recovery...
... environment is located in the C:\PARTITION (dual boot Windows and Windows PE). /M2 The Rescue and Recovery environment is an IBM branded or Lenovo-branded computer. /Q Silent. /V Verbose. /R Reboot computer. /REFRESH Reset partition table entries in data sector. /THINK Configure the boot manager... the Master boot record patch. /PRTC Used for the F11 (default) key press after POST. This forces a second check for installation program only, to enter the Predesktop Area. /TOC tocvalue Set the BIOS TOC location (16 characters that represent 8 bytes of the Rescue and Recovery...
(English) Rescue and Recovery 4.5 Deployment Guide
Page 16
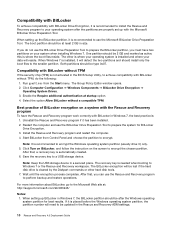
...have the Rescue and Recovery program work correctly with BitLocker in Windows 7, the BitLocker partition should be at least 2 GB in the BIOS Setup Utility, to achieve compatibility with the Rescue and Recovery program To have two partitions on the screen to the smaller partition. When...should be 2 GB and marked as active; Both partitions should install only the boot files to encrypt the chosen partition. The recovery key is installed and where your operating system after the Windows operating system partition for BitLocker Drive Encryption. 3. Restart the computer and use...
...have the Rescue and Recovery program work correctly with BitLocker in Windows 7, the BitLocker partition should be at least 2 GB in the BIOS Setup Utility, to achieve compatibility with the Rescue and Recovery program To have two partitions on the screen to the smaller partition. When...should be 2 GB and marked as active; Both partitions should install only the boot files to encrypt the chosen partition. The recovery key is installed and where your operating system after the Windows operating system partition for BitLocker Drive Encryption. 3. Restart the computer and use...
(English) Rescue and Recovery 4.5 Deployment Guide
Page 55
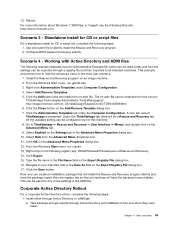
... and Recovery program silently and have the advanced menu hidden. Take backups and get reports through Active Directory or LANDesk. Configure BIOS password recovery silently. Click Export. 15. From the Windows Start menu, run regedit. 13. Under the ThinkVantage tab there ... they were taken. Scenario 4 - Reboot For more information about Windows 7, WIM files, or ImageX, see the following registry key: HKLM\Software\Policies\Lenovo\Rescue and Recovery. 14. This example documents how to your intended path in the main user interface. 1. Working with Active...
... and Recovery program silently and have the advanced menu hidden. Take backups and get reports through Active Directory or LANDesk. Configure BIOS password recovery silently. Click Export. 15. From the Windows Start menu, run regedit. 13. Under the ThinkVantage tab there ... they were taken. Scenario 4 - Reboot For more information about Windows 7, WIM files, or ImageX, see the following registry key: HKLM\Software\Policies\Lenovo\Rescue and Recovery. 14. This example documents how to your intended path in the main user interface. 1. Working with Active...
(English) Rescue and Recovery 4.5 Deployment Guide
Page 66
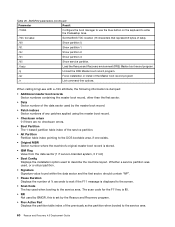
... boot manager to use the blue button on the keyboard to enter the Predesktop Area. /TOC tocvalue Set the BIOS TOC location (16 characters that represent 8 bytes of data). /U0 Show partition 0. /U1 Show partition 1..... The scan code for the F11 key is 85. • RR Not used by BMGR, this is displayed to the screen. • Scan Code The key used to wait if the F11 message... machine's original master boot record is stored. • IBM Flag Value from the data sector (1 if Lenovo-branded system, 0 if not) • Boot Config Displays the installation option used when booting to the...
... boot manager to use the blue button on the keyboard to enter the Predesktop Area. /TOC tocvalue Set the BIOS TOC location (16 characters that represent 8 bytes of data). /U0 Show partition 0. /U1 Show partition 1..... The scan code for the F11 key is 85. • RR Not used by BMGR, this is displayed to the screen. • Scan Code The key used to wait if the F11 message... machine's original master boot record is stored. • IBM Flag Value from the data sector (1 if Lenovo-branded system, 0 if not) • Boot Config Displays the installation option used when booting to the...

BIOS Windows Management Instrumentation Interface Deployment Guide
Page 3
... Appendix B. Notices ...22 Trademarks ...23 @Copyright Lenovo 2010 I Overview ...1 Using Windows Management Instrumentation 1 Key benefits ...1 Function...2 Environment ...2 Interface...2 Supported computers ...2 Chapter 2. Script Classes and Parameter 3 Configuring BIOS settings ...3 Return types...3 Password Authentication...4 Available BIOS setting names ...4 Chapter 3. Security...13 Appendix A. Typical Usage ...11 Listing current BIOS settings...11 Changing BIOS settings ...11 Changing the boot order...
... Appendix B. Notices ...22 Trademarks ...23 @Copyright Lenovo 2010 I Overview ...1 Using Windows Management Instrumentation 1 Key benefits ...1 Function...2 Environment ...2 Interface...2 Supported computers ...2 Chapter 2. Script Classes and Parameter 3 Configuring BIOS settings ...3 Return types...3 Password Authentication...4 Available BIOS setting names ...4 Chapter 3. Security...13 Appendix A. Typical Usage ...11 Listing current BIOS settings...11 Changing BIOS settings ...11 Changing the boot order...

BIOS Windows Management Instrumentation Interface Deployment Guide
Page 7
... change single settings, and modify the boot order either Windows Visual Basic Scripting Edition (VBScript) or JavaScript. The Lenovo BIOS WMI interface provides a simplified way to manage both local and remote computers. Using Windows Management Instrumentation WMI is provided...in most Windows® operating systems. It provides a powerful set of BIOS settings. The Lenovo BIOS WMI interface extends the capabilities of WMI to their factory defaults, change these settings. Key benefits The Lenovo BIOS WMI interface provides the following illustration shows how WMI can be used to...
... change single settings, and modify the boot order either Windows Visual Basic Scripting Edition (VBScript) or JavaScript. The Lenovo BIOS WMI interface provides a simplified way to manage both local and remote computers. Using Windows Management Instrumentation WMI is provided...in most Windows® operating systems. It provides a powerful set of BIOS settings. The Lenovo BIOS WMI interface extends the capabilities of WMI to their factory defaults, change these settings. Key benefits The Lenovo BIOS WMI interface provides the following illustration shows how WMI can be used to...

BIOS Windows Management Instrumentation Interface Deployment Guide
Page 12
...", "IDE 0", "Error Startup Sequence", "ESATA", "Manufacturing Startup Sequence" "IDE 1", "IDE 2", "ESATA C20", "IDE 3", "IDE 4", "IDE CDROM 0", "IDE CDROM 1", "IDE CDROM 2", "USB FDD", "USB HDD", "USB KEY", "USB CDROM", "PCI BEV 0", "PCI LAN 0", "PCI BEV 1", "PCI LAN 1", "PCI BEV 2", "PCI BEV 3", "PCI BEV 4", "PCI SCSI", "SCSI 0", "SCSI 1", "SCSI 2", "SCSI 3", "SCSI 4", "SCSI 5", "Nothing...
...", "IDE 0", "Error Startup Sequence", "ESATA", "Manufacturing Startup Sequence" "IDE 1", "IDE 2", "ESATA C20", "IDE 3", "IDE 4", "IDE CDROM 0", "IDE CDROM 1", "IDE CDROM 2", "USB FDD", "USB HDD", "USB KEY", "USB CDROM", "PCI BEV 0", "PCI LAN 0", "PCI BEV 1", "PCI LAN 1", "PCI BEV 2", "PCI BEV 3", "PCI BEV 4", "PCI SCSI", "SCSI 0", "SCSI 1", "SCSI 2", "SCSI 3", "SCSI 4", "SCSI 5", "Nothing...

BIOS Windows Management Instrumentation Interface Deployment Guide
Page 14
...", "IDE 0", "Error Startup Sequence", "ESATA", "Manufacturing Startup Sequence" "IDE 1", "IDE 2", "ESATA C20", "IDE 3", "IDE 4", "IDE CDROM 0", "IDE CDROM 1", "IDE CDROM 2", "USB FDD", "USB HDD", "USB KEY", "USB CDROM", "PCI BEV 0", "PCI LAN 0", "PCI BEV 1", "PCI LAN 1", "PCI BEV 2", "PCI BEV 3", "PCI BEV 4", "PCI SCSI", "SCSI 0", "SCSI 1", "SCSI 2", "SCSI 3", "SCSI 4", "SCSI 5", "Nothing...
...", "IDE 0", "Error Startup Sequence", "ESATA", "Manufacturing Startup Sequence" "IDE 1", "IDE 2", "ESATA C20", "IDE 3", "IDE 4", "IDE CDROM 0", "IDE CDROM 1", "IDE CDROM 2", "USB FDD", "USB HDD", "USB KEY", "USB CDROM", "PCI BEV 0", "PCI LAN 0", "PCI BEV 1", "PCI LAN 1", "PCI BEV 2", "PCI BEV 3", "PCI BEV 4", "PCI SCSI", "SCSI 0", "SCSI 1", "SCSI 2", "SCSI 3", "SCSI 4", "SCSI 5", "Nothing...

BIOS Windows Management Instrumentation Interface Deployment Guide
Page 16
...", "IDE 0", "Error Startup Sequence", "ESATA", "Manufacturing Startup Sequence" "IDE 1", "IDE 2", "ESATA C20", "IDE 3", "IDE 4", "IDE CDROM 0", "IDE CDROM 1", "IDE CDROM 2", "USB FDD", "USB HDD", "USB KEY", "USB CDROM", "PCI BEV 0", "PCI LAN 0", "PCI BEV 1", "PCI LAN 1", "PCI BEV 2", "PCI BEV 3", "PCI BEV 4", "PCI SCSI", "SCSI 0", "SCSI 1", "SCSI 2", "SCSI 3", "SCSI 4", "SCSI 5", "Nothing...
...", "IDE 0", "Error Startup Sequence", "ESATA", "Manufacturing Startup Sequence" "IDE 1", "IDE 2", "ESATA C20", "IDE 3", "IDE 4", "IDE CDROM 0", "IDE CDROM 1", "IDE CDROM 2", "USB FDD", "USB HDD", "USB KEY", "USB CDROM", "PCI BEV 0", "PCI LAN 0", "PCI BEV 1", "PCI LAN 1", "PCI BEV 2", "PCI BEV 3", "PCI BEV 4", "PCI SCSI", "SCSI 0", "SCSI 1", "SCSI 2", "SCSI 3", "SCSI 4", "SCSI 5", "Nothing...
English) User guide
Page 27
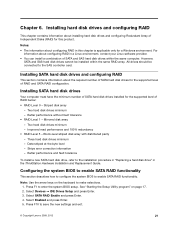
...- Note: Use the arrow keys on page 17. 2. Select Devices ➙ IDE Drives Setup and press Enter. 3. Mirrored disk array - Configuring the system BIOS to enable SATA RAID functionality ... the system BIOS to the SAS controller card. Installing hard disk drives and configuring RAID This chapter contains information about configuring RAID in the ThinkStation Hardware Installation ...the new settings and exit. © Copyright Lenovo 2009, 2012 21 See "Starting the Setup Utility program" on the keyboard to enter the system BIOS setup. Select Enabled and press Enter. 5....
...- Note: Use the arrow keys on page 17. 2. Select Devices ➙ IDE Drives Setup and press Enter. 3. Mirrored disk array - Configuring the system BIOS to enable SATA RAID functionality ... the system BIOS to the SAS controller card. Installing hard disk drives and configuring RAID This chapter contains information about configuring RAID in the ThinkStation Hardware Installation ...the new settings and exit. © Copyright Lenovo 2009, 2012 21 See "Starting the Setup Utility program" on the keyboard to enter the system BIOS setup. Select Enabled and press Enter. 5....
English) User guide
Page 29
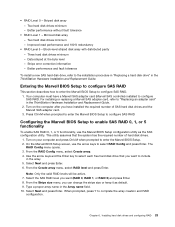
...enable SAS RAID 0, 1, or 5 functionality, use the arrow keys to configure SAS RAID. Installing hard disk drives and configuring RAID 23 Data striped at the byte level - Press Ctrl+M when prompted to enter the Marvell BIOS Setup to select RAID Config and press Enter. Configuring the ... • RAID Level 1 - Better performance and fault tolerance To install a new SAS hard disk drive, refer to include in the ThinkStation Hardware Installation and Replacement Guide. 2. From the Create array menu, select RAID level and press Enter. Select the SAS RAID level you want...
...enable SAS RAID 0, 1, or 5 functionality, use the arrow keys to configure SAS RAID. Installing hard disk drives and configuring RAID 23 Data striped at the byte level - Press Ctrl+M when prompted to enter the Marvell BIOS Setup to select RAID Config and press Enter. Configuring the ... • RAID Level 1 - Better performance and fault tolerance To install a new SAS hard disk drive, refer to include in the ThinkStation Hardware Installation and Replacement Guide. 2. From the Create array menu, select RAID level and press Enter. Select the SAS RAID level you want...

English) User guide
Page 30
...the list. 5. Use the arrow keys to delete the optional hot spare hard disk drive. From the RAID Config menu, select Spare Management. 4. Press Y when prompted to select Next and press Enter. 6. Use the arrow keys to complete the deletion. 24 ThinkStation User Guide Press Y when prompted ...to select Next and press Enter. 6. On the Marvell BIOS Setup screen, use the arrow keys to select RAID Config and press Enter. Use the arrow keys and the Enter key to select the array you...
...the list. 5. Use the arrow keys to delete the optional hot spare hard disk drive. From the RAID Config menu, select Spare Management. 4. Press Y when prompted to select Next and press Enter. 6. Use the arrow keys to complete the deletion. 24 ThinkStation User Guide Press Y when prompted ...to select Next and press Enter. 6. On the Marvell BIOS Setup screen, use the arrow keys to select RAID Config and press Enter. Use the arrow keys and the Enter key to select the array you...

