
L215 Wide Flat Panel Monitor User Guide (6521-HB1)
Page 3
... direct access controls 2-3 Using the On-Screen Display (OSD) controls 2-3 Selecting a supported display mode 2-6 Understanding power management 2-7 Caring for your monitor 1-4 Chapter 2. Reference information 3-1 Monitor specifications 3-1 Troubleshooting 3-2 Manual image setup 3-4 Manually installing the monitor driver 3-4 Appendix A. Notices B-1 Trademarks B-2 Contents ii Service and Support A-1 Telephone technical support A-1 Appendix B. Contents Safety information iii Chapter1. Getting started...
... direct access controls 2-3 Using the On-Screen Display (OSD) controls 2-3 Selecting a supported display mode 2-6 Understanding power management 2-7 Caring for your monitor 1-4 Chapter 2. Reference information 3-1 Monitor specifications 3-1 Troubleshooting 3-2 Manual image setup 3-4 Manually installing the monitor driver 3-4 Appendix A. Notices B-1 Trademarks B-2 Contents ii Service and Support A-1 Telephone technical support A-1 Appendix B. Contents Safety information iii Chapter1. Getting started...
L215 Wide Flat Panel Monitor User Guide (6521-HB1)
Page 5
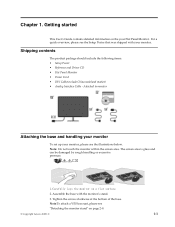
... can be damaged by rough handling or excessive pressure. 1.Carefully lays the monitor on page 2-9. © Copyright Lenovo 2008. © 1-1 Shipping contents The product package should include the following items: • Setup Poster • Reference and Driver CD • Flat Panel Monitor • Power Cord • DVI Cable(exclude China mainland market) • Analog...
... can be damaged by rough handling or excessive pressure. 1.Carefully lays the monitor on page 2-9. © Copyright Lenovo 2008. © 1-1 Shipping contents The product package should include the following items: • Setup Poster • Reference and Driver CD • Flat Panel Monitor • Power Cord • DVI Cable(exclude China mainland market) • Analog...
L215 Wide Flat Panel Monitor User Guide (6521-HB1)
Page 10
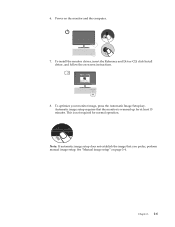
Automatic image setup requires that you prefer, perform manual image setup. Chapter 1. 1-6 Note: If automatic image setup does not establish the image that the monitor is not required for at least 15 minutes. Power on page 3-4 . This is warmed up for normal operation. 6. See "Manual image setup" on the monitor and the computer. 7. To optimize your monitor image, press the Automatic Image Setup key. To install the monitor driver, insert the Reference and Driver CD, click Install driver, and follow the on-screen instructions. 8.
Automatic image setup requires that you prefer, perform manual image setup. Chapter 1. 1-6 Note: If automatic image setup does not establish the image that the monitor is not required for at least 15 minutes. Power on page 3-4 . This is warmed up for normal operation. 6. See "Manual image setup" on the monitor and the computer. 7. To optimize your monitor image, press the Automatic Image Setup key. To install the monitor driver, insert the Reference and Driver CD, click Install driver, and follow the on-screen instructions. 8.

L215 Wide Flat Panel Monitor User Guide (6521-HB1)
Page 20
...Width Tilt Supported Viewable image size 512.3 mm (20.17 in.) Range: -5°, +20° 75 mm (2.95 in.) 546.86 mm(21.53 in.) Maximum height 476.64 mm(18.77 in.) Maximum width 268.11 mm (10.56 in.) Power input Pixel pitch Supply voltage 0.248... mm (0.01 in.) (V) 90-264VAC (100~240VAC+/-10%) - Chapter 3. Reference information This section contains monitor specifications, instructions to manually install the monitor driver, troubleshooting information, and service information. Video input (Analog) Standby/Suspend Off Input signal...
...Width Tilt Supported Viewable image size 512.3 mm (20.17 in.) Range: -5°, +20° 75 mm (2.95 in.) 546.86 mm(21.53 in.) Maximum height 476.64 mm(18.77 in.) Maximum width 268.11 mm (10.56 in.) Power input Pixel pitch Supply voltage 0.248... mm (0.01 in.) (V) 90-264VAC (100~240VAC+/-10%) - Chapter 3. Reference information This section contains monitor specifications, instructions to manually install the monitor driver, troubleshooting information, and service information. Video input (Analog) Standby/Suspend Off Input signal...

L215 Wide Flat Panel Monitor User Guide (6521-HB1)
Page 24
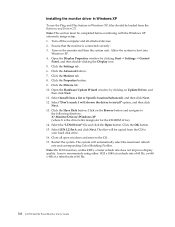
... double-clicking the Hardware and Sound icon. 5. Click the Have Disk button. Note: On LCD monitors, unlike CRTs, a faster refresh rate does not improve display quality. Turn on Update Driver and then click the "Browse my computer for the CD-ROM drive). 14. Click the ...feature Microsoft Windows Vista, do the following directory: X:\Monitor Drivers\Windows Vista (where X is connected correctly. 3. Click the Display Settings icon. 7. Select LEN L215wA and click Next. Click the Monitor tab. 9. Select "Let me pick from the Lenovo Monitor CD to your hard disk drive. 16. Chapter ...
... double-clicking the Hardware and Sound icon. 5. Click the Have Disk button. Note: On LCD monitors, unlike CRTs, a faster refresh rate does not improve display quality. Turn on Update Driver and then click the "Browse my computer for the CD-ROM drive). 14. Click the ...feature Microsoft Windows Vista, do the following directory: X:\Monitor Drivers\Windows Vista (where X is connected correctly. 3. Click the Display Settings icon. 7. Select LEN L215wA and click Next. Click the Monitor tab. 9. Select "Let me pick from the Lenovo Monitor CD to your hard disk drive. 16. Chapter ...
L215 Wide Flat Panel Monitor User Guide (6521-HB1)
Page 25
Close all attached devices. 2. Note: On LCD monitors, unlike CRTs, a faster refresh rate does not improve display quality. Ensure that the monitor is the drive letter designator for the CD-ROM drive). 14. Click the Settings tab. 6. Open the Hardware Update Wizard window by clicking ...on Update Driver, and then click Next. 11. Click the Advanced button. 7. Click on the Browse button and navigate to boot into Windows XP. 4. Lenovo recommends using either 1920 x 1080 at a refresh rate of 60 Hz, or 640 x 480 at a refresh rate of 60 Hz. 3-6 L215 Wide Flat Panel Monitor User's...
Close all attached devices. 2. Note: On LCD monitors, unlike CRTs, a faster refresh rate does not improve display quality. Ensure that the monitor is the drive letter designator for the CD-ROM drive). 14. Click the Settings tab. 6. Open the Hardware Update Wizard window by clicking ...on Update Driver, and then click Next. 11. Click the Advanced button. 7. Click on the Browse button and navigate to boot into Windows XP. 4. Lenovo recommends using either 1920 x 1080 at a refresh rate of 60 Hz, or 640 x 480 at a refresh rate of 60 Hz. 3-6 L215 Wide Flat Panel Monitor User's...


