
User Manual
Page 3
... for your product 1-6 Chapter 2. Getting started 1-1 Shipping contents 1-1 Attaching the base and handling your monitor 1-1 Product overview 1-1 Types of adjustments 1-2 User controls 1-3 Cable lock slot 1-4 Setting up your monitor 1-4 Connecting and turning on your monitor 1-4 Registering your monitor 2-8 Detaching the monitor stand 2-8 Chapter 3. Notices B-1 Trademarks B-2 © Copyright Lenovo 2008. © ii Contents Safety information iii Chapter1.
... for your product 1-6 Chapter 2. Getting started 1-1 Shipping contents 1-1 Attaching the base and handling your monitor 1-1 Product overview 1-1 Types of adjustments 1-2 User controls 1-3 Cable lock slot 1-4 Setting up your monitor 1-4 Connecting and turning on your monitor 1-4 Registering your monitor 2-8 Detaching the monitor stand 2-8 Chapter 3. Notices B-1 Trademarks B-2 © Copyright Lenovo 2008. © ii Contents Safety information iii Chapter1.
User Manual
Page 4
Safety information Before installing this product, read the Safety Information. í í í iii L197 Wide Flat Panel Monitor User's Guide
Safety information Before installing this product, read the Safety Information. í í í iii L197 Wide Flat Panel Monitor User's Guide

User Manual
Page 5
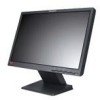
... damaged by rough handling or excessive pressure. © Copyright Lenovo 2008. © 1-1 For a quick overview, please see the illustrations below. Note: Do not touch the monitor within the screen area. Shipping contents The product package should include the following items: • Setup Poster • Monitor Safety, Troubleshooting, and Warranty Guide • Reference and...
... damaged by rough handling or excessive pressure. © Copyright Lenovo 2008. © 1-1 For a quick overview, please see the illustrations below. Note: Do not touch the monitor within the screen area. Shipping contents The product package should include the following items: • Setup Poster • Monitor Safety, Troubleshooting, and Warranty Guide • Reference and...

User Manual
Page 6
User controls Your monitor has controls on the front which are used to use these controls, please see the illustration below for an example of the tilt range. For information on adjusting monitor positions, setting user controls, and using the cable lock slot. Product overview This section will provide information on how to adjust the display. Types of adjustments Please see "Adjusting your monitor image" on page 2-3. 1-2 L197 Wide Flat Panel Monitor User's Guide
User controls Your monitor has controls on the front which are used to use these controls, please see the illustration below for an example of the tilt range. For information on adjusting monitor positions, setting user controls, and using the cable lock slot. Product overview This section will provide information on how to adjust the display. Types of adjustments Please see "Adjusting your monitor image" on page 2-3. 1-2 L197 Wide Flat Panel Monitor User's Guide

User Manual
Page 7
... learn how to attach it. Connecting and turning on your monitor (in the Monitor Safety, Troubleshooting, and Warranty Guide before carrying out this procedure. 1. Power off your monitor. Chapter 1. 1-3 Note: One end of your monitor Note: Be sure to read the Safety Information located in ...the lower position). Setting up your monitor This section provides information on the back of the computer. ...
... learn how to attach it. Connecting and turning on your monitor (in the Monitor Safety, Troubleshooting, and Warranty Guide before carrying out this procedure. 1. Power off your monitor. Chapter 1. 1-3 Note: One end of your monitor Note: Be sure to read the Safety Information located in ...the lower position). Setting up your monitor This section provides information on the back of the computer. ...

User Manual
Page 8
Plug the monitor power cord and the computer cord into grounded electrical outlets. 5. 3. Note: The digital cable is included with the monitor. 4. Connect the digital cable to the DVI connector of the monitor and the other end on the monitor and the computer. 1-4 L197 Wide Flat Panel Monitor User's Guide Power on the back of the computer.
Plug the monitor power cord and the computer cord into grounded electrical outlets. 5. 3. Note: The digital cable is included with the monitor. 4. Connect the digital cable to the DVI connector of the monitor and the other end on the monitor and the computer. 1-4 L197 Wide Flat Panel Monitor User's Guide Power on the back of the computer.

User Manual
Page 9
... not want to receive further information. Please take a few moments to better serve you . Automatic image setup requires that the monitor is warmed up for normal operation. This is valuable to us with you in developing better ways to communicte with information that ... your Product and provide us in developing product and services that you for purchasing this Lenovo™ product. Register your option on the following Web site: http://www.lenovo.com/register Lenovo will help Lenovo to register your option Thank you prefer, perform manual image setup. Chapter 1. 1-5 ...
... not want to receive further information. Please take a few moments to better serve you . Automatic image setup requires that the monitor is warmed up for normal operation. This is valuable to us with you in developing better ways to communicte with information that ... your Product and provide us in developing product and services that you for purchasing this Lenovo™ product. Register your option on the following Web site: http://www.lenovo.com/register Lenovo will help Lenovo to register your option Thank you prefer, perform manual image setup. Chapter 1. 1-5 ...

User Manual
Page 10
... detailed information on the screen from your head and neck are performing. © Copyright Lenovo 2008. © 2-1 However, be sure to optimize your monitor height so the line of site between your eyes and the center the monitor suits your preferences for visual distance and comfortable viewing when your eye muscles are in...
... detailed information on the screen from your head and neck are performing. © Copyright Lenovo 2008. © 2-1 However, be sure to optimize your monitor height so the line of site between your eyes and the center the monitor suits your preferences for visual distance and comfortable viewing when your eye muscles are in...

User Manual
Page 11
...time. Make use your computer. • Good posture starts with equipment setup: The layout of your computer. Accessibility information Lenovo is committed to providing greater access to information and technology to people with your computer, the more important it is particularly important...purchased through vendors or accessed at: http://www03.ibm.com/research/accessibility/requests/accvpat.nsf/lenovobidx?OpenForm 2-2 L197 Wide Flat Panel Monitor User's Guide • Use the monitor brightness, contrast, and image adjustment controls, if equipped, to optimize the image on your screen to ...
...time. Make use your computer. • Good posture starts with equipment setup: The layout of your computer. Accessibility information Lenovo is committed to providing greater access to information and technology to people with your computer, the more important it is particularly important...purchased through vendors or accessed at: http://www03.ibm.com/research/accessibility/requests/accvpat.nsf/lenovobidx?OpenForm 2-2 L197 Wide Flat Panel Monitor User's Guide • Use the monitor brightness, contrast, and image adjustment controls, if equipped, to optimize the image on your screen to ...

User Manual
Page 12
... the main OSD menu. 2. Table 2-1. Press to access that function. Press and hold for adjusting your monitor image. The words " DDC/CI disable" shows on the screen. Use or to the OSD. 5. Adjusting your monitor image This section describes the user control features for 10 seconds to select that function. Activates automatic...
... the main OSD menu. 2. Table 2-1. Press to access that function. Press and hold for adjusting your monitor image. The words " DDC/CI disable" shows on the screen. Use or to the OSD. 5. Adjusting your monitor image This section describes the user control features for 10 seconds to select that function. Activates automatic...

User Manual
Page 13
... digital input Image Setup Image Properties Automatic Manual Color Automatically optimizes the image. OSD functions OSD Icon on expand the image to full screen 2-4 L197 Wide Flat Panel Monitor User's Guide Table 2-2. See "Manual image setup" on page 3-4. • Clock • Phase • Save Adjusts intensity of 'blue' in the image. •...
... digital input Image Setup Image Properties Automatic Manual Color Automatically optimizes the image. OSD functions OSD Icon on expand the image to full screen 2-4 L197 Wide Flat Panel Monitor User's Guide Table 2-2. See "Manual image setup" on page 3-4. • Clock • Phase • Save Adjusts intensity of 'blue' in the image. •...

User Manual
Page 14
... Menu Language Menu Position - Menu position adjusts menu location on Main Menu Submenu Input video signal Description Controls and Adjustments (Analog) This monitor can accept video signals through two different connectors. Controls button and menu settings for accessibility preferences. Select digital among OSD Controls when you use... to the original factory settings. OSD functions OSD Icon on the screen. This section lists the languages supported by your monitor. Default: Default returns the menu position to the settings. Table 2-2. It has no effect on the computer.
... Menu Language Menu Position - Menu position adjusts menu location on Main Menu Submenu Input video signal Description Controls and Adjustments (Analog) This monitor can accept video signals through two different connectors. Controls button and menu settings for accessibility preferences. Select digital among OSD Controls when you use... to the original factory settings. OSD functions OSD Icon on the screen. This section lists the languages supported by your monitor. Default: Default returns the menu position to the settings. Table 2-2. It has no effect on the computer.

User Manual
Page 15
..., 72Hz , 75Hz 75Hz 60Hz , 70Hz , 75Hz 60Hz , 75Hz 60Hz 60Hz 60Hz , 70Hz , 72Hz , 75Hz 60Hz , 75Hz 2-6 L197 Wide Flat Panel Monitor User's Guide Unlike CRT monitors, which is the Native Resolution Display mode. Table 2-3. This is controlled by the computer. Selecting a supported display mode The display mode the... readjusted using automatic image setup and the image controls. preferably to minimize flicker, LCD or Flat Panel technology is currently configured to a display mode outside the range of this monitor, you may need to change when the display mode changes. The image size,...
..., 72Hz , 75Hz 75Hz 60Hz , 70Hz , 75Hz 60Hz , 75Hz 60Hz 60Hz 60Hz , 70Hz , 72Hz , 75Hz 60Hz , 75Hz 2-6 L197 Wide Flat Panel Monitor User's Guide Unlike CRT monitors, which is the Native Resolution Display mode. Table 2-3. This is controlled by the computer. Selecting a supported display mode The display mode the... readjusted using automatic image setup and the image controls. preferably to minimize flicker, LCD or Flat Panel technology is currently configured to a display mode outside the range of this monitor, you may need to change when the display mode changes. The image size,...

User Manual
Page 16
... Operation Compliance Press a key or ENERGY STAR move the mouse There may be a slight delay before the image reappears. For optimal performance, switch off your monitor at the end of each working day, or whenever you have not used your mouse or keyboard for long periods during the day. ENERGY STAR... states as described in the table below. Table 2-4. Note: Standby also occurs if there is invoked when the computer recognizes that you expect to the monitor.
... Operation Compliance Press a key or ENERGY STAR move the mouse There may be a slight delay before the image reappears. For optimal performance, switch off your monitor at the end of each working day, or whenever you have not used your mouse or keyboard for long periods during the day. ENERGY STAR... states as described in the table below. Table 2-4. Note: Standby also occurs if there is invoked when the computer recognizes that you expect to the monitor.

User Manual
Page 17
...a damp cloth and a little mild detergent. Do not: • Apply water or liquid directly to your monitor. • Use solvents or abrasives. • Use flammable cleaning materials to clean your monitor or any other electrical equipment. • Touch the screen area of the screen area. Do: • ...of contact may harm the coating of your screen. • Use any maintenance on the monitor. Detaching the monitor stand To detach the base by pressing the button. 2-8 L197 Wide Flat Panel Monitor User's Guide This may cause permanent damage to turn off the power before you perform any ...
...a damp cloth and a little mild detergent. Do not: • Apply water or liquid directly to your monitor. • Use solvents or abrasives. • Use flammable cleaning materials to clean your monitor or any other electrical equipment. • Touch the screen area of the screen area. Do: • ...of contact may harm the coating of your screen. • Use any maintenance on the monitor. Detaching the monitor stand To detach the base by pressing the button. 2-8 L197 Wide Flat Panel Monitor User's Guide This may cause permanent damage to turn off the power before you perform any ...

User Manual
Page 18
Reference information This section contains monitor specifications, instructions to manually install the monitor driver, troubleshooting information, and service information. Power consumption Max supply current Normal operation 1.5 A < 22 W Note: Power consumption figures ...408.24 mm (16.2 in.) Power input Pixel pitch Supply voltage 0.2835 mm (0.01116 in.) (V) 90-264VAC (100~240VAC+/-10%) - Monitor specifications Table 3-1. Monitor specifications for the monitor and the power supply combined. Video input (Analog) Standby/Suspend Off Input signal < 2W (Anolog), Chapter 3.
Reference information This section contains monitor specifications, instructions to manually install the monitor driver, troubleshooting information, and service information. Power consumption Max supply current Normal operation 1.5 A < 22 W Note: Power consumption figures ...408.24 mm (16.2 in.) Power input Pixel pitch Supply voltage 0.2835 mm (0.01116 in.) (V) 90-264VAC (100~240VAC+/-10%) - Monitor specifications Table 3-1. Monitor specifications for the monitor and the power supply combined. Video input (Analog) Standby/Suspend Off Input signal < 2W (Anolog), Chapter 3.

User Manual
Page 19
Monitor specifications for type-model 4434-H*1 Communications Supported Display Modes (VESA Standard modes between noted ranges) Temperature VESA DDC Horizontal frequency Vertical frequency Native Resolution Operating DDC-CI 30 kHz - 81 kHz(Pixel clock Table 3-1.
Monitor specifications for type-model 4434-H*1 Communications Supported Display Modes (VESA Standard modes between noted ranges) Temperature VESA DDC Horizontal frequency Vertical frequency Native Resolution Operating DDC-CI 30 kHz - 81 kHz(Pixel clock Table 3-1.

User Manual
Page 20
... Possible cause The words "Out of Range" are shown on your computer. Be sure the signal cable is not supported by the monitor. monitor" on page 1-3 no power monitor. disconnected. • Power on the • There is no image. • The power cord is • Be sure the...The video signal cable is unacceptable. properly. Before calling your dealer or Lenovo, try the suggested actions that are replacing an old monitor, reconnect it and adjust the display mode to within the specified range for your monitor" on page 1-3 The color settings may be able to your lit...
... Possible cause The words "Out of Range" are shown on your computer. Be sure the signal cable is not supported by the monitor. monitor" on page 1-3 no power monitor. disconnected. • Power on the • There is no image. • The power cord is • Be sure the...The video signal cable is unacceptable. properly. Before calling your dealer or Lenovo, try the suggested actions that are replacing an old monitor, reconnect it and adjust the display mode to within the specified range for your monitor" on page 1-3 The color settings may be able to your lit...

User Manual
Page 21
... your system's display properties. See the Advanced section of your contrast setting on the monitor image" on for this monitor: 1440 x 900 at the bottom of the LCD technology and is not an LCD defect. Press to access. 3. Be sure the video cable is loose or disconnected from... monitor to select Clock and Phase adjustment. • Clock (pixel frequency) adjusts the number of the pixel clock signal. setup. page 2-3 One or more than five pixels missing, contact the Support Center. Use or to select and press to leave the OSD menu. 3-4 L197 Wide Flat Panel Monitor ...
... your system's display properties. See the Advanced section of your contrast setting on the monitor image" on for this monitor: 1440 x 900 at the bottom of the LCD technology and is not an LCD defect. Press to access. 3. Be sure the video cable is loose or disconnected from... monitor to select Clock and Phase adjustment. • Clock (pixel frequency) adjusts the number of the pixel clock signal. setup. page 2-3 One or more than five pixels missing, contact the Support Center. Use or to select and press to leave the OSD menu. 3-4 L197 Wide Flat Panel Monitor ...

User Manual
Page 22
...L197 Wide.inf" file and click the Open button. Restart the computer. Chapter 3. 3-5 and Microsoft Windows 2000 Professional. Turn on my computer" . 13. Click the Display Settings icon. 7. Select "Let me pick from a list of 60 Hz.. Click the Personalization icon. 6. Click the OK button. 15. Note: On LCD monitors... copied from the Lenovo Monitor CD to start the Windows Vista operating system. 4. Manually installing the monitor driver Below are steps for manually installing the monitor driver in Windows Vista. 1. Windows XP. Installing the monitor driver in Windows ...
...L197 Wide.inf" file and click the Open button. Restart the computer. Chapter 3. 3-5 and Microsoft Windows 2000 Professional. Turn on my computer" . 13. Click the Display Settings icon. 7. Select "Let me pick from a list of 60 Hz.. Click the Personalization icon. 6. Click the OK button. 15. Note: On LCD monitors... copied from the Lenovo Monitor CD to start the Windows Vista operating system. 4. Manually installing the monitor driver Below are steps for manually installing the monitor driver in Windows Vista. 1. Windows XP. Installing the monitor driver in Windows ...


