

Hardware Maintanence Manual
Page 3
...password 24 Supervisor password 24 Power management 25 Screen blank state 25 Putting your computer into sleep state or shutting it down 25 Lenovo IdeaPad S300 26 Specifications 26 Status indicators 28 Hotkeys 30 FRU replacement notices 31 Screw notices 31 Removing and replacing an FRU 32 1010 Battery... and Heat Sink assembly 40 1060 Keyboard 42 1070 System board 44 1080 LCD unit 47 1090 Speakers, base cover, USB board, power assembly and power board 49 1100 LCD front bezel 52 1110 LCD panel, LCD cable, hinges.......... 53 1120 Integrated camera 55 Locations 56 Front view 56...
...password 24 Supervisor password 24 Power management 25 Screen blank state 25 Putting your computer into sleep state or shutting it down 25 Lenovo IdeaPad S300 26 Specifications 26 Status indicators 28 Hotkeys 30 FRU replacement notices 31 Screw notices 31 Removing and replacing an FRU 32 1010 Battery... and Heat Sink assembly 40 1060 Keyboard 42 1070 System board 44 1080 LCD unit 47 1090 Speakers, base cover, USB board, power assembly and power board 49 1100 LCD front bezel 52 1110 LCD panel, LCD cable, hinges.......... 53 1120 Integrated camera 55 Locations 56 Front view 56...

Hardware Maintanence Manual
Page 24
Lenovo IdeaPad S300 Hardware Maintenance Manual What to do first When you do return an FRU, you attach to excessive force, or dropped. 20 Customer's name and address ... number, and serial number 8. The following is covered under the warranty by referring to the following list: The following are not covered under warranty: • LCD panel cracked from the application of excessive force or from being dropped • Scratched (cosmetic) parts • Distortion, deformation, or discoloration of the cosmetic parts...
Lenovo IdeaPad S300 Hardware Maintenance Manual What to do first When you do return an FRU, you attach to excessive force, or dropped. 20 Customer's name and address ... number, and serial number 8. The following is covered under the warranty by referring to the following list: The following are not covered under warranty: • LCD panel cracked from the application of excessive force or from being dropped • Scratched (cosmetic) parts • Distortion, deformation, or discoloration of the cosmetic parts...

Hardware Maintanence Manual
Page 29
... supported for a day or two, shut it to resume use your computer while the hard disk is in the operating system expires, the LCD backlight turns off the LCD backlight by pressing . Screen blank state If the time set on the "Turn off monitor" timer in sleep state) before you will be...
... supported for a day or two, shut it to resume use your computer while the hard disk is in the operating system expires, the LCD backlight turns off the LCD backlight by pressing . Screen blank state If the time set on the "Turn off monitor" timer in sleep state) before you will be...

Hardware Maintanence Manual
Page 50
... of system board (continued) Unplug DC-IN cable connector in the direction c , speakers connector d , disconnect the LCD connector in the direction e , power board connector in the direction f , TP connector in the direction shown by arrow i. Lenovo IdeaPad S300 Hardware Maintenance Manual Figure 7. Remove the system board in the direction g , LED board connector h . e c d h f g When installing...
... of system board (continued) Unplug DC-IN cable connector in the direction c , speakers connector d , disconnect the LCD connector in the direction e , power board connector in the direction f , TP connector in the direction shown by arrow i. Lenovo IdeaPad S300 Hardware Maintenance Manual Figure 7. Remove the system board in the direction g , LED board connector h . e c d h f g When installing...

Hardware Maintanence Manual
Page 51
... they are not subjected to any tension. Removal steps of LCD unit Remove three screws a and screw b. Tension could cause the cables to be damaged by the cable guides, or a wire to be broken. • Make sure that the LCD connector is attached firmly and make sure that you do not... pinch the antenna cables when you attach the LCD assembly. Route the LCD cable along the cable guides. Lenovo IdeaPad S300 1080 LCD unit For access, remove these FRUs in order: • "1010 Battery pack" on page 33 • "1020 Hard disk drive" on page...
... they are not subjected to any tension. Removal steps of LCD unit Remove three screws a and screw b. Tension could cause the cables to be damaged by the cable guides, or a wire to be broken. • Make sure that the LCD connector is attached firmly and make sure that you do not... pinch the antenna cables when you attach the LCD assembly. Route the LCD cable along the cable guides. Lenovo IdeaPad S300 1080 LCD unit For access, remove these FRUs in order: • "1010 Battery pack" on page 33 • "1020 Hard disk drive" on page...

Hardware Maintanence Manual
Page 52
Removal steps of LCD unit (continued) Detach the LCD unit from the upper case. 48 Lenovo IdeaPad S300 Hardware Maintenance Manual Figure 8.
Removal steps of LCD unit (continued) Detach the LCD unit from the upper case. 48 Lenovo IdeaPad S300 Hardware Maintenance Manual Figure 8.

Hardware Maintanence Manual
Page 53
... four screws a , and then remove the speakers in the direction shown by arrow c. c When installing: Make sure that the power connector is attached firmly. 49 Lenovo IdeaPad S300 1090 Speakers, base cover, USB board, power assembly and power board For access, remove these FRUs in the direction shown by arrow b . aa a a b b Step a Screw...; "1050 Fan assembly and Heat Sink assembly" on page 40 • "1060 Keyboard" on page 42 • "1070 System board" on page 44 • "1080 LCD unit" on page 47 Figure 9.
... four screws a , and then remove the speakers in the direction shown by arrow c. c When installing: Make sure that the power connector is attached firmly. 49 Lenovo IdeaPad S300 1090 Speakers, base cover, USB board, power assembly and power board For access, remove these FRUs in the direction shown by arrow b . aa a a b b Step a Screw...; "1050 Fan assembly and Heat Sink assembly" on page 40 • "1060 Keyboard" on page 42 • "1070 System board" on page 44 • "1080 LCD unit" on page 47 Figure 9.

Hardware Maintanence Manual
Page 56
Removal steps of LCD front bezel Remove the LCD front bezel in order: • "1010 Battery pack" on page 33 • "1020 Hard disk drive" on page 35 • "1030 DIMM" on page 37 &#..." on page 42 • "1070 System board" on page 44 • "1080 LCD unit" on page 47 • "1090 Speakers, base cover, USB board, power assembly and power board" on page 49 Figure 10. a a a a 52 Lenovo IdeaPad S300 Hardware Maintenance Manual 1100 LCD front bezel For access, remove these FRUs in the direction shown by...
Removal steps of LCD front bezel Remove the LCD front bezel in order: • "1010 Battery pack" on page 33 • "1020 Hard disk drive" on page 35 • "1030 DIMM" on page 37 &#..." on page 42 • "1070 System board" on page 44 • "1080 LCD unit" on page 47 • "1090 Speakers, base cover, USB board, power assembly and power board" on page 49 Figure 10. a a a a 52 Lenovo IdeaPad S300 Hardware Maintenance Manual 1100 LCD front bezel For access, remove these FRUs in the direction shown by...

Hardware Maintanence Manual
Page 57
Lenovo IdeaPad S300 1110 LCD panel, LCD cable, hinges For access, remove these FRUs in the direction shown by arrow c. LCD panel, LCD cable, hinges Remove screws a. c b When installing: Make sure that the connector is attached firmly. 53 a a a a a a Step a Screw (quantity) Color M1.6 × ...3 mm, flat-head, nylok-coated (6) Black Torque 1.85 kgfcm Disconnect the connector b , lift the LCD panel in order: • "1010 Battery pack" on page 33 • "1020 Hard disk drive" on page 35 • "1030 DIMM" on page 37 •...
Lenovo IdeaPad S300 1110 LCD panel, LCD cable, hinges For access, remove these FRUs in the direction shown by arrow c. LCD panel, LCD cable, hinges Remove screws a. c b When installing: Make sure that the connector is attached firmly. 53 a a a a a a Step a Screw (quantity) Color M1.6 × ...3 mm, flat-head, nylok-coated (6) Black Torque 1.85 kgfcm Disconnect the connector b , lift the LCD panel in order: • "1010 Battery pack" on page 33 • "1020 Hard disk drive" on page 35 • "1030 DIMM" on page 37 •...

Hardware Maintanence Manual
Page 58
Lenovo IdeaPad S300 Hardware Maintenance Manual Figure 11. d eee d eee Step c Screw (quantity) M2 × 3 mm, flat-head, nylok-coated (6) M2.0 × 2.5, flat-head, nylok-coated(2) Color Black Silver Torque 1.85 kgfcm 1.85 kgfcm 54 LCD panel, LCD cable, hinges (continued) Remove two screws d ,six screws e and the hinges.
Lenovo IdeaPad S300 Hardware Maintenance Manual Figure 11. d eee d eee Step c Screw (quantity) M2 × 3 mm, flat-head, nylok-coated (6) M2.0 × 2.5, flat-head, nylok-coated(2) Color Black Silver Torque 1.85 kgfcm 1.85 kgfcm 54 LCD panel, LCD cable, hinges (continued) Remove two screws d ,six screws e and the hinges.

Hardware Maintanence Manual
Page 59
...base cover, USB board, power assembly and power board" on page 49 • "1100 LCD front bezel" on page 52 • "1110 LCD panel, LCD cable, hinges" on the top center of the LCD cover. Lenovo IdeaPad S300 1120 Integrated camera For access, remove these FRUs in the direction b. Removal steps of it to... make sure the connector is stuck on page 53 Figure 13. a b When installing: Stick the integrated camera to the top center of the LCD cover and ...
...base cover, USB board, power assembly and power board" on page 49 • "1100 LCD front bezel" on page 52 • "1110 LCD panel, LCD cable, hinges" on the top center of the LCD cover. Lenovo IdeaPad S300 1120 Integrated camera For access, remove these FRUs in the direction b. Removal steps of it to... make sure the connector is stuck on page 53 Figure 13. a b When installing: Stick the integrated camera to the top center of the LCD cover and ...

Hardware Maintanence Manual
Page 63
Lenovo IdeaPad S300 Parts list This section presents the following service parts: • "Overall" on page 60 • "LCD FRUs" on page 64 • "Keyboard" on page 66 • "Miscellaneous parts" on page 74 • "AC adapters" on page 75 • "Power cords" on page 76 Notes: • Each FRU is available for all types or models, unless specific types or models are specified. 59
Lenovo IdeaPad S300 Parts list This section presents the following service parts: • "Overall" on page 60 • "LCD FRUs" on page 64 • "Keyboard" on page 66 • "Miscellaneous parts" on page 74 • "AC adapters" on page 75 • "Power cords" on page 76 Notes: • Each FRU is available for all types or models, unless specific types or models are specified. 59

Hardware Maintanence Manual
Page 65
Lenovo IdeaPad S300 Table 4. FRU FRU no. 1 LCD unit (see "LCD FRUs" on page 64.) 2 Keyboard (see "Keyboard" on page 66.) 3 VIUS3 Upper Case White W/TP 90201497 4 DDR3 1600 2GB, M471B5773DH0-CK0 DDR3 1600 2GB 11200340 4 ...
Lenovo IdeaPad S300 Table 4. FRU FRU no. 1 LCD unit (see "LCD FRUs" on page 64.) 2 Keyboard (see "Keyboard" on page 66.) 3 VIUS3 Upper Case White W/TP 90201497 4 DDR3 1600 2GB, M471B5773DH0-CK0 DDR3 1600 2GB 11200340 4 ...

Hardware Maintanence Manual
Page 68
Lenovo IdeaPad S300 Hardware Maintenance Manual LCD FRUs In Lenovo IdeaPad S300, there are following types of LCDs. • "17.3 -in. HD TFT" 1 2 4 3 5 6 7 8 64
Lenovo IdeaPad S300 Hardware Maintenance Manual LCD FRUs In Lenovo IdeaPad S300, there are following types of LCDs. • "17.3 -in. HD TFT" 1 2 4 3 5 6 7 8 64
Hardware Maintanence Manual
Page 69
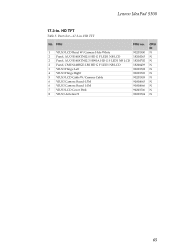
HD TFT No. FRU FRU no. 1 VIUS3 LCD Bezel W/Camera Hole White 90201500 2 Panel, AUO B140XTN02.0 HD G F LED1 NB LCD 18200263 2 Panel, AUO B140XTN02.3 HW0A HD G S LED1 NB LCD 18200702 2 Panel, CMI N140BGE-LB2 HD G F LED1 NB LCD 18200439 3 VIUS3 Hinge Left 90201502 4 VIUS3 Hinge Right 90201503 5 VIUS3 LCD Cable W/Camera Cable 90201505 6 VIUS3 Camera Board 0.3M 90000665 6 VIUS3 Camera Board 1.0M 90000666 7 VIUS3 LCD Cover Pink 90201506 8 VIUS3 Antenna*2 90201504 CRU ID N N N N N N N N N N N 65 Lenovo IdeaPad S300 17.3-in . Parts list-17.3-in . HD TFT Table 5.
HD TFT No. FRU FRU no. 1 VIUS3 LCD Bezel W/Camera Hole White 90201500 2 Panel, AUO B140XTN02.0 HD G F LED1 NB LCD 18200263 2 Panel, AUO B140XTN02.3 HW0A HD G S LED1 NB LCD 18200702 2 Panel, CMI N140BGE-LB2 HD G F LED1 NB LCD 18200439 3 VIUS3 Hinge Left 90201502 4 VIUS3 Hinge Right 90201503 5 VIUS3 LCD Cable W/Camera Cable 90201505 6 VIUS3 Camera Board 0.3M 90000665 6 VIUS3 Camera Board 1.0M 90000666 7 VIUS3 LCD Cover Pink 90201506 8 VIUS3 Antenna*2 90201504 CRU ID N N N N N N N N N N N 65 Lenovo IdeaPad S300 17.3-in . Parts list-17.3-in . HD TFT Table 5.

(English) User Guide
Page 6
c Computer display The LCD display with noise reduction) can be used for video communication. Getting to turn on page 11. 2 e Built-in microphone f Touchpad The built-in antennas ensure ...
c Computer display The LCD display with noise reduction) can be used for video communication. Getting to turn on page 11. 2 e Built-in microphone f Touchpad The built-in antennas ensure ...


