Hardware Maintenance Manual
Page 3
Contents About this manual iv Safety information 1 General safety 2 Electrical safety 3 Safety inspection guide 5 Handling devices that are sensitive to electrostatic discharge 6 Grounding requirements 6 Safety notices: multilingual translations.......... 7... factory default 23 Passwords 24 Power-on password 24 Supervisor password 24 Power management 25 Screen blank mode 25 Sleep (standby) mode 25 Lenovo IdeaPad Z500/P500 26 Specifications 26 Status indicators 28 Function key combinations 29 FRU replacement notices 30 Screw notices 30 Removing and replacing an FRU 31 1010 ...
Contents About this manual iv Safety information 1 General safety 2 Electrical safety 3 Safety inspection guide 5 Handling devices that are sensitive to electrostatic discharge 6 Grounding requirements 6 Safety notices: multilingual translations.......... 7... factory default 23 Passwords 24 Power-on password 24 Supervisor password 24 Power management 25 Screen blank mode 25 Sleep (standby) mode 25 Lenovo IdeaPad Z500/P500 26 Specifications 26 Status indicators 28 Function key combinations 29 FRU replacement notices 30 Screw notices 30 Removing and replacing an FRU 31 1010 ...
Hardware Maintenance Manual
Page 4
... intended only for servicing computers. •• The product-specific section includes service, reference, and product-specific parts information. iv Important: This manual is divided into the following Lenovo IdeaPad product: Lenovo IdeaPad Z500/P500 Use this manual to read all the information under "Safety information" on page 1 and "Important service information" on page 16. About this...
... intended only for servicing computers. •• The product-specific section includes service, reference, and product-specific parts information. iv Important: This manual is divided into the following Lenovo IdeaPad product: Lenovo IdeaPad Z500/P500 Use this manual to read all the information under "Safety information" on page 1 and "Important service information" on page 16. About this...
Hardware Maintenance Manual
Page 6
... machine to the customer. •• Fan louvers on the machine help to lift it by standing or pushing up above your leg muscles; IdeaPad Z500/P500 Hardware Maintenance Manual General safety Follow these rules below to the customer, or that makes the machine unsafe. •• Before you start the machine, make...
... machine to the customer. •• Fan louvers on the machine help to lift it by standing or pushing up above your leg muscles; IdeaPad Z500/P500 Hardware Maintenance Manual General safety Follow these rules below to the customer, or that makes the machine unsafe. •• Before you start the machine, make...

Hardware Maintenance Manual
Page 8
... on when they are moist floors, nongrounded power extension cables, power surges, and missing safety grounds. •• Do not touch live electrical circuits with the reflective surface of a plastic dental mirror. The surface is conductive; Pumps - Motor generators and similar ... the power. - Send the victim to get medical aid. 4 Power supply units - Caution: do not become a victim yourself. - IdeaPad Z500/P500 Hardware Maintenance Manual •• Always look carefully for possible hazards in a machine: - Examples of the units.) •• If an electrical accident ...
... on when they are moist floors, nongrounded power extension cables, power surges, and missing safety grounds. •• Do not touch live electrical circuits with the reflective surface of a plastic dental mirror. The surface is conductive; Pumps - Motor generators and similar ... the power. - Send the victim to get medical aid. 4 Power supply units - Caution: do not become a victim yourself. - IdeaPad Z500/P500 Hardware Maintenance Manual •• Always look carefully for possible hazards in a machine: - Examples of the units.) •• If an electrical accident ...
Hardware Maintenance Manual
Page 10
... plug on a double-insulated or battery-operated system, use coax or connectoroutside shells on your body. •• Prevent the part from touching your clothing. IdeaPad Z500/P500 Hardware Maintenance Manual Handling devices that the machine, the part, the work surface. Protect against ESD damage by equalizing the charge so that are sensitive to...
... plug on a double-insulated or battery-operated system, use coax or connectoroutside shells on your body. •• Prevent the part from touching your clothing. IdeaPad Z500/P500 Hardware Maintenance Manual Handling devices that the machine, the part, the work surface. Protect against ESD damage by equalizing the charge so that are sensitive to...
Hardware Maintenance Manual
Page 18
.... Opening the CD-ROM drive, the DVD-ROM drive, or any other than those drives. to conform to hazardous laser radiation. IdeaPad Z500/P500 Hardware Maintenance Manual Laser compliance statement Some models of Lenovo IdeaPad computer are also sold separately as a CD-ROM drive or a DVD-ROM drive. If one of procedures other optical storage...
.... Opening the CD-ROM drive, the DVD-ROM drive, or any other than those drives. to conform to hazardous laser radiation. IdeaPad Z500/P500 Hardware Maintenance Manual Laser compliance statement Some models of Lenovo IdeaPad computer are also sold separately as a CD-ROM drive or a DVD-ROM drive. If one of procedures other optical storage...
Hardware Maintenance Manual
Page 20
... the service action. Go to the system board before replacing any FRUs listed in this manual. "Important notice for replacing FRUs" on page 16 - After a system board is loaded to http://consumersupport.lenovo.com/. 2. IdeaPad Z500/P500 Hardware Maintenance Manual Important service information This chapter presents the following important service information: •• "Strategy for...
... the service action. Go to the system board before replacing any FRUs listed in this manual. "Important notice for replacing FRUs" on page 16 - After a system board is loaded to http://consumersupport.lenovo.com/. 2. IdeaPad Z500/P500 Hardware Maintenance Manual Important service information This chapter presents the following important service information: •• "Strategy for...
Hardware Maintenance Manual
Page 22
...compliant, replacement parts can also be RoHS compliant. Products sold in the EU. The following statement pertains to support Lenovo's requirements and schedule in 2005 and 2006 will contain some RoHS compliant FRUs. If the original FRU parts are RoHS... identified with a different FRU part number that is a European Union legal requirement affecting the global electronics industry. IdeaPad Z500/P500 Hardware Maintenance Manual Important information about replacing RoHS compliant FRUs RoHS, The Restriction of Hazardous Substances in Electrical and Electronic Equipment Directive ...
...compliant, replacement parts can also be RoHS compliant. Products sold in the EU. The following statement pertains to support Lenovo's requirements and schedule in 2005 and 2006 will contain some RoHS compliant FRUs. If the original FRU parts are RoHS... identified with a different FRU part number that is a European Union legal requirement affecting the global electronics industry. IdeaPad Z500/P500 Hardware Maintenance Manual Important information about replacing RoHS compliant FRUs RoHS, The Restriction of Hazardous Substances in Electrical and Electronic Equipment Directive ...
Hardware Maintenance Manual
Page 24
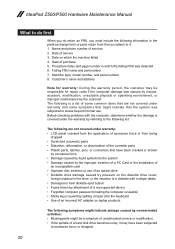
... onto the keyboard •• Use of an incorrect AC adapter on which the failing FRU was subjected to stress beyond normal use. IdeaPad Z500/P500 Hardware Maintenance Manual What to do first When you do return an FRU, you attach to it may be responsible for warranty: During the warranty period, the...
... onto the keyboard •• Use of an incorrect AC adapter on which the failing FRU was subjected to stress beyond normal use. IdeaPad Z500/P500 Hardware Maintenance Manual What to do first When you do return an FRU, you attach to it may be responsible for warranty: During the warranty period, the...

Hardware Maintenance Manual
Page 26
If the charge indicator still does not light on , remove the battery pack and let it return to room temperature. Then reinstall the battery pack. 22 If the battery status indicator or icon does not light on , replace the system board. If the charge indicator or icon is still off, replace the battery pack. IdeaPad Z500/P500 Hardware Maintenance Manual Perform operational charging. Reinstall the battery pack.
If the charge indicator still does not light on , remove the battery pack and let it return to room temperature. Then reinstall the battery pack. 22 If the battery status indicator or icon does not light on , replace the system board. If the charge indicator or icon is still off, replace the battery pack. IdeaPad Z500/P500 Hardware Maintenance Manual Perform operational charging. Reinstall the battery pack.

Hardware Maintenance Manual
Page 28
... booted. The user must enter the SVP in the BIOS Setup Utility. If any of these passwords has been set, a prompt for any Lenovo IdeaPad computer: the power-on . The password must be needed for it appears on the screen whenever the computer is no service procedure to complete ...(POP) protects the system from being powered on by an unauthorized person. Attention: If the SVP has been forgotten and cannot be booted. IdeaPad Z500/P500 Hardware Maintenance Manual When you use the recovery discs to boot your computer, the system will enter the user interface for a scheduled fee. 24
... booted. The user must enter the SVP in the BIOS Setup Utility. If any of these passwords has been set, a prompt for any Lenovo IdeaPad computer: the power-on . The password must be needed for it appears on the screen whenever the computer is no service procedure to complete ...(POP) protects the system from being powered on by an unauthorized person. Attention: If the SVP has been forgotten and cannot be booted. IdeaPad Z500/P500 Hardware Maintenance Manual When you use the recovery discs to boot your computer, the system will enter the user interface for a scheduled fee. 24
Hardware Maintenance Manual
Page 30
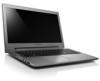
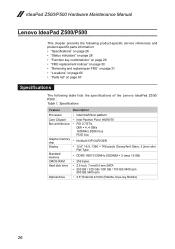
IdeaPad Z500/P500 Hardware Maintenance Manual Lenovo IdeaPad Z500/P500 This chapter presents the following product-specific service references and product-specific parts information: •• "Specifications" on page 26 •• "... •• "Locations" on page 65 •• "Parts list" on page 67 Specifications The following table lists the specifications of the Lenovo IdeaPad Z500/ P500 : Table 1. Specifications Feature Processor Core Chipset Bus architecture Graphic memory chip Display Standard memory CMOS RAM Hard disk drive Optical drive Description • ...
IdeaPad Z500/P500 Hardware Maintenance Manual Lenovo IdeaPad Z500/P500 This chapter presents the following product-specific service references and product-specific parts information: •• "Specifications" on page 26 •• "... •• "Locations" on page 65 •• "Parts list" on page 67 Specifications The following table lists the specifications of the Lenovo IdeaPad Z500/ P500 : Table 1. Specifications Feature Processor Core Chipset Bus architecture Graphic memory chip Display Standard memory CMOS RAM Hard disk drive Optical drive Description • ...
Hardware Maintenance Manual
Page 32
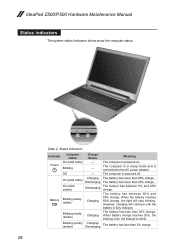
... has between 20% and 80% charge. When the battery reaches 80% charge, the light will stop blinking. The battery has less than 20% charge. IdeaPad Z500/P500 Hardware Maintenance Manual Status indicators The system status indicators below show the computer status: 1 2 Table 2. The battery has more than 20% charge. The computer is fully...
... has between 20% and 80% charge. When the battery reaches 80% charge, the light will stop blinking. The battery has less than 20% charge. IdeaPad Z500/P500 Hardware Maintenance Manual Status indicators The system status indicators below show the computer status: 1 2 Table 2. The battery has more than 20% charge. The computer is fully...
Hardware Maintenance Manual
Page 34
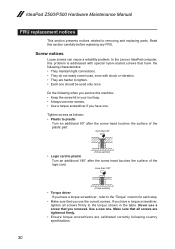
... IdeaPad Z500/P500 Hardware Maintenance Manual FRU replacement notices This section presents notices related to plastic Turn an additional 180° after the screw head touches the surface of the logic card: more than 180° (Cross-section) •• Torque driver If you removed. In the Lenovo IdeaPad ...country specifications. 30 Tighten screws as follows: •• Plastic to plastic Turn an additional 90° after the screw head touches the surface of the plastic part: more than 90° (Cross-section) •• Logic card to removing and replacing parts. Use ...
... IdeaPad Z500/P500 Hardware Maintenance Manual FRU replacement notices This section presents notices related to plastic Turn an additional 180° after the screw head touches the surface of the logic card: more than 180° (Cross-section) •• Torque driver If you removed. In the Lenovo IdeaPad ...country specifications. 30 Tighten screws as follows: •• Plastic to plastic Turn an additional 90° after the screw head touches the surface of the plastic part: more than 90° (Cross-section) •• Logic card to removing and replacing parts. Use ...
Hardware Maintenance Manual
Page 36
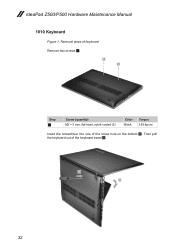
Removal steps of keyboard Remove two screws 1. 1 1 Step 1 Screw (quantity) M2 × 5 mm, flat-head, nylok-coated (2) Color Black Torque 3.62 kg-cm Insert the screwdriver into one of the keyboard bezel 3. 2 3 32 Then pull the keyboard out of the screw hole on the bottom 2. IdeaPad Z500/P500 Hardware Maintenance Manual 1010 Keyboard Figure 1.
Removal steps of keyboard Remove two screws 1. 1 1 Step 1 Screw (quantity) M2 × 5 mm, flat-head, nylok-coated (2) Color Black Torque 3.62 kg-cm Insert the screwdriver into one of the keyboard bezel 3. 2 3 32 Then pull the keyboard out of the screw hole on the bottom 2. IdeaPad Z500/P500 Hardware Maintenance Manual 1010 Keyboard Figure 1.

Hardware Maintenance Manual
Page 38
IdeaPad Z500/P500 Hardware Maintenance Manual 1020 Optical drive For access, remove this FRU: •• "1010 Keyboard" on page 32 Figure 2. Removal steps of optical drive Remove the screw 1. 1 Step 1 Screw (quantity) M2.5 × 6 mm, flat-head, nylok-coated (1) Color Black Torque 8.03 kg-cm 34
IdeaPad Z500/P500 Hardware Maintenance Manual 1020 Optical drive For access, remove this FRU: •• "1010 Keyboard" on page 32 Figure 2. Removal steps of optical drive Remove the screw 1. 1 Step 1 Screw (quantity) M2.5 × 6 mm, flat-head, nylok-coated (1) Color Black Torque 8.03 kg-cm 34
Hardware Maintenance Manual
Page 40
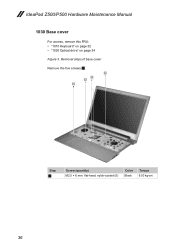
Removal steps of base cover Remove the five screws 1. 1 1 1 1 Step 1 Screw (quantity) M2.5 × 6 mm, flat-head, nylok-coated (5) Color Black Torque 8.03 kg-cm 36 IdeaPad Z500/P500 Hardware Maintenance Manual 1030 Base cover For access, remove this FRU: •• "1010 Keyboard" on page 32 •• "1020 Optical drive" on page 34 Figure 3.
Removal steps of base cover Remove the five screws 1. 1 1 1 1 Step 1 Screw (quantity) M2.5 × 6 mm, flat-head, nylok-coated (5) Color Black Torque 8.03 kg-cm 36 IdeaPad Z500/P500 Hardware Maintenance Manual 1030 Base cover For access, remove this FRU: •• "1010 Keyboard" on page 32 •• "1020 Optical drive" on page 34 Figure 3.
Hardware Maintenance Manual
Page 42
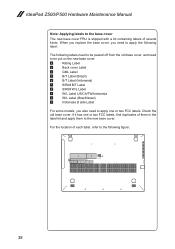
... the base cover, you also need to apply one or two FCC labels, find duplicates of several kinds. Check the old base cover; IdeaPad Z500/P500 Hardware Maintenance Manual Note: Applying labels to the base cover The new base cover FRU is shipped with a kit containing labels of them in the label kit...
... the base cover, you also need to apply one or two FCC labels, find duplicates of several kinds. Check the old base cover; IdeaPad Z500/P500 Hardware Maintenance Manual Note: Applying labels to the base cover The new base cover FRU is shipped with a kit containing labels of them in the label kit...
Hardware Maintenance Manual
Page 44
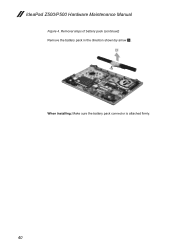
IdeaPad Z500/P500 Hardware Maintenance Manual Figure 4. Removal steps of battery pack (continued) Remove the battery pack in the direction shown by arrow 3. 3 When installing: Make sure the battery pack connector is attached firmly. 40
IdeaPad Z500/P500 Hardware Maintenance Manual Figure 4. Removal steps of battery pack (continued) Remove the battery pack in the direction shown by arrow 3. 3 When installing: Make sure the battery pack connector is attached firmly. 40
Hardware Maintenance Manual
Page 46
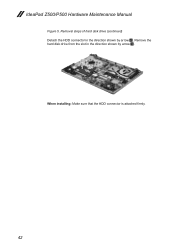
Removal steps of hard disk drive (continued) Detach the HDD connector in the direction shown by arrow 2. Remove the hard disk drive from the slot in the direction shown by arrow 3. 3 2 When installing: Make sure that the HDD connector is attached firmly. 42 IdeaPad Z500/P500 Hardware Maintenance Manual Figure 5.
Removal steps of hard disk drive (continued) Detach the HDD connector in the direction shown by arrow 2. Remove the hard disk drive from the slot in the direction shown by arrow 3. 3 2 When installing: Make sure that the HDD connector is attached firmly. 42 IdeaPad Z500/P500 Hardware Maintenance Manual Figure 5.


