
Hardware Maintenance Manual
Page 4
GS-35F-05925. Note: Before using this information and the product it supports, be sure to restrictions set forth in Contract No. Sixth Edition (June 2011) © Copyright Lenovo 2008, 2011. LIMITED AND RESTRICTED RIGHTS NOTICE: If data or software are delivered pursuant a General Services Administration "GSA" contract, use, reproduction, or disclosure is subject to read the information under Appendix A "Notices" on page 525.
GS-35F-05925. Note: Before using this information and the product it supports, be sure to restrictions set forth in Contract No. Sixth Edition (June 2011) © Copyright Lenovo 2008, 2011. LIMITED AND RESTRICTED RIGHTS NOTICE: If data or software are delivered pursuant a General Services Administration "GSA" contract, use, reproduction, or disclosure is subject to read the information under Appendix A "Notices" on page 525.

Hardware Maintenance Manual
Page 7
...this book before June 2006 are not required to have internet access, FRU part numbers are also available at: http:/www.lenovo.com/support Important Safety Information Be sure to read the Safety Information. Veuillez lire toutes les consignes de type DANGER et ATTENTION du ...machine type and model listed on the cover. If the parts are applicable to -FRU Index and Additional Service Information chapters are familiar with Lenovo® computer products. See Chapter 2 "Safety information" on the market before performing any machine type and are not compliant originally, replacement ...
...this book before June 2006 are not required to have internet access, FRU part numbers are also available at: http:/www.lenovo.com/support Important Safety Information Be sure to read the Safety Information. Veuillez lire toutes les consignes de type DANGER et ATTENTION du ...machine type and model listed on the cover. If the parts are applicable to -FRU Index and Additional Service Information chapters are familiar with Lenovo® computer products. See Chapter 2 "Safety information" on the market before performing any machine type and are not compliant originally, replacement ...

Hardware Maintenance Manual
Page 8
...be compliant. Products marketed before the implementation date and expects its suppliers to be ready to support Lenovo's requirements and schedule in the EU. Turkish statement of compliance The Lenovo product meets the requirements of the Republic of Turkey Directive on the Restriction of the Use ...of order. Türkiye EEE Yönetmeli ğ ine Uygunluk Beyan ı Bu Lenovo ürünü, T.C. Çevre ve Orman Bakanl ığı 'nın "Elektrik ve Elektronik E ş yalarda Baz ı ...
...be compliant. Products marketed before the implementation date and expects its suppliers to be ready to support Lenovo's requirements and schedule in the EU. Turkish statement of compliance The Lenovo product meets the requirements of the Republic of Turkey Directive on the Restriction of the Use ...of order. Türkiye EEE Yönetmeli ğ ine Uygunluk Beyan ı Bu Lenovo ürünü, T.C. Çevre ve Orman Bakanl ığı 'nın "Elektrik ve Elektronik E ş yalarda Baz ı ...
Hardware Maintenance Manual
Page 35
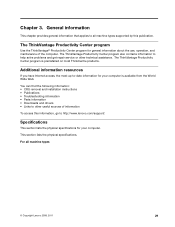
... on most up-to all machine types © Copyright Lenovo 2008, 2011 29 Additional information resources If you have Internet access, the most ThinkCentre products. For all machine types supported by this information, go to help solve problems and get...repair service or other useful sources of the computer. Chapter 3. The ThinkVantage Productivity Center program also contains information to http://www.lenovo.com/support/. You can find the following information: • CRU removal and installation instructions • Publications • Troubleshooting information •...
... on most up-to all machine types © Copyright Lenovo 2008, 2011 29 Additional information resources If you have Internet access, the most ThinkCentre products. For all machine types supported by this information, go to help solve problems and get...repair service or other useful sources of the computer. Chapter 3. The ThinkVantage Productivity Center program also contains information to http://www.lenovo.com/support/. You can find the following information: • CRU removal and installation instructions • Publications • Troubleshooting information •...

Hardware Maintenance Manual
Page 39
... position. 4. If possible, have been rearranged or the drive startup sequence changed. Is the failure repeatable? © Copyright Lenovo 2008, 2011 33 For an explanation of the problem: 1. Use the following procedure to help determine the cause of these ...combinations that software package. Do diagnostics indicate a failure? - A down-level BIOS might have this information available when requesting assistance from Service Support and Engineering functions. • Machine type and model • Processor or hard disk upgrades • Failure symptom - Run the Diagnostic...
... position. 4. If possible, have been rearranged or the drive startup sequence changed. Is the failure repeatable? © Copyright Lenovo 2008, 2011 33 For an explanation of the problem: 1. Use the following procedure to help determine the cause of these ...combinations that software package. Do diagnostics indicate a failure? - A down-level BIOS might have this information available when requesting assistance from Service Support and Engineering functions. • Machine type and model • Processor or hard disk upgrades • Failure symptom - Run the Diagnostic...

Hardware Maintenance Manual
Page 41
...are unable to view symptoms and solutions for Windows PE if you diagnose the computer problem. Running diagnostics from http://www.lenovo.com/support/. 2. When you turn off the computer. 2. Press the F1 key for Windows PE diagnostic program from the Rescue ... repair the problem yourself after Lenovo System Toolbox runs successfully, run the Lenovo System Toolbox, click Start ® All Programs ® Lenovo Services ® Lenovo System Toolbox. The diagnostic program opens automatically. If you speak to a Lenovo technical support representative. The Rescue and Recovery...
...are unable to view symptoms and solutions for Windows PE if you diagnose the computer problem. Running diagnostics from http://www.lenovo.com/support/. 2. When you turn off the computer. 2. Press the F1 key for Windows PE diagnostic program from the Rescue ... repair the problem yourself after Lenovo System Toolbox runs successfully, run the Lenovo System Toolbox, click Start ® All Programs ® Lenovo Services ® Lenovo System Toolbox. The diagnostic program opens automatically. If you speak to a Lenovo technical support representative. The Rescue and Recovery...

Hardware Maintenance Manual
Page 42
...press Ctrl-Enter to remove the disc from the drive. 6. This automatically runs a pre-defined group of the diagnostic program from http://www.lenovo.com/support After you download the image, you create. Press Esc at any CD/DVD burning software. Running tests There are unable to run all selected... operating system. PC-Doctor for DOS You can also download the latest version of the PC-Doctor for DOS diagnostic program from: http://www.lenovo.com/support The PC-Doctor for instructions on how to change the startup device. 4. Use PC-Doctor for DOS, if you created, do the following...
...press Ctrl-Enter to remove the disc from the drive. 6. This automatically runs a pre-defined group of the diagnostic program from http://www.lenovo.com/support After you download the image, you create. Press Esc at any CD/DVD burning software. Running tests There are unable to run all selected... operating system. PC-Doctor for DOS You can also download the latest version of the PC-Doctor for DOS diagnostic program from: http://www.lenovo.com/support The PC-Doctor for instructions on how to change the startup device. 4. Use PC-Doctor for DOS, if you created, do the following...

Hardware Maintenance Manual
Page 47
Selecting a temporary startup device Use this method, repeatedly press and release the F12 key rather than Windows Vista or Windows XP, your operating system supports HyperThreading. Start the Setup Utility program. This feature works only with HyperThreading-aware operating systems, such as expected, use one of the screen. 4. Exiting from ...
Selecting a temporary startup device Use this method, repeatedly press and release the F12 key rather than Windows Vista or Windows XP, your operating system supports HyperThreading. Start the Setup Utility program. This feature works only with HyperThreading-aware operating systems, such as expected, use one of the screen. 4. Exiting from ...
Hardware Maintenance Manual
Page 77
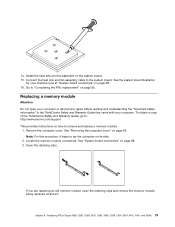
... position on the left side. 4. To reinstall the bezel, align the plastic tabs on page 95. To complete the installation, go to: http://www.lenovo.com/support This section provides instructions on how to "Completing the FRU replacement" on the right side of the ThinkCentre Safety and Warranty Guide, go to replace...
... position on the left side. 4. To reinstall the bezel, align the plastic tabs on page 95. To complete the installation, go to: http://www.lenovo.com/support This section provides instructions on how to "Completing the FRU replacement" on the right side of the ThinkCentre Safety and Warranty Guide, go to replace...
Hardware Maintenance Manual
Page 79
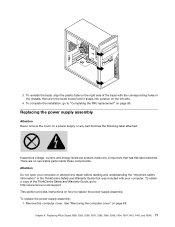
... the system board and disconnect all cable connections on page 82. 5. Release the lever securing the microprocessor retainer and open the retainer to : http://www.lenovo.com/support Note: When replacing the system board a new retention module for your machine type at "System board connectors" on the sides and lift it is...
... the system board and disconnect all cable connections on page 82. 5. Release the lever securing the microprocessor retainer and open the retainer to : http://www.lenovo.com/support Note: When replacing the system board a new retention module for your machine type at "System board connectors" on the sides and lift it is...

Hardware Maintenance Manual
Page 80
... any additional instructions included with those in the new system board. To obtain a copy of the ThinkCentre Safety and Warranty Guide, go to: http://www.lenovo.com/support This section provides instructions on page 68. 16. Make sure the lever is securely locked into position. 17. f. Turn off the computer and wait...
... any additional instructions included with those in the new system board. To obtain a copy of the ThinkCentre Safety and Warranty Guide, go to: http://www.lenovo.com/support This section provides instructions on page 68. 16. Make sure the lever is securely locked into position. 17. f. Turn off the computer and wait...

Hardware Maintenance Manual
Page 82
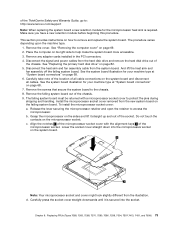
... Do not open the retainer 1 . 76 ThinkCentre Hardware Maintenance Manual Remove the four screws 1 securing the heat sink and fan assembly to : http://www.lenovo.com/support This section provides information on page 69. 2. The procedure varies depending upon the machine type. 1. Place the computer on its right side to remove and...
... Do not open the retainer 1 . 76 ThinkCentre Hardware Maintenance Manual Remove the four screws 1 securing the heat sink and fan assembly to : http://www.lenovo.com/support This section provides information on page 69. 2. The procedure varies depending upon the machine type. 1. Place the computer on its right side to remove and...
Hardware Maintenance Manual
Page 85
... and fan assembly cable to lay the computer on page 95. To obtain a copy of the ThinkCentre Safety and Warranty Guide, go to: http://www.lenovo.com/support This provides instructions on how to "Completing the FRU replacement" on its side. 2. Chapter 8. Replacing FRUs (Types 7258, 7260, 7268, 7270, 7280, 7296, 7298...
... and fan assembly cable to lay the computer on page 95. To obtain a copy of the ThinkCentre Safety and Warranty Guide, go to: http://www.lenovo.com/support This provides instructions on how to "Completing the FRU replacement" on its side. 2. Chapter 8. Replacing FRUs (Types 7258, 7260, 7268, 7270, 7280, 7296, 7298...

Hardware Maintenance Manual
Page 86
..." on page 69. 2. To install or replace an adapter card: 1. At the rear of the ThinkCentre Safety and Warranty Guide, go to: http://www.lenovo.com/support This section provides instructions on how to "Completing the FRU replacement" on page 95. Go to install or replace an adapter card. If you are...
..." on page 69. 2. To install or replace an adapter card: 1. At the rear of the ThinkCentre Safety and Warranty Guide, go to: http://www.lenovo.com/support This section provides instructions on how to "Completing the FRU replacement" on page 95. Go to install or replace an adapter card. If you are...
Hardware Maintenance Manual
Page 88
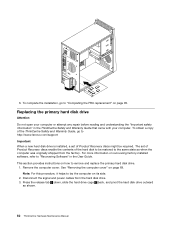
... cover. See "Removing the computer cover" on how to "Completing the FRU replacement" on page 95. To complete the installation, go to http://www.lenovo.com/support Important When a new hard disk drive is installed, a set of Product Recovery discs enable the contents of the hard disk to be required. Press the...
... cover. See "Removing the computer cover" on how to "Completing the FRU replacement" on page 95. To complete the installation, go to http://www.lenovo.com/support Important When a new hard disk drive is installed, a set of Product Recovery discs enable the contents of the hard disk to be required. Press the...
Hardware Maintenance Manual
Page 91
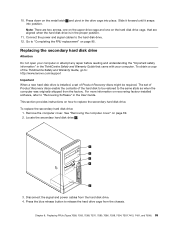
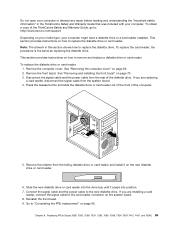
... to release the hard drive cage from the hard disk drive. 4. To obtain a copy of Product Recovery discs might be restored to : http://www.lenovo.com/support Important When a new hard disk drive is in the User Guide. Press the blue release button to the hard disk drive. 12. See "Removing the...
... to release the hard drive cage from the hard disk drive. 4. To obtain a copy of Product Recovery discs might be restored to : http://www.lenovo.com/support Important When a new hard disk drive is in the User Guide. Press the blue release button to the hard disk drive. 12. See "Removing the...

Hardware Maintenance Manual
Page 94
... Maintenance Manual Press the release button and remove the optical drive out the front of the ThinkCentre Safety and Warranty Guide, go to: http://www.lenovo.com/support This section provides instructions on how to "Completing the FRU replacement" on page 69. 2. Replacing an optical drive Attention Do not open your computer...
... Maintenance Manual Press the release button and remove the optical drive out the front of the ThinkCentre Safety and Warranty Guide, go to: http://www.lenovo.com/support This section provides instructions on how to "Completing the FRU replacement" on page 69. 2. Replacing an optical drive Attention Do not open your computer...
Hardware Maintenance Manual
Page 95
... card reader. See "Removing the computer cover" on the system board. 8. If you are installing a card reader, connect the signal cable to : http://www.lenovo.com/support Depending on page 70. 3. Chapter 8. To replace the card reader, the procedure is the same as replacing the diskette drive. This section provides instructions on...
... card reader. See "Removing the computer cover" on the system board. 8. If you are installing a card reader, connect the signal cable to : http://www.lenovo.com/support Depending on page 70. 3. Chapter 8. To replace the card reader, the procedure is the same as replacing the diskette drive. This section provides instructions on...

Hardware Maintenance Manual
Page 96
... installing the front bezel" on page 69. 2. Remove the front fan assembly out of the ThinkCentre Safety and Warranty Guide, go to: http://www.lenovo.com/support This section provides instructions on how to the chassis by breaking them or cutting them with your computer. Remove the front bezel. Disconnect the front...
... installing the front bezel" on page 69. 2. Remove the front fan assembly out of the ThinkCentre Safety and Warranty Guide, go to: http://www.lenovo.com/support This section provides instructions on how to the chassis by breaking them or cutting them with your computer. Remove the front bezel. Disconnect the front...
Hardware Maintenance Manual
Page 97
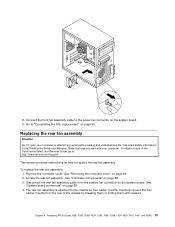
... scissors. To obtain a copy of the chassis by four rubber mounts. Remove the computer cover. The rear fan assembly is attached to : http://www.lenovo.com/support This section provides instructions on the system board. 9. Chapter 8. Connect the front fan assembly cable to the power fan connector on how to "Completing the...
... scissors. To obtain a copy of the chassis by four rubber mounts. Remove the computer cover. The rear fan assembly is attached to : http://www.lenovo.com/support This section provides instructions on the system board. 9. Chapter 8. Connect the front fan assembly cable to the power fan connector on how to "Completing the...


