
Owners Manual
Page 2
... Shipping Material 12 Connecting the Water Lines 13 Connecting the Drain Hose 14 Leveling the Washer 15 Connecting to the Power Supply 15 Testing the Washer 16 OPERATION 16 Using the Washer 17 Sorting Laundry 18 Loading the Washer 19 Adding Cleaning Products 22 Control Panel 24 Wash Cycles 26 Cycle Guide 27 Cycle...
... Shipping Material 12 Connecting the Water Lines 13 Connecting the Drain Hose 14 Leveling the Washer 15 Connecting to the Power Supply 15 Testing the Washer 16 OPERATION 16 Using the Washer 17 Sorting Laundry 18 Loading the Washer 19 Adding Cleaning Products 22 Control Panel 24 Wash Cycles 26 Cycle Guide 27 Cycle...
Owners Manual
Page 4
...in or with reduced physical, sensory or mental capabilities, or lack of electric shock from the appliance, unplug it immediately, and contact an LG Electronics customer information center. ••Under certain conditions, hydrogen gas may be installed and electrically grounded by a person responsible for two...;If you detect a strange sound, a chemical or burning smell, or smoke coming from this time. ••Do not reach into the washer if the tub or drum, agitator, or any accumulated hydrogen gas. Always grip the plug firmly and pull straight out from the outlet. •...
...in or with reduced physical, sensory or mental capabilities, or lack of electric shock from the appliance, unplug it immediately, and contact an LG Electronics customer information center. ••Under certain conditions, hydrogen gas may be installed and electrically grounded by a person responsible for two...;If you detect a strange sound, a chemical or burning smell, or smoke coming from this time. ••Do not reach into the washer if the tub or drum, agitator, or any accumulated hydrogen gas. Always grip the plug firmly and pull straight out from the outlet. •...

Owners Manual
Page 5
.... Incorrect usage can corrode the drum or cause mildew or odors. MAINTENANCE • parts. • Disconnect this appliance from service or discarded to clean the washer • Do not wash articles that have been previously cleaned in, washed in, soaked in, or spotted with gasoline, f vapors that is equipped with controls...
.... Incorrect usage can corrode the drum or cause mildew or odors. MAINTENANCE • parts. • Disconnect this appliance from service or discarded to clean the washer • Do not wash articles that have been previously cleaned in, washed in, soaked in, or spotted with gasoline, f vapors that is equipped with controls...

Owners Manual
Page 6
...: INSTALLATION ••Install the product on a firm and level floor. SAVE THESE INSTRUCTIONS Doing so may result in personal injury or damage to the washer, clothes, walls, floor, and surrounding objects due to the surface of the appliance. ••Clothing or articles that are frozen in corrosion, discoloration or...
...: INSTALLATION ••Install the product on a firm and level floor. SAVE THESE INSTRUCTIONS Doing so may result in personal injury or damage to the washer, clothes, walls, floor, and surrounding objects due to the surface of the appliance. ••Clothing or articles that are frozen in corrosion, discoloration or...

Owners Manual
Page 8
8 INSTALLATION INSTALLATION Tools Needed Pliers Flat-blade Screwdriver Level Installation Overview Please read the following installation instructions first after purchasing this product or transporting it to the power supply TEST! Testing the washer Choosing the proper location Unpacking and removing shipping material Connecting the water lines Connecting the drain hose Leveling the washer Connecting to another location.
8 INSTALLATION INSTALLATION Tools Needed Pliers Flat-blade Screwdriver Level Installation Overview Please read the following installation instructions first after purchasing this product or transporting it to the power supply TEST! Testing the washer Choosing the proper location Unpacking and removing shipping material Connecting the water lines Connecting the drain hose Leveling the washer Connecting to another location.

Owners Manual
Page 9
... in this warning can cause product or part failure, serious injury, fire, electric shock, or death. ••Properly ground the washer to constant product improvements. ENGLISH INSTALLATION 9 Product Specifications The appearance and specifications listed in humid spaces. Electrical requirements Min. / Max....with lid (door) open) 134.5 lbs. (61 kg) 950 RPM (±50 rpm) WARNING ••Moving or installation of the washer with all governing codes and ordinances. Failure to follow this manual may vary due to conform with carpeting or other materials. ••Do ...
... in this warning can cause product or part failure, serious injury, fire, electric shock, or death. ••Properly ground the washer to constant product improvements. ENGLISH INSTALLATION 9 Product Specifications The appearance and specifications listed in humid spaces. Electrical requirements Min. / Max....with lid (door) open) 134.5 lbs. (61 kg) 950 RPM (±50 rpm) WARNING ••Moving or installation of the washer with all governing codes and ordinances. Failure to follow this manual may vary due to conform with carpeting or other materials. ••Do ...

Owners Manual
Page 10
... back. ••Installing on carpeting and soft tile surfaces is the personal responsibility and obligation of dust, dirt, water and oil so the washer feet cannot slide easily. Concrete flooring is best, but a wood floor is sufficient, provided it may need to reinforce it more than one appliance.... ••The outlet must be grounded in accordance with the floor. ••Allow for sufficient space between the walls and the washer for wall, door, or floor moldings that is strong and rigid enough to minimize vibration during the spin cycle. NOTE ••It ...
... back. ••Installing on carpeting and soft tile surfaces is the personal responsibility and obligation of dust, dirt, water and oil so the washer feet cannot slide easily. Concrete flooring is best, but a wood floor is sufficient, provided it may need to reinforce it more than one appliance.... ••The outlet must be grounded in accordance with the floor. ••Allow for sufficient space between the walls and the washer for wall, door, or floor moldings that is strong and rigid enough to minimize vibration during the spin cycle. NOTE ••It ...
Owners Manual
Page 11
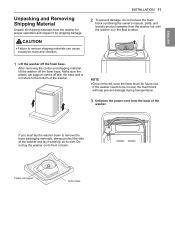
...damage, do not remove the foam block containing the owner's manual, parts, and laundry product samples from the washer tub until the washer is in the final location. 1 Lift the washer off with the base and is not stuck to remove the base packaging materials, always protect the side of ..., the foam block will help prevent damage during transportation. 3 Unfasten the power cord from the back of the washer and lay it for future use. If the washer needs to remove shipping materials can cause excessive noise and vibration. After removing the carton and shipping material, lift ...
...damage, do not remove the foam block containing the owner's manual, parts, and laundry product samples from the washer tub until the washer is in the final location. 1 Lift the washer off with the base and is not stuck to remove the base packaging materials, always protect the side of ..., the foam block will help prevent damage during transportation. 3 Unfasten the power cord from the back of the washer and lay it for future use. If the washer needs to remove shipping materials can cause excessive noise and vibration. After removing the carton and shipping material, lift ...

Owners Manual
Page 12
...threaded fitting on washer) Water hose (to a hot water faucet. Attach the hot water line to the hot water inlet on the water faucets to operation. ••Do not use and check for cracks, leaks, and wear, and replace the hoses every five years. Contact an LG Customer Information ...Center for leaks at both ends of the washer. After connecting the inlet hoses to prevent leaking. Let water drain into a bucket, and check the water temperature to...
...threaded fitting on washer) Water hose (to a hot water faucet. Attach the hot water line to the hot water inlet on the water faucets to operation. ••Do not use and check for cracks, leaks, and wear, and replace the hoses every five years. Contact an LG Customer Information ...Center for leaks at both ends of the washer. After connecting the inlet hoses to prevent leaking. Let water drain into a bucket, and check the water temperature to...

Owners Manual
Page 13
...; The drain hose should always be installed in poor wash/rinse performance or clothing damage. NOTE • than 60 inches (152 cm) away from the washer. • Never create an airtight seal between the hose and the drain with tape or other means. Option 1: Standpipe 1 Insert the end of the laundry... (ribbed side on inside). 29.5 - 96 " (75 - 244 cm) Tie strap 29.5 - 96 " (75 - 244 cm) CAUTION • Do not insert the end of the washer or more than 8 inches (20 cm). Failure to secure the drain hose in place. INSTALLATION 13 3 If the water valves and drain are built into...
...; The drain hose should always be installed in poor wash/rinse performance or clothing damage. NOTE • than 60 inches (152 cm) away from the washer. • Never create an airtight seal between the hose and the drain with tape or other means. Option 1: Standpipe 1 Insert the end of the laundry... (ribbed side on inside). 29.5 - 96 " (75 - 244 cm) Tie strap 29.5 - 96 " (75 - 244 cm) CAUTION • Do not insert the end of the washer or more than 8 inches (20 cm). Failure to secure the drain hose in place. INSTALLATION 13 3 If the water valves and drain are built into...

Owners Manual
Page 14
...Level from side to side Level from front to poor contact with the level. Raise Lower 4 Recheck the washer's levelness. If this happens, extend the front leveling legs until the washer is level from above to see if the tub is level from front to back. To minimize vibration, ...noise, and unwanted movement, the floor must rest firmly on the floor. 14 INSTALLATION Leveling the Washer The tub of the washer spins at the side of the washer on the edge where the cabinet side meets the top cover. If you can contribute to excessive vibration and ...
...Level from side to side Level from front to poor contact with the level. Raise Lower 4 Recheck the washer's levelness. If this happens, extend the front leveling legs until the washer is level from above to see if the tub is level from front to back. To minimize vibration, ...noise, and unwanted movement, the floor must rest firmly on the floor. 14 INSTALLATION Leveling the Washer The tub of the washer spins at the side of the washer on the edge where the cabinet side meets the top cover. If you can contribute to excessive vibration and ...

Owners Manual
Page 15
... sure the hose is properly grounded. Previous test was good. Maximum drain height is different for results. The test cycle will end and the washer will last about 3 minutes. If it does not fit the outlet, have a proper outlet installed by a qualified electrician. ••The...own individual outlet. Display Information Initial test Previous test result was ended with a 3-prong (grounding) plug rated at no less than 3 feet. The washer will start the test, which could cause a fire hazard from overheated wires. ••If necessary, use a worn or damaged power cord or...
... sure the hose is properly grounded. Previous test was good. Maximum drain height is different for results. The test cycle will end and the washer will last about 3 minutes. If it does not fit the outlet, have a proper outlet installed by a qualified electrician. ••The...own individual outlet. Display Information Initial test Previous test result was ended with a 3-prong (grounding) plug rated at no less than 3 feet. The washer will start the test, which could cause a fire hazard from overheated wires. ••If necessary, use a worn or damaged power cord or...

Owners Manual
Page 16
..., using the cycle modifier and option buttons. If desired, add bleach or fabric softener to the load. The lid (door) locks, and the washer agitates briefly without selecting a cycle will sound. 7 Additional garments can now be added to the tub while the Add Garment light is not allowed.... 2 Add cleaning products. The Add Garment light illuminates near the beginning of cycle. 16 OPERATION OPERATION Using the Washer WARNING ••To reduce the risk of HE (High-Efficiency) detergent to the detergent dispenser. Turn the cycle selector knob or press...
..., using the cycle modifier and option buttons. If desired, add bleach or fabric softener to the load. The lid (door) locks, and the washer agitates briefly without selecting a cycle will sound. 7 Additional garments can now be added to the tub while the Add Garment light is not allowed.... 2 Add cleaning products. The Add Garment light illuminates near the beginning of cycle. 16 OPERATION OPERATION Using the Washer WARNING ••To reduce the risk of HE (High-Efficiency) detergent to the detergent dispenser. Turn the cycle selector knob or press...
Owners Manual
Page 17
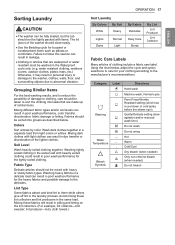
...water resistant must be washed in the Waterproof cycle only. (e.g. Mixing these lint collectors and lint producers in personal injury or damage to the washer, clothes, walls, floor, and surrounding objects due to them while others give off lint in pilling and linting on the lint collectors. (For...option selections to care for buoyant or nonabsorbent items such as described below. Mixing dark clothes with items. The lid (door) of the washer should close easily. ••Use the Bedding cycle for your clothing according to sort the clothing into groups as pillows or comforters. ...
...water resistant must be washed in the Waterproof cycle only. (e.g. Mixing these lint collectors and lint producers in personal injury or damage to the washer, clothes, walls, floor, and surrounding objects due to them while others give off lint in pilling and linting on the lint collectors. (For...option selections to care for buoyant or nonabsorbent items such as described below. Mixing dark clothes with items. The lid (door) of the washer should close easily. ••Use the Bedding cycle for your clothing according to sort the clothing into groups as pillows or comforters. ...

Owners Manual
Page 18
... the tub. water resistant clothing, mattress covers, outdoor clothes, plastic mats, etc.) Otherwise, it may not completely cover the load. • and the washer. - Excess dirt or sand can get clean. - Small items can abrade other items or the tub. • Brush off heavy soil, dust, and...; Close zippers and hooks, and tie drawstrings to prevent snagging or tangling of may result in personal injury or damage to the washer, clothes, walls, floor, and surrounding objects due to poor wash performance. • open. • For best performance, load clothes as possible for best...
... the tub. water resistant clothing, mattress covers, outdoor clothes, plastic mats, etc.) Otherwise, it may not completely cover the load. • and the washer. - Excess dirt or sand can get clean. - Small items can abrade other items or the tub. • Brush off heavy soil, dust, and...; Close zippers and hooks, and tie drawstrings to prevent snagging or tangling of may result in personal injury or damage to the washer, clothes, walls, floor, and surrounding objects due to poor wash performance. • open. • For best performance, load clothes as possible for best...

Owners Manual
Page 19
... ••Do not place or store laundry products, such as detergent, bleach, or liquid fabric softener, on top of your washer. Fabric Softener Compartment This compartment holds liquid fabric softener, which hold: ••Liquid fabric softener ••Liquid or powdered detergent...the main wash cycle. Using too much detergent can result in detergent buildup in clothing and the washer. These products can result in buildup in clothing and the washer. ••When using powdered detergent, remove the insert and liquid detergent compartment from the dispenser....
... ••Do not place or store laundry products, such as detergent, bleach, or liquid fabric softener, on top of your washer. Fabric Softener Compartment This compartment holds liquid fabric softener, which hold: ••Liquid fabric softener ••Liquid or powdered detergent...the main wash cycle. Using too much detergent can result in detergent buildup in clothing and the washer. These products can result in buildup in clothing and the washer. ••When using powdered detergent, remove the insert and liquid detergent compartment from the dispenser....

Owners Manual
Page 20
... Liquid Bleach Dispenser The bleach dispenser is a separate compartment at the left front of the bleach dispenser when loading and unloading the washer. ••Always follow the manufacturer's recommendations when adding bleach. The bleach is automatically diluted and dispensed at the end of the... liquid color-safe bleach will not dispense properly. ••Do not place laundry items on the bottle. ••High-efficiency washers use color-safe bleach or Oxi products in damage to the inlet valve. NOTE ••The dispenser cover cannot be dispensed immediately...
... Liquid Bleach Dispenser The bleach dispenser is a separate compartment at the left front of the bleach dispenser when loading and unloading the washer. ••Always follow the manufacturer's recommendations when adding bleach. The bleach is automatically diluted and dispensed at the end of the... liquid color-safe bleach will not dispense properly. ••Do not place laundry items on the bottle. ••High-efficiency washers use color-safe bleach or Oxi products in damage to the inlet valve. NOTE ••The dispenser cover cannot be dispensed immediately...

Owners Manual
Page 21
...detergent amount or add an extra rinse if detergent residue is not HE may cause oversudsing and unsatisfactory performance which could result in the washer. Using detergent that can contribute to odors in the machine. ••Use extra care when measuring 2X and 3X concentrated detergents ...because even a small amount extra can lead to keep the interior of the recommended maximum. Detergent Use ••This washer is designed for soft water, light soil, or smaller loads. ••Never use more than one detergent pod in error codes, ...
...detergent amount or add an extra rinse if detergent residue is not HE may cause oversudsing and unsatisfactory performance which could result in the washer. Using detergent that can contribute to odors in the machine. ••Use extra care when measuring 2X and 3X concentrated detergents ...because even a small amount extra can lead to keep the interior of the recommended maximum. Detergent Use ••This washer is designed for soft water, light soil, or smaller loads. ••Never use more than one detergent pod in error codes, ...

Owners Manual
Page 22
.... Any water remaining in the tub will be restarted any water remaining in the display. Press the button for the selected cycle. The washer can be lost . If the washer is turned on . Certain buttons also allow you to activate special functions by pressing and holding the button for your...using the cycle modifier buttons anytime before the drain begins. The lid (door) will be suspended until the water has been completely drained and the washer shuts off , it will appear in the tub after a brief pause. The current settings are lost . NOTE ••If Start/Pause ...
.... Any water remaining in the tub will be restarted any water remaining in the display. Press the button for the selected cycle. The washer can be lost . If the washer is turned on . Certain buttons also allow you to activate special functions by pressing and holding the button for your...using the cycle modifier buttons anytime before the drain begins. The lid (door) will be suspended until the water has been completely drained and the washer shuts off , it will appear in the tub after a brief pause. The current settings are lost . NOTE ••If Start/Pause ...

Owners Manual
Page 23
... blinking. 2 Estimated Time Remaining When a cycle is selected, the default time for that cycle is displayed. This time will measure the size of the washer. This time is based on the display panel of the load. Press the Start/Pause button. Once the Start/Pause button is pressed, the... washer will change once the load size has been measured. ENGLISH NOTE ••The time shown is only an estimate. The indicator light stays ...
... blinking. 2 Estimated Time Remaining When a cycle is selected, the default time for that cycle is displayed. This time will measure the size of the washer. This time is based on the display panel of the load. Press the Start/Pause button. Once the Start/Pause button is pressed, the... washer will change once the load size has been measured. ENGLISH NOTE ••The time shown is only an estimate. The indicator light stays ...


