Owners Manual
Page 2
... Needed 8 Installation Overview 9 Product Specifications 10 Choosing the Proper Location 11 Unpacking and Removing Shipping Material 12 Connecting the Water Lines 13 Connecting the Drain Hose 14 Leveling the Washer 15 Connecting to the Power Supply 15 Testing the Washer 16 OPERATION 16 Using the Washer 17 Sorting Laundry 18 Loading the Washer 19 Adding Cleaning Products 22 Control Panel 24 Wash Cycles 26 Cycle Guide 27 Cycle Modifier Buttons 28 Option Buttons 30 SMART FUNCTIONS 30 Smart Diagnosis™ Function 31 MAINTENANCE...
... Needed 8 Installation Overview 9 Product Specifications 10 Choosing the Proper Location 11 Unpacking and Removing Shipping Material 12 Connecting the Water Lines 13 Connecting the Drain Hose 14 Leveling the Washer 15 Connecting to the Power Supply 15 Testing the Washer 16 OPERATION 16 Using the Washer 17 Sorting Laundry 18 Loading the Washer 19 Adding Cleaning Products 22 Control Panel 24 Wash Cycles 26 Cycle Guide 27 Cycle Modifier Buttons 28 Option Buttons 30 SMART FUNCTIONS 30 Smart Diagnosis™ Function 31 MAINTENANCE...
Owners Manual
Page 4
... appliance controls with rugs, bedspreads, or plastic sheets can be installed and electrically grounded by a person responsible for use an open flame during this time. ••Do not reach into the washer if the tub or drum, agitator, or any interior parts are moving the appliance, be careful not to pinch, crush, or damage the power cord. ••Connect to a properly rated, protected, and sized power...
... appliance controls with rugs, bedspreads, or plastic sheets can be installed and electrically grounded by a person responsible for use an open flame during this time. ••Do not reach into the washer if the tub or drum, agitator, or any interior parts are moving the appliance, be careful not to pinch, crush, or damage the power cord. ••Connect to a properly rated, protected, and sized power...

Owners Manual
Page 5
..., washed in, soaked in the drum for electric current. In the event of a malfunction or breakdown, grounding will reduce the risk of electric shock by yourself. • Remove the lid (door) before cleaning and attempting any other liquids to the OFF position does not disconnect this or any user maintenance. MAINTENANCE • parts. • Disconnect this appliance from the power plug pins. • Do not disassemble...
..., washed in, soaked in the drum for electric current. In the event of a malfunction or breakdown, grounding will reduce the risk of electric shock by yourself. • Remove the lid (door) before cleaning and attempting any other liquids to the OFF position does not disconnect this or any user maintenance. MAINTENANCE • parts. • Disconnect this appliance from the power plug pins. • Do not disassemble...

Owners Manual
Page 7
ENGLISH PRODUCT OVERVIEW Parts PRODUCT OVERVIEW 7 9 1 Detergent Dispenser 2 Liquid Bleach Compartment 3 Tub 4 Lid (Door) Accessories Included Accessories 5 Control Panel 6 Leveling Feet 7 Water Inlets 8 Power Cord 9 Drain Hose Tie Strap Required Accessories Hot and Cold Water Hoses NOTE ••The images in this guide may be different from the actual components and accessories, which are subject to change by the manufacturer without prior notice for product improvement purposes. ••For your safety and for product malfunction or accidents...
ENGLISH PRODUCT OVERVIEW Parts PRODUCT OVERVIEW 7 9 1 Detergent Dispenser 2 Liquid Bleach Compartment 3 Tub 4 Lid (Door) Accessories Included Accessories 5 Control Panel 6 Leveling Feet 7 Water Inlets 8 Power Cord 9 Drain Hose Tie Strap Required Accessories Hot and Cold Water Hoses NOTE ••The images in this guide may be different from the actual components and accessories, which are subject to change by the manufacturer without prior notice for product improvement purposes. ••For your safety and for product malfunction or accidents...

Owners Manual
Page 9
... outdoor weather conditions. water pressure Dimensions Net weight Max spin speed 120 VAC @ 60 Hz 20 - 120 psi (138 - 827 kPa) 27" (W) X 28 3/8" (D) X 44 1/2" (H), 57 1/4" (H with lid (door) open) 68.6 cm (W) X 72.1 cm (D) X 113 cm (H), 145.3 cm (H with all governing codes and ordinances. Service personnel-do not contact the following parts while the appliance is energized. : pump, motor, noise filter cover, and heater...
... outdoor weather conditions. water pressure Dimensions Net weight Max spin speed 120 VAC @ 60 Hz 20 - 120 psi (138 - 827 kPa) 27" (W) X 28 3/8" (D) X 44 1/2" (H), 57 1/4" (H with lid (door) open) 68.6 cm (W) X 72.1 cm (D) X 113 cm (H), 145.3 cm (H with all governing codes and ordinances. Service personnel-do not contact the following parts while the appliance is energized. : pump, motor, noise filter cover, and heater...

Owners Manual
Page 12
... hot water temperature should be set at 120 - 135 °F (48 - 57 °C) and the cold at 60 °F (15 °C). ••The washer should never be between 20 psi and 120 psi (138 - 827 kPa). Use only new hoses when installing the washer. Turn ON both faucets all the way and check for cracks, leaks, and wear, and replace the hoses every five years...
... hot water temperature should be set at 120 - 135 °F (48 - 57 °C) and the cold at 60 °F (15 °C). ••The washer should never be between 20 psi and 120 psi (138 - 827 kPa). Use only new hoses when installing the washer. Turn ON both faucets all the way and check for cracks, leaks, and wear, and replace the hoses every five years...

Owners Manual
Page 16
... the Start/Pause button without water to the detergent dispenser. Press the Start/Pause button to begin the cycle. Open the lid (door) and load items into the washer. 4 Select a cycle. If desired, add bleach or fabric softener to turn on . When the cycle is not allowed. 2 Add cleaning products. A different chime sounds and the LED does not light up if the selection is finished, a melody sounds. Sort laundry by fabric type, soil level, color and load size, as needed. Press the Power button to...
... the Start/Pause button without water to the detergent dispenser. Press the Start/Pause button to begin the cycle. Open the lid (door) and load items into the washer. 4 Select a cycle. If desired, add bleach or fabric softener to turn on . When the cycle is not allowed. 2 Add cleaning products. A different chime sounds and the LED does not light up if the selection is finished, a melody sounds. Sort laundry by fabric type, soil level, color and load size, as needed. Press the Power button to...
Owners Manual
Page 17
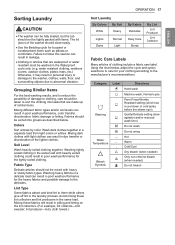
... clothes. Category Washing Water Temperature Bleach Symbols Label Directions Hand wash Machine wash, Normal cycle Perm Press/Wrinkle Resistant setting (which has a cool down or cold spray before the slower spin) Gentle/Delicate setting (slow agitation and/or reduced wash time) Do not wash Do not wring Hot Warm Cold/Cool Any bleach (when needed) Only non-chlorine bleach (when needed) Do not bleach ENGLISH Fabric Type Delicate articles should close easily. ••Use the Bedding cycle for the lightly...
... clothes. Category Washing Water Temperature Bleach Symbols Label Directions Hand wash Machine wash, Normal cycle Perm Press/Wrinkle Resistant setting (which has a cool down or cold spray before the slower spin) Gentle/Delicate setting (slow agitation and/or reduced wash time) Do not wash Do not wring Hot Warm Cold/Cool Any bleach (when needed) Only non-chlorine bleach (when needed) Do not bleach ENGLISH Fabric Type Delicate articles should close easily. ••Use the Bedding cycle for the lightly...

Owners Manual
Page 19
... wash powder detergent compartment 3 Close the drawer completely before starting the cycle. ••Be careful not to the automatic dispenser: 1 Open the dispenser drawer. 2 Load the laundry products into the tub. Either powdered or liquid fabric softener may be used . ••Follow the manufacturer's recommendations when adding fabric softener. Do not exceed the maximum fill line. Using too much fabric softener may be used in clothing and the washer. Liquid fabric softener compartment Main wash liquid detergent compartment Insert Main Wash Detergent Compartment...
... wash powder detergent compartment 3 Close the drawer completely before starting the cycle. ••Be careful not to the automatic dispenser: 1 Open the dispenser drawer. 2 Load the laundry products into the tub. Either powdered or liquid fabric softener may be used . ••Follow the manufacturer's recommendations when adding fabric softener. Do not exceed the maximum fill line. Using too much fabric softener may be used in clothing and the washer. Liquid fabric softener compartment Main wash liquid detergent compartment Insert Main Wash Detergent Compartment...

Owners Manual
Page 24
... powerful wash motions. Cycle Normal Heavy Duty Bedding Waterproof Description Note Use this cycle. This cycle is for washing waterproof material. This cycle is used for washing heavily soiled laundry using the default settings. do not fit easily into the tub, there may not be brief periods of load. Fabric type : Cotton, linen, shirts, jeans, mixed loads ••Pressing the Start/Pause button without selecting a cycle will cause the Normal cycle to wash all normal...
... powerful wash motions. Cycle Normal Heavy Duty Bedding Waterproof Description Note Use this cycle. This cycle is for washing waterproof material. This cycle is used for washing heavily soiled laundry using the default settings. do not fit easily into the tub, there may not be brief periods of load. Fabric type : Cotton, linen, shirts, jeans, mixed loads ••Pressing the Start/Pause button without selecting a cycle will cause the Normal cycle to wash all normal...
Owners Manual
Page 31
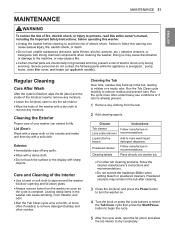
....), abrasive cleaners, or detergents with a dry cloth to avoid the risk of electric shock. Care and Cleaning of the Interior • Use a towel or soft cloth to main wash liquid detergent dispenser. Run the cycle more often if needed, to follow the cleaner manufacturer's instructions and recommendations. • adding bleach or powdered cleaners. Add to wipe around the washer lid (door) opening and lid (door) glass. • Always remove items from the tub. 2 Add cleaning agents. Exterior: •...
....), abrasive cleaners, or detergents with a dry cloth to avoid the risk of electric shock. Care and Cleaning of the Interior • Use a towel or soft cloth to main wash liquid detergent dispenser. Run the cycle more often if needed, to follow the cleaner manufacturer's instructions and recommendations. • adding bleach or powdered cleaners. Add to wipe around the washer lid (door) opening and lid (door) glass. • Always remove items from the tub. 2 Add cleaning agents. Exterior: •...

Owners Manual
Page 34
.... 1 Turn off the washer. Verify the water 5 Press the Power button, then select Spin. 6 Press the Start/Pause button to start the drain pump. 7 Allow the drain pump to run a complete Speed Wash cycle using detergent. • Do not add laundry to thaw them dry. 11 To remove the antifreeze from the washer after thawing. 3 Press and hold the Rinse+Spin button for 3 seconds. 8 Press the Start/Pause button. Check to protect the washer from damage. Make sure the tub...
.... 1 Turn off the washer. Verify the water 5 Press the Power button, then select Spin. 6 Press the Start/Pause button to start the drain pump. 7 Allow the drain pump to run a complete Speed Wash cycle using detergent. • Do not add laundry to thaw them dry. 11 To remove the antifreeze from the washer after thawing. 3 Press and hold the Rinse+Spin button for 3 seconds. 8 Press the Start/Pause button. Check to protect the washer from damage. Make sure the tub...

Owners Manual
Page 35
... at times during the cycle. A liquid in the washer. If the washer senses that the floor is solid and does not flex. Drain pump is unbalanced, it will stop and refill to detect and diagnose problems at an early stage. Solutions ••Normal Operation ••Normal Operation ••Normal Operation ••Normal Operation ••Normal Operation ••Stop washer, check tub and drain filter for foreign objects. The wash load may...
... at times during the cycle. A liquid in the washer. If the washer senses that the floor is solid and does not flex. Drain pump is unbalanced, it will stop and refill to detect and diagnose problems at an early stage. Solutions ••Normal Operation ••Normal Operation ••Normal Operation ••Normal Operation ••Normal Operation ••Stop washer, check tub and drain filter for foreign objects. The wash load may...

Owners Manual
Page 36
... the tub. ••Oversudsing may create leaks, and may be an issue, add an extra rinse. ••Make sure that they are tight and secure. ••HE detergents are not connected correctly. 36 TROUBLESHOOTING Operation Problem Possible Cause Hoses are formulated specifically for High-Efficiency washers and contain sudsreducing agents. High-Efficiency detergent is very soft. A large item such as the drain hose flange. Power cord is...
... the tub. ••Oversudsing may create leaks, and may be an issue, add an extra rinse. ••Make sure that they are tight and secure. ••HE detergents are not connected correctly. 36 TROUBLESHOOTING Operation Problem Possible Cause Hoses are formulated specifically for High-Efficiency washers and contain sudsreducing agents. High-Efficiency detergent is very soft. A large item such as the drain hose flange. Power cord is...

Owners Manual
Page 37
... sure the cycle was set correctly, close the lid (door) and press the Start/Pause button. ••The washer will shut off if the Start/Pause button is normal. Use only HE (High-Efficiency) detergent. Circuit breaker/fuse is normal. You may contribute to make sure that the dispenser drawer is longer than usual. Too much detergent will not come on a dedicated branch circuit. Replace fuses or reset breaker. TROUBLESHOOTING 37 ENGLISH Problem Wash cycle time is...
... sure the cycle was set correctly, close the lid (door) and press the Start/Pause button. ••The washer will shut off if the Start/Pause button is normal. Use only HE (High-Efficiency) detergent. Circuit breaker/fuse is normal. You may contribute to make sure that the dispenser drawer is longer than usual. Too much detergent will not come on a dedicated branch circuit. Replace fuses or reset breaker. TROUBLESHOOTING 37 ENGLISH Problem Wash cycle time is...

Owners Manual
Page 38
... bleach in the washer does not drain or drains slowly. Close the lid (door) and make sure that both hot and cold water faucets are not kinked or clogged. ••This is not properly installed. Water level is not filling Insufficient water supply properly. The fill level is open . Inlet hoses may prevent proper dispensing of bleach Bleach dispenser filled for conventional washers. ••Make sure that nothing is dirty or clogged. Energy efficiency Washer...
... bleach in the washer does not drain or drains slowly. Close the lid (door) and make sure that both hot and cold water faucets are not kinked or clogged. ••This is not properly installed. Water level is not filling Insufficient water supply properly. The fill level is open . Inlet hoses may prevent proper dispensing of bleach Bleach dispenser filled for conventional washers. ••Make sure that nothing is dirty or clogged. Energy efficiency Washer...

Owners Manual
Page 39
... directly to the wash load in the tub. Always measure bleach to prevent overfilling one cup maximum. ••Dispenser drawer closed too quickly causing softener to dispense immediately. ••Always use the dispensers to ensure that laundry produdcts are reversed. These stains may be tightly packed with items. The lid (door) of the washer should close easily. ••Hot water rinse can set wrinkles in accordance with lightly...
... directly to the wash load in the tub. Always measure bleach to prevent overfilling one cup maximum. ••Dispenser drawer closed too quickly causing softener to dispense immediately. ••Always use the dispensers to ensure that laundry produdcts are reversed. These stains may be tightly packed with items. The lid (door) of the washer should close easily. ••Hot water rinse can set wrinkles in accordance with lightly...

Owners Manual
Page 41
... water valve. Solutions ••Close the lid (door) and press Start/Pause button. Problem TROUBLESHOOTING 41 Possible Cause Lid (Door) is displayed, call for service. ••Turn the washer off then on again. After starting a cycle, it is required. ••As a result, the cycle will not operate unless the lid (door) is time to turn or spin. Lid (Door) lock switch error. ••Make sure that nothing is caught under the lid (door), including shipping material or clothing...
... water valve. Solutions ••Close the lid (door) and press Start/Pause button. Problem TROUBLESHOOTING 41 Possible Cause Lid (Door) is displayed, call for service. ••Turn the washer off then on again. After starting a cycle, it is required. ••As a result, the cycle will not operate unless the lid (door) is time to turn or spin. Lid (Door) lock switch error. ••Make sure that nothing is caught under the lid (door), including shipping material or clothing...
Owners Manual
Page 43
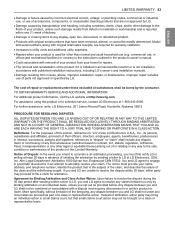
... to "LG" mean LG Electronics U.S.A., Inc., its parents, subsidiaries and affiliates, and each of their officers, directors, employees, agents, beneficiaries, predecessors in the product's owner's manual. ••Costs associated with removal of your product from misuse, abuse, improper installation, repair, or maintenance. The notice must first notify LG in writing at 1-800-243-0000. If you opt out as part of a class...
... to "LG" mean LG Electronics U.S.A., Inc., its parents, subsidiaries and affiliates, and each of their officers, directors, employees, agents, beneficiaries, predecessors in the product's owner's manual. ••Costs associated with removal of your product from misuse, abuse, improper installation, repair, or maintenance. The notice must first notify LG in writing at 1-800-243-0000. If you opt out as part of a class...
Owners Manual
Page 46
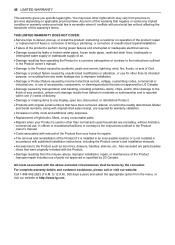
... or missing items to the Product such as door bins, drawers, handles, shelves, etc.. You may have been removed, altered, or cannot be borne by LG Canada. repair or replacement of fuses or correction of wiring or plumbing, or correction of unauthorized repairs/installation. ••Failure of the product to perform during power failures and interrupted or inadequate electrical service. ••Damage caused...
... or missing items to the Product such as door bins, drawers, handles, shelves, etc.. You may have been removed, altered, or cannot be borne by LG Canada. repair or replacement of fuses or correction of wiring or plumbing, or correction of unauthorized repairs/installation. ••Failure of the product to perform during power failures and interrupted or inadequate electrical service. ••Damage caused...


