
Owners Manual
Page 2
...Bolts 13 Connecting the Water Lines 14 Connecting the Drain Hose 15 Leveling the Washer 16 Connecting to the Power Supply 16 Testing the Washer 17 OPERATION 17 Using the Washer 18 Sorting Laundry 19 Loading the Washer 19 Adding Cleaning Products 22 Control Panel 24 Wash Cycles 26 Cycle Guide ...28 Cycle Modifier Buttons 29 Option Buttons 31 SMART FUNCTIONS 31 LG SmartThinQ Application 34 Smart Diagnosis™...
...Bolts 13 Connecting the Water Lines 14 Connecting the Drain Hose 15 Leveling the Washer 16 Connecting to the Power Supply 16 Testing the Washer 17 OPERATION 17 Using the Washer 18 Sorting Laundry 19 Loading the Washer 19 Adding Cleaning Products 22 Control Panel 24 Wash Cycles 26 Cycle Guide ...28 Cycle Modifier Buttons 29 Option Buttons 31 SMART FUNCTIONS 31 LG SmartThinQ Application 34 Smart Diagnosis™...
Owners Manual
Page 5
... complete stop before installing or servicing the appliance. ••The power cord of this time. ••Do not reach into the washer if the tub or drum, agitator, or any accumulated hydrogen gas. This will release any interior parts are moving the appliance, be careful not...replace all power cords that shows cracks or abrasion damage along its intended purpose. ••If the product has been submerged, contact an LG Electronics customer information center for two weeks or more. As the gas is equipped with a 3-prong (grounding) plug which mates with reduced ...
... complete stop before installing or servicing the appliance. ••The power cord of this time. ••Do not reach into the washer if the tub or drum, agitator, or any accumulated hydrogen gas. This will release any interior parts are moving the appliance, be careful not...replace all power cords that shows cracks or abrasion damage along its intended purpose. ••If the product has been submerged, contact an LG Electronics customer information center for two weeks or more. As the gas is equipped with a 3-prong (grounding) plug which mates with reduced ...
Owners Manual
Page 6
... to the OFF position does not disconnect this appliance from the power supply before the appliance is properly grounded. Turning the controls to clean the washer.
... to the OFF position does not disconnect this appliance from the power supply before the appliance is properly grounded. Turning the controls to clean the washer.

Owners Manual
Page 7
... in one load unless specified on the label. ••Do not touch draining water which may result in personal injury or damage to the washer, clothes, walls, floor, and surrounding objects due to the product or property when using the appliance. ••Do not store or spill liquid detergents...
... in one load unless specified on the label. ••Do not touch draining water which may result in personal injury or damage to the washer, clothes, walls, floor, and surrounding objects due to the product or property when using the appliance. ••Do not store or spill liquid detergents...

Owners Manual
Page 8
... notice for product improvement purposes. ••For your safety and for securing drain hose) Hot/cold water hoses (sold separately) NOTE Pedestal or Pedestal washer (sold separately) Stacking Kit (sold separately) ••The images in this guide may be different from the actual components and accessories, which are subject...
... notice for product improvement purposes. ••For your safety and for securing drain hose) Hot/cold water hoses (sold separately) NOTE Pedestal or Pedestal washer (sold separately) Stacking Kit (sold separately) ••The images in this guide may be different from the actual components and accessories, which are subject...

Owners Manual
Page 9
ENGLISH INSTALLATION Tools Needed INSTALLATION 9 Pliers Level Installation Overview Please read the following installation instructions first after purchasing this product or transporting it to the power supply Choosing the proper location Unpacking and removing shipping bolts Connecting the water lines Connecting the drain line TEST! Testing the washer Leveling the washer Connecting to another location.
ENGLISH INSTALLATION Tools Needed INSTALLATION 9 Pliers Level Installation Overview Please read the following installation instructions first after purchasing this product or transporting it to the power supply Choosing the proper location Unpacking and removing shipping bolts Connecting the water lines Connecting the drain line TEST! Testing the washer Leveling the washer Connecting to another location.
Owners Manual
Page 10
... (D with door open) 27"(W) X 30 ¼"(D) X 39"(H), 55" (D with door open) 187.4 lb (85 kg) 1300 RPM WARNING ••Moving or installation of the washer with all governing codes and ordinances. Do not use an adapter or extension cord. Plug into a grounded 3-prong outlet. Do not contact the following parts... appearance and specifications listed in this warning can cause product or part failure, serious injury, fire, electric shock, or death. ••Properly ground the washer to conform with carpeting or other materials. ••Do not remove the ground prong.
... (D with door open) 27"(W) X 30 ¼"(D) X 39"(H), 55" (D with door open) 187.4 lb (85 kg) 1300 RPM WARNING ••Moving or installation of the washer with all governing codes and ordinances. Do not use an adapter or extension cord. Plug into a grounded 3-prong outlet. Do not contact the following parts... appearance and specifications listed in this warning can cause product or part failure, serious injury, fire, electric shock, or death. ••Properly ground the washer to conform with carpeting or other materials. ••Do not remove the ground prong.

Owners Manual
Page 11
... and airflow, allow for installation. Power Outlet ••The power outlet must be within 60 inches (1.5 m) of either side of the washer. ••The appliance and outlet must be positioned so that can move or slide on the floor can block the drawer. ENGLISH Stacked or...instructions packaged with the optional pedestal kit before installing with a pedestal kit. ••Do not use a drip pan with a pedestal or pedestal washer installation as it can contribute to excess vibration and noise due to poor contact with the floor. ••If a drip pan must be ...
... and airflow, allow for installation. Power Outlet ••The power outlet must be within 60 inches (1.5 m) of either side of the washer. ••The appliance and outlet must be positioned so that can move or slide on the floor can block the drawer. ENGLISH Stacked or...instructions packaged with the optional pedestal kit before installing with a pedestal kit. ••Do not use a drip pan with a pedestal or pedestal washer installation as it can contribute to excess vibration and noise due to poor contact with the floor. ••If a drip pan must be ...

Owners Manual
Page 12
.... Retainer Shipping bolt Make sure the plastic tub support comes off the foam base. To prevent damage to internal components, do not transport the washer without reinstalling the shipping bolts. ••Failure to help prevent operation with the bottom two shipping bolts, use . Foam tub support Carton... stuck to remove the base packaging materials, always protect the side of the washer. Do not lay the washer on its front or back. If you must lay the washer down to the bottom of the washer and lay it for shipping damage. NOTE ••Save the bolt assemblies...
.... Retainer Shipping bolt Make sure the plastic tub support comes off the foam base. To prevent damage to internal components, do not transport the washer without reinstalling the shipping bolts. ••Failure to help prevent operation with the bottom two shipping bolts, use . Foam tub support Carton... stuck to remove the base packaging materials, always protect the side of the washer. Do not lay the washer on its front or back. If you must lay the washer down to the bottom of the washer and lay it for shipping damage. NOTE ••Save the bolt assemblies...

Owners Manual
Page 13
...tighten another 2/3 turn on the water faucets to the cold water inlet on the back of the washer. Attach the hot water line to prevent leaking. Contact an LG Customer Information Center for leaks prior to freezing temperatures. NOTE ••Periodically check the hoses for... several hours before use flood-preventing hoses with pliers. If the washer was exposed to freezing temperatures prior to installation,...
...tighten another 2/3 turn on the water faucets to the cold water inlet on the back of the washer. Attach the hot water line to prevent leaking. Contact an LG Customer Information Center for leaks prior to freezing temperatures. NOTE ••Periodically check the hoses for... several hours before use flood-preventing hoses with pliers. If the washer was exposed to freezing temperatures prior to installation,...

Owners Manual
Page 14
... Drain hose 3 Use a tie strap to the inside of the drain hose. Connect the elbow bracket within 4 inches (10 cm) of the end of the washer. 14 INSTALLATION Connecting the Drain Hose Connect the drain hose to the inside of the hose into the elbow bracket. Option 2: Laundry Tub 1 Clip the... end of the washer. If the drain hose is extended more than 4 inches (10 cm) beyond the end of the elbow bracket, mold or microorganisms could spread to secure...
... Drain hose 3 Use a tie strap to the inside of the drain hose. Connect the elbow bracket within 4 inches (10 cm) of the end of the washer. 14 INSTALLATION Connecting the Drain Hose Connect the drain hose to the inside of the hose into the elbow bracket. Option 2: Laundry Tub 1 Clip the... end of the washer. If the drain hose is extended more than 4 inches (10 cm) beyond the end of the elbow bracket, mold or microorganisms could spread to secure...

Owners Manual
Page 15
... can place it may cause abnormal vibration of the non-skid pad on the floor. Raise Lower 3 Tighten the locknuts. If the washer rocks, level the washer again. If you can contribute to excessive vibration and noise due to poor contact with the floor. 1 Position the...If you have a carpenter's level, you extend the leveling feet unnecessarily, it . 2 Adjust the level after placing the washer in the installation area. 3 Place the adhesive side of the washer. If the washer rocks, repeat steps 1-3. Use a dry rag to pinch, strain, or crush the water and drain lines. Lock nut ...
... can place it may cause abnormal vibration of the non-skid pad on the floor. Raise Lower 3 Tighten the locknuts. If the washer rocks, level the washer again. If you can contribute to excessive vibration and noise due to poor contact with the floor. 1 Position the...If you have a carpenter's level, you extend the leveling feet unnecessarily, it . 2 Adjust the level after placing the washer in the installation area. 3 Place the adhesive side of the washer. If the washer rocks, repeat steps 1-3. Use a dry rag to pinch, strain, or crush the water and drain lines. Lock nut ...

Owners Manual
Page 16
...to the rating prior to do so may result in serious injury, fire, electric shock, or death. ••For best performance, plug the washer into a 120-VAC, 60 Hz grounded 3-prong outlet. Take care not to damage it immediately. Check with a 3-prong (grounding) plug rated ... death, fire, electric shock, or malfunction. ••Make sure that the plug is properly installed and run a test cycle. 1 Load the washer with the appliance. This helps prevent overloading house wiring circuits which could cause a fire hazard from overheated wires. ••If necessary, use ....
...to the rating prior to do so may result in serious injury, fire, electric shock, or death. ••For best performance, plug the washer into a 120-VAC, 60 Hz grounded 3-prong outlet. Take care not to damage it immediately. Check with a 3-prong (grounding) plug rated ... death, fire, electric shock, or malfunction. ••Make sure that the plug is properly installed and run a test cycle. 1 Load the washer with the appliance. This helps prevent overloading house wiring circuits which could cause a fire hazard from overheated wires. ••If necessary, use ....

Owners Manual
Page 17
... desired, using detergent pods, place pod in a way that allows it to use less water while still fully saturating your clothing from the washer to see water during the wash cycle. ••If the temperature or the water level inside the machine is pressed. If desired, add... in these circumstances, press Add Garments. If using the cycle modifier and option buttons. ••Not all modifiers and options are available on the washer. To stop a cycle and drain the water completely, turn on all settings will be lost. 7 End of Cycle When the cycle is finished,...
... desired, using detergent pods, place pod in a way that allows it to use less water while still fully saturating your clothing from the washer to see water during the wash cycle. ••If the temperature or the water level inside the machine is pressed. If desired, add... in these circumstances, press Add Garments. If using the cycle modifier and option buttons. ••Not all modifiers and options are available on the washer. To stop a cycle and drain the water completely, turn on all settings will be lost. 7 End of Cycle When the cycle is finished,...
Owners Manual
Page 18
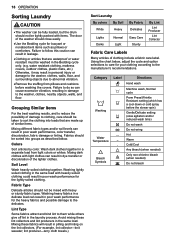
... resistant clothing, mattress covers, outdoor clothes, plastic mats, etc.) Otherwise, it may result in personal injury or damage to the washer, clothes, walls, floor, and surrounding objects due to the manufacturer's recommendations. Washing lightly soiled clothing in the same load with ... not bleach Using the chart below . Lint Type Some fabrics attract and bind lint to follow this caution can result in damage to the washer, clothes, nearby objects, walls, and floor. Mixing dark clothes with light clothes can cause excessive vibration, resulting in leakage. ••...
... resistant clothing, mattress covers, outdoor clothes, plastic mats, etc.) Otherwise, it may result in personal injury or damage to the washer, clothes, walls, floor, and surrounding objects due to the manufacturer's recommendations. Washing lightly soiled clothing in the same load with ... not bleach Using the chart below . Lint Type Some fabrics attract and bind lint to follow this caution can result in damage to the washer, clothes, nearby objects, walls, and floor. Mixing dark clothes with light clothes can cause excessive vibration, resulting in leakage. ••...

Owners Manual
Page 19
... automatic dispenser. 1 Open the detergent dispenser drawer. 2 Load the laundry products into the tub earlier than half of total load. ••The washer can be fully loaded, but the drum should not be tightly packed with other items. ••Do not wash/spin waterproof items. Washing raincoats... small items in the drum before loading the laundry. Do not press down on items while stacking them in the dispenser. ENGLISH Loading the Washer ••Check and empty pockets. Load clothes loosely, and do not overfill the drum. can get tangled or cause an unbalanced load ...
... automatic dispenser. 1 Open the detergent dispenser drawer. 2 Load the laundry products into the tub earlier than half of total load. ••The washer can be fully loaded, but the drum should not be tightly packed with other items. ••Do not wash/spin waterproof items. Washing raincoats... small items in the drum before loading the laundry. Do not press down on items while stacking them in the dispenser. ENGLISH Loading the Washer ••Check and empty pockets. Load clothes loosely, and do not overfill the drum. can get tangled or cause an unbalanced load ...

Owners Manual
Page 20
... or a detergent with high viscosity, it from the compartment. Fabric damage can result in detergent buildup in the dispenser at the end of your washer or dryer. The detergent is water, not bleach. ••Do not add powdered bleach to the main wash compartment with liquid chlorine bleach.... the cycle is added to the load at the proper time during the wash cycle. WARNING ••Do NOT mix chlorine bleach with your washer. 20 OPERATION IMPORTANT: ••Do not place or store laundry products, such as vinegar or rust/scale remover. NOTE ••Never...
... or a detergent with high viscosity, it from the compartment. Fabric damage can result in detergent buildup in the dispenser at the end of your washer or dryer. The detergent is water, not bleach. ••Do not add powdered bleach to the main wash compartment with liquid chlorine bleach.... the cycle is added to the load at the proper time during the wash cycle. WARNING ••Do NOT mix chlorine bleach with your washer. 20 OPERATION IMPORTANT: ••Do not place or store laundry products, such as vinegar or rust/scale remover. NOTE ••Never...

Owners Manual
Page 21
...load, use more than half of the recommended maximum. Do not exceed the manufacturer's recommendations when adding softener. Detergent Use This washer is not HE may stain clothes. ••Dilute concentrated fabric softeners with only HE (HighEfficiency) detergents. Either powdered or ...liquid fabric softener may not provide optimal results. Using too much fabric softener can lead to odors in the washer. Maximum Normal Load Amount Liquid detergent Powdered detergent Detergent Pods Place liquid or powdered detergent pods in the dispenser. ••...
...load, use more than half of the recommended maximum. Do not exceed the manufacturer's recommendations when adding softener. Detergent Use This washer is not HE may stain clothes. ••Dilute concentrated fabric softeners with only HE (HighEfficiency) detergents. Either powdered or ...liquid fabric softener may not provide optimal results. Using too much fabric softener can lead to odors in the washer. Maximum Normal Load Amount Liquid detergent Powdered detergent Detergent Pods Place liquid or powdered detergent pods in the dispenser. ••...

Owners Manual
Page 22
...settings, estimated time remaining, options, and status messages for that cycle and any time before starting the cycle. •• To protect your washer. Pressing the Power button during a cycle will be lost . 4 Cycle Modifier Buttons Use these buttons to select special cycles or additional cycle options...the button for your clothing, not all cycle selections. 3 Start/Pause Button Press this button to start the selected cycle. If the washer is running, use this knob to select the desired cycle. These settings can be adjusted using the cycle modifier buttons any load settings ...
...settings, estimated time remaining, options, and status messages for that cycle and any time before starting the cycle. •• To protect your washer. Pressing the Power button during a cycle will be lost . 4 Cycle Modifier Buttons Use these buttons to select special cycles or additional cycle options...the button for your clothing, not all cycle selections. 3 Start/Pause Button Press this button to start the selected cycle. If the washer is running, use this knob to select the desired cycle. These settings can be adjusted using the cycle modifier buttons any load settings ...

Owners Manual
Page 23
..., incoming water temperature, etc.) can affect the actual time. Once a stage is complete, the LED turns off . 4 Estimated Time Remaining When a cycle is pressed, the washer will light up . NOTE •• The time shown is selected to indicate which stages runs. Once the Start/Pause button is selected, the default...
..., incoming water temperature, etc.) can affect the actual time. Once a stage is complete, the LED turns off . 4 Estimated Time Remaining When a cycle is pressed, the washer will light up . NOTE •• The time shown is selected to indicate which stages runs. Once the Start/Pause button is selected, the default...


