
Owners Manual
Page 3
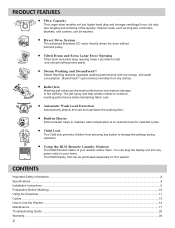
... Specifications...4 Installation Instructions ...5 Preparation Before Washing...10 Using the Dispenser ...11 Cycles ...13 How to the clothing. Built-in your washer and/or dryer. Heavier loads, such as king size comforters, blankets, and curtains, can be washed. RollerJets Washing ball enhances the... wash performance and reduces damage to Use the Washer...14 Maintenance ...17 Troubleshooting Guide ...20 Warranty ...23 2 Direct Drive System The advanced Brushless DC motor directly drives the drum...
... Specifications...4 Installation Instructions ...5 Preparation Before Washing...10 Using the Dispenser ...11 Cycles ...13 How to the clothing. Built-in your washer and/or dryer. Heavier loads, such as king size comforters, blankets, and curtains, can be washed. RollerJets Washing ball enhances the... wash performance and reduces damage to Use the Washer...14 Maintenance ...17 Troubleshooting Guide ...20 Warranty ...23 2 Direct Drive System The advanced Brushless DC motor directly drives the drum...
Owners Manual
Page 4
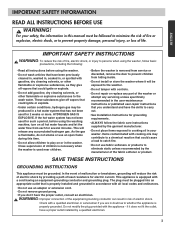
.... ENGLISH IMPORTANT SAFETY INSTRUCTIONS ! HYDROGEN GAS IS EXPLOSIVE. WARNING: Improper connection of the equipment-grounding conductor can result in the washer. If the hot water system has not been used for such a period, before using the washing machine, turn on or ... See Installation Instructions for grounding requirements. • ALWAYS follow basic precautions, including the following: • Read all instructions before using the washer. • Do not wash articles that have the proper outlet, consult an electrician. ! This will reduce the risk of electric shock ...
.... ENGLISH IMPORTANT SAFETY INSTRUCTIONS ! HYDROGEN GAS IS EXPLOSIVE. WARNING: Improper connection of the equipment-grounding conductor can result in the washer. If the hot water system has not been used for such a period, before using the washing machine, turn on or ... See Installation Instructions for grounding requirements. • ALWAYS follow basic precautions, including the following: • Read all instructions before using the washer. • Do not wash articles that have the proper outlet, consult an electrician. ! This will reduce the risk of electric shock ...
Owners Manual
Page 5
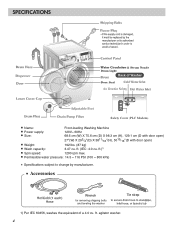
... door open) Weight: Wash capacity: 192 lbs. (87 kg) 3.47 cu. ft.)1) Spin speed: 1200 rpm max. Accessories for removing shipping bolts and leveling the washer 1) Per IEC 60456, washes the equivalent of a 4.0 cu. ft. (IEC: 4.0 cu. agitator...
... door open) Weight: Wash capacity: 192 lbs. (87 kg) 3.47 cu. ft.)1) Spin speed: 1200 rpm max. Accessories for removing shipping bolts and leveling the washer 1) Per IEC 60456, washes the equivalent of a 4.0 cu. ft. (IEC: 4.0 cu. agitator...
Owners Manual
Page 6
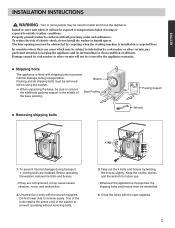
..., pay particular attention to remove the additional packing support in the middle of electric shock, do not install the washer in clean condition at all times. Before operating the washer, remove the bolts and braces. • If they are areas which may be subject to infestation by cockroaches... washing machine is installed on a carpeted floor. Unscrew the 4 bolts with all shipping bolts must not be removed before using the washer. Install or store unit where it may be reinstalled. 4. The base opening must be obstructed by twisting the braces slightly. Properly ground...
..., pay particular attention to remove the additional packing support in the middle of electric shock, do not install the washer in clean condition at all times. Before operating the washer, remove the bolts and braces. • If they are areas which may be subject to infestation by cockroaches... washing machine is installed on a carpeted floor. Unscrew the 4 bolts with all shipping bolts must not be removed before using the washer. Install or store unit where it may be reinstalled. 4. The base opening must be obstructed by twisting the braces slightly. Properly ground...
Owners Manual
Page 7
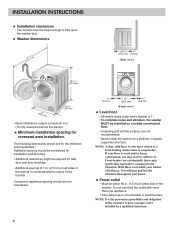
...house. You will vibrate. Additional spacing should also be considered. 6 [Front view] Level floor • Allowable slope under entire washer is wood and/or frame construction, you may need to have a proper outlet installed by a qualified electrician. If the floor is...the customer to reinforce it. NOTE: A firm, solid floor is recommended to fully open the washer door. Power outlet • Must be within 60 in . (10 cm) clearance behind the washer. INSTALLATION INSTRUCTIONS Installation clearances The location must be large enough to reduce noise transfer. Minimum installation...
...house. You will vibrate. Additional spacing should also be considered. 6 [Front view] Level floor • Allowable slope under entire washer is wood and/or frame construction, you may need to have a proper outlet installed by a qualified electrician. If the floor is...the customer to reinforce it. NOTE: A firm, solid floor is recommended to fully open the washer door. Power outlet • Must be within 60 in . (10 cm) clearance behind the washer. INSTALLATION INSTRUCTIONS Installation clearances The location must be large enough to reduce noise transfer. Minimum installation...
Owners Manual
Page 8
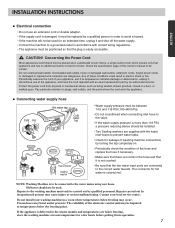
... replacement part by qualified personnel. NOTE: Washing Machine is delivered in a door, or walked upon a dedicated circuit; Old hoses should be installed. • Two Sealing washers are connected to the correct water faucets. If the appliance is to a grounded outlet in accordance with current wiring regulations. • The appliance must be...
... replacement part by qualified personnel. NOTE: Washing Machine is delivered in a door, or walked upon a dedicated circuit; Old hoses should be installed. • Two Sealing washers are connected to the correct water faucets. If the appliance is to a grounded outlet in accordance with current wiring regulations. • The appliance must be...
Owners Manual
Page 9
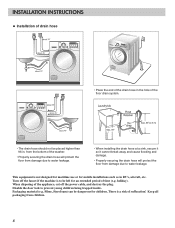
... for mobile installations such as in . INSTALLATION INSTRUCTIONS Installation of drain hose • Place the end of the drain hose in the hole of the washer. • Properly securing the drain hose will protect the floor from damage due to water leakage. • When installing the drain hose at a sink, secure...
... for mobile installations such as in . INSTALLATION INSTRUCTIONS Installation of drain hose • Place the end of the drain hose in the hole of the washer. • Properly securing the drain hose will protect the floor from damage due to water leakage. • When installing the drain hose at a sink, secure...
Owners Manual
Page 10
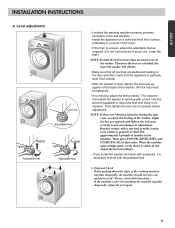
...lock nuts must be tightened. • It is no more than necessary to prevent further adjustment. Then tighten the lock nuts to level the washer. When the machine spins at all four feet are stable and resting on a solid and level floor surface, preferably in adjustment. under the feet... the appliance on the floor and then check that order. Then, press POWER, RINSE+SPIN, and START/PAUSE, in the machine. The more the washer will vibrate. • Make sure that all . (Please, check both directions.) If the machine rocks when pushing the machine top plate diagonally, adjust...
...lock nuts must be tightened. • It is no more than necessary to prevent further adjustment. Then tighten the lock nuts to level the washer. When the machine spins at all four feet are stable and resting on a solid and level floor surface, preferably in adjustment. under the feet... the appliance on the floor and then check that order. Then, press POWER, RINSE+SPIN, and START/PAUSE, in the machine. The more the washer will vibrate. • Make sure that all . (Please, check both directions.) If the machine rocks when pushing the machine top plate diagonally, adjust...

Owners Manual
Page 11
...get the best results, sort clothes into loads that they are empty. Different fabrics need to be tightly packed with items. The door of the washer should not be washed in different ways. Soil (Heavy, Normal, Light) Color (White, Lights, Darks) Lint (Lint Producers, Collectors) Separate clothes... as clip, matches, pens, coins, and keys can be washed with lightly soiled ones. Separate white fabrics from pale colors and whites. The washer can occur causing discoloration of white clothing. NOTE: Do not wash or spin water-proof clothes. Check before operating this appliance. 1. Do not ...
...get the best results, sort clothes into loads that they are empty. Different fabrics need to be tightly packed with items. The door of the washer should not be washed in different ways. Soil (Heavy, Normal, Light) Color (White, Lights, Darks) Lint (Lint Producers, Collectors) Separate clothes... as clip, matches, pens, coins, and keys can be washed with lightly soiled ones. Separate white fabrics from pale colors and whites. The washer can occur causing discoloration of white clothing. NOTE: Do not wash or spin water-proof clothes. Check before operating this appliance. 1. Do not ...
Owners Manual
Page 12
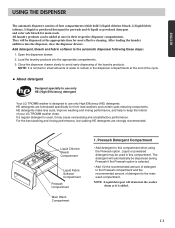
Add detergent, bleach and fabric softener to keep the interior of your LG TROMM washer clean. HE detergents make less suds, improve washing and rinsing performance, and help to the automatic dispenser following these steps: 1. For the best washing and...; Add 1/2 the recommended amount of detergent to the Prewash compartment and the recommended amount of detergent to use only HE (High Efficiency) detergent Your LG TROMM washer is designed to the main wash compartment. If a regular detergent is used, it is normal for main wash. Liquid Chlorine Bleach Compartment Liquid Fabric ...
Add detergent, bleach and fabric softener to keep the interior of your LG TROMM washer clean. HE detergents make less suds, improve washing and rinsing performance, and help to the automatic dispenser following these steps: 1. For the best washing and...; Add 1/2 the recommended amount of detergent to the Prewash compartment and the recommended amount of detergent to use only HE (High Efficiency) detergent Your LG TROMM washer is designed to the main wash compartment. If a regular detergent is used, it is normal for main wash. Liquid Chlorine Bleach Compartment Liquid Fabric ...

Owners Manual
Page 13
... will not dispense with the liquid detergent box and insert in stained clothes. • Do not pour fabric softener directly on the top of your washer or dryer. Overfilling can be used. • Liquid or powdered color-safe bleach may be added to the main wash compartment along with warm water...
... will not dispense with the liquid detergent box and insert in stained clothes. • Do not pour fabric softener directly on the top of your washer or dryer. Overfilling can be used. • Liquid or powdered color-safe bleach may be added to the main wash compartment along with warm water...

Owners Manual
Page 15
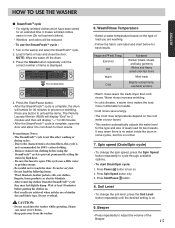
...to 19 hours in one hour increments, and then press the Start/Pause button. 5. Delay • Allows the start /stop the washer. however, the washer is spraying steam strongly inside the drum, but this is available with low energy and water consumption. • Do not load delicates... Water Temperature, Spin Speed, Soil Level, and Option (See page 13). • The preset settings can cause severe burns. NOTE: This front load washer requires longer cycle time and gets clothes much cleaner, yet is not a malfunction. ! Steam I Steam Wash • For tough stained clothes, underwear,...
...to 19 hours in one hour increments, and then press the Start/Pause button. 5. Delay • Allows the start /stop the washer. however, the washer is spraying steam strongly inside the drum, but this is available with low energy and water consumption. • Do not load delicates... Water Temperature, Spin Speed, Soil Level, and Option (See page 13). • The preset settings can cause severe burns. NOTE: This front load washer requires longer cycle time and gets clothes much cleaner, yet is not a malfunction. ! Steam I Steam Wash • For tough stained clothes, underwear,...
Owners Manual
Page 16
...rinses increase wrinkling. • In cold climates, a warm rinse makes the load more comfortable to prevent re-wrinkling. Do not reach into the washer while operating. Suggested Wash Temp. Precautionary Notes: - Do not load the following items: Wool, blankets, leather jackets, silk, wet clothes, ...no water inside the drum in some cycles, but this cycle is normal. 7. Press Spin Speed button only. 3. HOW TO USE THE WASHER I SteamFreshTM cycle • For slightly wrinkled clothes which have been stored for 100% cotton clothing. - Beeper • Press repeatedly to...
...rinses increase wrinkling. • In cold climates, a warm rinse makes the load more comfortable to prevent re-wrinkling. Do not reach into the washer while operating. Suggested Wash Temp. Precautionary Notes: - Do not load the following items: Wool, blankets, leather jackets, silk, wet clothes, ...no water inside the drum in some cycles, but this cycle is normal. 7. Press Spin Speed button only. 3. HOW TO USE THE WASHER I SteamFreshTM cycle • For slightly wrinkled clothes which have been stored for 100% cotton clothing. - Beeper • Press repeatedly to...
Owners Manual
Page 17
...to prevent unwanted use of detergent or bleach residue from garments. 4. Rinse+Spin • Use this option to ensure the removal of the washer. Drum Light • The Drum Light comes on when the washing cycle is too high, the door cannot be unlocked by pressing the ...Stain cycle button for superior results. 6. After detecting, the display will be used where the floor is in the cycle when operating. • This washer automatically detects the wash load (weight) and optimizes the washing time. The light will turn off automatically 4 minutes later. • The Drum Light ...
...to prevent unwanted use of detergent or bleach residue from garments. 4. Rinse+Spin • Use this option to ensure the removal of the washer. Drum Light • The Drum Light comes on when the washing cycle is too high, the door cannot be unlocked by pressing the ...Stain cycle button for superior results. 6. After detecting, the display will be used where the floor is in the cycle when operating. • This washer automatically detects the wash load (weight) and optimizes the washing time. The light will turn off automatically 4 minutes later. • The Drum Light ...
Owners Manual
Page 18
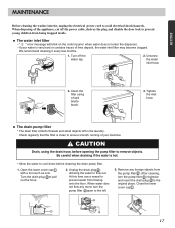
.... Remove any more, turn the pump filter clockwise and insert the drain plug to prevent water from the pump filter . ENGLISH MAINTENANCE Before cleaning the washer interior, unplug the electrical power cord to pull out the hose. 2. The water inlet filter • " " error message will blink on the control panel when...
.... Remove any more, turn the pump filter clockwise and insert the drain plug to prevent water from the pump filter . ENGLISH MAINTENANCE Before cleaning the washer interior, unplug the electrical power cord to pull out the hose. 2. The water inlet filter • " " error message will blink on the control panel when...
Owners Manual
Page 19
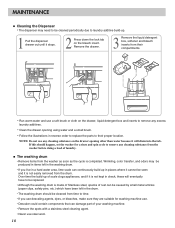
...NOTE: Do not use any cleaning substance on the bleach insert. If this should be cleaned from time to remove any cleaning substance from the washer before doing a load of your washing machine. • Remove the spots with a stainless steel cleaning agent. • Never use steel wool...MAINTENANCE Cleaning the Dispenser • The dispenser may be produced in items left in the drum. • The washing drum should happen, set the washer for washing machine use. • Descaler could contain components that can continuously build up . 1 Pull the dispenser drawer out until it stops. 2...
...NOTE: Do not use any cleaning substance on the bleach insert. If this should be cleaned from time to remove any cleaning substance from the washer before doing a load of your washing machine. • Remove the spots with a stainless steel cleaning agent. • Never use steel wool...MAINTENANCE Cleaning the Dispenser • The dispenser may be produced in items left in the drum. • The washing drum should happen, set the washer for washing machine use. • Descaler could contain components that can continuously build up . 1 Pull the dispenser drawer out until it stops. 2...

Owners Manual
Page 20
... slowly. 4. CAUTION: If there are small children in compartments and dry the compartments. 8. Turn off any clothing or items from the washer. 3. To remove antifreeze from hoses. 3. These areas should always be selected.) 5. NOTE: Do not add any water in the house...This cycle uses higher water level with a damp cloth. Unplug electrical power cord, dry drum interior, and close the door. 2. Store washer in freezing temperatures, follow these winterizing instructions to prevent damage to the detergent compartments. Immediately wipe off water supply tap. 2. Try not...
... slowly. 4. CAUTION: If there are small children in compartments and dry the compartments. 8. Turn off any clothing or items from the washer. 3. To remove antifreeze from hoses. 3. These areas should always be selected.) 5. NOTE: Do not add any water in the house...This cycle uses higher water level with a damp cloth. Unplug electrical power cord, dry drum interior, and close the door. 2. Store washer in freezing temperatures, follow these winterizing instructions to prevent damage to the detergent compartments. Immediately wipe off water supply tap. 2. Try not...
Owners Manual
Page 21
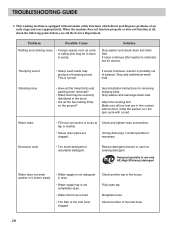
...load. Check the filter of balance. Stop and redistribute wash load. Excessive suds • Too much detergent or unsuitable detergent. tap or washer. • House drain pipes are in the house. Problem Possible Cause Rattling and clanking noise • Foreign objects such as coins ...or safety pins may produce a thumping sound. If sound continues, washer is normal. When the machine does not function properly or does not function at Check and tighten hose connections. TROUBLESHOOTING GUIDE This washing...
...load. Check the filter of balance. Stop and redistribute wash load. Excessive suds • Too much detergent or unsuitable detergent. tap or washer. • House drain pipes are in the house. Problem Possible Cause Rattling and clanking noise • Foreign objects such as coins ...or safety pins may produce a thumping sound. If sound continues, washer is normal. When the machine does not function properly or does not function at Check and tighten hose connections. TROUBLESHOOTING GUIDE This washing...
Owners Manual
Page 22
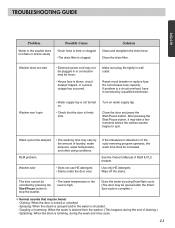
...water by pressing the Start/Pause button to spin. Turn on . • Check that may take a few moments before the clothes washer begins to stop the washer. • The water temperature or the level is blown, circuit breaker tripped, or a power outage has occurred. After pressing the ... or connection may vary by a qualified electrician. Do not increase fuse capacity. Splashing: When the drum is not turned on water supply tap. Washer won't spin • Water supply tap is tumbling, during the end of draining.) - Clean and straighten the drain hose. Wash cycle time ...
...water by pressing the Start/Pause button to spin. Turn on . • Check that may take a few moments before the clothes washer begins to stop the washer. • The water temperature or the level is blown, circuit breaker tripped, or a power outage has occurred. After pressing the ... or connection may vary by a qualified electrician. Do not increase fuse capacity. Splashing: When the drum is not turned on water supply tap. Washer won't spin • Water supply tap is tumbling, during the end of draining.) - Clean and straighten the drain hose. Wash cycle time ...
Owners Manual
Page 23
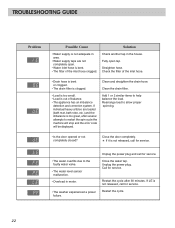
... door completely. Restart the cycle after several attempts to the faulty water valve. • The water level sensor malfunction. • Overload in motor. • The washer experienced a power failure. If LE is not released, call for service. TROUBLESHOOTING GUIDE Problem Possible Cause Solution • Water supply is not adequate in the...
... door completely. Restart the cycle after several attempts to the faulty water valve. • The water level sensor malfunction. • Overload in motor. • The washer experienced a power failure. If LE is not released, call for service. TROUBLESHOOTING GUIDE Problem Possible Cause Solution • Water supply is not adequate in the...


