
Owner's Manual
Page 4
...-grounding conductor and grounding plug. BASIC SAFETY PRECAUTIONS wWARNING: To reduce the risk of fire, electric shock, or injury to persons when using the washer, turn on or in use , the washer must be dangerous for mobile installations such as in RVs, aircraft, etc. •...; Turn off the water taps and unplug the washer if the machine is properly installed and grounded in accordance with all packaging from climbing inside of ...
...-grounding conductor and grounding plug. BASIC SAFETY PRECAUTIONS wWARNING: To reduce the risk of fire, electric shock, or injury to persons when using the washer, turn on or in use , the washer must be dangerous for mobile installations such as in RVs, aircraft, etc. •...; Turn off the water taps and unplug the washer if the machine is properly installed and grounded in accordance with all packaging from climbing inside of ...

Owner's Manual
Page 6
... fire, electric shock, or injury to comply with these warnings could ignite the materials. • Do not wash items that could result in the washer. Turning the controls to play . Incorrect usage can result in serious personal injuries. • Destroy the carton, plastic bag and other packing materials after laundering. As...
... fire, electric shock, or injury to comply with these warnings could ignite the materials. • Do not wash items that could result in the washer. Turning the controls to play . Incorrect usage can result in serious personal injuries. • Destroy the carton, plastic bag and other packing materials after laundering. As...

Owner's Manual
Page 11
Retainer Hole Cap 2 Remove the retainers by turning them slightly while pulling. IMPORTANT: To prevent internal damage during transport, the washer is secured to the back of the washer with a shipping bolt to ..., which can lead to permanent damage to internal components, the shipping bolts and retainers must lay the washer down to remove the 4 shipping bolts by turning them counterclockwise. INSTALLATION INSTRUCTIONS UNPACKING AND REMOVING SHIPPING BOLTS When removing the washer from the carton base, be installed when transporting the washer. 11 Rotate...
Retainer Hole Cap 2 Remove the retainers by turning them slightly while pulling. IMPORTANT: To prevent internal damage during transport, the washer is secured to the back of the washer with a shipping bolt to ..., which can lead to permanent damage to internal components, the shipping bolts and retainers must lay the washer down to remove the 4 shipping bolts by turning them counterclockwise. INSTALLATION INSTRUCTIONS UNPACKING AND REMOVING SHIPPING BOLTS When removing the washer from the carton base, be installed when transporting the washer. 11 Rotate...

Owner's Manual
Page 14
INSTALLATION INSTRUCTIONS LEVELING THE WASHER The drum of the washer. Turn clockwise to raise the washer or counterclockwise to lower it. 14 Tighten all 4 locknuts securely 3 Once the washer is level from corner to corner to ... vibration, noise, and unwanted movement, the floor must use the leveling feet on cycle selection and operation. Extending the leveling feet more than necessary can turn the feet with the locknuts.
INSTALLATION INSTRUCTIONS LEVELING THE WASHER The drum of the washer. Turn clockwise to raise the washer or counterclockwise to lower it. 14 Tighten all 4 locknuts securely 3 Once the washer is level from corner to corner to ... vibration, noise, and unwanted movement, the floor must use the leveling feet on cycle selection and operation. Extending the leveling feet more than necessary can turn the feet with the locknuts.
Owner's Manual
Page 18
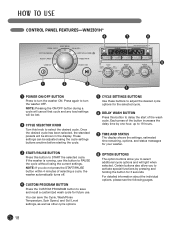
... anytime before starting the cycle. 3 START/PAUSE BUTTON Press this button to PAUSE the cycle without losing the current settings. Press again to turn the washer ON. These settings can save and recall a customized wash cycle for the selected cycle. 6 DELAY WASH BUTTON Press this knob ...wash cycle. NOTE: If you to select additional cycle options and will be lost. 2 CYCLE SELECTOR KNOB Turn this button to delay the start of selecting a cycle, the washer automatically turns off. 4 CUSTOM PROGRAM BUTTON Press the CUSTOM PROGRAM button to save the Cycle, Wash/Rinse Temperature, Spin ...
... anytime before starting the cycle. 3 START/PAUSE BUTTON Press this button to PAUSE the cycle without losing the current settings. Press again to turn the washer ON. These settings can save and recall a customized wash cycle for the selected cycle. 6 DELAY WASH BUTTON Press this knob ...wash cycle. NOTE: If you to select additional cycle options and will be lost. 2 CYCLE SELECTOR KNOB Turn this button to delay the start of selecting a cycle, the washer automatically turns off. 4 CUSTOM PROGRAM BUTTON Press the CUSTOM PROGRAM button to save the Cycle, Wash/Rinse Temperature, Spin ...
Owner's Manual
Page 21
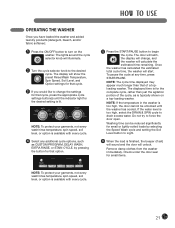
To pause the cycle at any additional cycle options, such as is too high, select the DRAIN & SPIN cycle to turn on a top-loading washer. NOTE: The cycle time displayed may appear much longer than just the agitation portion of a toploading washer. Remove damp clothes from ... shown on the washer. The displayed time is for the desired setting is finished, the beeper (if set) will sound and the door will illuminate. 2 Turn the cycle selector knob to begin the cycle. NOTE: If the temperature in the washer is available with every cycle. 4 Select any time, press START...
To pause the cycle at any additional cycle options, such as is too high, select the DRAIN & SPIN cycle to turn on a top-loading washer. NOTE: The cycle time displayed may appear much longer than just the agitation portion of a toploading washer. Remove damp clothes from ... shown on the washer. The displayed time is for the desired setting is finished, the beeper (if set) will sound and the door will illuminate. 2 Turn the cycle selector knob to begin the cycle. NOTE: If the temperature in the washer is available with every cycle. 4 Select any time, press START...
Owner's Manual
Page 24
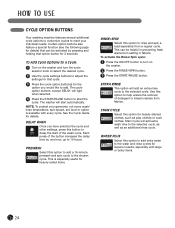
See the Cycle Guide for details) that can be activated by one hour, up to a Cycle: 1 Turn on the washer. 2 Press the RINSE+SPIN button. 3 Press the START/PAUSE button. EXTRA RINSE This option will start automatically. Use this option to rinse ... or bleach residue from setting in preventing fresh stains from fabrics. To activate the Rinse+Spin cycle: 1 Press the ON/OFF button to turn on the washer and turn the cycle selector knob to select the desired cycle. 2 Use the cycle settings buttons to start of the wash cycle. Certain option buttons...
See the Cycle Guide for details) that can be activated by one hour, up to a Cycle: 1 Turn on the washer. 2 Press the RINSE+SPIN button. 3 Press the START/PAUSE button. EXTRA RINSE This option will start automatically. Use this option to rinse ... or bleach residue from setting in preventing fresh stains from fabrics. To activate the Rinse+Spin cycle: 1 Press the ON/OFF button to turn on the washer and turn the cycle selector knob to select the desired cycle. 2 Use the cycle settings buttons to start of the wash cycle. Certain option buttons...

Owner's Manual
Page 25
...(wool safe) detergents should be locked during a cycle. NOTE: Do NOT use of this cycle with the special function for 3 seconds to turn off with the WATER PLUS button Press and hold the STAIN CYCLE button for 3 seconds to activate. To cancel SPINSENSE™: Press and hold...the National Sanitation Foundation), certifies that SPINSENSE™ is operating. Press and hold the PREWASH button for details. BEEPER ON/OFF You may turn the beeper back on wood floor installations. The SPINSENSE™ function will alternate between CL and the time remaining. HAND WASH/WOOL &#...
...(wool safe) detergents should be locked during a cycle. NOTE: Do NOT use of this cycle with the special function for 3 seconds to turn off with the WATER PLUS button Press and hold the STAIN CYCLE button for 3 seconds to activate. To cancel SPINSENSE™: Press and hold...the National Sanitation Foundation), certifies that SPINSENSE™ is operating. Press and hold the PREWASH button for details. BEEPER ON/OFF You may turn the beeper back on wood floor installations. The SPINSENSE™ function will alternate between CL and the time remaining. HAND WASH/WOOL &#...

Owner's Manual
Page 26
... is in an upright position. 9 To remove the antifreeze from the stainless steel drum using detergent. If the gasket cannot be exposed to freezing temperatures: 1 Turn off any odor. (Be sure to fold back the lip of time and is suitable for an extended period of the gasket to get under...
... is in an upright position. 9 To remove the antifreeze from the stainless steel drum using detergent. If the gasket cannot be exposed to freezing temperatures: 1 Turn off any odor. (Be sure to fold back the lip of time and is suitable for an extended period of the gasket to get under...

Owner's Manual
Page 28
... vinegar or a lime scale remover, following the manufacturer's instructions. Do NOT operate the washer without the inlet filters. Contact LG Customer Service or a qualified LG servicer. Other hoses may be caused by LG with hard water, this laundry product. Unscrew the hot and cold water lines from the water inlets, and soak them... terms of the washer. IMPORTANT: Use ONLY the inlet hoses provided by clogged inlet filters. Inlet Filter 2 Carefully remove the filters from the back of LG's warranty. 1 Turn off both water taps completely.
... vinegar or a lime scale remover, following the manufacturer's instructions. Do NOT operate the washer without the inlet filters. Contact LG Customer Service or a qualified LG servicer. Other hoses may be caused by LG with hard water, this laundry product. Unscrew the hot and cold water lines from the water inlets, and soak them... terms of the washer. IMPORTANT: Use ONLY the inlet hoses provided by clogged inlet filters. Inlet Filter 2 Carefully remove the filters from the back of LG's warranty. 1 Turn off both water taps completely.
Owner's Manual
Page 31
...glass to prevent odor or mildew: 1. Do not increase fuse capacity. Allow the washer to cool until the DOOR LOCK indicator turns off in the display. • Allow the washer to complete the programmed cycle, or run the DRAIN & SPIN cycle to... turn on Washer won't spin, or the display shows: Door will not unlock when cycle is stopped or paused Wash cycle ...the water. • This is normal. The washer will not spin unless the door is locked (DOOR LOCK will not turn or spin.
...glass to prevent odor or mildew: 1. Do not increase fuse capacity. Allow the washer to cool until the DOOR LOCK indicator turns off in the display. • Allow the washer to complete the programmed cycle, or run the DRAIN & SPIN cycle to... turn on Washer won't spin, or the display shows: Door will not unlock when cycle is stopped or paused Wash cycle ...the water. • This is normal. The washer will not spin unless the door is locked (DOOR LOCK will not turn or spin.


