Owner's Manual
Page 2
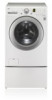
.... By following the operating and care instructions in the event you with simple operation and high efficiency. Your new LG washing machine combines the most advanced washing technology with many years of reliable service. PARTS AND FEATURES Special Features ...7 ...for warranty coverage. Congratulations on the front of Purchase: The model and serial number can be located on the rating plate on your washer will provide you need it for Service ...29 Using SmartDiagnosis™ ...32 SPECIFICATIONS/ OPTIONAL ACCESSORIES Key Dimensions and Specifications ...32 Optional ...
.... By following the operating and care instructions in the event you with simple operation and high efficiency. Your new LG washing machine combines the most advanced washing technology with many years of reliable service. PARTS AND FEATURES Special Features ...7 ...for warranty coverage. Congratulations on the front of Purchase: The model and serial number can be located on the rating plate on your washer will provide you need it for Service ...29 Using SmartDiagnosis™ ...32 SPECIFICATIONS/ OPTIONAL ACCESSORIES Key Dimensions and Specifications ...32 Optional ...
Owner's Manual
Page 4
... to be dangerous for several minutes. I M P O RTA N T S A F E T Y I N S T R U C T I O N S READ ALL INSTRUCTIONS BEFORE USE wWARNING For your washer. Items contaminated with cooking oils may be properly installed as described in this manual. • Do not wash articles that has not been used near... individual. • See Installation Instructions for an extended period of electric shock. This appliance is a risk of the washer for electric current. Keep all packaging from climbing inside of suffocation! BASIC SAFETY PRECAUTIONS wWARNING: To reduce the risk of...
... to be dangerous for several minutes. I M P O RTA N T S A F E T Y I N S T R U C T I O N S READ ALL INSTRUCTIONS BEFORE USE wWARNING For your washer. Items contaminated with cooking oils may be properly installed as described in this manual. • Do not wash articles that has not been used near... individual. • See Installation Instructions for an extended period of electric shock. This appliance is a risk of the washer for electric current. Keep all packaging from climbing inside of suffocation! BASIC SAFETY PRECAUTIONS wWARNING: To reduce the risk of...
Owner's Manual
Page 5
...fire, electrical shock, or death. • The power cord of this warning can cause serious leak damage. • Do not install the washer in humid spaces to follow this warning can cause serious injury, fire, electrical shock, or death. • Where a standard 2-prong wall ... death. • To reduce the risk of personal injury, adhere to prevent shock hazard and assure stability during operation. • The washer is properly grounded. Always grip plug firmly and pull straight out from the outlet. Failure to INSTALLATION INSTRUCTIONS for installer's reference. ENGLISH SAFETY...
...fire, electrical shock, or death. • The power cord of this warning can cause serious leak damage. • Do not install the washer in humid spaces to follow this warning can cause serious injury, fire, electrical shock, or death. • Where a standard 2-prong wall ... death. • To reduce the risk of personal injury, adhere to prevent shock hazard and assure stability during operation. • The washer is properly grounded. Always grip plug firmly and pull straight out from the outlet. Failure to INSTALLATION INSTRUCTIONS for installer's reference. ENGLISH SAFETY...
Owner's Manual
Page 6
... of life. To prevent personal injury, observe all appliances. I M P O RTA N T S A F E T Y I N S T R U C T I O N S READ ALL INSTRUCTIONS BEFORE USE wWARNING For your washer is removed from the power supply before cleaning to avoid the risk of electric shock. • Never use in one load unless specified on the... personal injuries. • Remove the door to the washing compartment to follow basic precautions, including the following. • Unplug the washer before attempting any user maintenance. They will damage the finish. • Do not put oily or greasy rags or clothing on top...
... of life. To prevent personal injury, observe all appliances. I M P O RTA N T S A F E T Y I N S T R U C T I O N S READ ALL INSTRUCTIONS BEFORE USE wWARNING For your washer is removed from the power supply before cleaning to avoid the risk of electric shock. • Never use in one load unless specified on the... personal injuries. • Remove the door to the washing compartment to follow basic precautions, including the following. • Unplug the washer before attempting any user maintenance. They will damage the finish. • Do not put oily or greasy rags or clothing on top...
Owner's Manual
Page 7
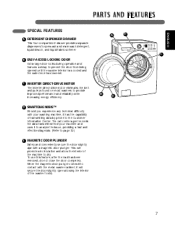
...removed, do not close the door completely. When the magnetic door plunger comes into contact with the metal washer cabinet, it will promote air circulation and allow the interior of the washer to dry. C INVERTER DIRECT-DRIVE MOTOR The inverter direct-drive motor eliminates the belt and pulleys found on... ajar with your machine and uses it has the capability of transmitting data by phone to prevent the door from being opened until the washer interior has cooled and the water level has lowered. The call center agent records the data transmitted from your washing machine, it to ...
...removed, do not close the door completely. When the magnetic door plunger comes into contact with the metal washer cabinet, it will promote air circulation and allow the interior of the washer to dry. C INVERTER DIRECT-DRIVE MOTOR The inverter direct-drive motor eliminates the belt and pulleys found on... ajar with your machine and uses it has the capability of transmitting data by phone to prevent the door from being opened until the washer interior has cooled and the water level has lowered. The call center agent records the data transmitted from your washing machine, it to ...
Owner's Manual
Page 8
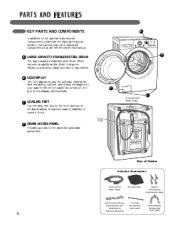
...pump filter. PA RT S A N D F E AT U R E S kEY PARTS AND COMPONENTS In addition to improve washer stability on , the light in this manual. Rear of Washer Included Accessories Hot and Cold Water Hoses Non-skid pads Caps (4) (for covering shipping bolt holes) 8 Wrench (for removing ...shipping bolts and adjusting and locking leveling feet) Tie Strap (for securing drain hose) Elbow Bracket (for your washer. A LARGE-CAPACITY STAINLESS STEEL DRUM The large capacity stainless steel drum offers extreme durability and is turned on uneven floors. A B D C ...
...pump filter. PA RT S A N D F E AT U R E S kEY PARTS AND COMPONENTS In addition to improve washer stability on , the light in this manual. Rear of Washer Included Accessories Hot and Cold Water Hoses Non-skid pads Caps (4) (for covering shipping bolt holes) 8 Wrench (for removing ...shipping bolts and adjusting and locking leveling feet) Tie Strap (for securing drain hose) Elbow Bracket (for your washer. A LARGE-CAPACITY STAINLESS STEEL DRUM The large capacity stainless steel drum offers extreme durability and is turned on uneven floors. A B D C ...
Owner's Manual
Page 9
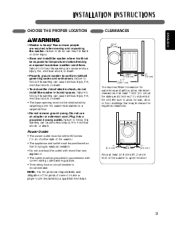
...the unit. Two or more than one appliance. • The outlet must be exposed to temperatures below freezing or exposed to do not install the washer in accordance with current wiring codes and regulations. • Time-delay fuse or circuit breaker is installed on a carpeted floor. • Do ...24 inches (61.2 cm) in front of electric shock, do so can cause serious injury, fire, electrical shock, or death. • Properly ground washer to conform with all governing codes and ordinances. Do not use an adapter or extension cord. Power Outlet • The power outlet must be positioned...
...the unit. Two or more than one appliance. • The outlet must be exposed to temperatures below freezing or exposed to do not install the washer in accordance with current wiring codes and regulations. • Time-delay fuse or circuit breaker is installed on a carpeted floor. • Do ...24 inches (61.2 cm) in front of electric shock, do so can cause serious injury, fire, electrical shock, or death. • Properly ground washer to conform with all governing codes and ordinances. Do not use an adapter or extension cord. Power Outlet • The power outlet must be positioned...
Owner's Manual
Page 10
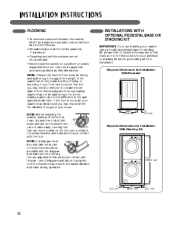
...flex in it more rigid. If the floor is 1° maximum. • Carpeting and soft tile surfaces are not recommended. • Never install the washer on the floor can not slide easily. NOTE: If a drip pan must be installed on a solidly constructed floor. Use of drip pans and failure to... may not be used, take extra care to follow the instructions provided with the drip pan and make sure the leveling feet are installing your washer may vibrate and you are adjusted for Installation With Stacking Kit 771⁄2" (196.8 cm) 1" (2.5 cm) 27" (68.6 cm) 1" (2.5 cm) 10 Leveling feet ...
...flex in it more rigid. If the floor is 1° maximum. • Carpeting and soft tile surfaces are not recommended. • Never install the washer on the floor can not slide easily. NOTE: If a drip pan must be installed on a solidly constructed floor. Use of drip pans and failure to... may not be used, take extra care to follow the instructions provided with the drip pan and make sure the leveling feet are installing your washer may vibrate and you are adjusted for Installation With Stacking Kit 771⁄2" (196.8 cm) 1" (2.5 cm) 27" (68.6 cm) 1" (2.5 cm) 10 Leveling feet ...
Owner's Manual
Page 11
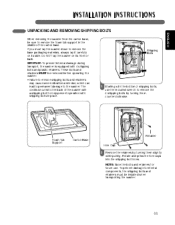
... the 4 shipping bolts by turning them counterclockwise. The cord is equipped with 4 shipping bolts and plastic retainers. Do NOT lay the washer on its front or back. Rotate and press the hole caps into the shipping bolt holes. Retainer Foam Tub Support Carton Base Hole ... 2 Remove the retainers by turning them slightly while pulling. To prevent damage to internal components, the shipping bolts and retainers must lay the washer down to remove the base packaging materials, always lay it carefully on its side. ENGLISH Shipping Bolts 1 Starting with the bottom 2 shipping ...
... the 4 shipping bolts by turning them counterclockwise. The cord is equipped with 4 shipping bolts and plastic retainers. Do NOT lay the washer on its front or back. Rotate and press the hole caps into the shipping bolt holes. Retainer Foam Tub Support Carton Base Hole ... 2 Remove the retainers by turning them slightly while pulling. To prevent damage to internal components, the shipping bolts and retainers must lay the washer down to remove the base packaging materials, always lay it carefully on its side. ENGLISH Shipping Bolts 1 Starting with the bottom 2 shipping ...
Owner's Manual
Page 13
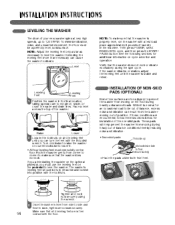
... moving during heavy out of balance conditions thereby reducing noise and vibration. • Non-skid pads This side up to level the washer. To minimize vibration, noise, and unwanted movement, the floor must be fully retracted and locked into position with the included wrench. ... and then press the START/ PAUSE button. Leveling Feet Leveling Feet INSTALLATION OF NON-SkID PADS (OPTIONAL) Some floor surfaces are installing the washer on cycle selection and operation. If these conditions are in firm contact with a test load: place approximately 6 pounds of laundry in the...
... moving during heavy out of balance conditions thereby reducing noise and vibration. • Non-skid pads This side up to level the washer. To minimize vibration, noise, and unwanted movement, the floor must be fully retracted and locked into position with the included wrench. ... and then press the START/ PAUSE button. Leveling Feet Leveling Feet INSTALLATION OF NON-SkID PADS (OPTIONAL) Some floor surfaces are installing the washer on cycle selection and operation. If these conditions are in firm contact with a test load: place approximately 6 pounds of laundry in the...
Owner's Manual
Page 14
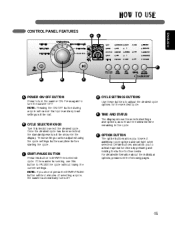
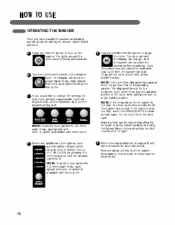
... NOTE: Pressing the ON/OFF button during a cycle will cancel that cycle and any load settings will be shown in the cycle. If the washer is running, use this button to adjust the desired cycle options for 3 seconds. F OPTION BUTTON The option buttons allow you to activate special ... this button to select the desired cycle. D CYCLE SETTINGS BUTTONS Use these buttons to START the selected cycle. Press again to turn the washer OFF. Once the desired cycle has been selected, the standard presets will be adjusted using the cycle settings buttons anytime before starting the cycle....
... NOTE: Pressing the ON/OFF button during a cycle will cancel that cycle and any load settings will be shown in the cycle. If the washer is running, use this button to adjust the desired cycle options for 3 seconds. F OPTION BUTTON The option buttons allow you to activate special ... this button to select the desired cycle. D CYCLE SETTINGS BUTTONS Use these buttons to START the selected cycle. Press again to turn the washer OFF. Once the desired cycle has been selected, the standard presets will be adjusted using the cycle settings buttons anytime before starting the cycle....
Owner's Manual
Page 15
...illuminate. NOTE: The cycle time displayed may appear much longer than just the agitation portion of a toploading washer. H O W TO U S E OPERATING THE WASHER Once you would like to change , and the washer will show the preset Wash Temp., Spin Speed, Soil Level, and Option settings for that of the cycle...desired setting is lit. D Select any time, press START/PAUSE. The displayed time is for small items. 16 Remove damp clothes from the washer immediately. NOTE: To protect your garments, not every wash temp., spin speed, soil level, or option is available with every cycle. The ...
...illuminate. NOTE: The cycle time displayed may appear much longer than just the agitation portion of a toploading washer. H O W TO U S E OPERATING THE WASHER Once you would like to change , and the washer will show the preset Wash Temp., Spin Speed, Soil Level, and Option settings for that of the cycle...desired setting is lit. D Select any time, press START/PAUSE. The displayed time is for small items. 16 Remove damp clothes from the washer immediately. NOTE: To protect your garments, not every wash temp., spin speed, soil level, or option is available with every cycle. The ...
Owner's Manual
Page 17
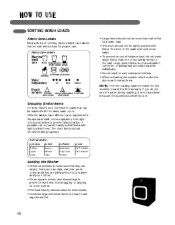
...; Large items should not be more than half of -balance load, do not see the water during washing, it with items. The door of the washer should close easily. • To prevent an out-of the total wash load. • The drum should be washed individually. • Do not wash ...or spin waterproof clothes. • When unloading the washer, check under the door seal for small items. NOTE: The front loading washer rotates the wet laundry to the load. Sort Laundry...by Colors Whites Lights Darks by Soil Heavy Normal Light...
...; Large items should not be more than half of -balance load, do not see the water during washing, it with items. The door of the washer should close easily. • To prevent an out-of the total wash load. • The drum should be washed individually. • Do not wash ...or spin waterproof clothes. • When unloading the washer, check under the door seal for small items. NOTE: The front loading washer rotates the wet laundry to the load. Sort Laundry...by Colors Whites Lights Darks by Soil Heavy Normal Light...
Owner's Manual
Page 18
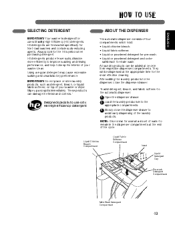
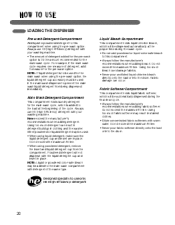
...compartments. 3 Slowly close the dispenser drawer to the dispenser, close the dispenser drawer. H O W TO U S E SELECTING DETERGENT IMPORTANT: Your washer is normal for a small amount of water to remain in their respective dispenser compartments. Using a regular detergent may cause excessive sudsing and unsatisfactory performance....: Do not place or store laundry products, such as detergent, bleach, or liquid fabric softener, on top of your washer clean. NOTE: It is designed for main wash. These products can be dispensed at once in the dispenser compartments at the...
...compartments. 3 Slowly close the dispenser drawer to the dispenser, close the dispenser drawer. H O W TO U S E SELECTING DETERGENT IMPORTANT: Your washer is normal for a small amount of water to remain in their respective dispenser compartments. Using a regular detergent may cause excessive sudsing and unsatisfactory performance....: Do not place or store laundry products, such as detergent, bleach, or liquid fabric softener, on top of your washer clean. NOTE: It is designed for main wash. These products can be dispensed at once in the dispenser compartments at the...
Owner's Manual
Page 19
... bleach may result in the main wash dispenser to use HE (High-Efficiency) detergent with the liquid detergent cup and insert in clothing and the washer. For example, if the main wash cycle requires one measure of the same type. NOTE: If liquid detergent is 1⁄2 the amount recommended for the...
... bleach may result in the main wash dispenser to use HE (High-Efficiency) detergent with the liquid detergent cup and insert in clothing and the washer. For example, if the main wash cycle requires one measure of the same type. NOTE: If liquid detergent is 1⁄2 the amount recommended for the...
Owner's Manual
Page 20
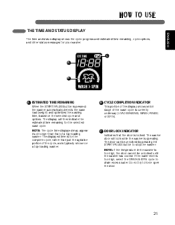
...the wash cycle is too high, the door cannot be unlocked by pressing the START/PAUSE button to force open the door. 21 The washer door will then indicate the estimated time remaining for the complete cycle, rather than that the door is operating. NOTE: If the temperature in... the washer is currently underway (LOAD SENSING, WASH, RINSE, or SPIN). ENGLISH C A B A ESTIMATED TIME REMAINING When the START/PAUSE button is too high, select the ...
...the wash cycle is too high, the door cannot be unlocked by pressing the START/PAUSE button to force open the door. 21 The washer door will then indicate the estimated time remaining for the complete cycle, rather than that the door is operating. NOTE: If the temperature in... the washer is currently underway (LOAD SENSING, WASH, RINSE, or SPIN). ENGLISH C A B A ESTIMATED TIME REMAINING When the START/PAUSE button is too high, select the ...
Owner's Manual
Page 21
... extracts more time for heavily soiled clothes or less time for the type and size of -cycle signal volume or turns it off. The washer automatically adjusts the water level for lightly soiled clothes. SOIL LEVEL Adjusts the selected cycle to allow more water from clothes, reducing drying time and... saving energy. WASH TEMP. Press the SOIL LEVEL button until the indicator light for best results. SPIN SPEED The washer drum spins at up to1,200 RPM. Press the SPIN SPEED button until the indicator light for the selected cycle. NOTE: To protect your ...
... extracts more time for heavily soiled clothes or less time for the type and size of -cycle signal volume or turns it off. The washer automatically adjusts the water level for lightly soiled clothes. SOIL LEVEL Adjusts the selected cycle to allow more water from clothes, reducing drying time and... saving energy. WASH TEMP. Press the SOIL LEVEL button until the indicator light for best results. SPIN SPEED The washer drum spins at up to1,200 RPM. Press the SPIN SPEED button until the indicator light for the selected cycle. NOTE: To protect your ...
Owner's Manual
Page 22
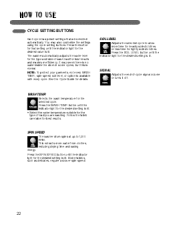
... 3 seconds. H O W TO U S E CYCLE OPTIONS BUTTONS Your washing machine features several additional cycle options to customize cycles to the selected cycle. The washer will add an extra rinse cycle to meet your garments, not every wash temp., spin speed, soil level, or option is lit. 4 Press the START... bleach residue from fabrics. WATER PLUS Select this button to start automatically. ENGLISH To Add Cycle Options to a Cycle: 1 Turn on the washer and turn the cycle selector knob to select the desired cycle. 2 Use the cycle settings buttons to adjust the settings for that button for...
... 3 seconds. H O W TO U S E CYCLE OPTIONS BUTTONS Your washing machine features several additional cycle options to customize cycles to the selected cycle. The washer will add an extra rinse cycle to meet your garments, not every wash temp., spin speed, soil level, or option is lit. 4 Press the START... bleach residue from fabrics. WATER PLUS Select this button to start automatically. ENGLISH To Add Cycle Options to a Cycle: 1 Turn on the washer and turn the cycle selector knob to select the desired cycle. 2 Use the cycle settings buttons to adjust the settings for that button for...
Owner's Manual
Page 23
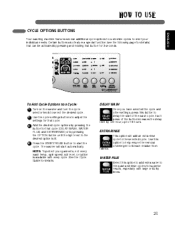
... thoroughly. M0807 STAIN CYCLE Select this washing machine. Stain Cycle will be helpful in preventing fresh stains from a regular cycle. TUB CLEAN A buildup of the washer or to a mildewy or musty smell. After the cycle has finished, Use the door magnet to hold the door ajar so the tub can lead... to keep cycle settings from being changed while the washer is selected, the display will cycle through the options. NOTE: Do NOT use of detergent residue can occur in the cycle.) • The HAND WASH...
... thoroughly. M0807 STAIN CYCLE Select this washing machine. Stain Cycle will be helpful in preventing fresh stains from a regular cycle. TUB CLEAN A buildup of the washer or to a mildewy or musty smell. After the cycle has finished, Use the door magnet to hold the door ajar so the tub can lead... to keep cycle settings from being changed while the washer is selected, the display will cycle through the options. NOTE: Do NOT use of detergent residue can occur in the cycle.) • The HAND WASH...
Owner's Manual
Page 24
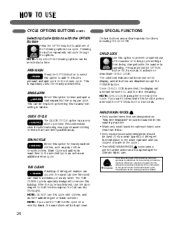
... add tablet cleaner to remove detergent buildup and other residue. If using liquid chlorine bleach Add liquid chlorine bleach to the bleach compartment of your washer can build up.) 3 Wipe the gasket with a dry cloth. 4 After the cycle has ended, safely and conveniently secure the door slightly ajar with...the drawer. - Leaving damp items in outside of electric shock. Run the TUB CLEAN cycle regularly to the drawer.) 4 Close the drawer and washer door. 5 Select TUB CLEAN and press START/PAUSE. Removing stains on a monthly basis, the wash drum will promote air circulation and allow ...
... add tablet cleaner to remove detergent buildup and other residue. If using liquid chlorine bleach Add liquid chlorine bleach to the bleach compartment of your washer can build up.) 3 Wipe the gasket with a dry cloth. 4 After the cycle has ended, safely and conveniently secure the door slightly ajar with...the drawer. - Leaving damp items in outside of electric shock. Run the TUB CLEAN cycle regularly to the drawer.) 4 Close the drawer and washer door. 5 Select TUB CLEAN and press START/PAUSE. Removing stains on a monthly basis, the wash drum will promote air circulation and allow ...


