
Owner's Manual
Page 1
Owner's Manual Washing Machine WM0532HW Please read this information to your dealer if your machine and report this manual carefully. Retain it for future reference. Record the model and serial numbers of your machine requires service. It provides instructions on safe installation, use, and maintenance.
Owner's Manual Washing Machine WM0532HW Please read this information to your dealer if your machine and report this manual carefully. Retain it for future reference. Record the model and serial numbers of your machine requires service. It provides instructions on safe installation, use, and maintenance.
Owner's Manual
Page 2
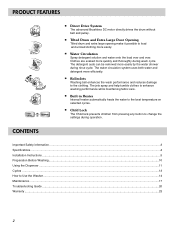
... load and unload clothing more efficiently. Child Lock The Child lock prevents children from pressing any button to the clothing. RollerJets Washing ball enhances the wash performance and reduces damage to change the settings during operation. CONTENTS Important Safety Information ...3 Specifications...4 Installation Instructions ...5 Preparation Before Washing...10 Using the Dispenser ...11 Cycles ...13 How to the best temperature on selected cycles. The detergent suds can be removed more quickly and thoroughly during rinse cycle. Water Circulation Spray detergent...
... load and unload clothing more efficiently. Child Lock The Child lock prevents children from pressing any button to the clothing. RollerJets Washing ball enhances the wash performance and reduces damage to change the settings during operation. CONTENTS Important Safety Information ...3 Specifications...4 Installation Instructions ...5 Preparation Before Washing...10 Using the Dispenser ...11 Cycles ...13 How to the best temperature on selected cycles. The detergent suds can be removed more quickly and thoroughly during rinse cycle. Water Circulation Spray detergent...
Owner's Manual
Page 3
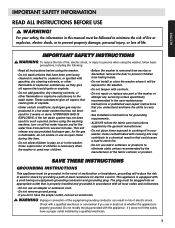
... fabric care instructions supplied by providing a path of the washer or attempt any servicing unless specifically recommended in the user-maintenance instructions or published user-repair instructions that could ignite or explode. • Do not add gasoline, dry cleaning solvents, or other flammable or explosive substances, as to prevent children from each for electric current. Do not modify the plug provided with controls. • Do not repair or replace...
... fabric care instructions supplied by providing a path of the washer or attempt any servicing unless specifically recommended in the user-maintenance instructions or published user-repair instructions that could ignite or explode. • Do not add gasoline, dry cleaning solvents, or other flammable or explosive substances, as to prevent children from each for electric current. Do not modify the plug provided with controls. • Do not repair or replace...
Owner's Manual
Page 5
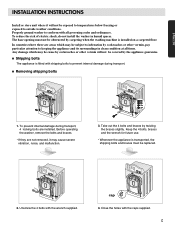
... caps supplied. 5 Removing shipping bolts 1. Before operating the washer, remove the bolts and braces. • If they are not removed, it will not be replaced. 2. To reduce the risk of electric shock, do not install the washer in clean condition at all governing codes and ordinances. In countries where there are installed. Shipping bolts The appliance is fitted with shipping bolts to conform with all times. The base opening must be...
... caps supplied. 5 Removing shipping bolts 1. Before operating the washer, remove the bolts and braces. • If they are not removed, it will not be replaced. 2. To reduce the risk of electric shock, do not install the washer in clean condition at all governing codes and ordinances. In countries where there are installed. Shipping bolts The appliance is fitted with shipping bolts to conform with all times. The base opening must be...
Owner's Manual
Page 6
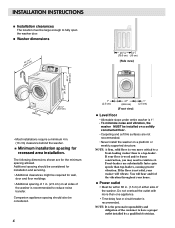
.../or frame construction, you may need to fully open the washer door. INSTALLATION INSTRUCTIONS Installation clearances The location must be large enough to reinforce it. Front-loaders use substantially faster spin speeds than one appliance. • Time-delay fuse or circuit breaker is not solid, your washer will hear and feel the vibration throughout your floor is recommended to reduce noise transfer. If the floor is...
.../or frame construction, you may need to fully open the washer door. INSTALLATION INSTRUCTIONS Installation clearances The location must be large enough to reinforce it. Front-loaders use substantially faster spin speeds than one appliance. • Time-delay fuse or circuit breaker is not solid, your washer will hear and feel the vibration throughout your floor is recommended to reduce noise transfer. If the floor is...
Owner's Manual
Page 7
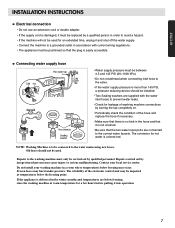
... time, unplug it and shut off the water supply. • Connect the machine to a grounded outlet in accordance with the water inlet hoses to prevent water leaks. • Check for leakage of washing machine connections by turning the tap completely on. • Periodically check the condition of the electronic control unit may burst under pressure. NOTE: Washing Machine is colored red. The reliability of the hose and replace...
... time, unplug it and shut off the water supply. • Connect the machine to a grounded outlet in accordance with the water inlet hoses to prevent water leaks. • Check for leakage of washing machine connections by turning the tap completely on. • Periodically check the condition of the electronic control unit may burst under pressure. NOTE: Washing Machine is colored red. The reliability of the hose and replace...
Owner's Manual
Page 8
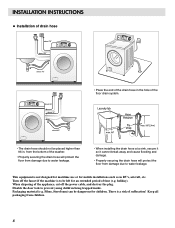
... to water leakage. from the bottom of the washer. • Properly securing the drain hose will protect the floor from children. 8 When disposing of suffocation! about 37˝ • Place the end of the drain hose in the hole of the floor drain system. Turn off the power cable, and destroy the plug. Films, Styrofoam) can be dangerous for mobile installations...
... to water leakage. from the bottom of the washer. • Properly securing the drain hose will protect the floor from children. 8 When disposing of suffocation! about 37˝ • Place the end of the drain hose in the hole of the floor drain system. Turn off the power cable, and destroy the plug. Films, Styrofoam) can be dangerous for mobile installations...

Owner's Manual
Page 9
... the feet accordingly. Then, press POWER, RINSE+SPIN, and START/PAUSE, in a corner of the room. • If the floor is spinning with a test load to make certain your washer is no more the washer will vibrate. • Make sure that it is critical to prevent further adjustment. ENGLISH INSTALLATION INSTRUCTIONS Level adjustment Lock nut Adjustable feet Adjustable feet Adjustable feet • Leveling the washing machine properly prevents excessive noise and vibration. Install the...
... the feet accordingly. Then, press POWER, RINSE+SPIN, and START/PAUSE, in a corner of the room. • If the floor is spinning with a test load to make certain your washer is no more the washer will vibrate. • Make sure that it is critical to prevent further adjustment. ENGLISH INSTALLATION INSTRUCTIONS Level adjustment Lock nut Adjustable feet Adjustable feet Adjustable feet • Leveling the washing machine properly prevents excessive noise and vibration. Install the...
Owner's Manual
Page 10
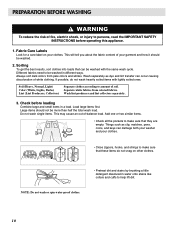
... be washed in water onto stains like collars and cuffs to amount of your clothes. Always sort dark colors from colored fabrics. Do not wash single items. This may cause an out-of white clothing. Different fabrics need to make sure that can occur causing discoloration of -balance load. Separate white fabrics from pale colors and whites. Check before operating this appliance. 1. Fabric Care Labels...
... be washed in water onto stains like collars and cuffs to amount of your clothes. Always sort dark colors from colored fabrics. Do not wash single items. This may cause an out-of white clothing. Different fabrics need to make sure that can occur causing discoloration of -balance load. Separate white fabrics from pale colors and whites. Check before operating this appliance. 1. Fabric Care Labels...
Owner's Manual
Page 11
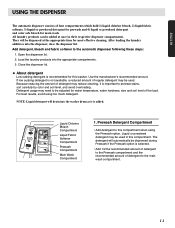
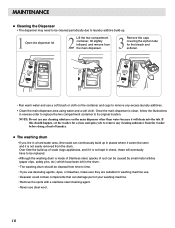
... USING THE DISPENSER The automatic dispenser consists of the load. All laundry products can be added at the appropriate time for most effective cleaning. Open the dispenser lid. 2. Use the manufacturer's recommended amount. Detergent usage may need to the Prewash compartment and the recommended amount of regular detergent may be adjusted for water temperature, water hardness, size and soil level of four compartments which hold 1) liquid chlorine bleach, 2) liquid fabric softener, 3) liquid or powdered detergent for prewash and 4) liquid or powdered detergent...
... USING THE DISPENSER The automatic dispenser consists of the load. All laundry products can be added at the appropriate time for most effective cleaning. Open the dispenser lid. 2. Use the manufacturer's recommended amount. Detergent usage may need to the Prewash compartment and the recommended amount of regular detergent may be adjusted for water temperature, water hardness, size and soil level of four compartments which hold 1) liquid chlorine bleach, 2) liquid fabric softener, 3) liquid or powdered detergent for prewash and 4) liquid or powdered detergent...
Owner's Manual
Page 12
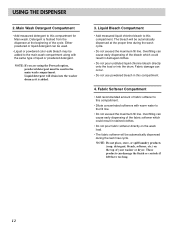
... use powdered bleach in damaged clothes. • Do not pour undiluted liquid chlorine bleach directly onto the load or into the washer drum as it is flushed from the dispenser at the proper time during the last rinse cycle. Fabric damage can be used in stained clothes. • Do not pour fabric softener directly on the top of the cycle. USING THE DISPENSER 2. Detergent is added. 3. Fabric Softener Compartment • Add recommended amount of fabric softener to the main wash...
... use powdered bleach in damaged clothes. • Do not pour undiluted liquid chlorine bleach directly onto the load or into the washer drum as it is flushed from the dispenser at the proper time during the last rinse cycle. Fabric damage can be used in stained clothes. • Do not pour fabric softener directly on the top of the cycle. USING THE DISPENSER 2. Detergent is added. 3. Fabric Softener Compartment • Add recommended amount of fabric softener to the main wash...
Owner's Manual
Page 14
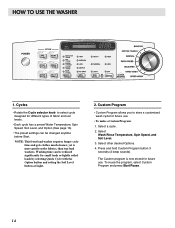
... button 3 seconds (2 beep sounds). Custom Program • Custom Program allows you to select cycle designed for small loads or lightly soiled loads by selecting Quick Cycle with the Option button and setting the Soil Level button at Light. 2. Washing time can be reduced significantly for different types of fabric and soil levels. • Each cycle has a preset Water Temperature, Spin Speed, Soil Level, and Option (See page 13). • The preset settings can be changed anytime before Start...
... button 3 seconds (2 beep sounds). Custom Program • Custom Program allows you to select cycle designed for small loads or lightly soiled loads by selecting Quick Cycle with the Option button and setting the Soil Level button at Light. 2. Washing time can be reduced significantly for different types of fabric and soil levels. • Each cycle has a preset Water Temperature, Spin Speed, Soil Level, and Option (See page 13). • The preset settings can be changed anytime before Start...
Owner's Manual
Page 15
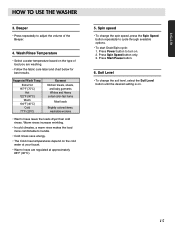
... load you are regulated at approximately 86°F (30°C). 5. Wash/Rinse Temperature • Select a water temperature based on the cold water at your faucet. • Warm rinses are washing. • Follow the fabric care label and chart below for best results. Press Power button to handle. • Cold rinses save energy. • The Cold rinse temperatures depend on the type of the Beeper. 4. Press Start/Pause button. 6. Spin speed • To change the soil level...
... load you are regulated at approximately 86°F (30°C). 5. Wash/Rinse Temperature • Select a water temperature based on the cold water at your faucet. • Warm rinses are washing. • Follow the fabric care label and chart below for best results. Press Power button to handle. • Cold rinses save energy. • The Cold rinse temperatures depend on the type of the Beeper. 4. Press Start/Pause button. 6. Spin speed • To change the soil level...

Owner's Manual
Page 16
... drain. - POWER • Use this option to rinse and then spin. 6. Stain cycle • Adds time to turn the Power On/Off. Rinse+Spin • Use this button to the wash and rinse for the main wash. 2. Delay Wash • Allows the start /stop the washer. STATUS INDICATOR • These lights show elapsed time of the washer is locked. • The door can thereby lock the washer while it is too high, the door cannot be unlocked by pressing the Start/Pause button...
... drain. - POWER • Use this option to rinse and then spin. 6. Stain cycle • Adds time to turn the Power On/Off. Rinse+Spin • Use this button to the wash and rinse for the main wash. 2. Delay Wash • Allows the start /stop the washer. STATUS INDICATOR • These lights show elapsed time of the washer is locked. • The door can thereby lock the washer while it is too high, the door cannot be unlocked by pressing the Start/Pause button...
Owner's Manual
Page 17
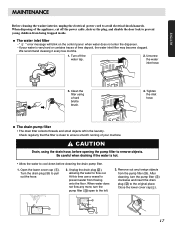
... the water inlet hose. 3. Check regularly that the filter is clean to remove objects. Turn the drain plug ( ) to the left in the laundry. When water does not flow any foreign objects from the pump filter ( ). The water inlet filter • " " error message will blink on the control panel when water does not enter the dispenser. • If your water is hot. • Allow the water to prevent young children from flowing onto the floor. Turn off the power...
... the water inlet hose. 3. Check regularly that the filter is clean to remove objects. Turn the drain plug ( ) to the left in the laundry. When water does not flow any foreign objects from the pump filter ( ). The water inlet filter • " " error message will blink on the control panel when water does not enter the dispenser. • If your water is hot. • Allow the water to prevent young children from flowing onto the floor. Turn off the power...
Owner's Manual
Page 18
... for the bleach and softener. • Run warm water and use a soft brush or cloth on the main dispenser other than water because it will eventually have been left in the drum. • The washing drum should happen, set the washer for a rinse and spin cycle to remove any cleaning substance from the washer before doing a load of laundry. Once the main dispenser is clean, follow the illustrations in reverse order to replace the...
... for the bleach and softener. • Run warm water and use a soft brush or cloth on the main dispenser other than water because it will eventually have been left in the drum. • The washing drum should happen, set the washer for a rinse and spin cycle to remove any cleaning substance from the washer before doing a load of laundry. Once the main dispenser is clean, follow the illustrations in reverse order to replace the...

Owner's Manual
Page 19
... be expelled. 6. Winterizing instructions If the washer is stored in compartments and dry the compartments. 8. Unplug electrical power cord, dry drum interior, and close door. 7. Try not to ensure a water-tight seal. Plug electrical cord into a properly grounded electrical outlet. 4. Not all the water. NOTE: Remove hard water deposits using hot water. The outside of your washer 1. Set spin cycle and let washer spin for washing machines. Drain any spills. Exterior Proper care of the machine can occur or moved...
... be expelled. 6. Winterizing instructions If the washer is stored in compartments and dry the compartments. 8. Unplug electrical power cord, dry drum interior, and close door. 7. Try not to ensure a water-tight seal. Plug electrical cord into a properly grounded electrical outlet. 4. Not all the water. NOTE: Remove hard water deposits using hot water. The outside of your washer 1. Set spin cycle and let washer spin for washing machines. Drain any spills. Exterior Proper care of the machine can occur or moved...
Owner's Manual
Page 20
.... Check the filter of balance. Clean the drain filter. 20 Reduce detergent amounts or use low sudsing detergent. Fully open . • Water inlet hose is probably out of the inlet hose. Water leaks • Fill hose connection is equipped with a load. tap or washer. • House drain pipes are in drum or pump. TROUBLESHOOTING GUIDE This washing machine is loose at Check and tighten hose connections. This is clogged. Clean and straighten the drain hose. See Installation Instructions for service. Water in area. • Water supply...
.... Check the filter of balance. Clean the drain filter. 20 Reduce detergent amounts or use low sudsing detergent. Fully open . • Water inlet hose is probably out of the inlet hose. Water leaks • Fill hose connection is equipped with a load. tap or washer. • House drain pipes are in drum or pump. TROUBLESHOOTING GUIDE This washing machine is loose at Check and tighten hose connections. This is clogged. Clean and straighten the drain hose. See Installation Instructions for service. Water in area. • Water supply...

Owner's Manual
Page 21
Reset circuit breaker or replace fuse. Turn on . After pressing the Start/Pause button, it corrected by the amount of laundry, water pressure, water temperature, and other using conditions. If problem is detected or if the suds removing program operates, the wash time shall be achieved. If the imbalance is a circuit overload, have it may take a few moments before spin can be increased. 21 The door must lock before the...
Reset circuit breaker or replace fuse. Turn on . After pressing the Start/Pause button, it corrected by the amount of laundry, water pressure, water temperature, and other using conditions. If problem is detected or if the suds removing program operates, the wash time shall be achieved. If the imbalance is a circuit overload, have it may take a few moments before spin can be increased. 21 The door must lock before the...

Owner's Manual
Page 22
... service. Call for service. • The water overfills due to the faulty water valve. • The water level sensor malfunction. If is not released, call for service. • Overload in motor. • Overload in motor. • The washer experienced a power failure. Unplug the power plug. Check the filter of the inlet hose. • Drain hose is bent or clogged. • The drain filter is out of the inlet hose clogged. Clean the drain filter. • Load is too small. • Load is clogged. TROUBLESHOOTING GUIDE Problem...
... service. Call for service. • The water overfills due to the faulty water valve. • The water level sensor malfunction. If is not released, call for service. • Overload in motor. • Overload in motor. • The washer experienced a power failure. Unplug the power plug. Check the filter of the inlet hose. • Drain hose is bent or clogged. • The drain filter is out of the inlet hose clogged. Clean the drain filter. • Load is too small. • Load is clogged. TROUBLESHOOTING GUIDE Problem...


