Owner's Manual (English)
Page 2
... for more than a short period of time, unplug it can cause electric shock. Some internal parts carry hazardous voltages. To Prevent Fire or Hazards: Always turn the display OFF if you have not been designed for this display. Important Precautions This unit has been engineered and manufactured to ensure your personal...
... for more than a short period of time, unplug it can cause electric shock. Some internal parts carry hazardous voltages. To Prevent Fire or Hazards: Always turn the display OFF if you have not been designed for this display. Important Precautions This unit has been engineered and manufactured to ensure your personal...
Owner's Manual (English)
Page 4
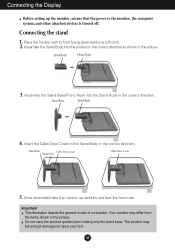
...carry the product upside down holding only the stand base. Insert the Cable Deco Cover in the Stand Body in the picture. Place the monitor with its front facing downward on a soft cloth. 2. Stand Base Cable Deco Cover Stand Body Cable Deco Cover 5. Assemble the Stand Body ...get damaged or injure your foot. Stand Body Hinge Body 3. A3 Once assembled take the monitor up the monitor, ensure that the power to the monitor, the computer system, and other attached devices is turned off. Connecting the Display Before setting up carefully and face the front side Important This ...
...carry the product upside down holding only the stand base. Insert the Cable Deco Cover in the Stand Body in the picture. Place the monitor with its front facing downward on a soft cloth. 2. Stand Base Cable Deco Cover Stand Body Cable Deco Cover 5. Assemble the Stand Body ...get damaged or injure your foot. Stand Body Hinge Body 3. A3 Once assembled take the monitor up the monitor, ensure that the power to the monitor, the computer system, and other attached devices is turned off. Connecting the Display Before setting up carefully and face the front side Important This ...
Owner's Manual (English)
Page 6
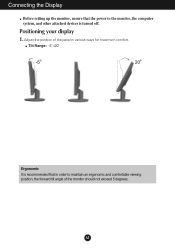
Tilt Range: -5˚~20˚ Ergonomic It is turned off. Connecting the Display Before setting up the monitor, ensure that in order to the monitor, the computer system, and other attached devices is recommended that the power to maintain an ergonomic and comfortable viewing position, the forward tilt angle of the panel in various ways for maximum comfort. A5 Positioning your display 1. Adjust the position of the monitor should not exceed 5 degrees.
Tilt Range: -5˚~20˚ Ergonomic It is turned off. Connecting the Display Before setting up the monitor, ensure that in order to the monitor, the computer system, and other attached devices is recommended that the power to maintain an ergonomic and comfortable viewing position, the forward tilt angle of the panel in various ways for maximum comfort. A5 Positioning your display 1. Adjust the position of the monitor should not exceed 5 degrees.
Owner's Manual (English)
Page 7
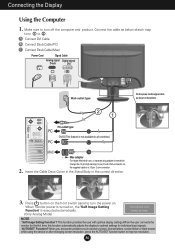
Connect the cable as shown in the picture. Press button on the front switch panel to a 15 pin 2 row connector. 2. When monitor power is turned on, the 'Self Image Setting Function' is needed to change the 15 pin high density (3 row) D-sub VGA connector on . A6 PC-outlet ...user connects the monitor for individual input signals. 'AUTO/SET' Function? A Connect DVI Cable B Connect Dsub Cable (PC) C Connect Dsub Cable (Mac) Power Cord Signal Cable Analog signal Digital signal D-sub DVI Wall-outlet type Fix the power cord & signal cable as below sketch map form 1 to turn the power ...
Connect the cable as shown in the picture. Press button on the front switch panel to a 15 pin 2 row connector. 2. When monitor power is turned on, the 'Self Image Setting Function' is needed to change the 15 pin high density (3 row) D-sub VGA connector on . A6 PC-outlet ...user connects the monitor for individual input signals. 'AUTO/SET' Function? A Connect DVI Cable B Connect Dsub Cable (PC) C Connect Dsub Cable (Mac) Power Cord Signal Cable Analog signal Digital signal D-sub DVI Wall-outlet type Fix the power cord & signal cable as below sketch map form 1 to turn the power ...

Owner's Manual (English)
Page 9
Use this button to turn the display on or off. AUTO IMAGE ADJUSTMENT When adjusting your display image to the ideal settings for the current screen resolution size (display mode). ..., always press the AUTO/SET button prior to select or adjust functions in the On Screen Display. The best display mode is: W1952TQ : 1440 x 900 W2252TQ : 1680 x 1050 Power Button Use this button to select an icon in Sleep Mode (Energy Saving), this button to page A17. This feature is in...
Use this button to turn the display on or off. AUTO IMAGE ADJUSTMENT When adjusting your display image to the ideal settings for the current screen resolution size (display mode). ..., always press the AUTO/SET button prior to select or adjust functions in the On Screen Display. The best display mode is: W1952TQ : 1440 x 900 W2252TQ : 1680 x 1050 Power Button Use this button to select an icon in Sleep Mode (Energy Saving), this button to page A17. This feature is in...
Owner's Manual (English)
Page 11
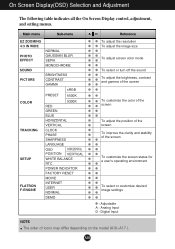
... INDICATOR FACTORY RESET MOVIE INTERNET USER NORMAL DEMO To adjust the resolution To adjust the image size To adjust screen color mode To select or turn off the sound To adjust the brightness, contrast and gamma of the screen To customize the color of the screen To adjust the position of...
... INDICATOR FACTORY RESET MOVIE INTERNET USER NORMAL DEMO To adjust the resolution To adjust the image size To adjust screen color mode To select or turn off the sound To adjust the brightness, contrast and gamma of the screen To customize the color of the screen To adjust the position of...
Owner's Manual (English)
Page 15
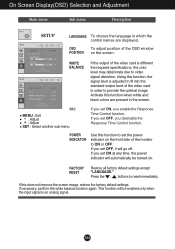
.... RTC MENU : Exit : Adjust : Adjust SET : Select another sub-menu If you set ON, you set the power indicator on the front side of the monitor to ON or OFF. If you enable the Response Time Control function. This function will automatically be enabled only when the input signal is an... into the standard output level of the OSD window POSITION on . If this function to set ON at any time, the power indicator will be turned on the screen. OSD To adjust position of the video card in the screen. On Screen Display(OSD) Selection and Adjustment Main menu Sub menu...
.... RTC MENU : Exit : Adjust : Adjust SET : Select another sub-menu If you set ON, you set the power indicator on the front side of the monitor to ON or OFF. If you enable the Response Time Control function. This function will automatically be enabled only when the input signal is an... into the standard output level of the OSD window POSITION on . If this function to set ON at any time, the power indicator will be turned on the screen. OSD To adjust position of the video card in the screen. On Screen Display(OSD) Selection and Adjustment Main menu Sub menu...

Owner's Manual (English)
Page 17
... NORMAL: The PhotoEffect function is displayed by white, black, gray. MONOCHROME: This option changed the screen to be Gray tone. SOUND SOUND To select or turn off the Buzzer sound. The Buzzer sound operates in below cases: • DC power On • DC power Off • Main Button Menu On •... option changes the screen to be Sepia tone. The Sepia tone is to add the effect to select sound (two kinds of Buzzer sound) or turn off the sound, and use 'MENU' button to save the selection and exit the OSD menu. On Screen Display(OSD) Selection and Adjustment Main menu...
... NORMAL: The PhotoEffect function is displayed by white, black, gray. MONOCHROME: This option changed the screen to be Gray tone. SOUND SOUND To select or turn off the Buzzer sound. The Buzzer sound operates in below cases: • DC power On • DC power Off • Main Button Menu On •... option changes the screen to be Sepia tone. The Sepia tone is to add the effect to select sound (two kinds of Buzzer sound) or turn off the sound, and use 'MENU' button to save the selection and exit the OSD menu. On Screen Display(OSD) Selection and Adjustment Main menu...

Owner's Manual (English)
Page 19
... any time by pushing the MENU button for service. You can secure the current control settings, so that they cannot be inadvertently changed. properly to turn on the PC. ● Do you see an "OUT OF • This message appears when the signal from the RANGE" message on PC (video card...
... any time by pushing the MENU button for service. You can secure the current control settings, so that they cannot be inadvertently changed. properly to turn on the PC. ● Do you see an "OUT OF • This message appears when the signal from the RANGE" message on PC (video card...


