
User Manual
Page 6
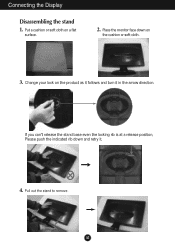
Change your lock on the product as it follows and turn it . 4. Put a cushion or soft cloth on the cushion or soft cloth. 3. Place the monitor face down and retry it in the arrow direction. A5 If you can't release the stand base even the locking rib is at a release position, Please push the indicated rib down on a flat surface. 2. Connecting the Display Disassembling the stand 1. Pull out the stand to remove.
Change your lock on the product as it follows and turn it . 4. Put a cushion or soft cloth on the cushion or soft cloth. 3. Place the monitor face down and retry it in the arrow direction. A5 If you can't release the stand base even the locking rib is at a release position, Please push the indicated rib down on a flat surface. 2. Connecting the Display Disassembling the stand 1. Pull out the stand to remove.
User Manual
Page 8
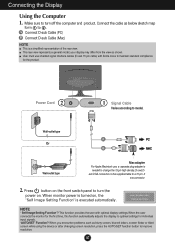
...power on the front switch panel to model. Connecting the Display Using the Computer 1. User must use , a separate plug adapter is needed to change the 15 pin high density (3 row) Dsub VGA connector on , the 'Self Image Setting Function' is a simplified representation of the rear view....and product. your display may differ from the view as blurry screen, blurred letters, screen flicker or tilted screen while using the device or after changing screen resolution, press the AUTO/SET function button to 2 . This rear view represents a general model; Press button on . NOTE ' Self ...
...power on the front switch panel to model. Connecting the Display Using the Computer 1. User must use , a separate plug adapter is needed to change the 15 pin high density (3 row) Dsub VGA connector on , the 'Self Image Setting Function' is a simplified representation of the rear view....and product. your display may differ from the view as blurry screen, blurred letters, screen flicker or tilted screen while using the device or after changing screen resolution, press the AUTO/SET function button to 2 . This rear view represents a general model; Press button on . NOTE ' Self ...
User Manual
Page 10
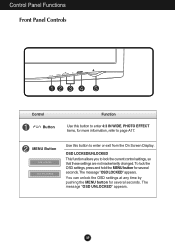
OSD LOCKED/UNLOCKED This function allows you to lock the current control settings, so that these settings are not inadvertently changed. You can unlock the OSD settings at any time by pushing the MENU button for several seconds. MENU Button Use this button to enter 4:3 IN ...
OSD LOCKED/UNLOCKED This function allows you to lock the current control settings, so that these settings are not inadvertently changed. You can unlock the OSD settings at any time by pushing the MENU button for several seconds. MENU Button Use this button to enter 4:3 IN ...
User Manual
Page 11
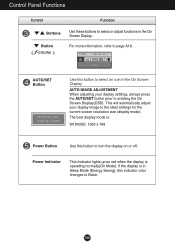
...Display(OSD). A10 Control Panel Functions Control Function Buttons Use these buttons to select or adjust functions in Sleep Mode (Energy Saving), this indicator color changes to flicker. AUTO/SET Button Use this button to page A18. Power Indicator This Indicator lights up as red when the display is... : W1943SE: 1360 x 768 Power Button Use this button to select an icon in the On Screen Display. Button ( ) For more information, refer to turn the ...
...Display(OSD). A10 Control Panel Functions Control Function Buttons Use these buttons to select or adjust functions in Sleep Mode (Energy Saving), this indicator color changes to flicker. AUTO/SET Button Use this button to page A18. Power Indicator This Indicator lights up as red when the display is... : W1943SE: 1360 x 768 Power Button Use this button to select an icon in the On Screen Display. Button ( ) For more information, refer to turn the ...
User Manual
Page 16
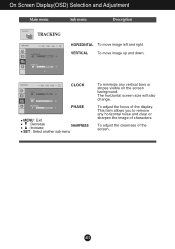
To adjust the focus of characters. CLOCK PHASE MENU : Exit : Decrease : Increase SHARPNESS SET : Select another sub-menu To minimize any horizontal noise and clear or sharpen the image of the display. This item allows you to remove any vertical bars or stripes visible on the screen background. To adjust the clearness of the screen. The horizontal screen size will also change. A15 On Screen Display(OSD) Selection and Adjustment Main menu Sub menu Description TRACKING TRACKING HORIZONTAL To move image up and down. VERTICAL To move image left and right.
To adjust the focus of characters. CLOCK PHASE MENU : Exit : Decrease : Increase SHARPNESS SET : Select another sub-menu To minimize any horizontal noise and clear or sharpen the image of the display. This item allows you to remove any vertical bars or stripes visible on the screen background. To adjust the clearness of the screen. The horizontal screen size will also change. A15 On Screen Display(OSD) Selection and Adjustment Main menu Sub menu Description TRACKING TRACKING HORIZONTAL To move image up and down. VERTICAL To move image left and right.
User Manual
Page 18
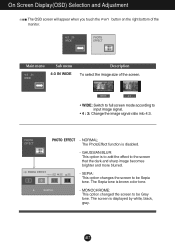
... screen to the screen that the dark and sharp image becomes brighter and more blurred. - MONOCHROME: This option changed the screen to input image signal. • 4 : 3: Change the image signal ratio into 4:3. button on the right bottom of the Main menu Sub menu 4:3 IN WIDE Description To select the image size of...
... screen to the screen that the dark and sharp image becomes brighter and more blurred. - MONOCHROME: This option changed the screen to input image signal. • 4 : 3: Change the image signal ratio into 4:3. button on the right bottom of the Main menu Sub menu 4:3 IN WIDE Description To select the image size of...
User Manual
Page 20
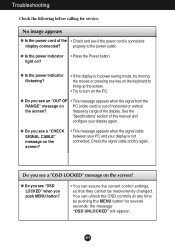
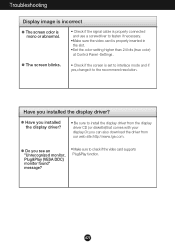
.... G Is the power indicator flickering? • If the display is not connected. You can secure the current control settings, so that they cannot be inadvertently changed. See the 'Specifications' section of horizontal or vertical the screen? No image appears G Is the power cord of the display. properly to turn on ?
.... G Is the power indicator flickering? • If the display is not connected. You can secure the current control settings, so that they cannot be inadvertently changed. See the 'Specifications' section of horizontal or vertical the screen? No image appears G Is the power cord of the display. properly to turn on ?
User Manual
Page 21
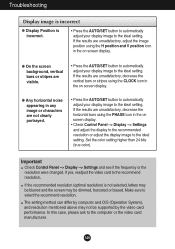
... resolution. G Any horizontal noise appearing in the on screen display. Important Check Control Panel --> Display --> Settings and see if the frequency or the resolution were changed. Make sure to the ideal setting. If the results are unsatisfactory, decrease the vertical bars or stripes using the PHASE icon in any image or...
... resolution. G Any horizontal noise appearing in the on screen display. Important Check Control Panel --> Display --> Settings and see if the frequency or the resolution were changed. Make sure to the ideal setting. If the results are unsatisfactory, decrease the vertical bars or stripes using the PHASE icon in any image or...
User Manual
Page 22
... 24 bits (true color) at Control Panel -Settings . ❁ The screen blinks. • Check if the screen is set to interlace mode and if yes,change it to check if the video card supports Plug&Play function. A21
... 24 bits (true color) at Control Panel -Settings . ❁ The screen blinks. • Check if the screen is set to interlace mode and if yes,change it to check if the video card supports Plug&Play function. A21
User Manual
Page 23
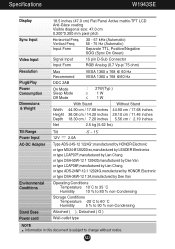
A22 Specifications W1943SE Display Sync Input Video Input Resolution Plug&Play Power Consumption Dimensions & Weight 18.5 inches (47.0 cm) Flat ...type MU24-B120200-xx,manufactured by LEADER Electronics or type LCAP07F,manufactured by Lien Chang or type DSA-50W-12 1 120420,manufactured by Dee Van or type LCAP08F,manufactured by Lien Chang or type ADS-24NP-12-1 12024G,manufactured by HONOR Electronic or type DSA-...730;C Humidity 5 % to 90 % non-Condensing Attached ( ), Detached ( O ) Wall-outlet type NOTE Information in this document is subject to change without notice. Vertical Freq.
A22 Specifications W1943SE Display Sync Input Video Input Resolution Plug&Play Power Consumption Dimensions & Weight 18.5 inches (47.0 cm) Flat ...type MU24-B120200-xx,manufactured by LEADER Electronics or type LCAP07F,manufactured by Lien Chang or type DSA-50W-12 1 120420,manufactured by Dee Van or type LCAP08F,manufactured by Lien Chang or type ADS-24NP-12-1 12024G,manufactured by HONOR Electronic or type DSA-...730;C Humidity 5 % to 90 % non-Condensing Attached ( ), Detached ( O ) Wall-outlet type NOTE Information in this document is subject to change without notice. Vertical Freq.
Brochure
Page 2
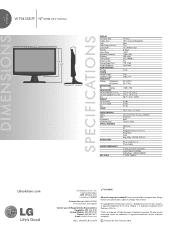
....com/support Contact your LG Regional Sales Representative Hospitality: 800.228.1236 Vertical Markets: 800.897.8788 Channel: 800.897.8871 E-mail: [email protected] SPEC_1943SE-PF_011213_PR All screen images are simulated. lcd dimensions monitor specifications W1943SE-PF 19" class (18...Swap Program available Call Toll-Free 1-800-243-0000 7 19192 18601 9 LGsolutions.com LG Electronics U.S.A., Inc. Design, features and specifications subject to change without notice. © Copyright 2012 LG Electronics USA, Inc. "LG Life's Good" is a registered trademark of their respective companies.
....com/support Contact your LG Regional Sales Representative Hospitality: 800.228.1236 Vertical Markets: 800.897.8788 Channel: 800.897.8871 E-mail: [email protected] SPEC_1943SE-PF_011213_PR All screen images are simulated. lcd dimensions monitor specifications W1943SE-PF 19" class (18...Swap Program available Call Toll-Free 1-800-243-0000 7 19192 18601 9 LGsolutions.com LG Electronics U.S.A., Inc. Design, features and specifications subject to change without notice. © Copyright 2012 LG Electronics USA, Inc. "LG Life's Good" is a registered trademark of their respective companies.


