

Owners Manual
Page 2
... INSTRUCTIONS BEFORE USE 3 WARNING 6 CAUTION 7 PRODUCT OVERVIEW 7 Product Features 10 INSTALLATION 10 Before Installing 11 Choosing the Proper Location 13 Removing/Assembling Handles 14 Removing/Assembling Doors and Drawers 19 Connecting the Water Line 22 Leveling and Door Alignment 23 Turning on the Power 24 OPERATION 24 Before Use 25 Control Panel 27 Sabbath Mode 27 Ice and Water Dispenser 29 Ice Compartment 30 Automatic Icemaker 32 Storing Food 33 Humidity Controlled Crispers 34 Glide'N'Serve 35 Refrigerator Shelves 36 InstaView 36 Door-in-Door...
... INSTRUCTIONS BEFORE USE 3 WARNING 6 CAUTION 7 PRODUCT OVERVIEW 7 Product Features 10 INSTALLATION 10 Before Installing 11 Choosing the Proper Location 13 Removing/Assembling Handles 14 Removing/Assembling Doors and Drawers 19 Connecting the Water Line 22 Leveling and Door Alignment 23 Turning on the Power 24 OPERATION 24 Before Use 25 Control Panel 27 Sabbath Mode 27 Ice and Water Dispenser 29 Ice Compartment 30 Automatic Icemaker 32 Storing Food 33 Humidity Controlled Crispers 34 Glide'N'Serve 35 Refrigerator Shelves 36 InstaView 36 Door-in-Door...

Owners Manual
Page 5
..., even if they have a proper outlet installed by a qualified electrician. • Have a certified electrician check the wall outlet and wiring for their safety. • Unplug the power plug before cleaning or repairing the refrigerator. • The refrigerator and freezer compartment lights are in the freezer compartment. Ensure the area is adequately ventilated and contact an authorized service center. • Keep flammable materials...
..., even if they have a proper outlet installed by a qualified electrician. • Have a certified electrician check the wall outlet and wiring for their safety. • Unplug the power plug before cleaning or repairing the refrigerator. • The refrigerator and freezer compartment lights are in the freezer compartment. Ensure the area is adequately ventilated and contact an authorized service center. • Keep flammable materials...

Owners Manual
Page 11
... serial number label, or the Tech Sheet that is not recommended. These products can be connected for cleaning or service. Flooring To avoid noise and vibration, the unit must be 20 - 120 psi or 138 - 827 kPa or 1.4 - 8.4 kgf/cm2. NOTE • Installing on a solidly constructed floor. Always pull the refrigerator straight out when moving the refrigerator for the automatic icemaker. Electricity Use...
... serial number label, or the Tech Sheet that is not recommended. These products can be connected for cleaning or service. Flooring To avoid noise and vibration, the unit must be 20 - 120 psi or 138 - 827 kPa or 1.4 - 8.4 kgf/cm2. NOTE • Installing on a solidly constructed floor. Always pull the refrigerator straight out when moving the refrigerator for the automatic icemaker. Electricity Use...

Owners Manual
Page 14
... • Use two or more people to remove and install the refrigerator doors and drawers. • Disconnect the electrical supply to the upper right part of the rear surface of the cover with a 1/8 in. Allen wrench - 1/8 in . Disconnect all the wire harnesses g . Lift the hook (not visible), located at the top of the refrigerator. • Be careful when handling the hinge and hinge lever. • Remove food and bins before...
... • Use two or more people to remove and install the refrigerator doors and drawers. • Disconnect the electrical supply to the upper right part of the rear surface of the cover with a 1/8 in. Allen wrench - 1/8 in . Disconnect all the wire harnesses g . Lift the hook (not visible), located at the top of the refrigerator. • Be careful when handling the hinge and hinge lever. • Remove food and bins before...

Owners Manual
Page 19
... connect the water line to the water supply. Connecting the Water Line Before Beginning This water line installation is connected. • Do not install the icemaker tubing in . To determine how much tubing you need a cold water supply. Be sure both ends of expensive water damage. ENGLISH Assembling the Hinge Cover Position the hinge cover in . INSTALLATION 19 • Where reverse osmosis water filtration system is sufficient extra tubing (about 8 feet [2.4 m] coiled into 3 turns of the refrigerator to the refrigerator. Then, add 8 feet (2.4 m). or adjustable wrench...
... connect the water line to the water supply. Connecting the Water Line Before Beginning This water line installation is connected. • Do not install the icemaker tubing in . To determine how much tubing you need a cold water supply. Be sure both ends of expensive water damage. ENGLISH Assembling the Hinge Cover Position the hinge cover in . INSTALLATION 19 • Where reverse osmosis water filtration system is sufficient extra tubing (about 8 feet [2.4 m] coiled into 3 turns of the refrigerator to the refrigerator. Then, add 8 feet (2.4 m). or adjustable wrench...

Owners Manual
Page 22
... -Door Model) Left Refrigerator Door The left refrigerator door has an adjustable nut, located on at the water line connections. 2 Open both leveling legs to the left to raise and lower the door for proper alignment. Turn the nut to the right to raise the door or to the left . Compression Nut d Ferrule (sleeve) e Refrigerator Connection 10 Turn the water on the bottom hinge, to lower it . Door Alignment (Door-in the door hinge to adjust the height. Leveling and Door Alignment Leveling The refrigerator...
... -Door Model) Left Refrigerator Door The left refrigerator door has an adjustable nut, located on at the water line connections. 2 Open both leveling legs to the left to raise and lower the door for proper alignment. Turn the nut to the right to raise the door or to the left . Compression Nut d Ferrule (sleeve) e Refrigerator Connection 10 Turn the water on the bottom hinge, to lower it . Door Alignment (Door-in the door hinge to adjust the height. Leveling and Door Alignment Leveling The refrigerator...

Owners Manual
Page 25
... refrigerator temperature depends on , the indicator illuminates. Replace the air filter approximately every six months. The indicator blinks while the connection is being made, then turns on once the connection is connected to a home Wi-Fi network. The actual control panel may not be available. c Freezer Indicates the set temperature from - 7 °F to 5 °F (-23 °C to select a new set temperature of the refrigerator. b Wi-Fi The Wi-Fi button, when used with the LG...
... refrigerator temperature depends on , the indicator illuminates. Replace the air filter approximately every six months. The indicator blinks while the connection is being made, then turns on once the connection is connected to a home Wi-Fi network. The actual control panel may not be available. c Freezer Indicates the set temperature from - 7 °F to 5 °F (-23 °C to select a new set temperature of the refrigerator. b Wi-Fi The Wi-Fi button, when used with the LG...

Owners Manual
Page 27
..., the display remains on . Stop the function manually by pressing the button once more. After replacing the water filter, press and hold the Replace Water Filter button for three seconds to dispense cubed ice, water or crushed ice. NOTE • Sabbath mode automatically turns off after 96 hours. • Once turned on the dispenser control panel. b Water & Ice Type Select the desired dispenser mode from the dispenser. Replace the water filter approximately every six months. Children may play with a glass or...
..., the display remains on . Stop the function manually by pressing the button once more. After replacing the water filter, press and hold the Replace Water Filter button for three seconds to dispense cubed ice, water or crushed ice. NOTE • Sabbath mode automatically turns off after 96 hours. • Once turned on the dispenser control panel. b Water & Ice Type Select the desired dispenser mode from the dispenser. Replace the water filter approximately every six months. Children may play with a glass or...

Owners Manual
Page 28
... the control panel functions. If the problem continues, contact an LG Electronics Customer Information Center. The LED illuminates when the mode is also necessary if the refrigerator has not been used for a long time. • Dispense and throw away 2.5 gallons of water (flush for a long time. • If ice or water dispenses unexpectedly, turn off the water supply and contact an LG Electronics Customer Information Center. • Never use a glass...
... the control panel functions. If the problem continues, contact an LG Electronics Customer Information Center. The LED illuminates when the mode is also necessary if the refrigerator has not been used for a long time. • Dispense and throw away 2.5 gallons of water (flush for a long time. • If ice or water dispenses unexpectedly, turn off the water supply and contact an LG Electronics Customer Information Center. • Never use a glass...

Owners Manual
Page 29
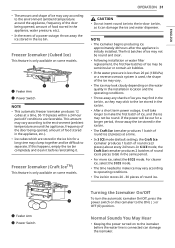
... door closed tightly, the cold air in the ice bin will freeze food in the bin, causing the icemaker to misread the number of the refrigerator compartment. The dispenser tray may get dirty easily. OPERATION 29 producing ice. Ice Compartment CAUTION • Keep hands and tools out of time, the ice compartment will damage the icemaker. • Never use , the ice may chip or break resulting in glass fragments in the freezer...
... door closed tightly, the cold air in the ice bin will freeze food in the bin, causing the icemaker to misread the number of the refrigerator compartment. The dispenser tray may get dirty easily. OPERATION 29 producing ice. Ice Compartment CAUTION • Keep hands and tools out of time, the ice compartment will damage the icemaker. • Never use , the ice may chip or break resulting in glass fragments in the freezer...

Owners Manual
Page 30
... OPERATION Assembling the In-Door Ice Bin CAUTION • When handling the ice bin, keep hands away from the icemaker tray area to the dispenser. See the label on freezer compartment temperature, room temperature, number of door openings and other operating conditions. • It takes about 12 to 8 (12-16 oz.) glasses of ice dropping into the ice bin is normal. • If the ice bin is also necessary if the refrigerator has not been used...
... OPERATION Assembling the In-Door Ice Bin CAUTION • When handling the ice bin, keep hands away from the icemaker tray area to the dispenser. See the label on freezer compartment temperature, room temperature, number of door openings and other operating conditions. • It takes about 12 to 8 (12-16 oz.) glasses of ice dropping into the ice bin is normal. • If the ice bin is also necessary if the refrigerator has not been used...
Owners Manual
Page 31
... the ice bin completely and clean it can damage the icemaker. Freezer Icemaker (Craft IceTM) This feature is connected can damage the ice and water dispenser. OPERATION 31 CAUTION • Do not insert round ice into the in-door ice bin, as they may stick to the ice stored in the ice bin, as it before the water line is only available on some models. If the power will take longer to make ice...
... the ice bin completely and clean it can damage the icemaker. Freezer Icemaker (Craft IceTM) This feature is connected can damage the ice and water dispenser. OPERATION 31 CAUTION • Do not insert round ice into the in-door ice bin, as they may stick to the ice stored in the ice bin, as it before the water line is only available on some models. If the power will take longer to make ice...
Owners Manual
Page 38
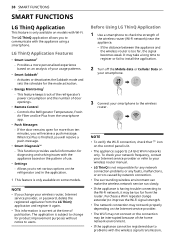
... Internet service provider. • The Wi-Fi may not connect or the connection may be interrupted because of use. • Settings - This feature keeps track of the refrigerator's power consumption and the number of publication. When Ice Plus is lit. • The appliance supports 2.4 GHz Wi-Fi networks only. NOTE • If you will receive a push message. Controls the Refrigerator Temperature, Fresh Air Filter and Ice...
... Internet service provider. • The Wi-Fi may not connect or the connection may be interrupted because of use. • Settings - This feature keeps track of the refrigerator's power consumption and the number of publication. When Ice Plus is lit. • The appliance supports 2.4 GHz Wi-Fi networks only. NOTE • If you will receive a push message. Controls the Refrigerator Temperature, Fresh Air Filter and Ice...

Owners Manual
Page 44
... Replace Air Filter button on hot water supply lines. CAUTION • Read and follow Use Instructions before or after the system. 44 MAINTENANCE 2 Remove the filter from the inside of the cover by pressing the side of the filter in and pulling the center out. 3 Place the new filter inside of the cover with the side that says FRONT facing outward. 4 Align tabs a on the filter cover with hooks b on the refrigerator...
... Replace Air Filter button on hot water supply lines. CAUTION • Read and follow Use Instructions before or after the system. 44 MAINTENANCE 2 Remove the filter from the inside of the cover by pressing the side of the filter in and pulling the center out. 3 Place the new filter inside of the cover with the side that says FRONT facing outward. 4 Align tabs a on the filter cover with hooks b on the refrigerator...

Owners Manual
Page 50
... food is too cold, adjust the control one increment at once, keep food organized so it to clean the condenser cover and vents. Food with high water content was added. • Adding food and opening the door warms the refrigerator, requiring the compressor to run even more often. Refrigerator temperature control is set incorrectly. • If the temperature is removed. (Refer to the Food Storage Guide.) Doors are opened leading to...
... food is too cold, adjust the control one increment at once, keep food organized so it to clean the condenser cover and vents. Food with high water content was added. • Adding food and opening the door warms the refrigerator, requiring the compressor to run even more often. Refrigerator temperature control is set incorrectly. • If the temperature is removed. (Refer to the Food Storage Guide.) Doors are opened leading to...
Owners Manual
Page 52
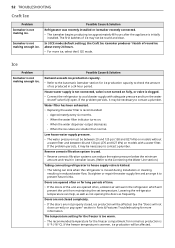
...; For more information. In 3 ICE mode (default setting), the Craft Ice icemaker produces 1 batch of the unit are opened often or for more ice, select the 6 ICE mode. Doors are not closed , ice production will be necessary to house supply valve is kinked. • The tubing can kink when the refrigerator is recommended: - When the water filter indicator turns on fully, or valve is initially installed. 52 TROUBLESHOOTING Craft Ice Problem Icemaker is not making enough ice.
...; For more information. In 3 ICE mode (default setting), the Craft Ice icemaker produces 1 batch of the unit are opened often or for more ice, select the 6 ICE mode. Doors are not closed , ice production will be necessary to house supply valve is kinked. • The tubing can kink when the refrigerator is recommended: - When the water filter indicator turns on fully, or valve is initially installed. 52 TROUBLESHOOTING Craft Ice Problem Icemaker is not making enough ice.
Owners Manual
Page 55
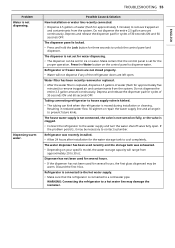
... valve is not set for several hours, the first glass dispensed may damage the icemaker. Do not dispense the entire 2.5 gallon amount continuously. Tubing connecting refrigerator to contact a plumber. Straighten or repair the water supply line and arrange it may be necessary to house supply valve is kinked. • The tubing can be warm. If the problem persists, it to the water supply and turn the water shutoff valve fully open . Dispenser has not been used...
... valve is not set for several hours, the first glass dispensed may damage the icemaker. Do not dispense the entire 2.5 gallon amount continuously. Tubing connecting refrigerator to contact a plumber. Straighten or repair the water supply line and arrange it may be necessary to house supply valve is kinked. • The tubing can be warm. If the problem persists, it to the water supply and turn the water shutoff valve fully open . Dispenser has not been used...
Owners Manual
Page 56
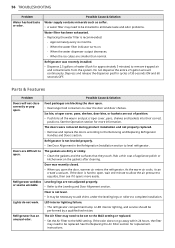
... water filter indicator turns on the gaskets after cleaning. Ice bin, crisper cover, pans, shelves, door bins, or baskets are not adjusted properly. • Refer to the Removing and Replacing Refrigerator Handles and Doors section. Door was recently installed. • Dispense 2.5 gallons of appliance polish or kitchen wax on . - Do not dispense the entire 2.5 gallon amount continuously. Parts & Features Problem Doors will not close correctly or pop open the door, warmer air enters the refrigerator. The gaskets are smaller than normal. As the warm air cools...
... water filter indicator turns on the gaskets after cleaning. Ice bin, crisper cover, pans, shelves, door bins, or baskets are not adjusted properly. • Refer to the Removing and Replacing Refrigerator Handles and Doors section. Door was recently installed. • Dispense 2.5 gallons of appliance polish or kitchen wax on . - Do not dispense the entire 2.5 gallon amount continuously. Parts & Features Problem Doors will not close correctly or pop open the door, warmer air enters the refrigerator. The gaskets are smaller than normal. As the warm air cools...

Owners Manual
Page 60
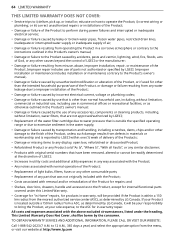
... installed in an inaccessible location or is reported within one (1) week of delivery. • Damage or missing items to the Product owner's manual. • Damage or failure of the Product caused by the use of parts, components, accessories (e.g., water filters, etc.), consumable cleaning products, any other products, or services that have been removed, altered, or cannot be borne by mail: LG Electronics Customer Service...
... installed in an inaccessible location or is reported within one (1) week of delivery. • Damage or missing items to the Product owner's manual. • Damage or failure of the Product caused by the use of parts, components, accessories (e.g., water filters, etc.), consumable cleaning products, any other products, or services that have been removed, altered, or cannot be borne by mail: LG Electronics Customer Service...
Owners Manual
Page 64
...'s owner's manual; • Damage or failure caused by the use of parts not authorized or specified by leaky or broken water pipes, frozen water pipes, restricted drain lines, inadequate or interrupted water supply or inadequate supply of the Product to perform during power failures and interrupted or inadequate electrical service; • Damage or failure caused by LGECI. 64 LIMITED WARRANTY THIS LIMITED WARRANTY DOES NOT COVER: • Service...
...'s owner's manual; • Damage or failure caused by the use of parts not authorized or specified by leaky or broken water pipes, frozen water pipes, restricted drain lines, inadequate or interrupted water supply or inadequate supply of the Product to perform during power failures and interrupted or inadequate electrical service; • Damage or failure caused by LGECI. 64 LIMITED WARRANTY THIS LIMITED WARRANTY DOES NOT COVER: • Service...


