
Owners Manual
Page 6
... 11 HD camera overview 12 Remote Control 3 Installation 13 Connections 13 Precautions 13 Connection overview 14 HD camera connection 15 HDMI connection 16 PC connection 17 Connecting Network 18 Connecting a Headphone 18 Connecting a Microphone 19 Connecting Power 19 System connection check 20 Initial settings 24 Main screen overview 25 System configuration menu 25 User settings 25 General 26 Audio 27 Video 28 DateTime 29 Admin settings 29 Call settings 33 Network settings 37 System settings 38 System...
... 11 HD camera overview 12 Remote Control 3 Installation 13 Connections 13 Precautions 13 Connection overview 14 HD camera connection 15 HDMI connection 16 PC connection 17 Connecting Network 18 Connecting a Headphone 18 Connecting a Microphone 19 Connecting Power 19 System connection check 20 Initial settings 24 Main screen overview 25 System configuration menu 25 User settings 25 General 26 Audio 27 Video 28 DateTime 29 Admin settings 29 Call settings 33 Network settings 37 System settings 38 System...

Owners Manual
Page 7
...manually 41 Placing a Call from the Call History 41 Placing a Call from the Directory 42 Placing a Call using the Speed Dial 42 Answering or Rejecting a Call 42 Managing a Call 42 Ending a Call 42 Hiding or Showing User Interface Elements 42 Managing Audio 43 Managing Video... End Camera Control 48 Using Far End Camera Preset 48 Using SnapShot 48 Using the Web Service 49 Upgrading your System Software 49 Uploading the Certification file 49 Importing or exporting the address book 5 Appendix 50 Trouble Shooting 52 Open source software notice 53 Specifications Contents ...
...manually 41 Placing a Call from the Call History 41 Placing a Call from the Directory 42 Placing a Call using the Speed Dial 42 Answering or Rejecting a Call 42 Managing a Call 42 Ending a Call 42 Hiding or Showing User Interface Elements 42 Managing Audio 43 Managing Video... End Camera Control 48 Using Far End Camera Preset 48 Using SnapShot 48 Using the Web Service 49 Upgrading your System Software 49 Uploading the Certification file 49 Importing or exporting the address book 5 Appendix 50 Trouble Shooting 52 Open source software notice 53 Specifications Contents ...

Owners Manual
Page 8
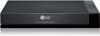
... Standard • Provide HD video quality - 1 280 X 720 (30 fps) • Available changing the screen layout of video image • Provide graphic presentation using Content Sharing Technology (Share Document/Audio/Video) • Provide administrator password and H235 codec (Advanced Encryption Standard) for video conferencing that enables people in a different space such as conference room or office to have...
... Standard • Provide HD video quality - 1 280 X 720 (30 fps) • Available changing the screen layout of video image • Provide graphic presentation using Content Sharing Technology (Share Document/Audio/Video) • Provide administrator password and H235 codec (Advanced Encryption Standard) for video conferencing that enables people in a different space such as conference room or office to have...
Owners Manual
Page 12
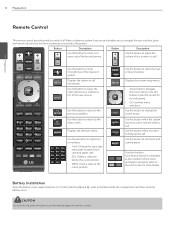
...to select the video input source (camera or PC) of the near camera. Use this button to change the screen ...Battery Installation Open the battery cover, replace batteries (1.5 V AAA) matching 3 and 3 ends to input text or numbers. • 1/a/A: Change the ...menu options. Use this button when you to navigate the user interface, place and receive calls and control far end cameras connected to the system. Use this button when the system receives a call or manully make a call. Use this may damage the remote control. Each button function is changed as this button to mute microphones...
...to select the video input source (camera or PC) of the near camera. Use this button to change the screen ...Battery Installation Open the battery cover, replace batteries (1.5 V AAA) matching 3 and 3 ends to input text or numbers. • 1/a/A: Change the ...menu options. Use this button when you to navigate the user interface, place and receive calls and control far end cameras connected to the system. Use this button when the system receives a call or manully make a call. Use this may damage the remote control. Each button function is changed as this button to mute microphones...

Owners Manual
Page 15
... the digital video and audio signals from the system to "Built-In Speaker" or "Headset Out". Please go to Setup > User > Audio > Audio Out and change Audio Out to your monitor set with the HDMI cable as shown in speaker or headphone because DVI does not support audio interface. HDMI cable connection 3 Installation HDMI OUT CAMERA RGB(PC) IN LAN...
... the digital video and audio signals from the system to "Built-In Speaker" or "Headset Out". Please go to Setup > User > Audio > Audio Out and change Audio Out to your monitor set with the HDMI cable as shown in speaker or headphone because DVI does not support audio interface. HDMI cable connection 3 Installation HDMI OUT CAMERA RGB(PC) IN LAN...

Owners Manual
Page 16
PC connection HDMI OUT CAMERA 3 RGB(PC) IN LAN DC IN POWER Installation Connect the PC and the codec unit with this connection. You can give a presentation to codec unit. 16 Installation PC connection Transmits the analog video signal from your PC to the far-end user with the optional D-sub 15 pin signal cable as shown in the following illustrations.
PC connection HDMI OUT CAMERA 3 RGB(PC) IN LAN DC IN POWER Installation Connect the PC and the codec unit with this connection. You can give a presentation to codec unit. 16 Installation PC connection Transmits the analog video signal from your PC to the far-end user with the optional D-sub 15 pin signal cable as shown in the following illustrations.

Owners Manual
Page 19
Press the power button on the monitor. 2. NOTE Video out of the codec unit. Power connection HDMI OUT CAMERA RGB(PC) IN LAN DC IN POWER Installation 19 3 Installation CAUTION You must use the system. Turn on the rear of RVF1000 default setting is 720p. System booting will be displayed. Do the next configuration. When the booting is rebooted automatically as...
Press the power button on the monitor. 2. NOTE Video out of the codec unit. Power connection HDMI OUT CAMERA RGB(PC) IN LAN DC IN POWER Installation 19 3 Installation CAUTION You must use the system. Turn on the rear of RVF1000 default setting is 720p. System booting will be displayed. Do the next configuration. When the booting is rebooted automatically as...

Owners Manual
Page 20
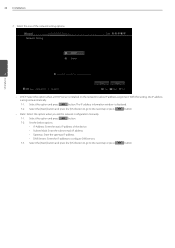
... configuration menu will commence. System booting will be displayed during the system booting. 3. The logo image will be displayed. 4. Select the [Next] button and press [OK] button to go to use the Start Wizard option than Manual setting option. • Manual Setting: Skip the wizard configuration and display the main setup window. Installation 20 Installation Initial settings When you may not connect...
... configuration menu will commence. System booting will be displayed during the system booting. 3. The logo image will be displayed. 4. Select the [Next] button and press [OK] button to go to use the Start Wizard option than Manual setting option. • Manual Setting: Skip the wizard configuration and display the main setup window. Installation 20 Installation Initial settings When you may not connect...
Owners Manual
Page 22
...DNS Servers: Enter the IP address to allow IP address assignment. Select this option when you set the network configuration manually. 7-1. IP Address: Enter the static IP address of the network setting options. 3 • DHCP: Select this option and press ll button. 22 Installation 7. Select the [Next]...button to go to the next step or press ll button. With this setting, the IP address is installed on the network to configure DNS servers. 7-3. Select the one of the device. -- Installation The IP address information window is displayed. 7-2. Gateway: Enter the gateway IP...
...DNS Servers: Enter the IP address to allow IP address assignment. Select this option when you set the network configuration manually. 7-1. IP Address: Enter the static IP address of the network setting options. 3 • DHCP: Select this option and press ll button. 22 Installation 7. Select the [Next]...button to go to the next step or press ll button. With this setting, the IP address is installed on the network to configure DNS servers. 7-3. Select the one of the device. -- Installation The IP address information window is displayed. 7-2. Gateway: Enter the gateway IP...

Owners Manual
Page 25
...you can show the user interface element other remote key. m Setup : You can enter setup menu so you can change system status. Press the [RETURN] button to exit the setup menu User settings General • System name: Enter a system name using up to access the Setup Menu. Press the [OK]...SET-UP] button to 127 characters. i Text input field: Enter the dial numbers or IP address manually. j Call button: Use this button when you want to the previous menu or level. 2. h IP address: Displays the current IP address of the VCS system are configured through the setup menu. 1. Installation...
...you can show the user interface element other remote key. m Setup : You can enter setup menu so you can change system status. Press the [RETURN] button to exit the setup menu User settings General • System name: Enter a system name using up to access the Setup Menu. Press the [OK]...SET-UP] button to 127 characters. i Text input field: Enter the dial numbers or IP address manually. j Call button: Use this button when you want to the previous menu or level. 2. h IP address: Displays the current IP address of the VCS system are configured through the setup menu. 1. Installation...

Owners Manual
Page 26
... for the setup menu and information display. If you must manually answer incoming calls. -- 26 Installation 2. Audio Only: Select this option, basically the unit selects the built-in the Call History. Callers hear a busy signal and missed calls appear in speaker of the codec unit. -- Installation • Microphone: Select the audio input to confirm the setting. •...
... for the setup menu and information display. If you must manually answer incoming calls. -- 26 Installation 2. Audio Only: Select this option, basically the unit selects the built-in the Call History. Callers hear a busy signal and missed calls appear in speaker of the codec unit. -- Installation • Microphone: Select the audio input to confirm the setting. •...

Owners Manual
Page 27
... the setting. • Camera Whitebalance: Select the Whitebalance activation mode. You can be unbalanced. It is displayed and then press the [OK] button to cope with very challenging lighting conditions. Video Installation 27 3 Installation • Display Resolution: Select the display resolution of the ring tones. -- Manual: Adjust the white balance level on the Whitebalance level menu. •...
... the setting. • Camera Whitebalance: Select the Whitebalance activation mode. You can be unbalanced. It is displayed and then press the [OK] button to cope with very challenging lighting conditions. Video Installation 27 3 Installation • Display Resolution: Select the display resolution of the ring tones. -- Manual: Adjust the white balance level on the Whitebalance level menu. •...

Owners Manual
Page 29
... sip outgoing Call. Admin settings If you select this, the password input window is "1234". The default administrator password is displayed. If you selected Auto, you are able to connect moderately with far site setting.(H.323 is attempted automatically.) • SIP Transport protocol: Select the transport protocol to connect moderately with far site setting. To change the administrator settings, you can...
... sip outgoing Call. Admin settings If you select this, the password input window is "1234". The default administrator password is displayed. If you selected Auto, you are able to connect moderately with far site setting.(H.323 is attempted automatically.) • SIP Transport protocol: Select the transport protocol to connect moderately with far site setting. To change the administrator settings, you can...

Owners Manual
Page 30
... connect, are enabled to set it is used device when making calls with E.164. If you use the gatekeeper function. This name is registered in gatekeeper server, far site user can check the registered status in H.323 calls. Installation 30 Installation H.323 This unit supports the H.323 protocol for NAT and firewall traversal. • GateKeeper Address: Enter...
... connect, are enabled to set it is used device when making calls with E.164. If you use the gatekeeper function. This name is registered in gatekeeper server, far site user can check the registered status in H.323 calls. Installation 30 Installation H.323 This unit supports the H.323 protocol for NAT and firewall traversal. • GateKeeper Address: Enter...

Owners Manual
Page 31
... number of the used when users attempt to On when you set to On, the User Name, Password, TLS, Register Server Address, Register Server Port, Proxy Server Address and Proxy Server Port options are set it. • User Name: Enter the SIP server authorization username. • Password: Enter the SIP server authorization password. • TLS: When users call . • Use SIP Server...
... number of the used when users attempt to On when you set to On, the User Name, Password, TLS, Register Server Address, Register Server Port, Proxy Server Address and Proxy Server Port options are set it. • User Name: Enter the SIP server authorization username. • Password: Enter the SIP server authorization password. • TLS: When users call . • Use SIP Server...

Owners Manual
Page 33
... this function. If you set the IP address for your network configuration. -- Disable: Not used when users try to allow IP address assignment. Network settings IP You must set the network configuration manually. • IP Address: Enter the static IP address of the device. • Subnet Mask: Enter the subnet mask IP address. • Gateway: Enter the default gateway IP address. • Main DNS...
... this function. If you set the IP address for your network configuration. -- Disable: Not used when users try to allow IP address assignment. Network settings IP You must set the network configuration manually. • IP Address: Enter the static IP address of the device. • Subnet Mask: Enter the subnet mask IP address. • Gateway: Enter the default gateway IP address. • Main DNS...

Owners Manual
Page 37
System settings Management Installation 37 Installation 3 • Admin Password: Change the password of the setup menu. 1. Select the [Restart] button and press the [OK] button. The system will be restarted. • Setup Initialization: You can reset the system to factory default and restarted. Select the [Reset] button and press the [OK] button. The system will be initialized and restarted. • Factory Reset: You can initialize the configuration of...
System settings Management Installation 37 Installation 3 • Admin Password: Change the password of the setup menu. 1. Select the [Restart] button and press the [OK] button. The system will be restarted. • Setup Initialization: You can reset the system to factory default and restarted. Select the [Reset] button and press the [OK] button. The system will be initialized and restarted. • Factory Reset: You can initialize the configuration of...

Owners Manual
Page 50
...in main screen. The subject is not clear enough to the microphone. The remote control is connected correctly. Adjust the camera brightness and white balance in speaker). You can confirm camera connection status as camera icon in User > Audio Muffled audio reception from the far side may be caused...that are powered and configured correctly. 50 Appendix Appendix 5 Appendix Trouble Shooting Symptoms The system power does not turn on even if the power cable is connected correctly, please contact the service center. The system power is turned on but 5 no video data is turned on...
...in main screen. The subject is not clear enough to the microphone. The remote control is connected correctly. Adjust the camera brightness and white balance in speaker). You can confirm camera connection status as camera icon in User > Audio Muffled audio reception from the far side may be caused...that are powered and configured correctly. 50 Appendix Appendix 5 Appendix Trouble Shooting Symptoms The system power does not turn on even if the power cable is connected correctly, please contact the service center. The system power is turned on but 5 no video data is turned on...

Owners Manual
Page 51
...) • Check remote user's VCS video capability -- If a call protocol(H.323 or SIP). What Video codec is supported : H.264, H.263 Can't see PC screen after CONTENT button Check the D-sub cable is indicated at all times in main screen. Appendix 51 You can 't solve this problem, please contact the service center. Network status is connected properly between PC and VCS...
...) • Check remote user's VCS video capability -- If a call protocol(H.323 or SIP). What Video codec is supported : H.264, H.263 Can't see PC screen after CONTENT button Check the D-sub cable is indicated at all times in main screen. Appendix 51 You can 't solve this problem, please contact the service center. Network status is connected properly between PC and VCS...

Owners Manual
Page 54
... support Far-End Camera Control (H.224/H.281) AES (FIPS197, H.235) NAT / Firewall Client (H.460.17/18/19) IP Precedence DiffServ (Differeniated Service) Lost Packet Recovery Dynamic bandwidth allocation Up to 1000 local directory entries Save, Remove Redial List features Missed call notification LDAP support / H.350 compliant Web-based system management Network Time Protocol (NTP) Firmware Upgrade via Web...
... support Far-End Camera Control (H.224/H.281) AES (FIPS197, H.235) NAT / Firewall Client (H.460.17/18/19) IP Precedence DiffServ (Differeniated Service) Lost Packet Recovery Dynamic bandwidth allocation Up to 1000 local directory entries Save, Remove Redial List features Missed call notification LDAP support / H.350 compliant Web-based system management Network Time Protocol (NTP) Firmware Upgrade via Web...