
Owner's Manual
Page 2
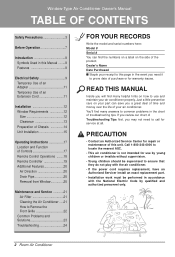
...8226; This air conditioner is not intended for warranty issues. Just a little preventive care on your air conditioner properly. READ THIS MANUAL Inside you a great deal of time and money over the life of purchase or for use and maintain your part can find ... Code by qualified and authorized personnel only. 2 Room Air Conditioner Window-Type Air Conditioner Owner's Manual TABLE OF CONTENTS Safety Precautions 3 Before Operation 7 Introduction 8 Symbols Used in this Manual ........8 Features 8 Electrical Safety 9 Temporary Use of an Adapter 11 Temporary Use of an Extension ...
...8226; This air conditioner is not intended for warranty issues. Just a little preventive care on your air conditioner properly. READ THIS MANUAL Inside you a great deal of time and money over the life of purchase or for use and maintain your part can find ... Code by qualified and authorized personnel only. 2 Room Air Conditioner Window-Type Air Conditioner Owner's Manual TABLE OF CONTENTS Safety Precautions 3 Before Operation 7 Introduction 8 Symbols Used in this Manual ........8 Features 8 Electrical Safety 9 Temporary Use of an Adapter 11 Temporary Use of an Extension ...
Owner's Manual
Page 3
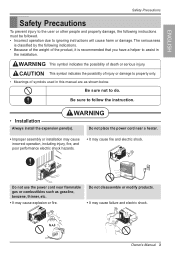
...is classified by the following instructions must be followed. • Incorrect operation due to ignoring instructions will cause harm or damage. Gasolin Owner's Manual 3 CAUTION This symbol indicates the possibility of injury or damage to property only. • Meanings of symbols used in the installation. WARNING ...the following indications. • Because of the weight of the product, it is recommended that you have a helper to assist in this manual are as gasoline, benzene, thinner, etc. • It may cause explosion or fire. Be sure not to follow the instruction. Be sure ...
...is classified by the following instructions must be followed. • Incorrect operation due to ignoring instructions will cause harm or damage. Gasolin Owner's Manual 3 CAUTION This symbol indicates the possibility of injury or damage to property only. • Meanings of symbols used in the installation. WARNING ...the following indications. • Because of the weight of the product, it is recommended that you have a helper to assist in this manual are as gasoline, benzene, thinner, etc. • It may cause explosion or fire. Be sure not to follow the instruction. Be sure ...
Owner's Manual
Page 4
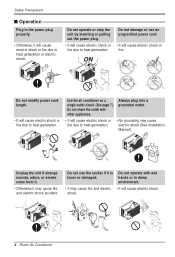
... modify power cord length. • It will cause electric shock or fire due to heat generation. • No grounding may cause electric shock (See Installation Manual). Always plug into a grounded outlet. • It will cause electric shock or fire due to heat generation. shock. 4 Room Air Conditioner Do not use an...
... modify power cord length. • It will cause electric shock or fire due to heat generation. • No grounding may cause electric shock (See Installation Manual). Always plug into a grounded outlet. • It will cause electric shock or fire due to heat generation. shock. 4 Room Air Conditioner Do not use an...
Owner's Manual
Page 5
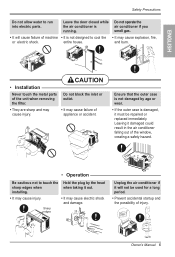
...; Prevent accidental startup and the possibility of the unit when removing the filter. • They are sharp and may cause electric shock and damage. Owner's Manual 5 Leave the door closed while the air conditioner is damaged, it damaged could result in the air conditioner falling out of appliance or accident. Sharp...
...; Prevent accidental startup and the possibility of the unit when removing the filter. • They are sharp and may cause electric shock and damage. Owner's Manual 5 Leave the door closed while the air conditioner is damaged, it damaged could result in the air conditioner falling out of appliance or accident. Sharp...
Owner's Manual
Page 7
Use a dedicated circuit. Do not use this manual. Do not start/stop operation by plugging/unplugging the power cord. 5. Such usage could create a fire hazard. 3. Do not touch the metal parts of time. 2. ... edges. 2. Exposure to direct airflow for an extended period of oxygen deficiency, ventilate the room when used together with stoves or other heating devices. 3. Owner's Manual 7 Do not use an extension cord. Cleaning and Maintenance 1. Do not use water to direct airflow for extended periods of the unit when removing the...
Use a dedicated circuit. Do not use this manual. Do not start/stop operation by plugging/unplugging the power cord. 5. Such usage could create a fire hazard. 3. Do not touch the metal parts of time. 2. ... edges. 2. Exposure to direct airflow for an extended period of oxygen deficiency, ventilate the room when used together with stoves or other heating devices. 3. Owner's Manual 7 Do not use an extension cord. Cleaning and Maintenance 1. Do not use water to direct airflow for extended periods of the unit when removing the...

Owner's Manual
Page 13
... Outdoors Figure. B. 4. Installation Clearance Proper clearance enhances the cooling efficiency of the unit and prevents heat radiation of wood strips are not necessary. A Figure. B Owner's Manual 13 See Figure. Install a second wood strip (approximately 6" long by the storm window frame. 2. If the distance between Storm Window Frame and Wood Strip Mounted...
... Outdoors Figure. B. 4. Installation Clearance Proper clearance enhances the cooling efficiency of the unit and prevents heat radiation of wood strips are not necessary. A Figure. B Owner's Manual 13 See Figure. Install a second wood strip (approximately 6" long by the storm window frame. 2. If the distance between Storm Window Frame and Wood Strip Mounted...
Owner's Manual
Page 15
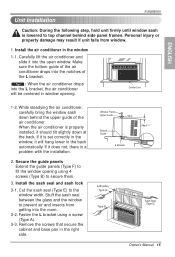
... installed, it will be centered in the back automatically. Window Frame Upper Guide Bottom Guide Seal About 1/4" L Bracket L Bracket Type A Type B Sash Seal (Type E) Owner's Manual 15 Install the air conditioner in the right side. If it into the L bracket, the air conditioner will hang lower in window opening using a screw...
... installed, it will be centered in the back automatically. Window Frame Upper Guide Bottom Guide Seal About 1/4" L Bracket L Bracket Type A Type B Sash Seal (Type E) Owner's Manual 15 Install the air conditioner in the right side. If it into the L bracket, the air conditioner will hang lower in window opening using a screw...
Owner's Manual
Page 21
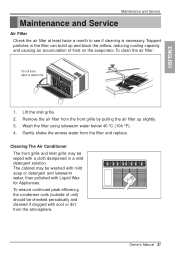
.... The cabinet may be checked periodically and cleaned if clogged with Liquid Wax for Appliances. Remove the air filter from the filter and replace. Owner's Manual 21 To clean the air filter: Do not force open or open to see if cleaning is necessary. Wash the filter using lukewarm water below...
.... The cabinet may be checked periodically and cleaned if clogged with Liquid Wax for Appliances. Remove the air filter from the filter and replace. Owner's Manual 21 To clean the air filter: Do not force open or open to see if cleaning is necessary. Wash the filter using lukewarm water below...
Service Manual
Page 1
website http://www.lgappliances.com LG LG Room Air Conditioner SERVICE MANUAL MODELS: LWHD8008R CAUTION • BEFORE SERVICING THE UNIT, READ THE SAFETY PRECAUTIONS IN THIS MANUAL. • ONLY FOR AUTHORIZED SERVICE PERSONNEL.
website http://www.lgappliances.com LG LG Room Air Conditioner SERVICE MANUAL MODELS: LWHD8008R CAUTION • BEFORE SERVICING THE UNIT, READ THE SAFETY PRECAUTIONS IN THIS MANUAL. • ONLY FOR AUTHORIZED SERVICE PERSONNEL.
Service Manual
Page 3
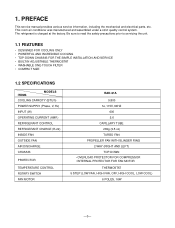
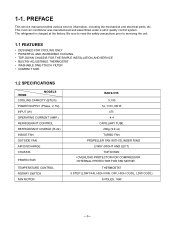
PREFACE This service manual provides various service information, including the mechanical and electrical parts, etc. The refrigerant is charged at the factory. Be sure to read the safety precautions ...
PREFACE This service manual provides various service information, including the mechanical and electrical parts, etc. The refrigerant is charged at the factory. Be sure to read the safety precautions ...
Service Manual
Page 4
The refrigerant is charged at the factory. PREFACE This service manual provides various service information, including the mechanical and electrical parts, etc. This room air conditioner was manufactured and assembled under a strict quality control system. Be ...
The refrigerant is charged at the factory. PREFACE This service manual provides various service information, including the mechanical and electrical parts, etc. This room air conditioner was manufactured and assembled under a strict quality control system. Be ...

Service Manual
Page 6
... the bottom. Remove the front grille. (Refer to base pan and air guide. (See Figure 4) 5. Remove the two knobs by placing the tabs in this manual or inside control board.) Figure 3 Figure 4 Figure 5 -5- Remove 2 screws that secure the control board to section 2.1.1) 3.
... the bottom. Remove the front grille. (Refer to base pan and air guide. (See Figure 4) 5. Remove the two knobs by placing the tabs in this manual or inside control board.) Figure 3 Figure 4 Figure 5 -5- Remove 2 screws that secure the control board to section 2.1.1) 3.


